 September 3, 2016 at 17:21
Learning OpenGL ES2 for Android Lesson # 4. Textures
Before you begin
"If you are new to OpenGL ES, I recommend that you first study the previous 3 lessons: one / two / three.
" The basics of the code used in this article are taken from here and here .
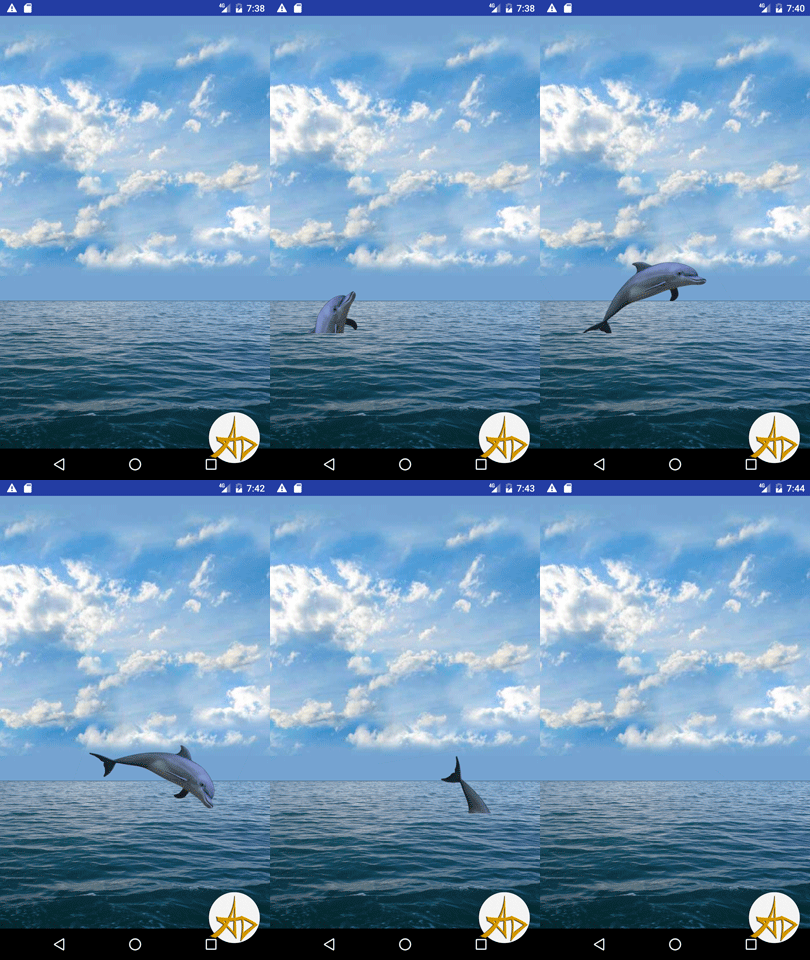
The result of this lesson will be a dolphin jumping above the surface of the sea.
A texture is a raster image that is superimposed on the surface of a polygonal model to give it a color, coloring, or illusion of relief. The use of textures can be easily imagined as a picture on the surface of a sculptural image.

Using textures also allows you to reproduce small surface details, the creation of which polygons would prove to be excessively resource-intensive. For example, scars on the skin, folds on clothes, small stones and other objects on the surface of walls and soil.
The quality of a textured surface is determined by texels - the number of pixels per minimum unit of texture. Since the texture itself is an image, the resolution of the texture and its format play a large role, which subsequently affects the speed and quality of the graphics in the application.
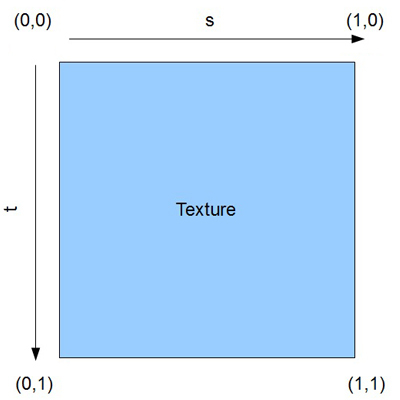
In OpenGL, texture coordinates are usually specified in coordinates (s, t) or (u, v) instead of (x, y). (s, t) is a texel texture, which is then converted to a polygon.
In most computer coordinate display systems, the Y axis is down, and the X is right, so the upper left corner corresponds to the image at (0, 0).
It must be remembered that on some android systems, memory will work only with textures whose sides are multiples of 2 to the power of n. Therefore, you need to strive for an atlas with textures to be of appropriate size in pixels, for example, 512x512 or 1024x512. Also, if you do not use the POT texture (POT - Power Of Two, that is, the power of two), you will not be able to apply tiling or automatic generation of mipmaps. In this case, tiling refers to repeated repetition of a single texture. Remember, the lower right corner always has coordinates (1,1), even if the width is two times the height. This is called normalized coordinates.
Applications often use many small textures, and switching from one texture to another is a relatively slow process. Therefore, in such situations it is advisable to use one large image instead of many small ones. Such an image is called a texture atlas. Sub-textures are mapped onto the object using UV conversion, while the coordinates in the atlas determine which part of the image to use.
Since there are three textures in our application (sky, sea and dolphin), they are combined into one atlas of size 1024x1024 png format.

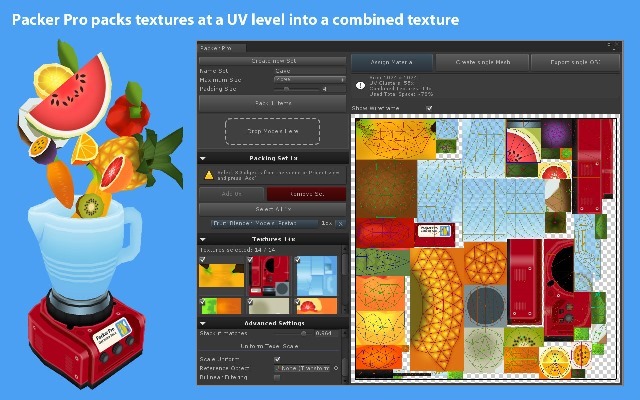
As you can see, I added another dolphin image (in the lower right corner). Then you can play around and connect it instead of the one on the left. This atlas is made very poorly, as there is a lot of free space left. There are algorithms and programs that allow you to pack images in an optimal way. For example, as in the photo.
The weight (size of occupied memory) of a texture can be determined in this way: multiply bytes by a pixel of height and a pixel of width, so a 32-bit texture of size 1024 by 1024 takes 4 * 1024 * 1024 = 4'194'304 bytes.
The 16-bit texture of 1024 by 1024 will only take 2MB, so you should consider whether to use 32-bit images or not.
There is hardware texture compression, which usually allows you to four times reduce the weight of textures. However, now these issues are not the main ones, just passing information for consideration.
In this lesson, we will use only the GL_TEXTURE_2D method, which allows you to put the texture on the plane (there is also GL_TEXTURE_CUBE_MAP, which works with the texture of an expanded cube consisting of 6 squares).
Before putting on, find out what.
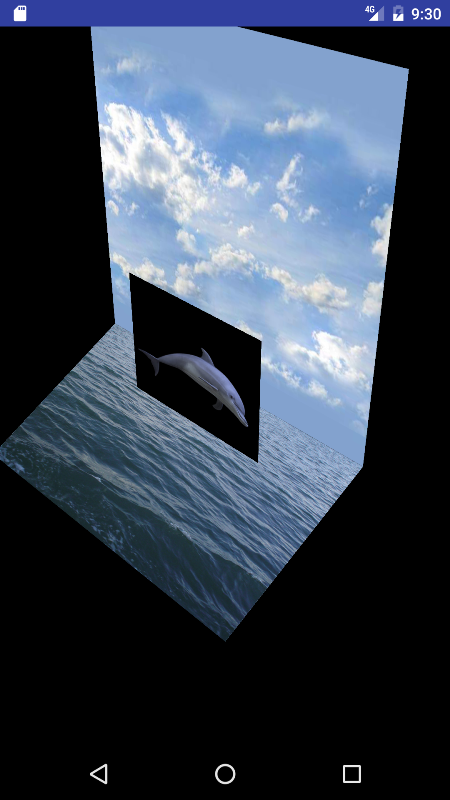
One rectangle (consisting of two triangles) will lie in the x0y plane, we will put on it the texture of the sky. To do this, in the private void prepareData () method of the OpenGLRenderer class, create an array of coordinates float [] vertices, where we enter the coordinates of not only triangles, but also the coordinates of the corresponding texture.
The first three numbers of the line are the coordinates of the upper left corner of the sky (-2, 4, 0), the next two numbers are the coordinates of the texel point (0,0), which correspond to our vertex of the triangle. Pay attention to the second point (second line), which coincides with the lower left edge of the sky (-2, 0, 0), for it the coordinates of the texel point (0, 0.5f), i.e. s = 0 (left edge of the texel), and t = 0.5, since the sky texture occupies vertically only half of the texel. Then we set the third point (upper right edge of the sky) and the fourth point to draw two triangles using the GL_TRIANGLE_STRIP method (see the previous lesson).
At first I decided to make the second plane (sea) perpendicular to the first (sky), but then I slightly increased the angle, lowering the front edge of the sea for the beauty of the front view on the device.
Notice how the coordinates that cut us out of the atlas have changed. I placed the image of the dolphin on a plane that is parallel to the sky and is shifted towards us along the 0Z axis by 0.5 units.
If there is a desire to exchange a dolphin for another, then this must be done here. So, we went through the first step and made a correspondence between the vertices of the triangles and the texel points.
Before describing the loading of textures, you need to deal with a concept such as a texture slot. It is to him that we connect the texture, with the help of it we can perform various manipulations with it and change its parameters.
You can select the current slot for work as follows:
where GLES20.GL_TEXTUREx is the number of the selected slot, for example GLES20.GL_TEXTURE0, the
constants are registered for 32 textures (the last GL_TEXTURE31).
To connect the texture to the slot, use the procedure
Where: the first parameter is the type of texture, the second is a link to the texture.
This procedure attaches a texture to the current slot that was previously selected by the GLES20.glActiveTexture () procedure.
That is, in order to attach a texture to a specific slot, you need to call two procedures:
It is important to remember that you cannot connect one texture at the same time to several slots. If you switched it to another slot and did not set the texture for the slot to which it was connected earlier, then an attempt to read it will most likely lead to the application crashing.
As soon as we placed our texture.png graphic file in the drawable project resources folder, the system automatically assigned it an id number (the resource identifier is an integer that is a link to this resource). Resource identifiers are stored in the R.java file.
The TextureUtils class has a loadTexture method. This method accepts the input of the resource id of the picture, and the output returns the id of the created texture object that will contain this picture.
So, first we pass as arguments the resource identifier of the graphic file public static int loadTexture (Context context, int resourceId) {
Then we create an empty array of one element. In this array, OpenGL ES will write the free texture number, which is called the textureIdsId texture name.
Then we generate a free texture name, which will be written in textureIds [0]
glGenTextures (1, textureIds, 0);
The first parameter determines how many texture objects we want to create. Usually we create only one. The next parameter is the name of the texture where OpenGL ES will write the id of the generated texture objects. The last parameter simply tells OpenGL ES from which point in the array to start writing id.
Check if nothing is written, then return zero.
The inScaled flag is enabled by default and should be turned off if we need a non-scalable version of the bitmap.
Download a picture in Bitmap from a resource
The texture object is still empty. This means that it still does not have any graphic data. Upload our bitmap. To do this, we first need to bind the texture. In OpenGL ES, binding means something that we want OpenGL ES to use this particular object for all subsequent calls until we change the binding again. In this case, we want to snap the texture of the object. To do this, we use the glBindTexture () method. Once we attach the texture, we can control its properties, such as image data.
Select the active texture slot
Make the texture named textureIds [0] current
Create texture transparency. If you do not write these two lines, our dolphin will be on a black opaque background, as in the screenshot above.
There is one more detail that we need to determine before we can use the texture object. It is due to the fact that our triangle can occupy more or less pixels on the screen compared to how many pixels are in the designated area of the texture. For example, on the screen we can use much more pixels than what we transferred from the texture zone. Naturally, it can be the other way around: we use fewer pixels on the screen than on the selected area of the texture. The first case is called magnification, and the second - minification. In each of them, we need to tell OpenGL ES how to increase or decrease the texture. In OpenGL ES terminology, the corresponding mechanisms are called minification and magnification filters. These filters are properties of the texture object, as are the image data itself. To install them, you must first check to see if the texture object is bound with glBindTexture (). If so, install them as follows:
You can read about the effect of filters on the image here .
Rewriting Bitmap to video card memory
We remove the Bitmap from memory, as picture has already been rewritten into video memory
And finally, we call the glBindTexture method again, in which we pass 0. To the texture slot GL_TEXTURE_2D, we unlink our texture object from this slot.
Once again, we first placed the texture object in the GL_TEXTURE_2D slot,
then they completed all operations with him, then released the slot. As a result, the texture object is now set up for us, ready to work, and not tied to any texture slot.
In previous lessons, we wrote shaders in the body of the program in the form of string objects. It is convenient to place them in a separate resource, as suggested here . In this way, a raw folder is created in the res project folder, into which two vertex_shader.glsl and fragment_shader.glsl files are placed. Here are their contents
vertex_shader.glsl
Here, as before, we calculate the final coordinates (gl_Position) for each vertex using a matrix. And in the a_Texture attribute we get data on the coordinates of the texture, which we immediately write to the varying variable v_Texture. This will allow us to obtain interpolated data on the coordinates of the texture in the fragment shader.
fragment_shader.glsl
First, set the average accuracy of calculations
GLSL has a special type of uniform called sampler2D. Samplers can only be declared in the fragment shader.
In it, we have the uniform variable u_TextureUnit, into which we get the slot number of the texture in which the texture we need is located. Pay attention to the type of variable. Let me remind you that from the application we passed 0 to this variable as an integer. Those. the number passed to the shader (in our case, 0) indicates which texture slot to look at.
The varying v_Texture variable receives the interpolated texture coordinates from the vertex shader. And the shader knows which texture point to display at the current point of the triangle.
It remains to use the coordinates of the texture and the texture itself to get the final fragment. This will execute the texture2D method, and in gl_FragColor we get the color of the desired point from the texture.
Download sources from here . Good luck and all the best!
Main sources:
" www.opengl.org/sdk/docs/
" startandroid.ru
" andmonahov.blogspot.com
" developer.android.com/reference
" www.opengl.org
" www.learnopengles.com
» w3bsit3-dns.com/forum / lofiversion
» developer.android.com/guide
"If you are new to OpenGL ES, I recommend that you first study the previous 3 lessons: one / two / three.
" The basics of the code used in this article are taken from here and here .
The result of this lesson will be a dolphin jumping above the surface of the sea.
A bit about textures
A texture is a raster image that is superimposed on the surface of a polygonal model to give it a color, coloring, or illusion of relief. The use of textures can be easily imagined as a picture on the surface of a sculptural image.
Using textures also allows you to reproduce small surface details, the creation of which polygons would prove to be excessively resource-intensive. For example, scars on the skin, folds on clothes, small stones and other objects on the surface of walls and soil.
The quality of a textured surface is determined by texels - the number of pixels per minimum unit of texture. Since the texture itself is an image, the resolution of the texture and its format play a large role, which subsequently affects the speed and quality of the graphics in the application.
Texture coordinates
In OpenGL, texture coordinates are usually specified in coordinates (s, t) or (u, v) instead of (x, y). (s, t) is a texel texture, which is then converted to a polygon.
In most computer coordinate display systems, the Y axis is down, and the X is right, so the upper left corner corresponds to the image at (0, 0).
It must be remembered that on some android systems, memory will work only with textures whose sides are multiples of 2 to the power of n. Therefore, you need to strive for an atlas with textures to be of appropriate size in pixels, for example, 512x512 or 1024x512. Also, if you do not use the POT texture (POT - Power Of Two, that is, the power of two), you will not be able to apply tiling or automatic generation of mipmaps. In this case, tiling refers to repeated repetition of a single texture. Remember, the lower right corner always has coordinates (1,1), even if the width is two times the height. This is called normalized coordinates.
Applications often use many small textures, and switching from one texture to another is a relatively slow process. Therefore, in such situations it is advisable to use one large image instead of many small ones. Such an image is called a texture atlas. Sub-textures are mapped onto the object using UV conversion, while the coordinates in the atlas determine which part of the image to use.
Since there are three textures in our application (sky, sea and dolphin), they are combined into one atlas of size 1024x1024 png format.
As you can see, I added another dolphin image (in the lower right corner). Then you can play around and connect it instead of the one on the left. This atlas is made very poorly, as there is a lot of free space left. There are algorithms and programs that allow you to pack images in an optimal way. For example, as in the photo.
The weight (size of occupied memory) of a texture can be determined in this way: multiply bytes by a pixel of height and a pixel of width, so a 32-bit texture of size 1024 by 1024 takes 4 * 1024 * 1024 = 4'194'304 bytes.
The 16-bit texture of 1024 by 1024 will only take 2MB, so you should consider whether to use 32-bit images or not.
There is hardware texture compression, which usually allows you to four times reduce the weight of textures. However, now these issues are not the main ones, just passing information for consideration.
In this lesson, we will use only the GL_TEXTURE_2D method, which allows you to put the texture on the plane (there is also GL_TEXTURE_CUBE_MAP, which works with the texture of an expanded cube consisting of 6 squares).
How to put on a texture?
Before putting on, find out what.
One rectangle (consisting of two triangles) will lie in the x0y plane, we will put on it the texture of the sky. To do this, in the private void prepareData () method of the OpenGLRenderer class, create an array of coordinates float [] vertices, where we enter the coordinates of not only triangles, but also the coordinates of the corresponding texture.
//coordinates for sky
 -2, 4, 0,   0, 0,
 -2, 0, 0,   0, 0.5f,
  2, 4, 0,   0.5f, 0,
  2, 0, 0,   0.5f, 0.5f,
The first three numbers of the line are the coordinates of the upper left corner of the sky (-2, 4, 0), the next two numbers are the coordinates of the texel point (0,0), which correspond to our vertex of the triangle. Pay attention to the second point (second line), which coincides with the lower left edge of the sky (-2, 0, 0), for it the coordinates of the texel point (0, 0.5f), i.e. s = 0 (left edge of the texel), and t = 0.5, since the sky texture occupies vertically only half of the texel. Then we set the third point (upper right edge of the sky) and the fourth point to draw two triangles using the GL_TRIANGLE_STRIP method (see the previous lesson).
At first I decided to make the second plane (sea) perpendicular to the first (sky), but then I slightly increased the angle, lowering the front edge of the sea for the beauty of the front view on the device.
//coordinates for sea
  -2, 0, 0,       0.5f, 0,
  -2, -1, 2,      0.5f, 0.5f,
   2, 0, 0,       1, 0,
   2,-1, 2,        1, 0.5f,
Notice how the coordinates that cut us out of the atlas have changed. I placed the image of the dolphin on a plane that is parallel to the sky and is shifted towards us along the 0Z axis by 0.5 units.
//coordinates for dolphin
-1, 1, 0.5f,      0, 0.5f,
-1, -1, 0.5f,      0, 1,
 1,  1, 0.5f,      0.5f, 0.5f,
 1, -1, 0.5f,       0.5f, 1,
If there is a desire to exchange a dolphin for another, then this must be done here. So, we went through the first step and made a correspondence between the vertices of the triangles and the texel points.
The second step or how the textures load
Before describing the loading of textures, you need to deal with a concept such as a texture slot. It is to him that we connect the texture, with the help of it we can perform various manipulations with it and change its parameters.
You can select the current slot for work as follows:
GLES20.glActiveTexture(GLES20.GL_TEXTUREx);where GLES20.GL_TEXTUREx is the number of the selected slot, for example GLES20.GL_TEXTURE0, the
constants are registered for 32 textures (the last GL_TEXTURE31).
To connect the texture to the slot, use the procedure
GLES20.glBindTexture(GLES20.GL_TEXTURE_2D, texture_id);Where: the first parameter is the type of texture, the second is a link to the texture.
This procedure attaches a texture to the current slot that was previously selected by the GLES20.glActiveTexture () procedure.
That is, in order to attach a texture to a specific slot, you need to call two procedures:
GLES20.glActiveTexture(Номер_Слота);
GLES20.glBindTexture(GLES20.GL_TEXTURE_2D, ссылка_на_текстуру);
It is important to remember that you cannot connect one texture at the same time to several slots. If you switched it to another slot and did not set the texture for the slot to which it was connected earlier, then an attempt to read it will most likely lead to the application crashing.
As soon as we placed our texture.png graphic file in the drawable project resources folder, the system automatically assigned it an id number (the resource identifier is an integer that is a link to this resource). Resource identifiers are stored in the R.java file.
The TextureUtils class has a loadTexture method. This method accepts the input of the resource id of the picture, and the output returns the id of the created texture object that will contain this picture.
So, first we pass as arguments the resource identifier of the graphic file public static int loadTexture (Context context, int resourceId) {
Then we create an empty array of one element. In this array, OpenGL ES will write the free texture number, which is called the textureIdsId texture name.
final int[] textureIds = new int[1];Then we generate a free texture name, which will be written in textureIds [0]
glGenTextures (1, textureIds, 0);
The first parameter determines how many texture objects we want to create. Usually we create only one. The next parameter is the name of the texture where OpenGL ES will write the id of the generated texture objects. The last parameter simply tells OpenGL ES from which point in the array to start writing id.
Check if nothing is written, then return zero.
if (textureIds[0] == 0) {
    return 0;
}
The inScaled flag is enabled by default and should be turned off if we need a non-scalable version of the bitmap.
final BitmapFactory.Options options = new BitmapFactory.Options();
options.inScaled = false;
Download a picture in Bitmap from a resource
final Bitmap bitmap = BitmapFactory.decodeResource(
        context.getResources(), resourceId, options);
The texture object is still empty. This means that it still does not have any graphic data. Upload our bitmap. To do this, we first need to bind the texture. In OpenGL ES, binding means something that we want OpenGL ES to use this particular object for all subsequent calls until we change the binding again. In this case, we want to snap the texture of the object. To do this, we use the glBindTexture () method. Once we attach the texture, we can control its properties, such as image data.
Select the active texture slot
glActiveTexture(GL_TEXTURE0);Make the texture named textureIds [0] current
glBindTexture(GL_TEXTURE_2D, textureIds[0]);Create texture transparency. If you do not write these two lines, our dolphin will be on a black opaque background, as in the screenshot above.
GLES20.glBlendFunc(GLES20.GL_SRC_ALPHA, GLES20.GL_ONE_MINUS_SRC_ALPHA);
GLES20.glEnable(GLES20.GL_BLEND);
There is one more detail that we need to determine before we can use the texture object. It is due to the fact that our triangle can occupy more or less pixels on the screen compared to how many pixels are in the designated area of the texture. For example, on the screen we can use much more pixels than what we transferred from the texture zone. Naturally, it can be the other way around: we use fewer pixels on the screen than on the selected area of the texture. The first case is called magnification, and the second - minification. In each of them, we need to tell OpenGL ES how to increase or decrease the texture. In OpenGL ES terminology, the corresponding mechanisms are called minification and magnification filters. These filters are properties of the texture object, as are the image data itself. To install them, you must first check to see if the texture object is bound with glBindTexture (). If so, install them as follows:
GLES20.glTexParameteri(GLES20.GL_TEXTURE_2D, GLES20.GL_TEXTURE_MIN_FILTER, GLES20.GL_LINEAR);
GLES20.glTexParameteri(GLES20.GL_TEXTURE_2D, GLES20.GL_TEXTURE_MAG_FILTER, GLES20.GL_LINEAR);
You can read about the effect of filters on the image here .
Rewriting Bitmap to video card memory
GLUtils.texImage2D(GLES20.GL_TEXTURE_2D, 0, bitmap, 0);We remove the Bitmap from memory, as picture has already been rewritten into video memory
bitmap.recycle();And finally, we call the glBindTexture method again, in which we pass 0. To the texture slot GL_TEXTURE_2D, we unlink our texture object from this slot.
glBindTexture(GL_TEXTURE_2D, 0);
return textureIds[0];
Once again, we first placed the texture object in the GL_TEXTURE_2D slot,
glBindTexture(GL_TEXTURE_2D, textureIds[0]);then they completed all operations with him, then released the slot. As a result, the texture object is now set up for us, ready to work, and not tied to any texture slot.
Shader texture access
In previous lessons, we wrote shaders in the body of the program in the form of string objects. It is convenient to place them in a separate resource, as suggested here . In this way, a raw folder is created in the res project folder, into which two vertex_shader.glsl and fragment_shader.glsl files are placed. Here are their contents
vertex_shader.glsl
attribute vec4 a_Position;
uniform mat4 u_Matrix;
attribute vec2 a_Texture;
varying vec2 v_Texture;
void main()
{
    gl_Position = u_Matrix * a_Position;
    v_Texture = a_Texture;
}
Here, as before, we calculate the final coordinates (gl_Position) for each vertex using a matrix. And in the a_Texture attribute we get data on the coordinates of the texture, which we immediately write to the varying variable v_Texture. This will allow us to obtain interpolated data on the coordinates of the texture in the fragment shader.
fragment_shader.glsl
precision mediump float;
uniform sampler2D u_TextureUnit;
varying vec2 v_Texture;
void main()
{
    gl_FragColor = texture2D(u_TextureUnit, v_Texture);
}
First, set the average accuracy of calculations
precision mediump float;GLSL has a special type of uniform called sampler2D. Samplers can only be declared in the fragment shader.
uniform sampler2D u_TextureUnit;In it, we have the uniform variable u_TextureUnit, into which we get the slot number of the texture in which the texture we need is located. Pay attention to the type of variable. Let me remind you that from the application we passed 0 to this variable as an integer. Those. the number passed to the shader (in our case, 0) indicates which texture slot to look at.
The varying v_Texture variable receives the interpolated texture coordinates from the vertex shader. And the shader knows which texture point to display at the current point of the triangle.
It remains to use the coordinates of the texture and the texture itself to get the final fragment. This will execute the texture2D method, and in gl_FragColor we get the color of the desired point from the texture.
Download sources from here . Good luck and all the best!
Main sources:
" www.opengl.org/sdk/docs/
" startandroid.ru
" andmonahov.blogspot.com
" developer.android.com/reference
" www.opengl.org
" www.learnopengles.com
» w3bsit3-dns.com/forum / lofiversion
» developer.android.com/guide









