How we shoot a video for YouTube. Office equipment and design
Hello everyone on Habré! In this article we will tell you how to organize a small video studio in your office. In this way we record videos for YouTube. The videos are created in a single corporate style, so we’ll tell you some points about editing such videos.
The name "professional video" is still very far away, but it seems to us that we managed to find some balance between the words "fast, high-quality, inexpensive." And most importantly - it’s convenient. No need to spend time traveling in a video studio. As a result of the work, such videos are obtained. It tells about the same as in the first part of this article.
If you divide the video into parts, then it consists of the following items.
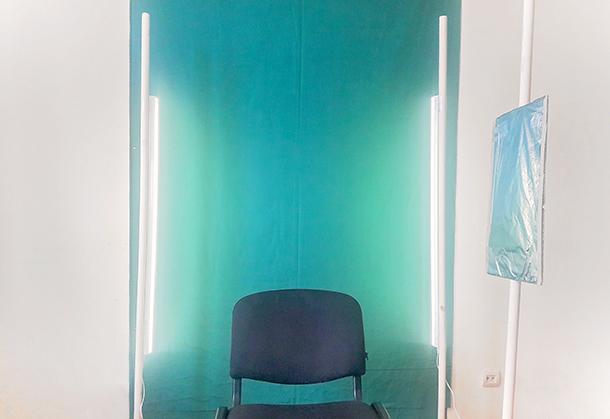
The first thing we need, of course, is a chromakey. Chroma key is a background, usually green, that is being recorded. Next, this background needs to be cut out in a special program and replaced with your image.
More precisely, we need to separate the subject from the background. Programs for separating the subject from the background work on the principle that "the background is everything that is not in the subject." If an object is considered a person, then knowing that the skin of a person is predominantly red and yellow, not green, the hair is also not green, then the green background will allow the editor to easily consider "everything that is not green is an object." Most often, the background is made exactly green, but we also experimented with red.
In our case, the function of chromakey was performed by five meters of green fabric from the sewing store. The standard width of this canvas is 1.5 meters. This is enough to fully fit into the background during shooting. The main requirement for the fabric is to not reflect light to the maximum. In our case, a raincoat fabric came up, which is attached to the wall with the usual long buttons. Absolute evenness of the background and ironing the fabric from bruises is not necessary, under normal lighting everything will be in order.
It is not necessary that the entire video be fully covered by chromakey. The main thing is that the object to be cut is completely on it. And the excess around the edges can be cut in simple ways in the editor.
In our case, we used diode lamps with white light. These are long lamps of one and a half meters to cover the entire subject in a sitting position.
Lamps must be placed behind the subject from two sides, so that they shine only on a chroma key for a uniform background without a shadow. Such backlighting of the background not only removes shadows from the object and folds, but also creates a clearer contour of the object for the future separation of it from the background.
Both the object and the background should preferably be evenly lit on both sides, so that there is no situation that the left half of the object is clearly cut out, and the right, worse lit, was cut out unevenly.
We use diode lamps, not long fluorescent ones. Luminescent will create too much extra light on the subject, but only on chroma key.
Next we needed three tripods. To fix the lamps in an upright position, it took two. The third was required for cardboard with foil. Recording is carried out near the window during the day, so it turns out better light without additional lamps and equipment.
A tripod with a cardboard foil is used to reflect light from the window onto the second half of the speaker's face. If there is not enough daylight, then you can place another directional lamp on the side and reflect it with foil on the second side.
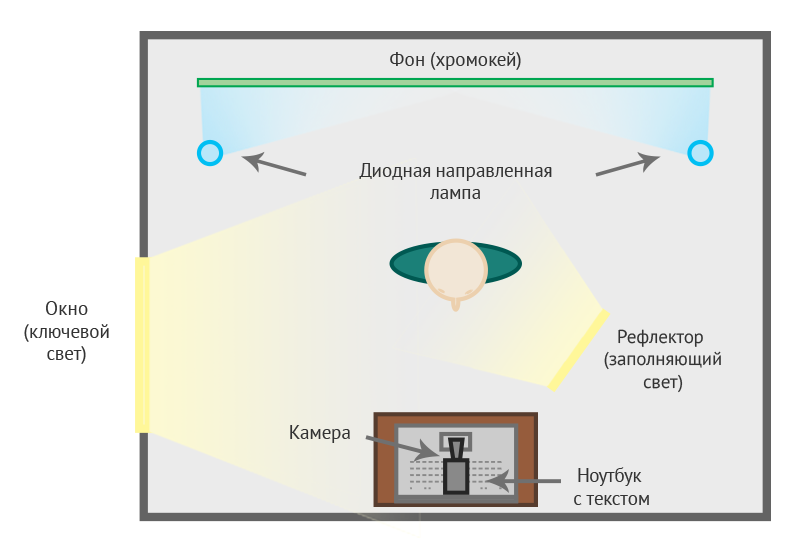
To record sound, you need a microphone buttonhole. Standard sound recording through the camera will not be enough. Sound can be recorded on a smartphone or laptop. In our case, during recording, there is a table with a laptop nearby, into which a buttonhole is inserted as a microphone and everything is recorded through the Audacity program.
The texts of our videos are recorded in advance and are read during recording. A laptop with text is installed at the camera level. More specifically, the camera is located directly on the laptop. Then, when reading, the run of eyes is not very noticeable and the look is directed almost at the camera. If the text is poorly visible for reading, then you just need to zoom in on the document.

Since no hands are visible during recording, using a wireless mouse you can scroll the text during recording. In the same way, you can just make notes for the video so that you don’t get lost while recording it and shoot everything in one take.
Full instructions on what and how to do in the video editor will not fit in this article, but we will tell you the main points.
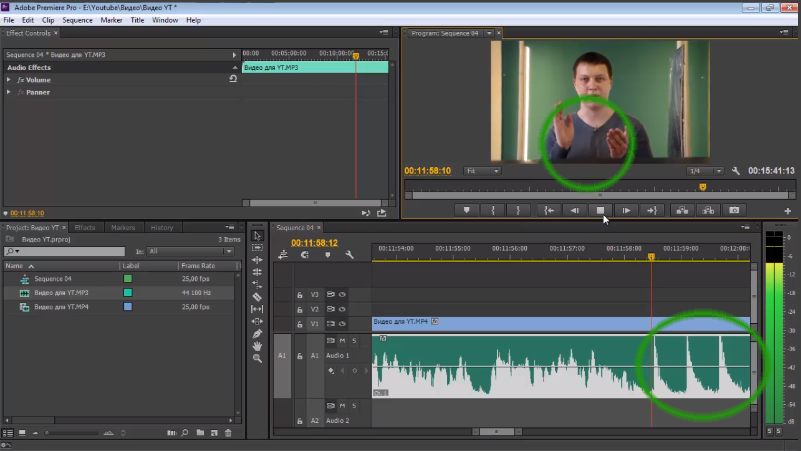
In order to be able to quickly reduce the sound from the video, at the very beginning of the video recording, you need to make three loud pops on the camera with the sound recording turned on. So the video will show pops and you can adjust the sound to them by hearing them on the sound track. Pops will be clearly visible on the soundtrack. All that remains is to move the audio track to the corresponding part of the video.
We used templates from videohive.net. They can be found in the After Effects Project Files section of the Logo Stings, Openers, and Titles subsections.
Usually with such videos there are step-by-step instructions on how to replace the names and logo with your own. If you still have no experience with After Effects, then you should not count on a big change in the animation option. It will only turn out to replace the picture and text. Therefore, you need to choose the template that suits you completely.
We will need animations for each video title and one animation for the logo, it will be the same everywhere. That is, each video title is a separate video, which is added to the main video in the future.
In our case, we use one common background for the title, a background with a presentation for the video itself, and a final splash screen. At different intervals of the video, the background changes to the corresponding images. That is, we do not use complex animations, but simply change the background.
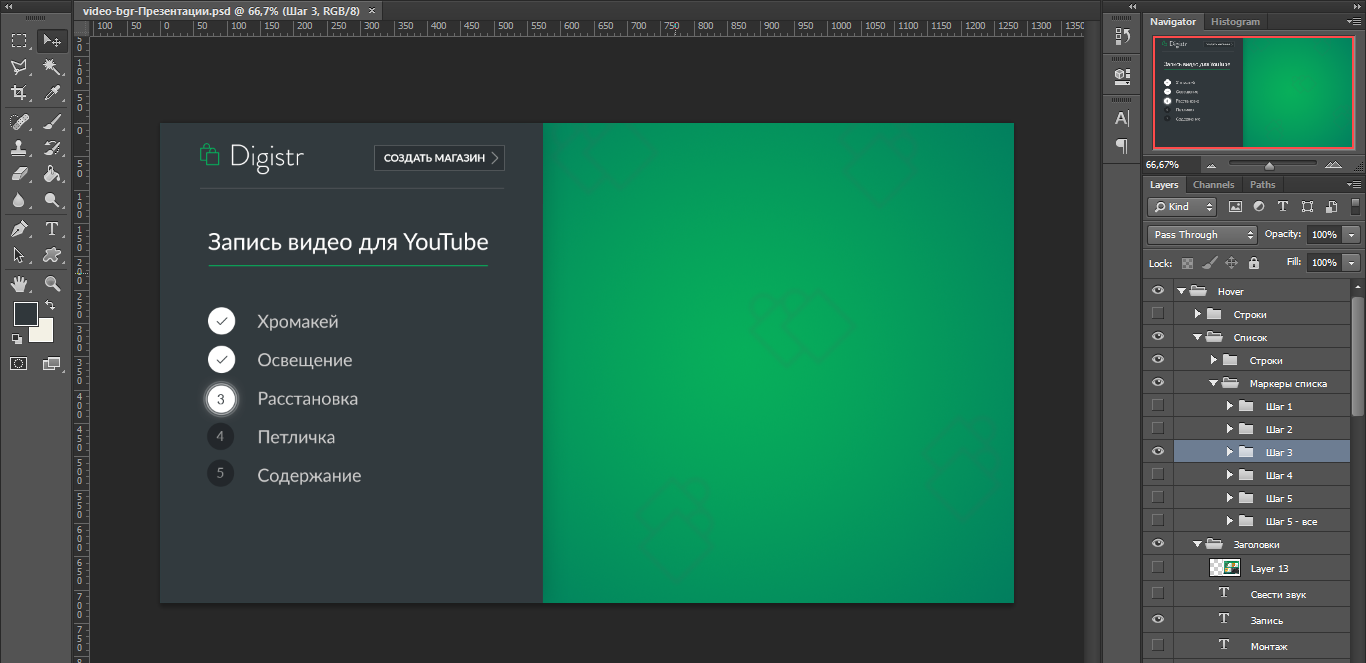
So for the five points of a step-by-step presentation, we create six backgrounds with the current state of the presentation and place them on the video track.
The following details should be considered when creating background images.
1. At the bottom of the video will be a toolbar from YouTube. Therefore, the alleged links and the name of the video should not be placed at the very bottom of the video.
2. Links and buttons are made using various types of annotations. They are all with frames or backgrounds, so the buttons on the video may have extra borders. The “Frame” annotation turned out to be the most suitable for us. But even hovering frames give extra boundaries and when creating links they can overwrite small elements of the video. This is noticeable here when you hover over a Facebook subscription link.
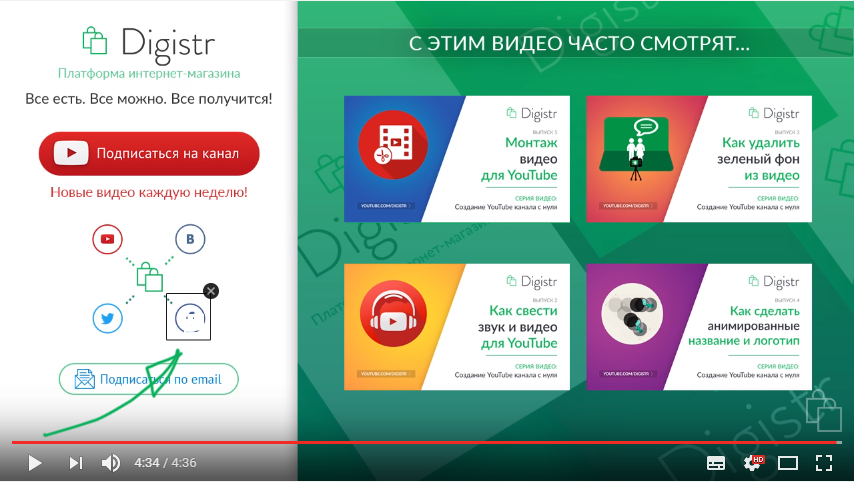
3. The following videos are made right in the video. Since we have the same type, instead of frames from the video we add their banners. Then annotations are also added to these images.
All this design allows us to record stylized videos for our YouTube channel. We hope it will be useful to you. Related articles on installation details in the form of articles will no longer be published, as it is more convenient to watch in the video. If this was useful to you, then subscribe to our channel to receive a notification when these videos come out.
Good luck in recording and editing your videos!
The name "professional video" is still very far away, but it seems to us that we managed to find some balance between the words "fast, high-quality, inexpensive." And most importantly - it’s convenient. No need to spend time traveling in a video studio. As a result of the work, such videos are obtained. It tells about the same as in the first part of this article.
If you divide the video into parts, then it consists of the following items.
- Title of the video with a heading.
- Small branded animation with the logo and the slogan “Try it!”
- The main video with a presentation, photographs and a screen demonstration, which is voiced by the announcer.
- The final branded screensaver with a subscription and the following videos.
How to record a video
Background, chromakey
The first thing we need, of course, is a chromakey. Chroma key is a background, usually green, that is being recorded. Next, this background needs to be cut out in a special program and replaced with your image.
More precisely, we need to separate the subject from the background. Programs for separating the subject from the background work on the principle that "the background is everything that is not in the subject." If an object is considered a person, then knowing that the skin of a person is predominantly red and yellow, not green, the hair is also not green, then the green background will allow the editor to easily consider "everything that is not green is an object." Most often, the background is made exactly green, but we also experimented with red.
In our case, the function of chromakey was performed by five meters of green fabric from the sewing store. The standard width of this canvas is 1.5 meters. This is enough to fully fit into the background during shooting. The main requirement for the fabric is to not reflect light to the maximum. In our case, a raincoat fabric came up, which is attached to the wall with the usual long buttons. Absolute evenness of the background and ironing the fabric from bruises is not necessary, under normal lighting everything will be in order.
It is not necessary that the entire video be fully covered by chromakey. The main thing is that the object to be cut is completely on it. And the excess around the edges can be cut in simple ways in the editor.
Lighting
In our case, we used diode lamps with white light. These are long lamps of one and a half meters to cover the entire subject in a sitting position.
Lamps must be placed behind the subject from two sides, so that they shine only on a chroma key for a uniform background without a shadow. Such backlighting of the background not only removes shadows from the object and folds, but also creates a clearer contour of the object for the future separation of it from the background.
Both the object and the background should preferably be evenly lit on both sides, so that there is no situation that the left half of the object is clearly cut out, and the right, worse lit, was cut out unevenly.
We use diode lamps, not long fluorescent ones. Luminescent will create too much extra light on the subject, but only on chroma key.
Next we needed three tripods. To fix the lamps in an upright position, it took two. The third was required for cardboard with foil. Recording is carried out near the window during the day, so it turns out better light without additional lamps and equipment.
A tripod with a cardboard foil is used to reflect light from the window onto the second half of the speaker's face. If there is not enough daylight, then you can place another directional lamp on the side and reflect it with foil on the second side.
Sound recording
To record sound, you need a microphone buttonhole. Standard sound recording through the camera will not be enough. Sound can be recorded on a smartphone or laptop. In our case, during recording, there is a table with a laptop nearby, into which a buttonhole is inserted as a microphone and everything is recorded through the Audacity program.
Content
The texts of our videos are recorded in advance and are read during recording. A laptop with text is installed at the camera level. More specifically, the camera is located directly on the laptop. Then, when reading, the run of eyes is not very noticeable and the look is directed almost at the camera. If the text is poorly visible for reading, then you just need to zoom in on the document.
Since no hands are visible during recording, using a wireless mouse you can scroll the text during recording. In the same way, you can just make notes for the video so that you don’t get lost while recording it and shoot everything in one take.
How to mount a video
Full instructions on what and how to do in the video editor will not fit in this article, but we will tell you the main points.
Sound mixing
In order to be able to quickly reduce the sound from the video, at the very beginning of the video recording, you need to make three loud pops on the camera with the sound recording turned on. So the video will show pops and you can adjust the sound to them by hearing them on the sound track. Pops will be clearly visible on the soundtrack. All that remains is to move the audio track to the corresponding part of the video.
Animation for the name and logo
We used templates from videohive.net. They can be found in the After Effects Project Files section of the Logo Stings, Openers, and Titles subsections.
Usually with such videos there are step-by-step instructions on how to replace the names and logo with your own. If you still have no experience with After Effects, then you should not count on a big change in the animation option. It will only turn out to replace the picture and text. Therefore, you need to choose the template that suits you completely.
We will need animations for each video title and one animation for the logo, it will be the same everywhere. That is, each video title is a separate video, which is added to the main video in the future.
Video components
In our case, we use one common background for the title, a background with a presentation for the video itself, and a final splash screen. At different intervals of the video, the background changes to the corresponding images. That is, we do not use complex animations, but simply change the background.
So for the five points of a step-by-step presentation, we create six backgrounds with the current state of the presentation and place them on the video track.
The following details should be considered when creating background images.
1. At the bottom of the video will be a toolbar from YouTube. Therefore, the alleged links and the name of the video should not be placed at the very bottom of the video.
2. Links and buttons are made using various types of annotations. They are all with frames or backgrounds, so the buttons on the video may have extra borders. The “Frame” annotation turned out to be the most suitable for us. But even hovering frames give extra boundaries and when creating links they can overwrite small elements of the video. This is noticeable here when you hover over a Facebook subscription link.
3. The following videos are made right in the video. Since we have the same type, instead of frames from the video we add their banners. Then annotations are also added to these images.
Total
All this design allows us to record stylized videos for our YouTube channel. We hope it will be useful to you. Related articles on installation details in the form of articles will no longer be published, as it is more convenient to watch in the video. If this was useful to you, then subscribe to our channel to receive a notification when these videos come out.
Good luck in recording and editing your videos!