Installing any software using WSUS - 2
- Tutorial
In continuation of the first part from yosemity, I would like to introduce the logical continuation and development of LUP - WSUS Package Publisher . Unlike LUP, WSUSPP lives, develops and supports working with Windows Server 2012. In this manual, we will only consider adding updates, creating rules and descriptions of the most common third-party software. Namely:
1) Adobe Flash Player & Adobe Reader
2) 7-Zip
3) PDF24 Creator
4) X-Mouse Button Control
5) Adobe Acrobat Reader DC (update from Adobe Reader XI)
Attention! A lot of pictures, links and information!
Of course, you need a working WSUS and WSUSPP. WSUSPP configuration is trivial and will not be considered.
Tools that will not be superfluous:
- Remote MSI Manager - Software for viewing / removing installed products, installing msi packages on remote computers. It will be required to detect Produst Codes.
- SuperOrca - development of Orca, viewing / changing the properties of msi-packages.
- Several test virtual machines, the number depends on your fleet of jobs.
There are examples for these products on the WSUSPP website , you can study them yourself. I will leave links to all resources below.
But what is not in the instructions is the documentation for SCUP directories. Yes, WSUSPP supports third-party software catalogs. And it is for these Adobe products that there are predefined templates.
The same method can be applied to Adobe Flash Player. All the necessary rules are already at the package level, and the update will be installed only where the player was previously installed.
Simple, right? All this, of course, can be done manually.
There are no directories for this software, but there are msi assemblies for 32-bit and 64-bit. Therefore, the task is reduced only to the correct determination of where to put what. Almost always, an indicator that the update is installed is the Product Code. You can view this code in msi both by WSUSPP ( "Tools" -> "Msi Reader" ) and by third-party programs like SuperOrca. But the OS architecture and product codes of versions 16.00, 16.01 and 9.20 will be an indicator of the need for installation.
As you noticed, we update only selected versions.
Upd 2017.01.17 : Thank you for correcting inaccuracies @perlestius .
But what if users do not have software versions 2-3 installed, but 10? You won’t get enough product codes for them. In my case, it was PDF24 Creator , a free tool for working with PDF.
2 checks will help us with this: the existence of the file and the version of the file. You can not limit yourself to just checking for a version, because if there is no file, it is considered positive. Another subtle point is that PDF24 Creator is a 32-bit application. So, you need to check in both the Program Files and Program Files (x86) folders.
With msi packages sorted out. And if only exe are available?
There is such a wonderful free program - X-Mouse Button Control . It allows you to assign many different functions and combinations to your mouse buttons. I highly recommend if you use a mouse with 5+ buttons.Updates for this software come in the form of exe files that need to be intercepted in the Temp directory of the active user. Links to current updates below. Also, for updating, it is necessary that no program processes are started in the system. All this is supported, conversion to msi is not required.
Upd. 2017/02/09 : You can use the links below to download the latest update. Note that updates are available for X32 and X64 versions separately.
Probably many asked this question. And I want to update immediately to the current version. Nothing complicated, just a few additional steps are needed. And also the documentation: Bootstrapper with keys , GUIDs , Adobe Properties .
As it turned out, WSUSPP is a very powerful product that can compete with SCCM. Of course, he is not without flaws. These include the impossibility of revising the first steps in the Custom Update Creator wizard, as well as the peculiar logic of adding rules. But even so, the WSUS Package Publisher will come in handy for many system administrators who understand the importance of the up-to-date of their fleet.
1) Adobe Flash Player & Adobe Reader
2) 7-Zip
3) PDF24 Creator
4) X-Mouse Button Control
5) Adobe Acrobat Reader DC (update from Adobe Reader XI)
Attention! A lot of pictures, links and information!
Of course, you need a working WSUS and WSUSPP. WSUSPP configuration is trivial and will not be considered.
Tools that will not be superfluous:
- Remote MSI Manager - Software for viewing / removing installed products, installing msi packages on remote computers. It will be required to detect Produst Codes.
- SuperOrca - development of Orca, viewing / changing the properties of msi-packages.
- Several test virtual machines, the number depends on your fleet of jobs.
Adobe Flash Player & Adobe Reader
There are examples for these products on the WSUSPP website , you can study them yourself. I will leave links to all resources below.
But what is not in the instructions is the documentation for SCUP directories. Yes, WSUSPP supports third-party software catalogs. And it is for these Adobe products that there are predefined templates.
Create update
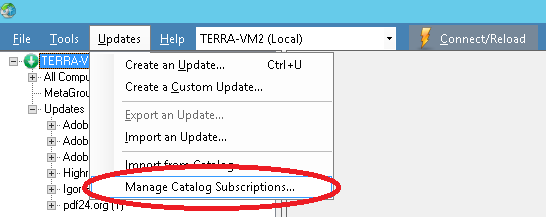
1) “Updates” -> “Manage Catalog Subscribtions ...”
2) Configure directories and their parameters
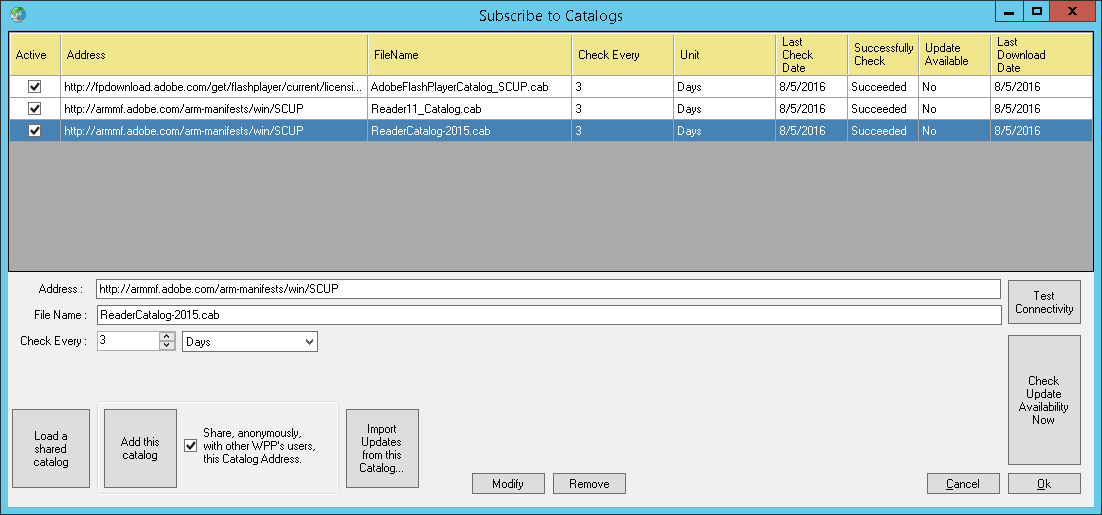
Where:
Load a shared catalog - download the catalog in xml format to the list. By default, the folder with the predefined
Add this catalog is displayed - adding a directory if you manually make changes to the Address and File name fields
Check every: - interval for checking
Modify directory updates - saving the parameters of the selected directory
Delete - deleting the selected
Import Updates directory from this Catalog ... - View available updates. Similar to double clicking on a line. This menu can also be accessed through "Updates" -> "Import from Catalog"
Test Connectivity - Check the connection.
Check Update Availability Now - check for updates for the selected directory.
3) To add a new update, you must select a directory, click "Import Updates from this Catalog ..." -> "Open Catalog" , mark the updates you are interested in and click "Import Selected Updates" .
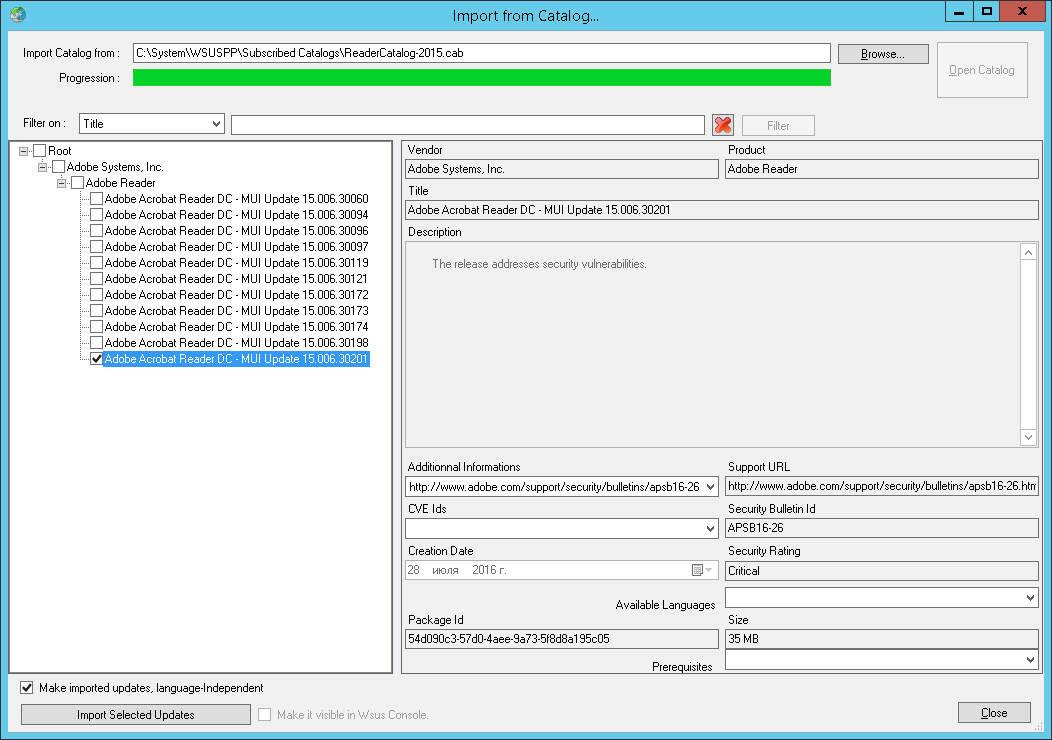
After downloading and publishing, you just have to click “Close” . Update ready for approval. No additional changes are required, msp packages already have all the necessary parameters.
2) Configure directories and their parameters
Where:
Load a shared catalog - download the catalog in xml format to the list. By default, the folder with the predefined
Add this catalog is displayed - adding a directory if you manually make changes to the Address and File name fields
Check every: - interval for checking
Modify directory updates - saving the parameters of the selected directory
Delete - deleting the selected
Import Updates directory from this Catalog ... - View available updates. Similar to double clicking on a line. This menu can also be accessed through "Updates" -> "Import from Catalog"
Test Connectivity - Check the connection.
Check Update Availability Now - check for updates for the selected directory.
3) To add a new update, you must select a directory, click "Import Updates from this Catalog ..." -> "Open Catalog" , mark the updates you are interested in and click "Import Selected Updates" .
After downloading and publishing, you just have to click “Close” . Update ready for approval. No additional changes are required, msp packages already have all the necessary parameters.
The same method can be applied to Adobe Flash Player. All the necessary rules are already at the package level, and the update will be installed only where the player was previously installed.
Simple, right? All this, of course, can be done manually.
References
7-zip archiver
There are no directories for this software, but there are msi assemblies for 32-bit and 64-bit. Therefore, the task is reduced only to the correct determination of where to put what. Almost always, an indicator that the update is installed is the Product Code. You can view this code in msi both by WSUSPP ( "Tools" -> "Msi Reader" ) and by third-party programs like SuperOrca. But the OS architecture and product codes of versions 16.00, 16.01 and 9.20 will be an indicator of the need for installation.
Create update
Product Code for x86 versions:
9.20 - {23170F69-40C1-2701-0920-000001000000}
16.00 - {23170F69-40C1-2701-1600-000001000000}
16.01 - {23170F69-40C1-2701-1601-000001000000}
16.02 - {23170F69- 40C1-2701-1602-000001000000}
1) We create a simple update, specify the file, “Next” .
By the way, I advise you to leave several versions of old updates.
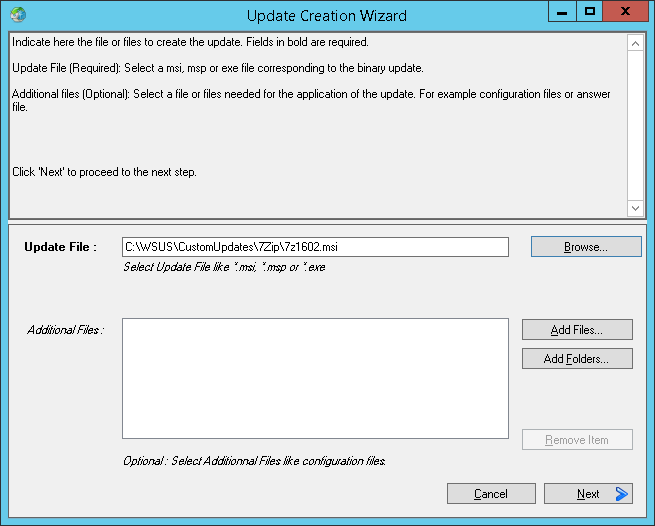
2) Fill in the fields “Vendor Name” , “Product Name” , “Title” , etc. “Package Type” should be indicated as “Application” .
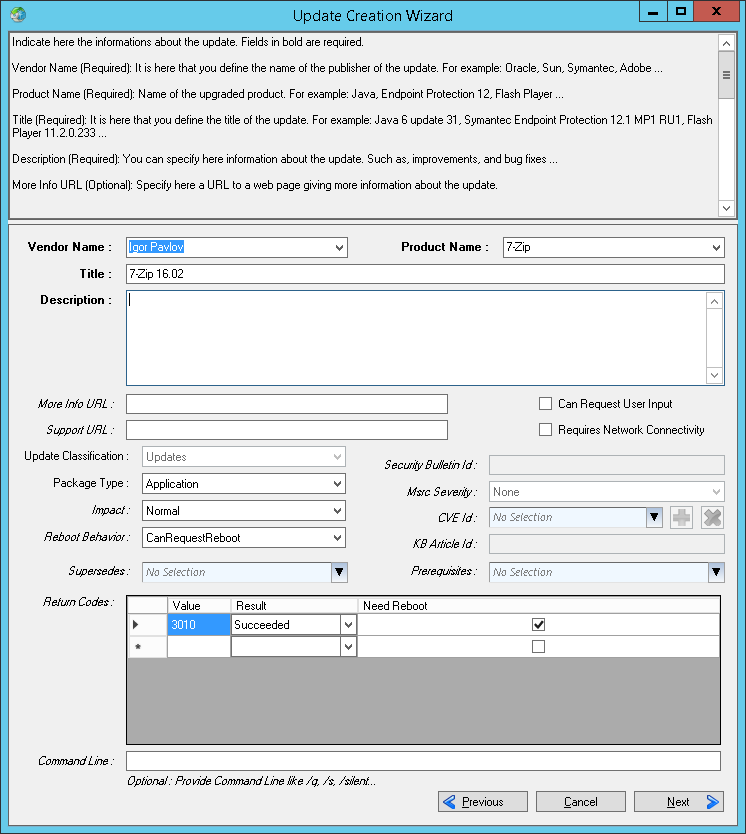
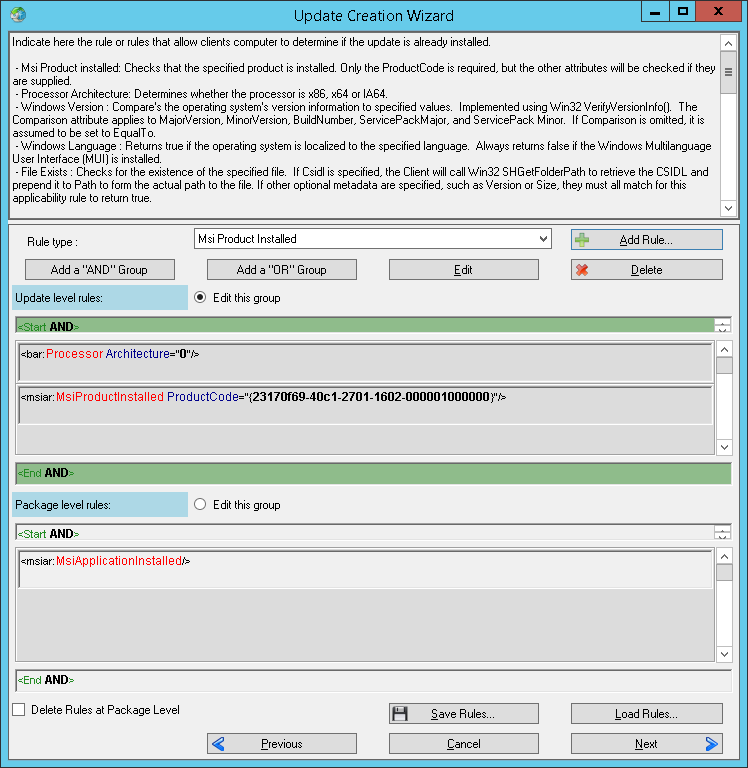
3) Installed section. This indicates the Product Code of the package to be installed.
“Rule Type: Processor Architecture” -> “Add Rule” -> Architecture x86-> “Ok”
“Rule Type: Msi Produst Installed” -> “Add Rule” -> insert with code for 16.02 -> “Ok” -> “Next”
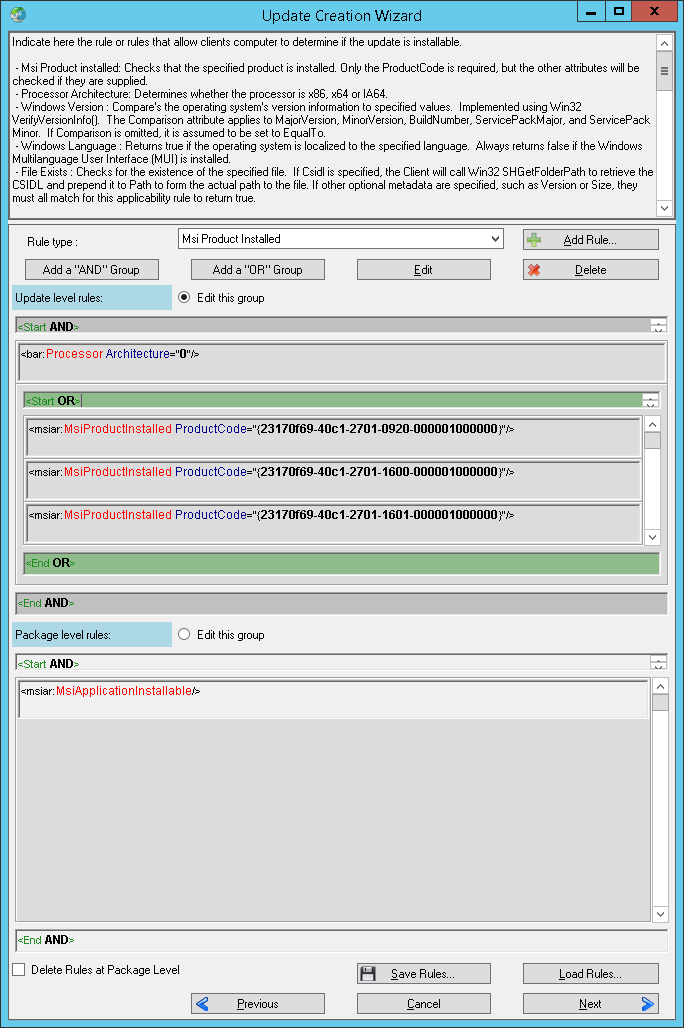
4) Installable section. And here we need a more complicated design.
For 32-bit:
“Rule Type: Processor Architecture” -> “Add Rule” -> Architecture x86-> “Ok”
“Add a“ OR “Group”
“Rule Type: Msi Produst Installed” -> “Add Rule” - > insert Product Code version 9.20 -> “Ok”
“Rule Type: Msi Produst Installed” -> “Add Rule” -> insert Product Code version 16.00 -> “Ok”
“Rule Type: Msi Produst Installed” -> “Add Rule "-> insert Product Code version 16.01 ->" Ok "->" Next "
The result should be the following:
You can save and load , for this at the bottom there are corresponding buttons.
5) Experienced users can correct the meta data. We click Publish .
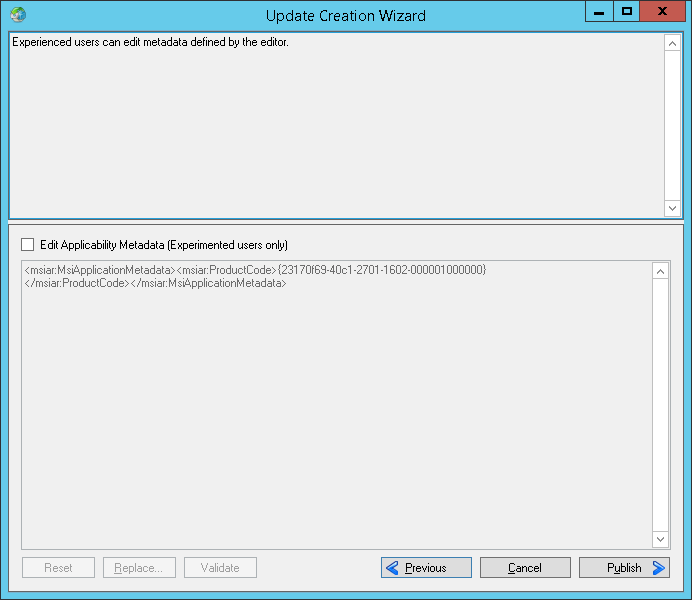
The update has been published and is ready for approval.
For the 64-bit version, the manipulations are similar except for: “Processor Architecture” -> “Architecture x64” and the corresponding product codes.
9.20 - {23170F69-40C1-2701-0920-000001000000}
16.00 - {23170F69-40C1-2701-1600-000001000000}
16.01 - {23170F69-40C1-2701-1601-000001000000}
16.02 - {23170F69- 40C1-2701-1602-000001000000}
1) We create a simple update, specify the file, “Next” .
By the way, I advise you to leave several versions of old updates.
2) Fill in the fields “Vendor Name” , “Product Name” , “Title” , etc. “Package Type” should be indicated as “Application” .
3) Installed section. This indicates the Product Code of the package to be installed.
“Rule Type: Processor Architecture” -> “Add Rule” -> Architecture x86-> “Ok”
“Rule Type: Msi Produst Installed” -> “Add Rule” -> insert with code for 16.02 -> “Ok” -> “Next”
4) Installable section. And here we need a more complicated design.
For 32-bit:
“Rule Type: Processor Architecture” -> “Add Rule” -> Architecture x86-> “Ok”
“Add a“ OR “Group”
“Rule Type: Msi Produst Installed” -> “Add Rule” - > insert Product Code version 9.20 -> “Ok”
“Rule Type: Msi Produst Installed” -> “Add Rule” -> insert Product Code version 16.00 -> “Ok”
“Rule Type: Msi Produst Installed” -> “Add Rule "-> insert Product Code version 16.01 ->" Ok "->" Next "
The result should be the following:
You can save and load , for this at the bottom there are corresponding buttons.
5) Experienced users can correct the meta data. We click Publish .
The update has been published and is ready for approval.
For the 64-bit version, the manipulations are similar except for: “Processor Architecture” -> “Architecture x64” and the corresponding product codes.
As you noticed, we update only selected versions.
Upd 2017.01.17 : Thank you for correcting inaccuracies @perlestius .
PDF24 Creator
But what if users do not have software versions 2-3 installed, but 10? You won’t get enough product codes for them. In my case, it was PDF24 Creator , a free tool for working with PDF.
2 checks will help us with this: the existence of the file and the version of the file. You can not limit yourself to just checking for a version, because if there is no file, it is considered positive. Another subtle point is that PDF24 Creator is a 32-bit application. So, you need to check in both the Program Files and Program Files (x86) folders.
Create update
Product Code for version 7.9.0 - 26364d59-91dd-4b5f-a521-8c7d35e1743c
The first 2 steps are similar to those from the example with 7-Zip
3) Installed section.
“Rule Type: Msi Produst Installed” -> “Add Rule” -> Insert Product Code -> “Ok” -> “Next”
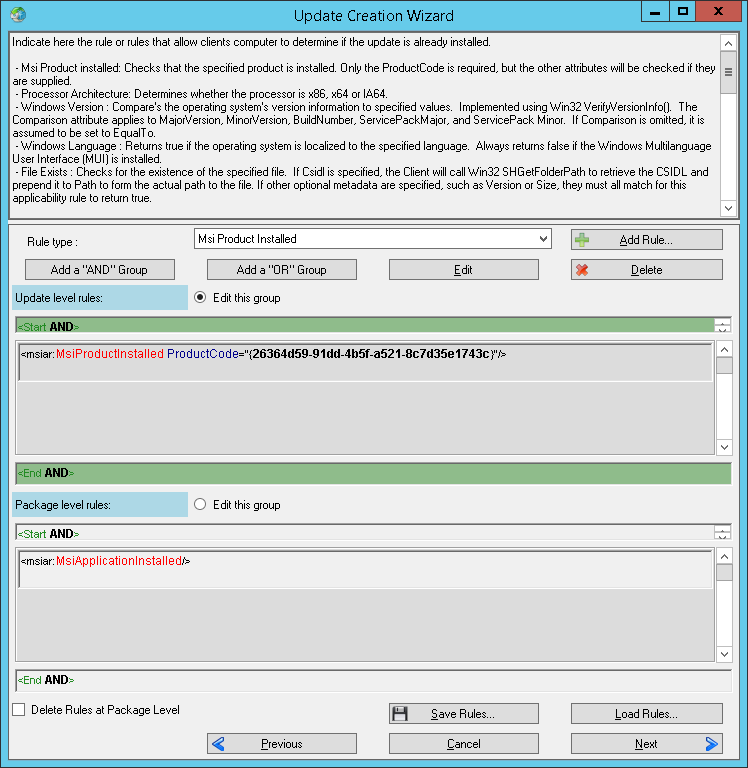
4) Installable section.
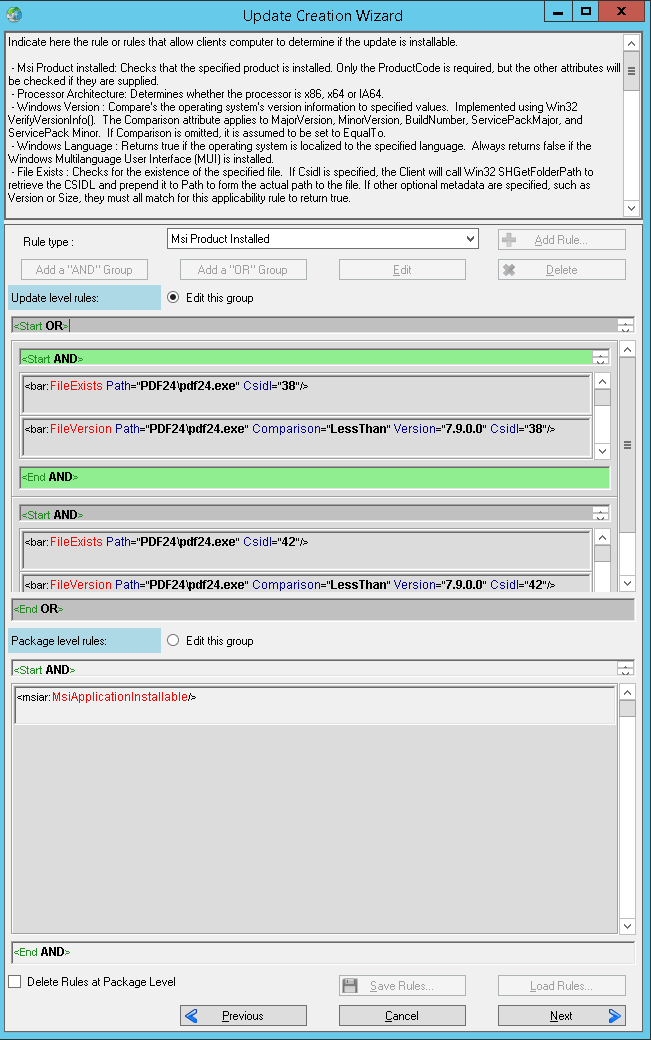
Translate the basic rule to "Start OR" . To do this, double-click on the "Start AND" strip, or click on the "Edit" button.
“Add a„ AND “Group”
“Rule Type: File Exists” -> “Add Rule” -> “Known Folder: PROGRAM_FILES”, “File Path: PDF24 \ pdf24.exe” -> “Ok”
“Rule Type: File Version ”->“ Add Rule ”->“ Wellknown directory: PROGRAM_FILES ”,“ File Path: PDF24 \ pdf24.exe ”,“ Comprasion: Less Then ”,“ File Version: 7.9.0.0 ”->“ Ok ”
Translate the selection into the main rule
“Add a„ AND “Group”
“Rule Type: File Exists” -> “Add Rule” -> “Known Folder: PROGRAM_FILESX86”, “File Path: PDF24 \ pdf24.exe” -> “Ok”
“Rule Type: File Version” -> “Add Rule” -> “Wellknown directory: PROGRAM_FILESX86”, “File Path: PDF24 \ pdf24.exe”, “Comprasion: Less Then”, “File Version: 7.9.0.0” -> “Ok” You can also
specify a file through the full path.
As a result, you should have the following:
5) Experienced users can correct the meta data. We click Publish
The first 2 steps are similar to those from the example with 7-Zip
3) Installed section.
“Rule Type: Msi Produst Installed” -> “Add Rule” -> Insert Product Code -> “Ok” -> “Next”
4) Installable section.
Translate the basic rule to "Start OR" . To do this, double-click on the "Start AND" strip, or click on the "Edit" button.
“Add a„ AND “Group”
“Rule Type: File Exists” -> “Add Rule” -> “Known Folder: PROGRAM_FILES”, “File Path: PDF24 \ pdf24.exe” -> “Ok”
“Rule Type: File Version ”->“ Add Rule ”->“ Wellknown directory: PROGRAM_FILES ”,“ File Path: PDF24 \ pdf24.exe ”,“ Comprasion: Less Then ”,“ File Version: 7.9.0.0 ”->“ Ok ”
Translate the selection into the main rule
“Add a„ AND “Group”
“Rule Type: File Exists” -> “Add Rule” -> “Known Folder: PROGRAM_FILESX86”, “File Path: PDF24 \ pdf24.exe” -> “Ok”
“Rule Type: File Version” -> “Add Rule” -> “Wellknown directory: PROGRAM_FILESX86”, “File Path: PDF24 \ pdf24.exe”, “Comprasion: Less Then”, “File Version: 7.9.0.0” -> “Ok” You can also
specify a file through the full path.
As a result, you should have the following:
5) Experienced users can correct the meta data. We click Publish
With msi packages sorted out. And if only exe are available?
X-Mouse Button Control
There is such a wonderful free program - X-Mouse Button Control . It allows you to assign many different functions and combinations to your mouse buttons. I highly recommend if you use a mouse with 5+ buttons.
Create update
Such updates are created through "Updates" -> "Create a Custom Update" .
The necessary actions are added by a double click. If you made a mistake in the sequence, then the line up / down can be moved, right-click on the action.
1) First, we will cover all the steps for a full installation.
“Allow to kill process by his name” -> XMouseButtonControl -> “Ok” (the name is specified without extension)
“Allow to execute a file” -> XMBCUpdate_2.13.1.exe -> “Ok” -> “Ok” (arbitrary name , but the file with that name should be used in point
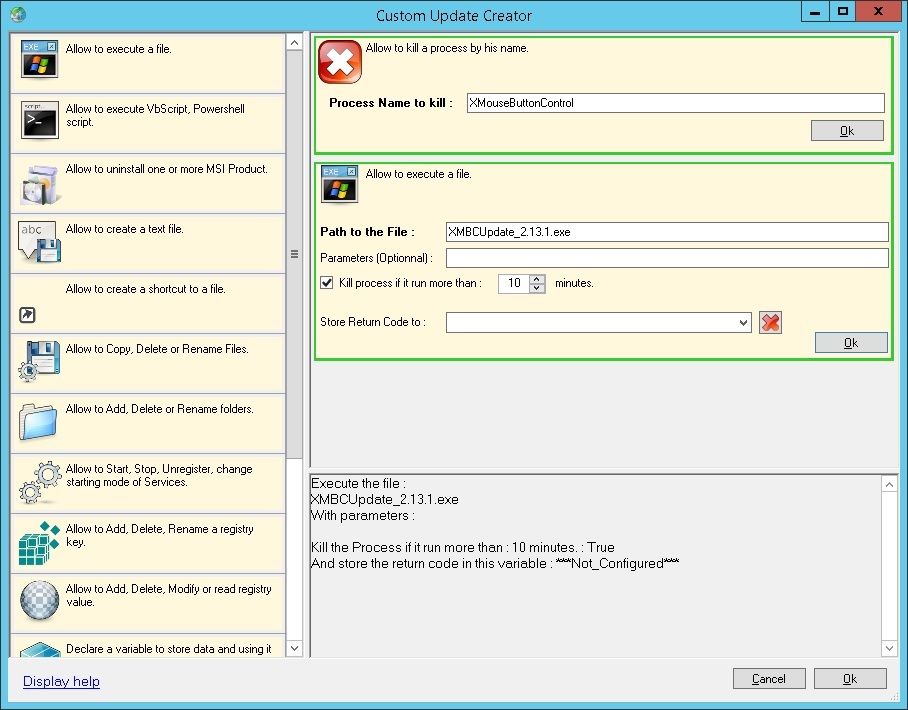
2) 2) In the next window, you need to add the exe-file. The rest of the files should not be touched.
"Add Files ..." -> XMBCUpdate_2.13.1.exe -> "Ok" ->
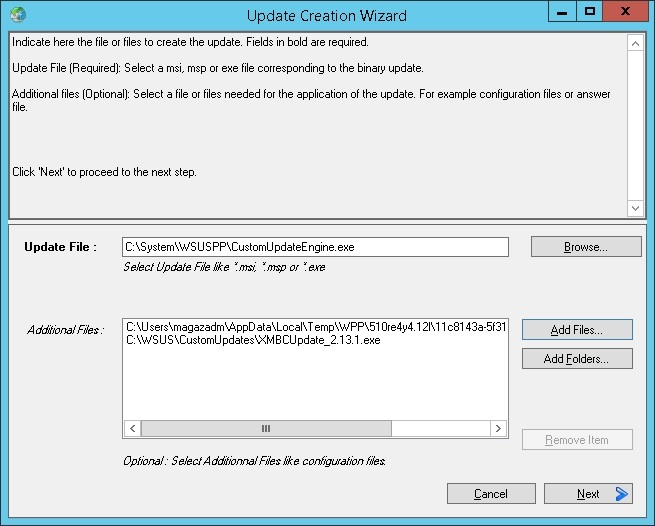
“Vendor Name” , “Product Name” , “Title” , etc. Command Line do not modify / delete.

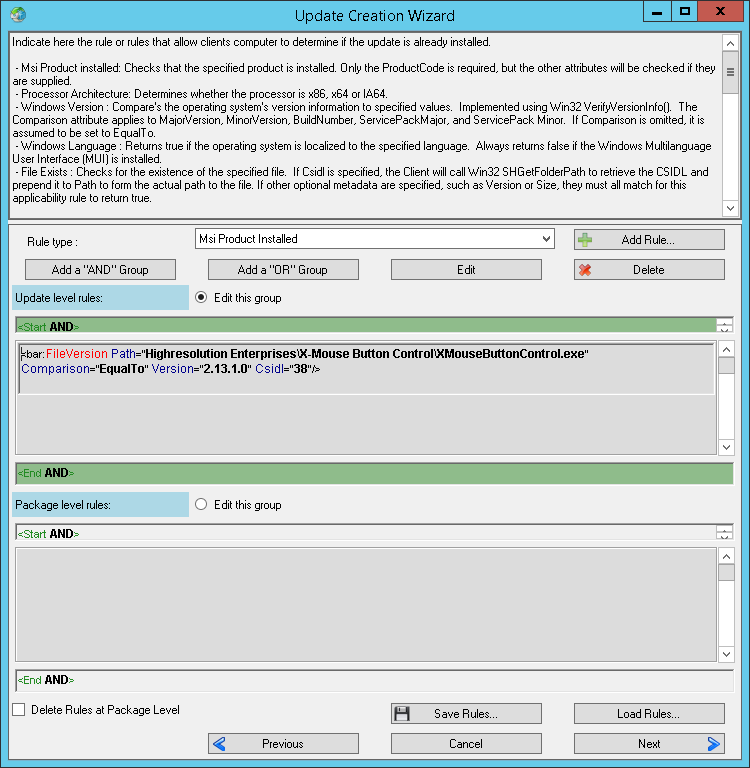
4) We will consider the update to be installed by checking the version of the file, because Product Code is not registered in the system. For x32 and x64 it is installed the same in Program Files .
“Rule Type: File Version” -> “Add Rule” -> “Wellknown directory: PROGRAM_FILES”, “File Path: Highresolution Enterprises \ X-Mouse Button Control \ XMouseButtonControl.exe”, “Comprasion: Equal To”, “File Version : 2.13.1.0 ”->“ Ok ”->“ Next ”
5) We check the need for installation as in the previous example.
“Rule Type: File Exists” -> “Add Rule” -> “Known Folder: PROGRAM_FILES”, “Highresolution Enterprises \ X-Mouse Button Control \ XMouseButtonControl.exe” -> “Ok”
“Rule Type: File Version” -> “Add Rule” -> “Wellknown directory: PROGRAM_FILES”, “File Path: Highresolution Enterprises \ X-Mouse Button Control \ XMouseButtonControl.exe”, “Comprasion: Less Then,” “File Version: 2.13.1.0” -> “Ok "->" Next "

6) Experienced users can correct the meta data. We click Publish .
The necessary actions are added by a double click. If you made a mistake in the sequence, then the line up / down can be moved, right-click on the action.
1) First, we will cover all the steps for a full installation.
“Allow to kill process by his name” -> XMouseButtonControl -> “Ok” (the name is specified without extension)
“Allow to execute a file” -> XMBCUpdate_2.13.1.exe -> “Ok” -> “Ok” (arbitrary name , but the file with that name should be used in point
2) 2) In the next window, you need to add the exe-file. The rest of the files should not be touched.
"Add Files ..." -> XMBCUpdate_2.13.1.exe -> "Ok" ->
“Vendor Name” , “Product Name” , “Title” , etc. Command Line do not modify / delete.
4) We will consider the update to be installed by checking the version of the file, because Product Code is not registered in the system. For x32 and x64 it is installed the same in Program Files .
“Rule Type: File Version” -> “Add Rule” -> “Wellknown directory: PROGRAM_FILES”, “File Path: Highresolution Enterprises \ X-Mouse Button Control \ XMouseButtonControl.exe”, “Comprasion: Equal To”, “File Version : 2.13.1.0 ”->“ Ok ”->“ Next ”
5) We check the need for installation as in the previous example.
“Rule Type: File Exists” -> “Add Rule” -> “Known Folder: PROGRAM_FILES”, “Highresolution Enterprises \ X-Mouse Button Control \ XMouseButtonControl.exe” -> “Ok”
“Rule Type: File Version” -> “Add Rule” -> “Wellknown directory: PROGRAM_FILES”, “File Path: Highresolution Enterprises \ X-Mouse Button Control \ XMouseButtonControl.exe”, “Comprasion: Less Then,” “File Version: 2.13.1.0” -> “Ok "->" Next "
6) Experienced users can correct the meta data. We click Publish .
Upd. 2017/02/09 : You can use the links below to download the latest update. Note that updates are available for X32 and X64 versions separately.
Direct download links
Relevant for 2019/09/17 links:
highrez.co.uk/downloads/XMBCUpdateX64.2.18.8.exe or highrez.co.uk/downloads/XMBCUpdateX86.2.18.8.exe
highrez.co.uk/downloads/XMBCUpdateX64.2.18.8.exe or highrez.co.uk/downloads/XMBCUpdateX86.2.18.8.exe
Update Adobe Reader XI to Adobe Acrobat Reader DC
Probably many asked this question. And I want to update immediately to the current version. Nothing complicated, just a few additional steps are needed. And also the documentation: Bootstrapper with keys , GUIDs , Adobe Properties .
Training
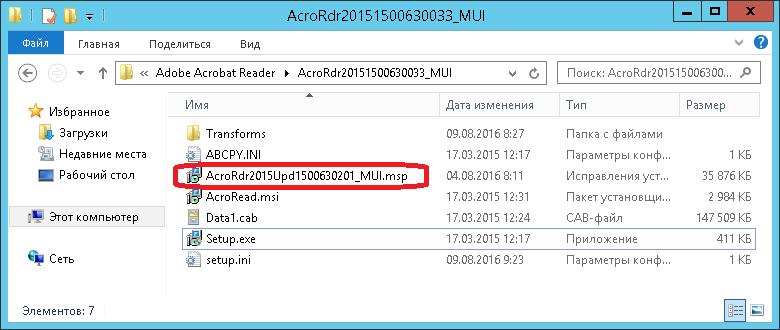
First you need to unzip exe. This is done from the command line using the parameters -sfx_o "unpack path" -sfx_ne ( you can use nos instead of sfx ).
In my case, it turns out like this:
“C: \ WSUS \ CustomUpdates \ Adobe Acrobat Reader \ AcroRdr20151500630033_MUI.exe” -sfx_o “C: \ WSUS \ CustomUpdates \ Adobe AcrobatReader \ AcroRdr20151500630033_MUI” -sfx_ne
You need to put the actual contents in the folder with the folder the moment of writing the article - 15.006.30201).
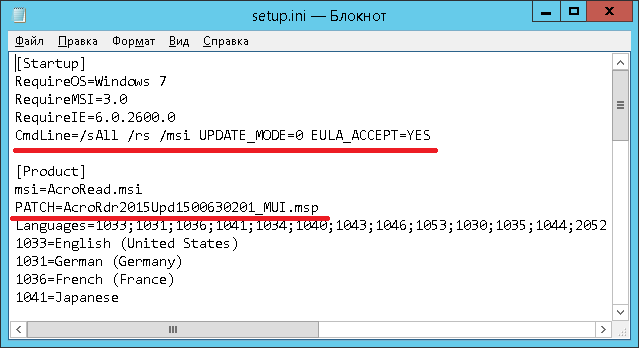
And, finally, edit the Setup.ini file, adding 2 lines: [Startup]
CmdLine = / sAll / rs / msi UPDATE_MODE = 0 EULA_ACCEPT = YES
[Product]
PATCH = AcroRdr2015Upd1500630201_MUI.msp
Create update
0) “Updates” -> “Create a Custom Update” .
1) To fully automate the process, you need to complete the AcroRd32.exe process.
“Allow to kill process by his name” -> AcroRd32 -> “Ok” (the name is specified without extension)
“Allow to execute a file” -> AcroRdr20151500630033_MUI \ Setup.exe -> “Ok” -> “Ok” (since in paragraph 2, the folder will be indicated, then the path to the file is indicated taking into account it).
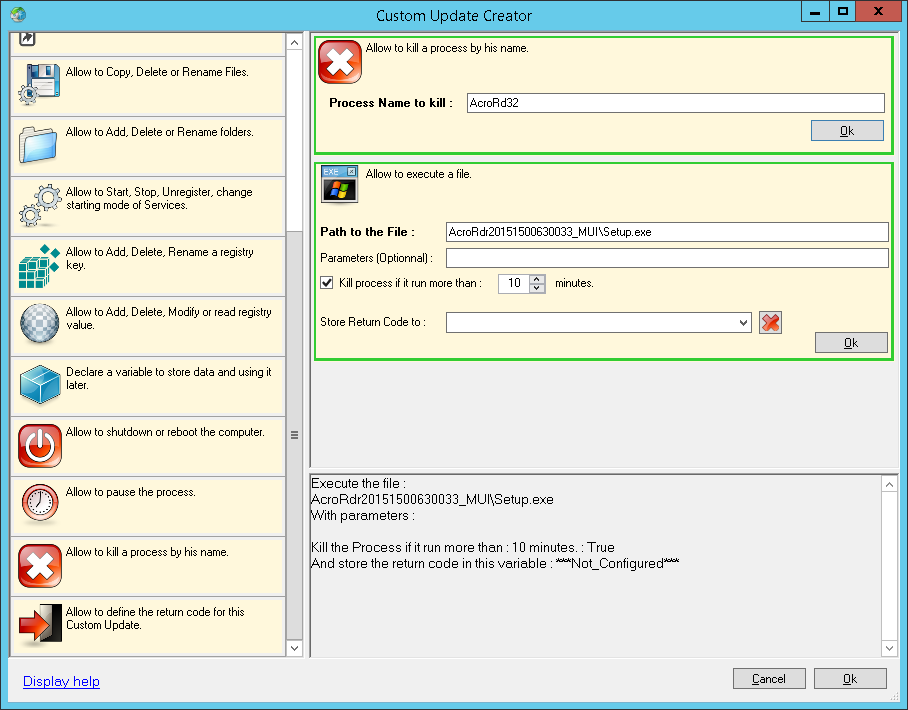
Additional parameters are not used, because everything is already specified in Setup.ini
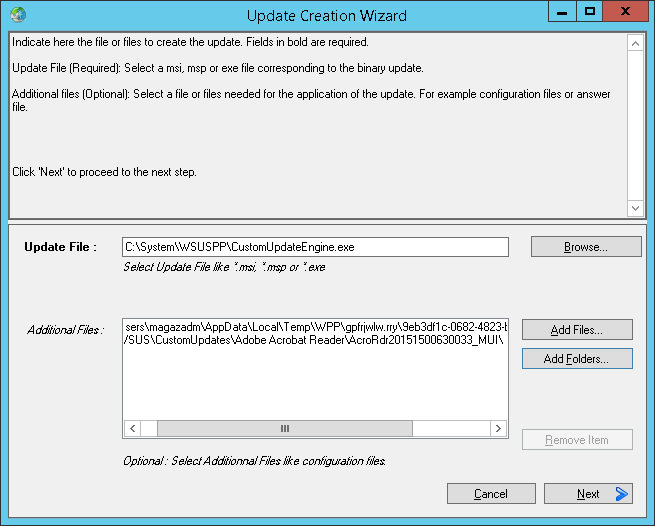
2) Add the folder
“Add Folders ...” -> AcroRdr20151500630033_MUI -> “Ok” -> “Next”
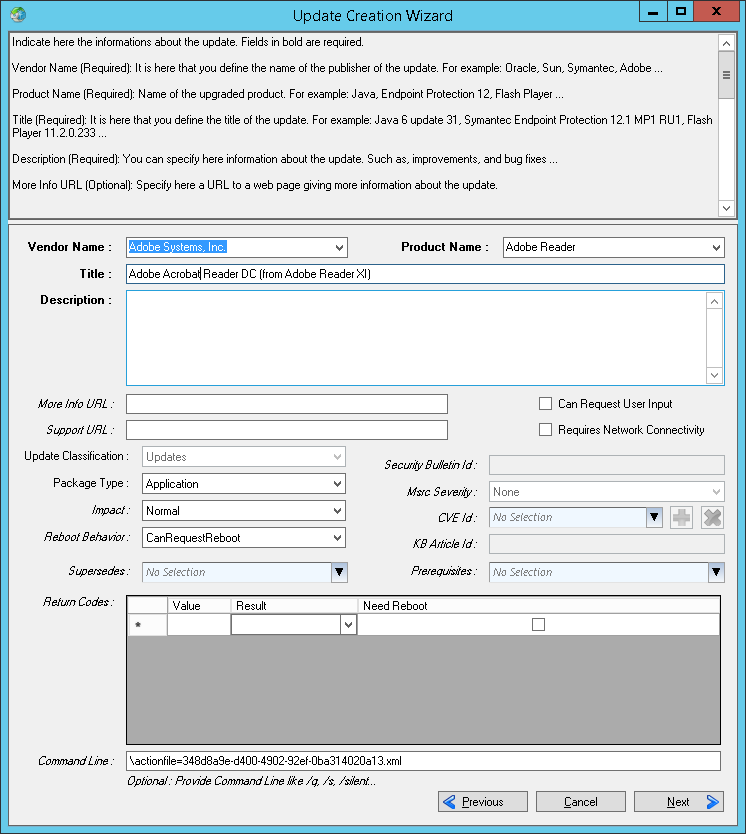
3) Fill in the fields “Vendor Name” , “Product Name” , “Title”etc. Command Line do not modify / delete.
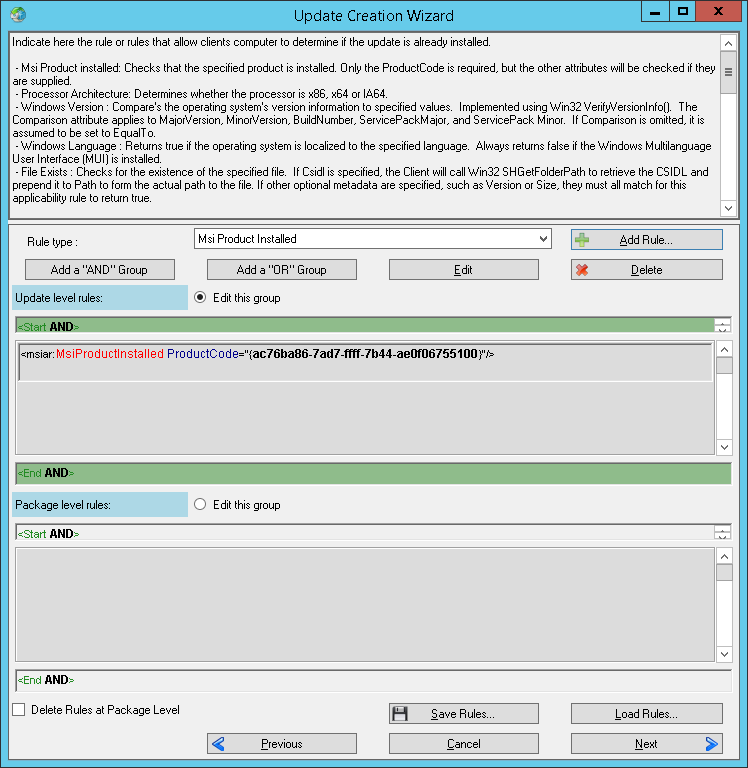
4) We will consider the update installed through the verification of the Product Code. It does not change when installing new patches.
“Rule Type: Msi Produst Installed” -> “Add Rule” -> AC76BA86-7AD7-FFFF-7B44-AE0F06755100 -> “Ok” -> “Next”
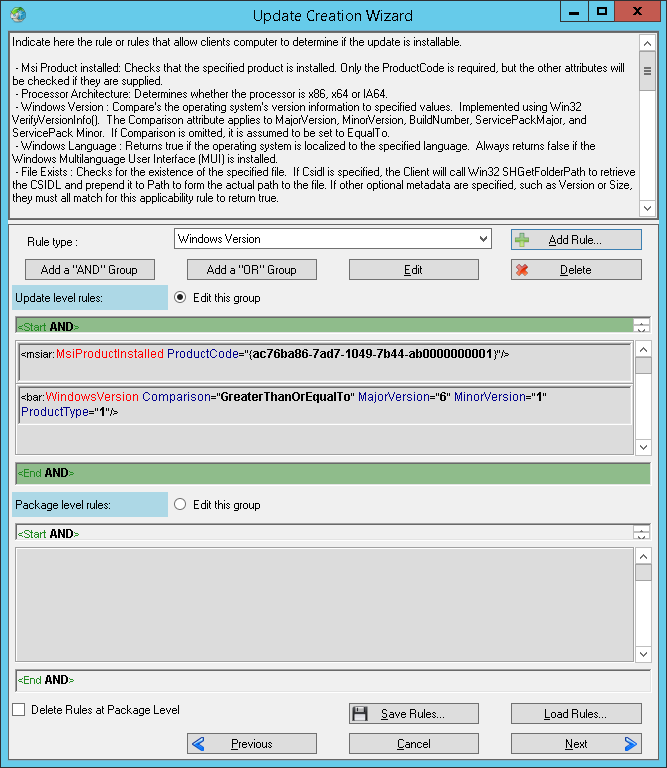
5) The need for installation is checked similarly, but also according to the OS version (version DC supports Windows 7 and later).
“Rule Type: Msi Produst Installed” -> “Add Rule” -> AC76BA86-7AD7-1049-7B44-AB0000000001 -> “Ok”
“Rule Type: Windows Version” -> “Add Rule” -> “Comparison: Greater Then or Equal To ”,“ Easy Selection: Windows 7 ”->“ Ok ”->“ Next ”
6) Experienced users can correct the meta data. We click Publish .
PS: ContentCmdLine can be migrated from Setup.ini to Parameters (Optional) in step 1 .
1) To fully automate the process, you need to complete the AcroRd32.exe process.
“Allow to kill process by his name” -> AcroRd32 -> “Ok” (the name is specified without extension)
“Allow to execute a file” -> AcroRdr20151500630033_MUI \ Setup.exe -> “Ok” -> “Ok” (since in paragraph 2, the folder will be indicated, then the path to the file is indicated taking into account it).
Additional parameters are not used, because everything is already specified in Setup.ini
2) Add the folder
“Add Folders ...” -> AcroRdr20151500630033_MUI -> “Ok” -> “Next”
3) Fill in the fields “Vendor Name” , “Product Name” , “Title”etc. Command Line do not modify / delete.
4) We will consider the update installed through the verification of the Product Code. It does not change when installing new patches.
“Rule Type: Msi Produst Installed” -> “Add Rule” -> AC76BA86-7AD7-FFFF-7B44-AE0F06755100 -> “Ok” -> “Next”
5) The need for installation is checked similarly, but also according to the OS version (version DC supports Windows 7 and later).
“Rule Type: Msi Produst Installed” -> “Add Rule” -> AC76BA86-7AD7-1049-7B44-AB0000000001 -> “Ok”
“Rule Type: Windows Version” -> “Add Rule” -> “Comparison: Greater Then or Equal To ”,“ Easy Selection: Windows 7 ”->“ Ok ”->“ Next ”
6) Experienced users can correct the meta data. We click Publish .
PS: ContentCmdLine can be migrated from Setup.ini to Parameters (Optional) in step 1 .
As it turned out, WSUSPP is a very powerful product that can compete with SCCM. Of course, he is not without flaws. These include the impossibility of revising the first steps in the Custom Update Creator wizard, as well as the peculiar logic of adding rules. But even so, the WSUS Package Publisher will come in handy for many system administrators who understand the importance of the up-to-date of their fleet.









