Altaro VM Backup: Backup Hyper-V and VMware Virtual Machines
Deploying virtual machines is becoming common practice for companies of all sizes. With the introduction of virtualization and the growing popularity of the cloud model, appropriate backup tools are developing, covering more and more virtual environments, operating systems and applications. So how to organize backup of the virtual environment at the proper level? How difficult is it?

There is still an opinion that, with all its advantages, virtualization makes backup much more difficult. Perhaps this is one of the reasons for companies to ignore the need to protect the virtual environment: according to foreign analytical agencies, backup procedures cover less than 70% of virtual servers.
In fact, everything is not so complicated. Regardless of which hypervisor you are using, such as Hyper-V or VMware, the approaches to backing up virtual machines (VMs) are the same. It can be performed at the host system level (or, as it is also called, at the hypervisor level), or at the VM level. Currently, there are many different classes of products available for backing up virtual environments. Some companies use specialized solutions designed specifically for a particular hypervisor, while others prefer universal products.
The recovery process in a virtual environment has its own specifics. Instead of restoring the entire VM image, most backup products allow you to restore a single file or group of VM files. And the backup itself can be stored in the cloud, in a remote data center. This method is becoming increasingly popular. In this case, the data is usually copied locally and then replicated to the cloud (Cloud Backup). Cloud redundancy does not solve all the problems of local protection and high availability, but it protects against crashes (DR).
New features of backup products help to restore virtual machines, applications and data more reliably and faster in the event of a failure, find the necessary balance between the acceptable time for recovering information (Recovery Time Objective, RTO), the acceptable loss of information (Recovery Point Objective, RPO) and the cost of the solution. Below we will talk about one of these solutions.
Altaro VM Backup is an easy-to-use backup solution with an intuitive interface and easy setup. More than 30 thousand companies use it for reliable storage and recovery of Hyper-V and VMware virtual machines. According to user reviews, Altaro VM Backup installs many times faster than competitive solutions and has a very convenient and intuitive interface. This software supports backup and recovery of VMs between different servers and different types of storage for backups - local (DAS), external (NAS / SAN) and cloud (Cloud Backup).
Altaro software, previously known as Altaro Hyper-V Backup, is targeted at SMB companies. That is why the developers tried to make it as simple and intuitive as possible, but at the same time possessing all the means necessary for small and medium-sized businesses. The sixth version of the product released last year supports VM backup both in Microsoft Hyper-V and in VMware vSphere, which is why it is now called Altaro VM Backup.
We list its main features:
Often, system administrators do not like backup tools, many of which have a complex user interface with many never-used options, or simply do not work and generate errors. Altaro VM Backup is not one of those: few products are so easy to install and operate. All tasks are performed through convenient procedures. And the price of Altaro VM Backup is quite attractive. Altaro VM Backup can be tested for free for 30 days . An unlimited free version is also offered, but it only supports two VMs per host system.
In addition to supporting VMware, version 6.0 offers the following new features:
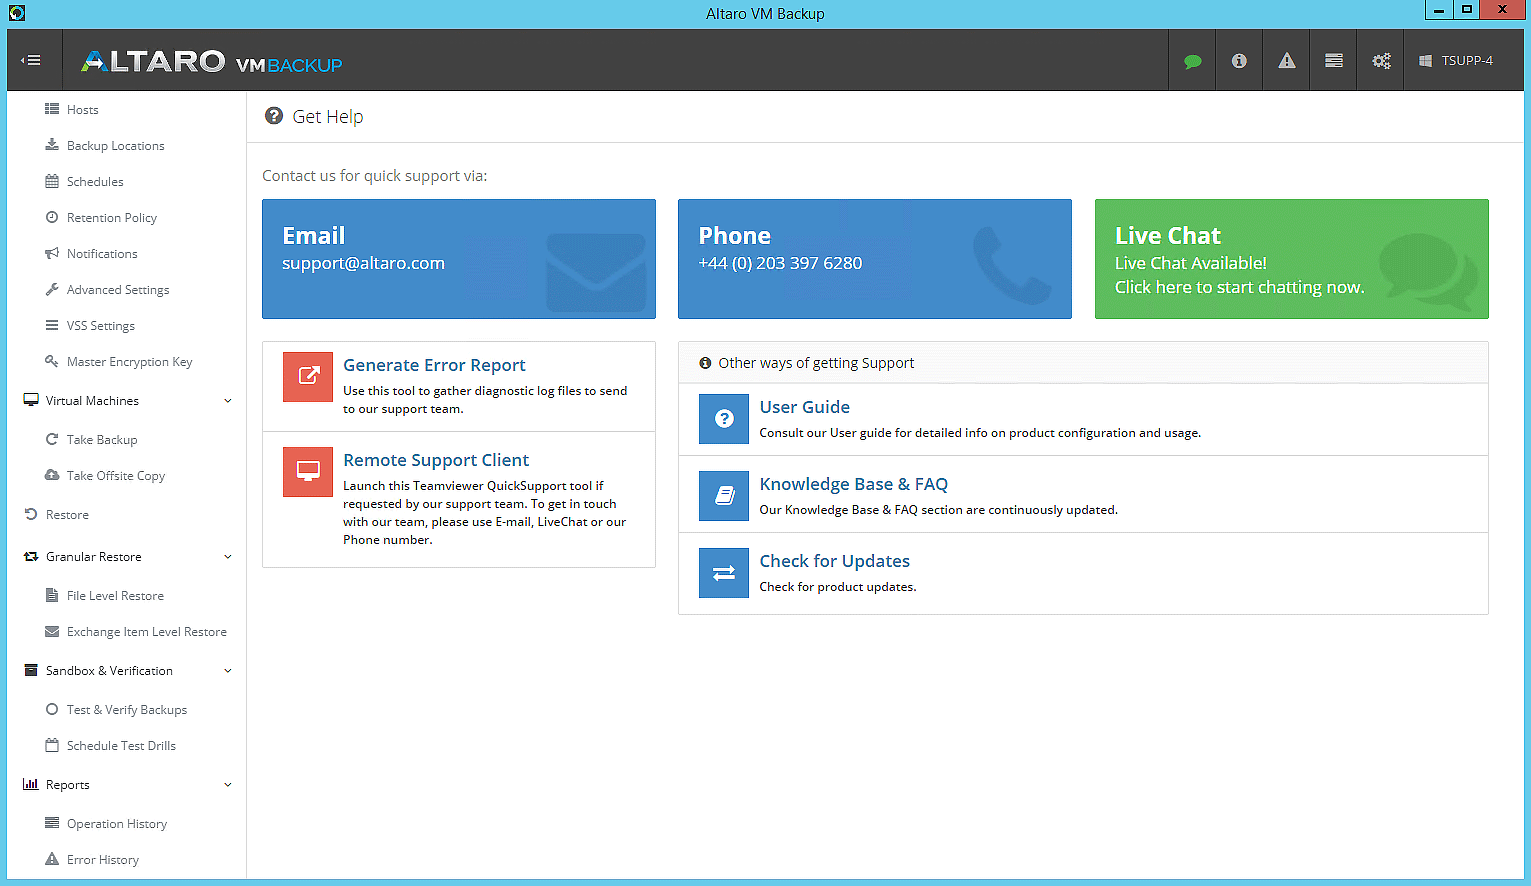
Support options for contacting support
Altaro VM Backup has four key components:
Installing Altaro VM Backup is not easy, but very simple. It is enough to run the installer, click “Next” a couple of times, and that’s it. No additional components are required. After completing the process and starting Altaro VM Backup, a connection is established with the application instance on one of the servers, for example, localhost. The port (35107) necessary for this is already registered in the interface.
The next step is to connect to
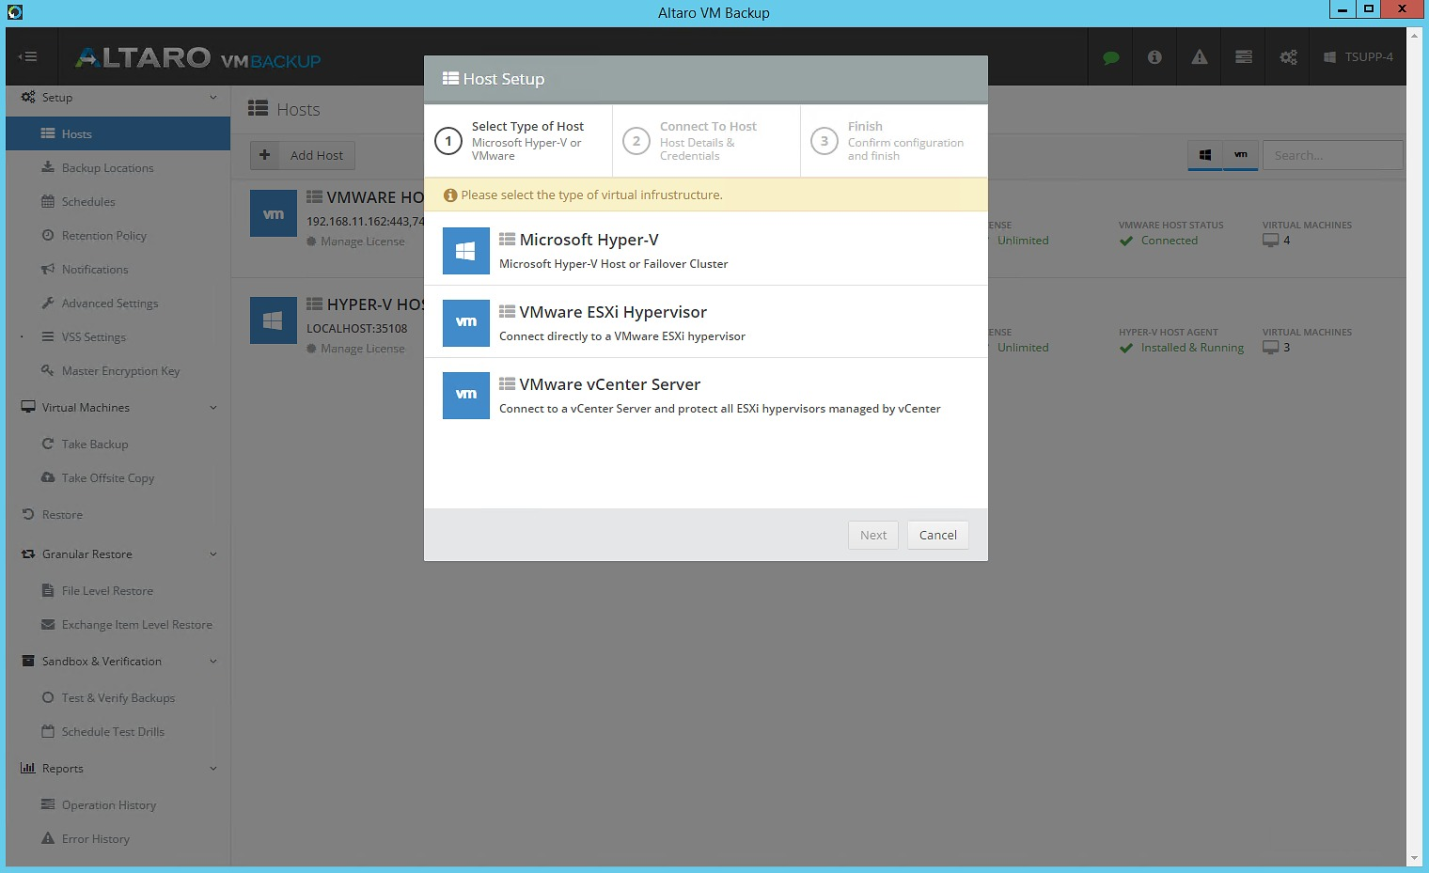
Let's choose an ESXi host as an example. To connect, you will need a name, hostname, account and password. Ports 443 and 902 (vSphere VDDK) must be open. After the connection with the host is established, you need to choose a place for data backup - local (USB, eSATA, iSCSI) or network device. Of course, for reliability, it is preferable to store backups on removable media or on another site, for example, configure replication over a global network. The stored VM data is encrypted.
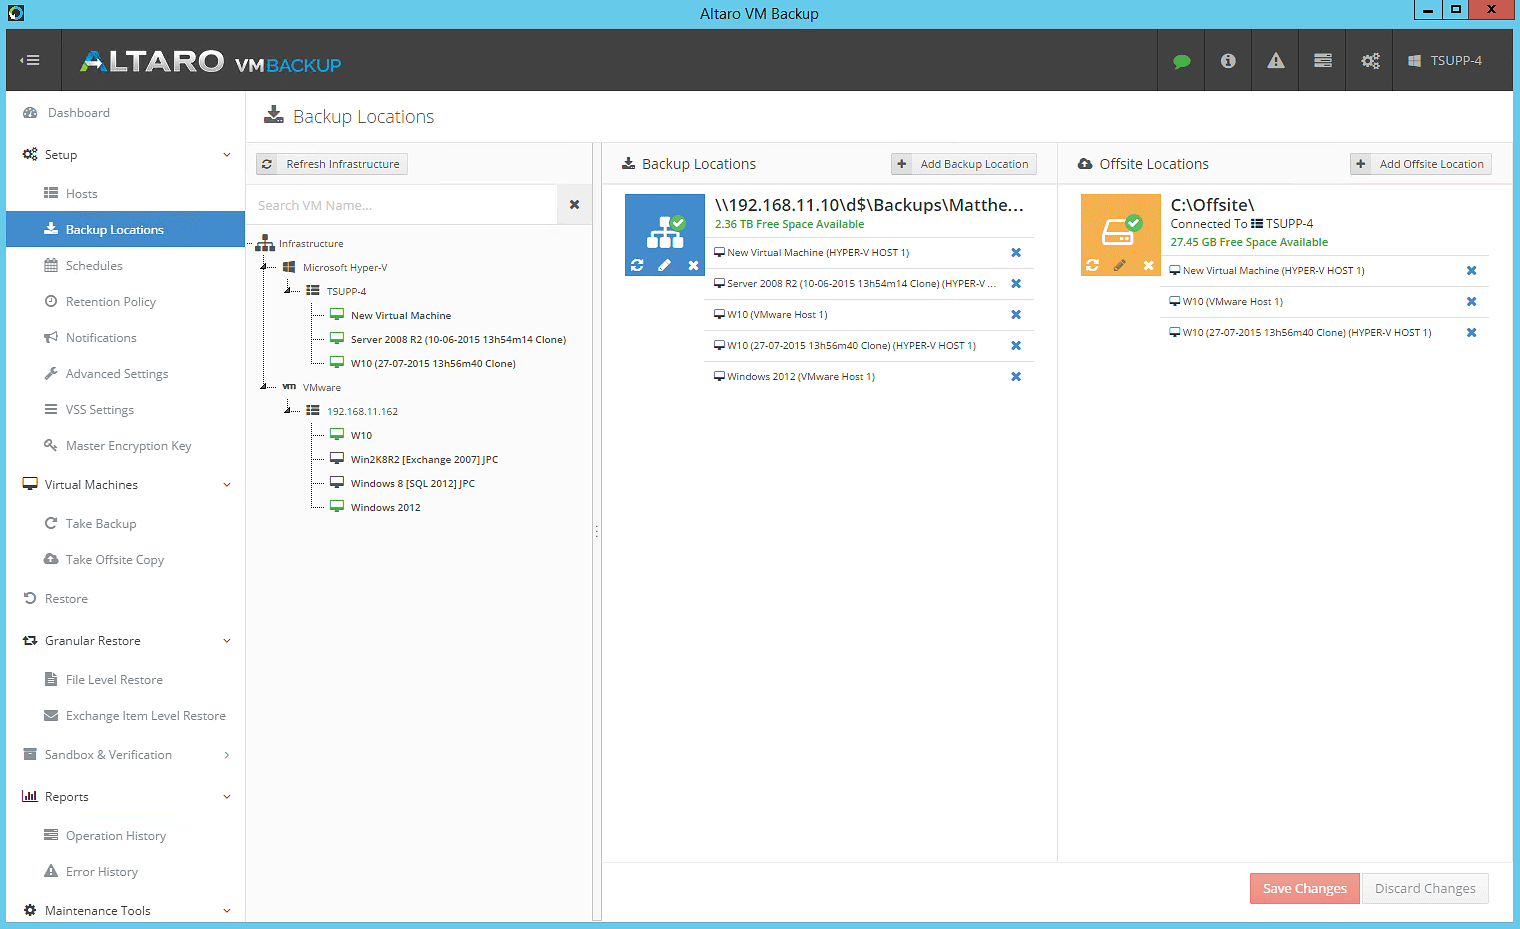
Backup storage locations
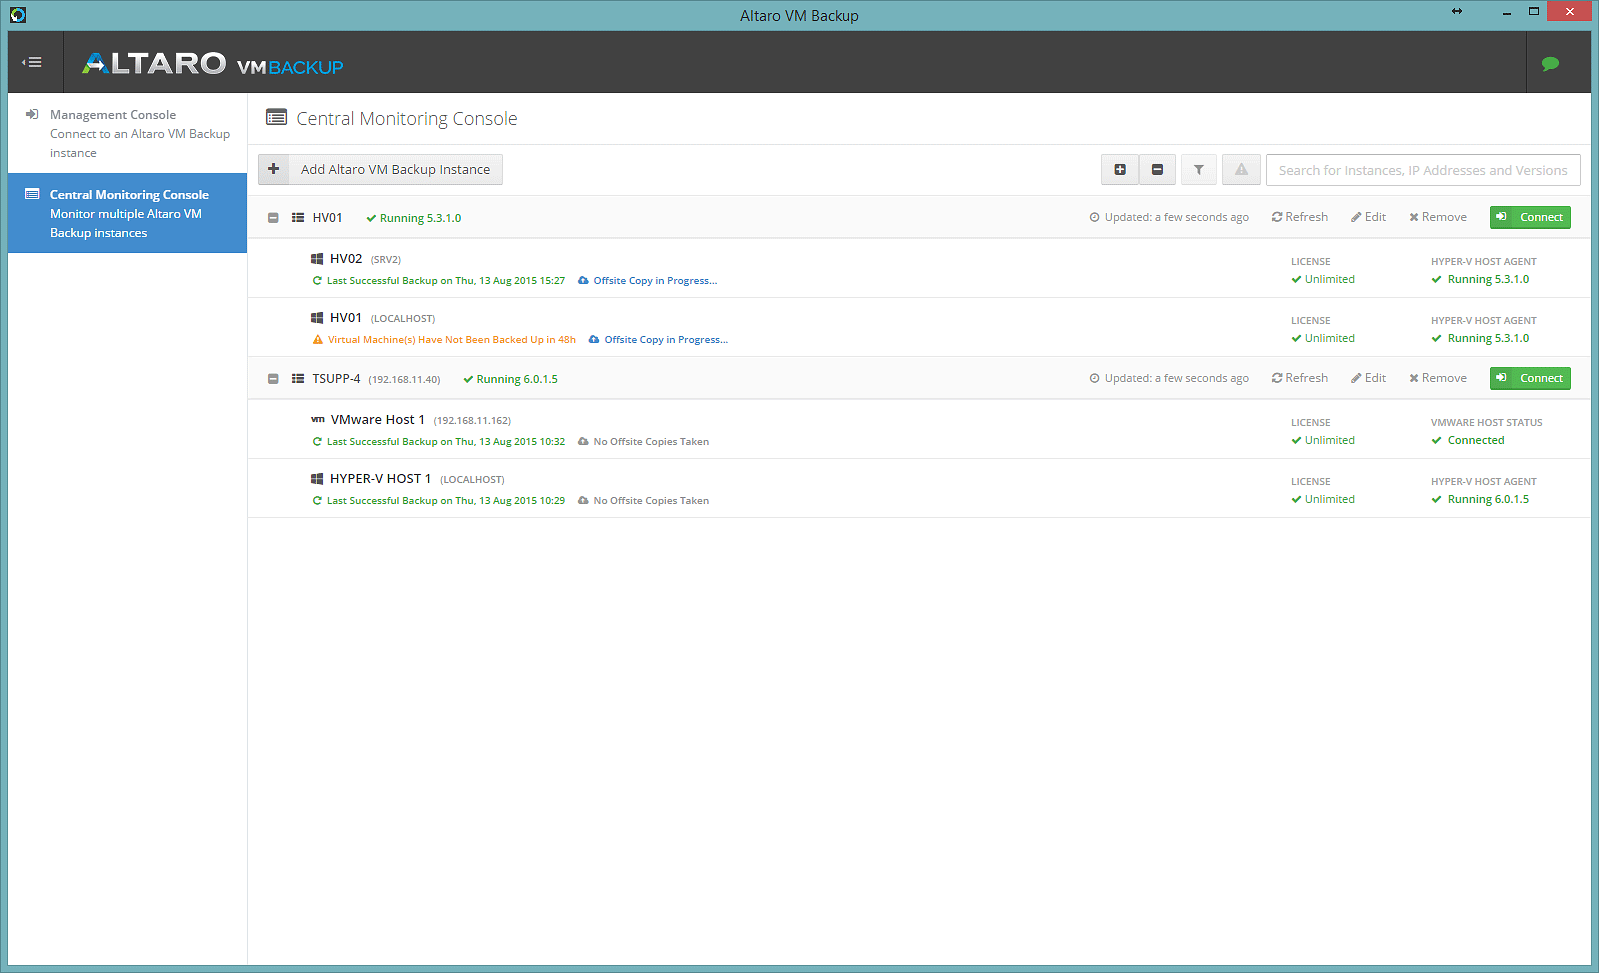
The monitoring console displays information on backup jobs, third-party backups and backup storage.
For a clearer understanding, we describe the process of installing and launching the product in steps.
That, in fact, is all. It usually takes about ten minutes from the start of the installation to the start of the backup process.
Initial backups can take a long time and create a load on the network. Therefore, you can simply copy data to removable media and transfer it to another site, and transfer subsequent copies over the global network - this process will no longer be so resource-intensive. This option the product supports.
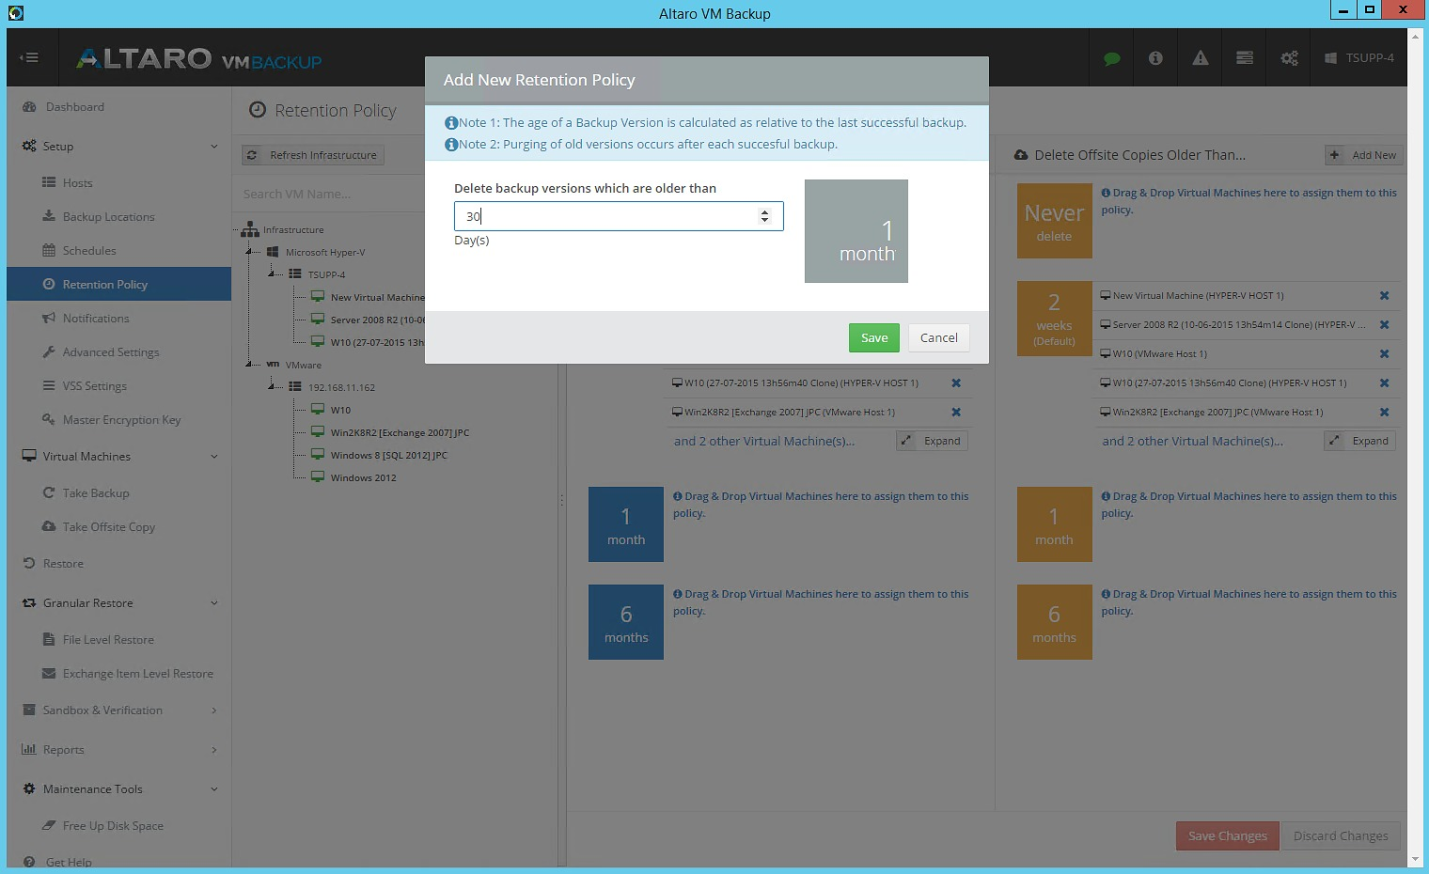
Adding a new backup retention rule.
Next, you need to assign a storage location for the VM. This is done by simply dragging the VM in the graphical interface to the target storage and clicking the “Save Changes” button. It remains to create a backup. Select a VM and click on “Backup”. Now you can configure the copy schedule.
Altaro supports the creation of consistent copies of applications using Microsoft VSS technology. This means that after recovering the VM, the VSS-enabled application will not be “corrupted”. To work with application logs such as Exchange Server or SQL, you need to install Altaro VM Tools. This can be done remotely using the management console.
How to make sure that you can really recover from a backup? This is often simply forgotten. Altaro VM Backup offers two verification methods - by checksums and by actually recovering the VM. The first, Backup Verification, allows you to simply verify the integrity of the data on the media. The second, Sandbox Restore, lets you sleep well. Both options can be planned to automate this process.
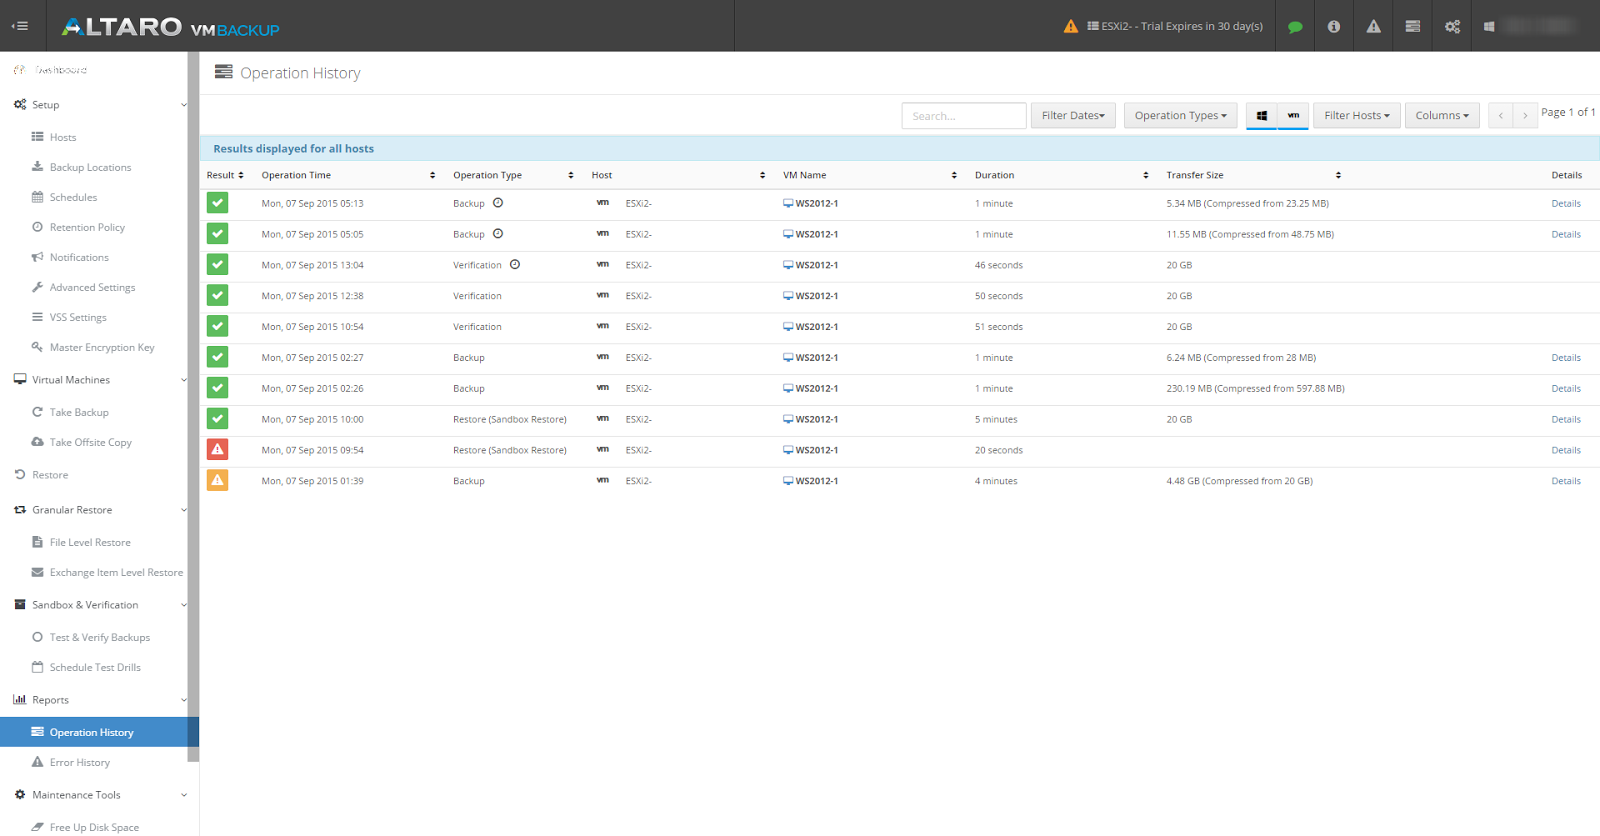
The report window shows the status of the backup, the result of verification and recovery tasks.
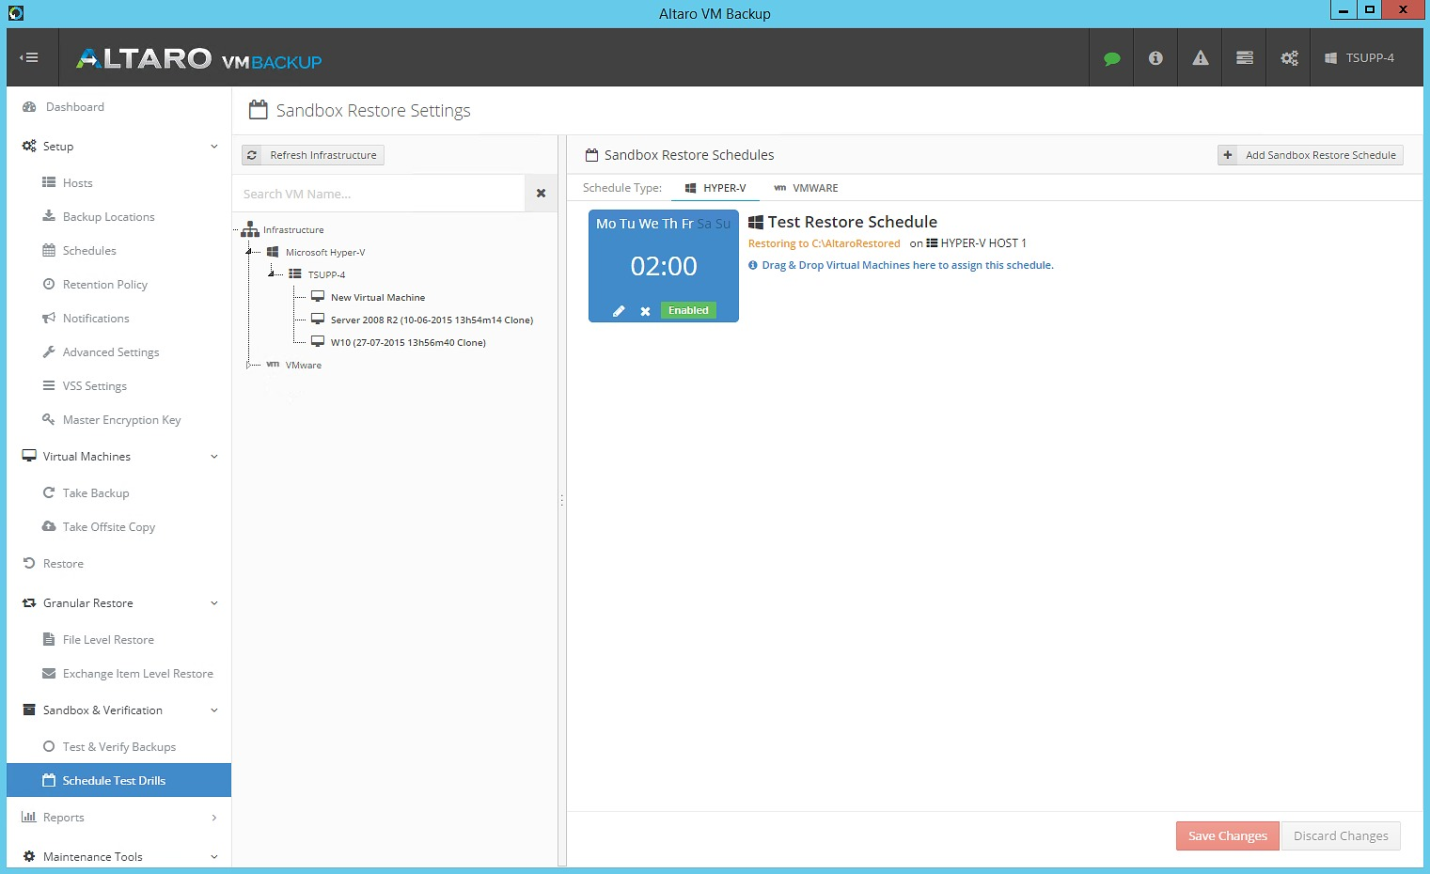
Setting up and scheduling Sandbox Restore
Sandbox Restore restores the VM under a temporary name. An administrator can run it and make sure it boots. This will not affect the operation of other VMs.
There are three ways to recover files:
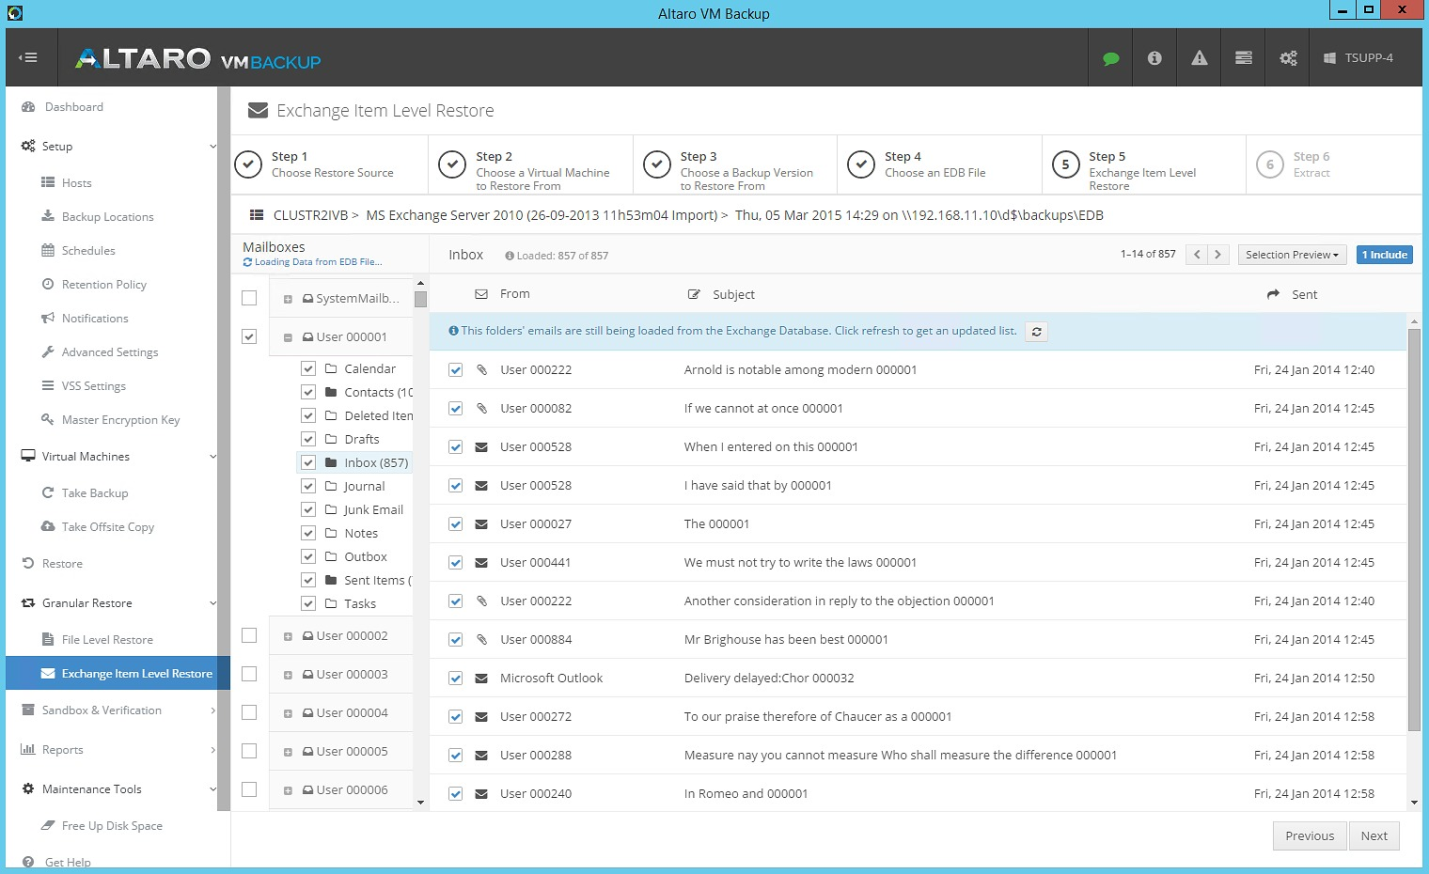
Restoring from Exchange at the Element Level The
second method is very simple and is performed in steps. Selected VM, virtual hard disk and files for recovery. Altaro VM Backup restores files to a special folder, after which it remains to copy them to the VM.
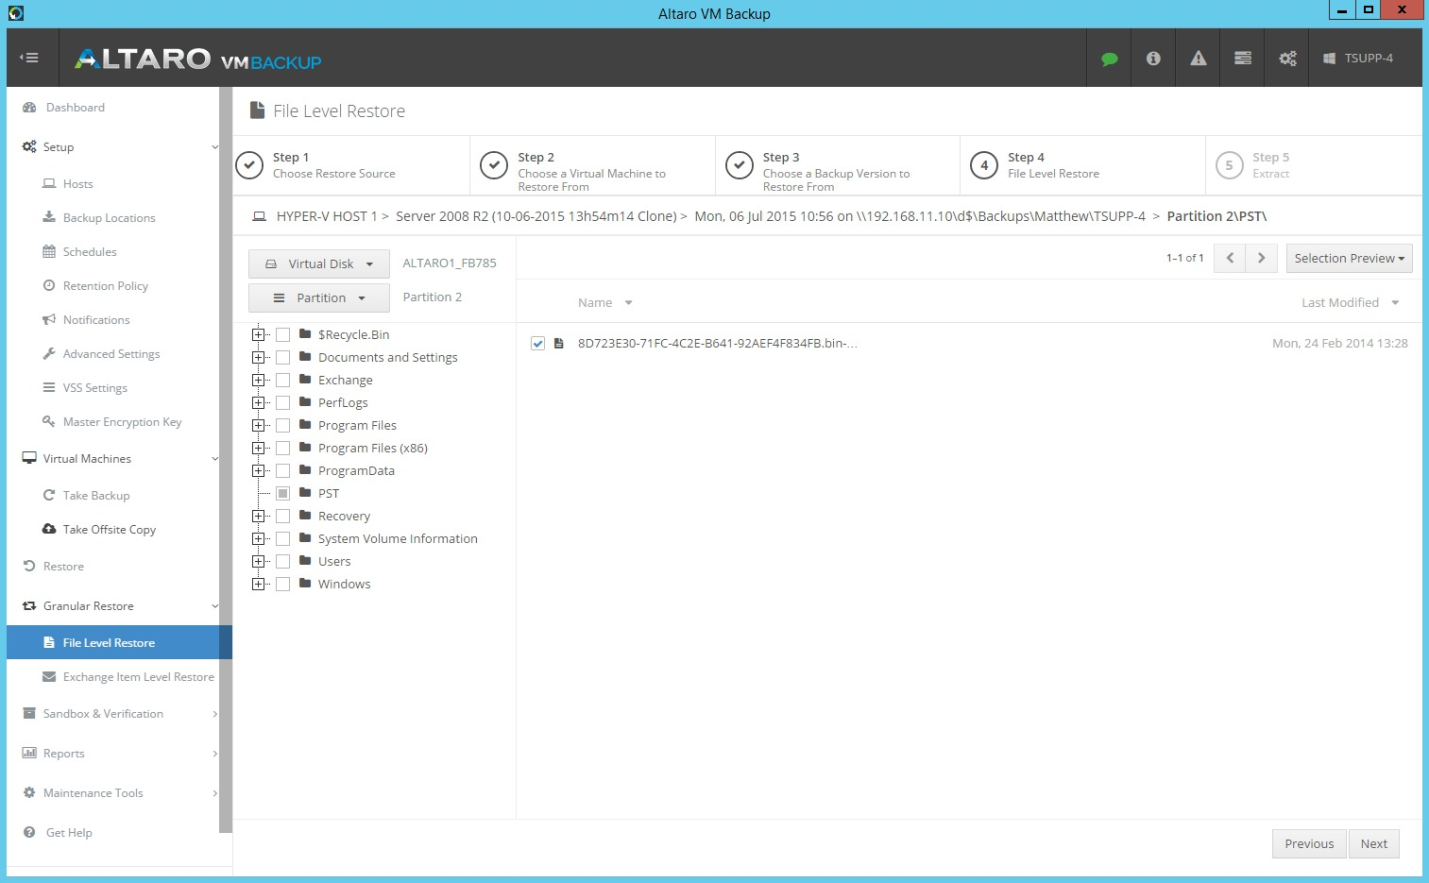
Altaro directly from the console, you can perform granular recovery of, for example, to restore a file or mailbox
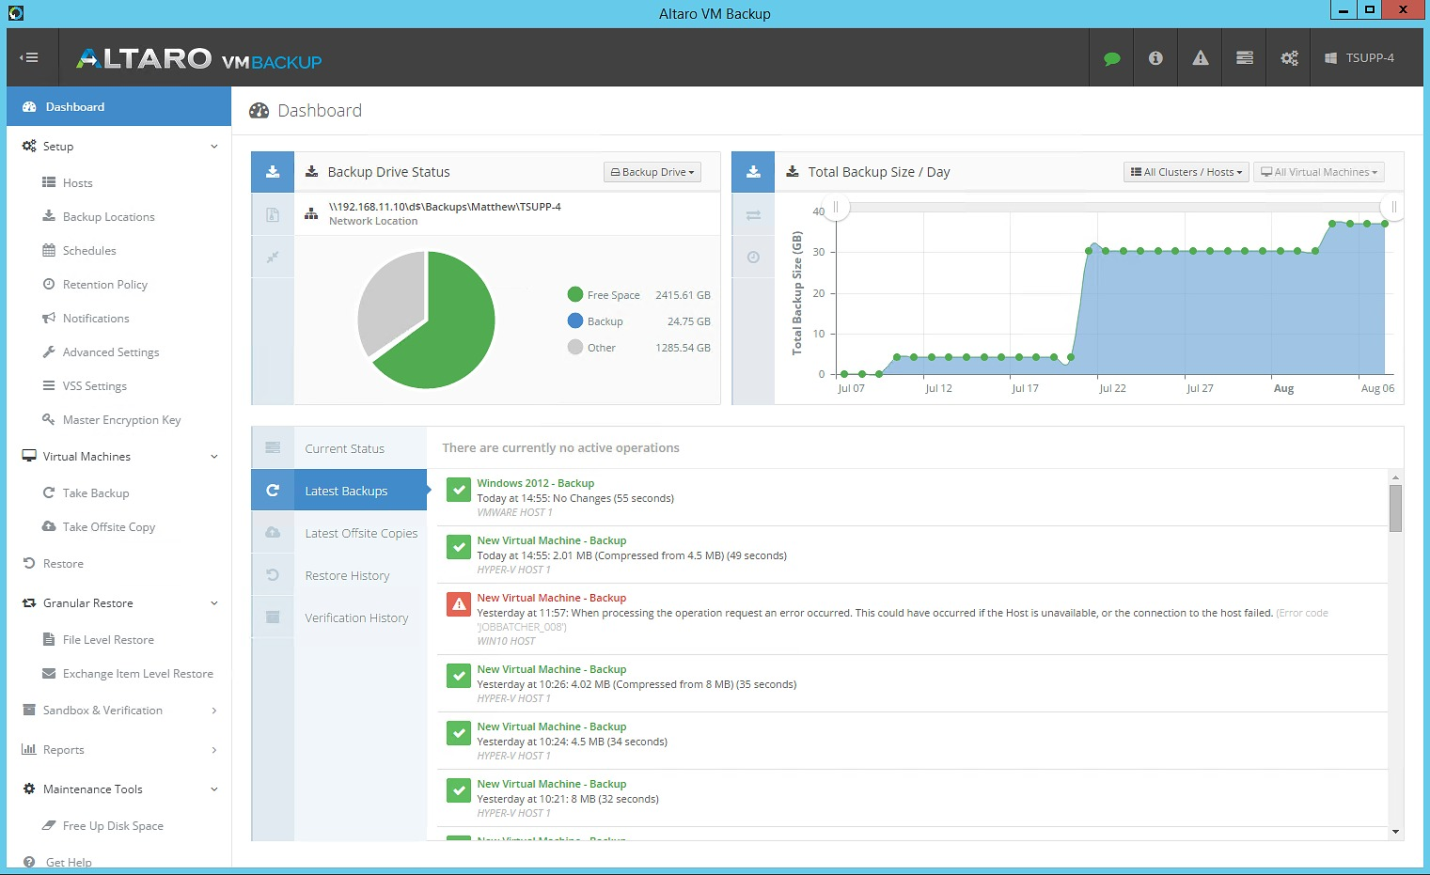
Altaro VM Backup control panel in graphic form shows all the necessary information
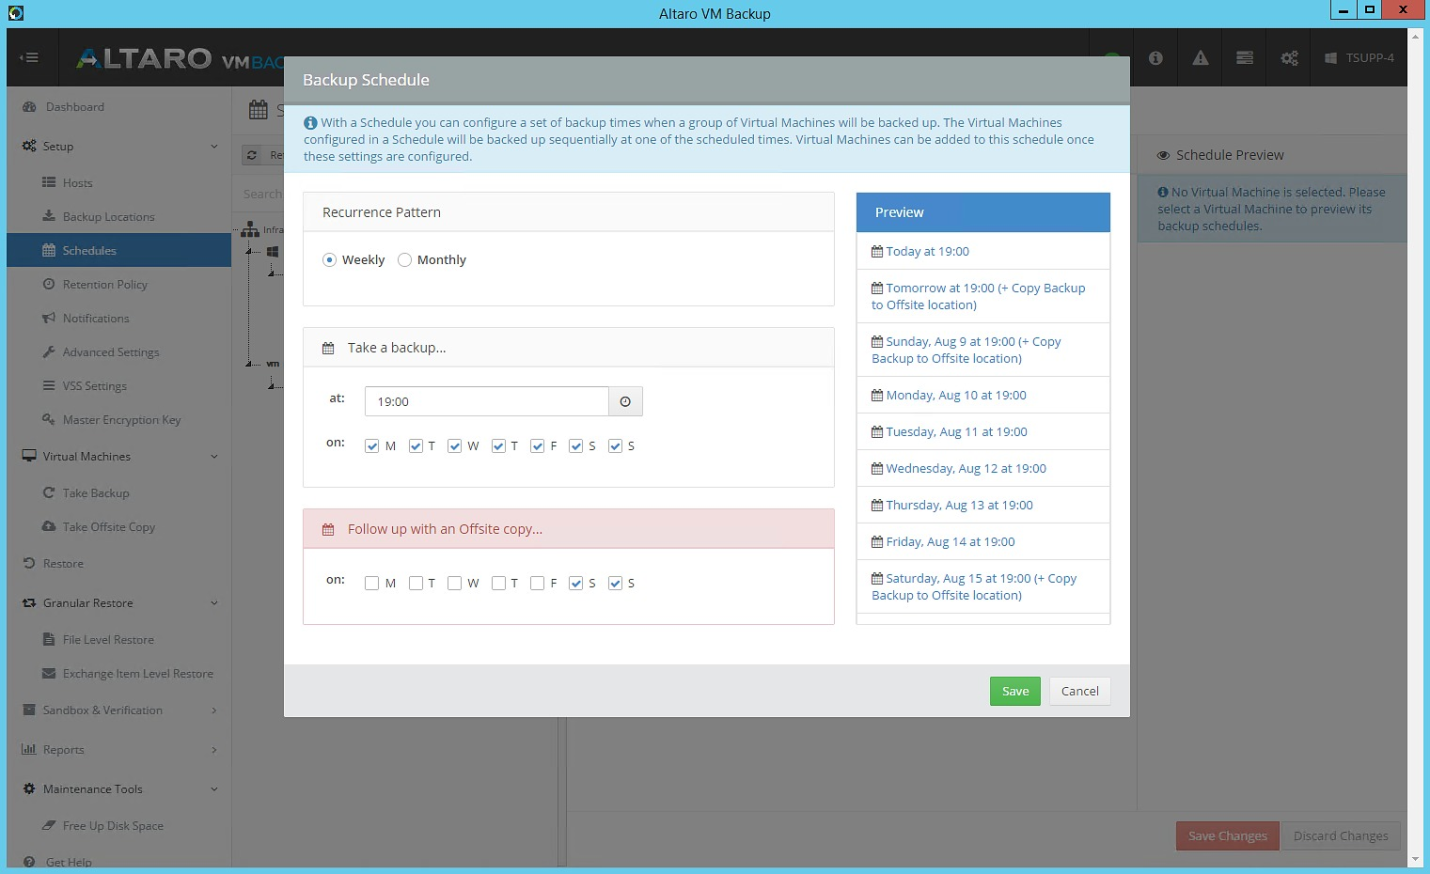
Backup Plan
What technology or VM backup product, which approach is best used in specific circumstances? What should I pay attention to first of all? There is no single answer to this question - it all depends on corporate policy, business procedures and requirements, company size and other factors. Altaro VM Backup definitely deserves to get to know him better . Give it a try!
You can download a free, fully functional version (demo, 30 days) here:
www.altaro.com/vm-backup/download.php
Post 1 - GFI LanGuard - virtual security consultant >>
Post 2 - GFI Archiver: storage for mail >>
Post 3 - GFI MailEssentials: mail is protected >>

There is still an opinion that, with all its advantages, virtualization makes backup much more difficult. Perhaps this is one of the reasons for companies to ignore the need to protect the virtual environment: according to foreign analytical agencies, backup procedures cover less than 70% of virtual servers.
In fact, everything is not so complicated. Regardless of which hypervisor you are using, such as Hyper-V or VMware, the approaches to backing up virtual machines (VMs) are the same. It can be performed at the host system level (or, as it is also called, at the hypervisor level), or at the VM level. Currently, there are many different classes of products available for backing up virtual environments. Some companies use specialized solutions designed specifically for a particular hypervisor, while others prefer universal products.
The recovery process in a virtual environment has its own specifics. Instead of restoring the entire VM image, most backup products allow you to restore a single file or group of VM files. And the backup itself can be stored in the cloud, in a remote data center. This method is becoming increasingly popular. In this case, the data is usually copied locally and then replicated to the cloud (Cloud Backup). Cloud redundancy does not solve all the problems of local protection and high availability, but it protects against crashes (DR).
New features of backup products help to restore virtual machines, applications and data more reliably and faster in the event of a failure, find the necessary balance between the acceptable time for recovering information (Recovery Time Objective, RTO), the acceptable loss of information (Recovery Point Objective, RPO) and the cost of the solution. Below we will talk about one of these solutions.
Backing up is easy
Altaro VM Backup is an easy-to-use backup solution with an intuitive interface and easy setup. More than 30 thousand companies use it for reliable storage and recovery of Hyper-V and VMware virtual machines. According to user reviews, Altaro VM Backup installs many times faster than competitive solutions and has a very convenient and intuitive interface. This software supports backup and recovery of VMs between different servers and different types of storage for backups - local (DAS), external (NAS / SAN) and cloud (Cloud Backup).

Altaro software, previously known as Altaro Hyper-V Backup, is targeted at SMB companies. That is why the developers tried to make it as simple and intuitive as possible, but at the same time possessing all the means necessary for small and medium-sized businesses. The sixth version of the product released last year supports VM backup both in Microsoft Hyper-V and in VMware vSphere, which is why it is now called Altaro VM Backup.
We list its main features:
- Hyper-V support in Windows Server 2008 R2 and later.
- Support for VMware vSphere 5.6 and later.
- Exchange Server reservation at the item level.
- ReverseDelta incremental backup technology.
- Replication of backups to another site.
- Data compression that reduces backups by about 25%.
- Encryption of backups.
- Instant file level recovery.
- Restore to the Sandbox Restore sandbox to verify the integrity of the backup and the ability to restore it.
- Support for Microsoft Exchange and SQL.
- Full support for Microsoft Cluster Shared Volumes.
- The ability to restore VMs on different systems.
- Individual, set for individual VMs, backup and storage policies.
Often, system administrators do not like backup tools, many of which have a complex user interface with many never-used options, or simply do not work and generate errors. Altaro VM Backup is not one of those: few products are so easy to install and operate. All tasks are performed through convenient procedures. And the price of Altaro VM Backup is quite attractive. Altaro VM Backup can be tested for free for 30 days . An unlimited free version is also offered, but it only supports two VMs per host system.
What's new in Altaro VM Backup 6.0?
In addition to supporting VMware, version 6.0 offers the following new features:
- Centralized configuration and management of multiple host systems.
The user interface allows you to configure backup / restore jobs for multiple hosts and manage all of these jobs. All VMs are controlled from a single console. - Parallel work with host systems to speed up backups.
Backup jobs can be run on multiple hosts at the same time, which significantly reduces backup time. - Automatically upload error reports.
Reports are generated automatically and sent to support to resolve problems. - The Altaro Console has LiveChat integrated.
You can chat with Altaro Support directly from the application in the chat.

Support options for contacting support
What does Altaro VM Backup include?
Altaro VM Backup has four key components:
- The main Altaro VM Backup application .
- Hyper-V Host Agent software agent .
- Remote management tools Altaro the Remote Management the Tools .
- Altaro Offsite Server utility for copying to another site.
Installation process
Installing Altaro VM Backup is not easy, but very simple. It is enough to run the installer, click “Next” a couple of times, and that’s it. No additional components are required. After completing the process and starting Altaro VM Backup, a connection is established with the application instance on one of the servers, for example, localhost. The port (35107) necessary for this is already registered in the interface.
The next step is to connect to
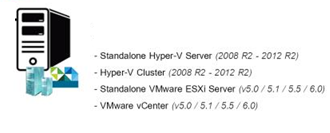
- Hyper-V host or failover cluster.
- ESXi host (if vCenter Server is unavailable)
- vCenter Server

Let's choose an ESXi host as an example. To connect, you will need a name, hostname, account and password. Ports 443 and 902 (vSphere VDDK) must be open. After the connection with the host is established, you need to choose a place for data backup - local (USB, eSATA, iSCSI) or network device. Of course, for reliability, it is preferable to store backups on removable media or on another site, for example, configure replication over a global network. The stored VM data is encrypted.

Backup storage locations

The monitoring console displays information on backup jobs, third-party backups and backup storage.
For a clearer understanding, we describe the process of installing and launching the product in steps.
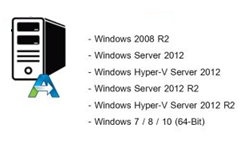
- Download and install Altaro VM Backup on a Windows computer with one of the following versions. It can be a Hyper-V host, then skip step 2.
- Add hosts (from the following) to the Altaro console.
- Choose a place to store the backup. This can be an external USB or eSATA drive, a network drive, or a SAN / NAS device.
- Optionally, for Altaro remote control, we connect via RDP to the server where the product is installed, or we install Altaro Remote Management Tools.
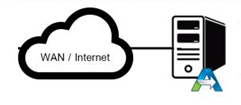
- We optionally install Altaro Offsite Server on a machine outside the local network and send backup copies via WAN / VPN / Internet there. This is in case of disaster recovery in case of major trouble.
That, in fact, is all. It usually takes about ten minutes from the start of the installation to the start of the backup process.
Initial backups can take a long time and create a load on the network. Therefore, you can simply copy data to removable media and transfer it to another site, and transfer subsequent copies over the global network - this process will no longer be so resource-intensive. This option the product supports.

Adding a new backup retention rule.
Next, you need to assign a storage location for the VM. This is done by simply dragging the VM in the graphical interface to the target storage and clicking the “Save Changes” button. It remains to create a backup. Select a VM and click on “Backup”. Now you can configure the copy schedule.
Create consistent copies of applications
Altaro supports the creation of consistent copies of applications using Microsoft VSS technology. This means that after recovering the VM, the VSS-enabled application will not be “corrupted”. To work with application logs such as Exchange Server or SQL, you need to install Altaro VM Tools. This can be done remotely using the management console.
Verify backups
How to make sure that you can really recover from a backup? This is often simply forgotten. Altaro VM Backup offers two verification methods - by checksums and by actually recovering the VM. The first, Backup Verification, allows you to simply verify the integrity of the data on the media. The second, Sandbox Restore, lets you sleep well. Both options can be planned to automate this process.

The report window shows the status of the backup, the result of verification and recovery tasks.

Setting up and scheduling Sandbox Restore
Sandbox Restore restores the VM under a temporary name. An administrator can run it and make sure it boots. This will not affect the operation of other VMs.
File recovery
There are three ways to recover files:
- Restoring an entire VM on the same or on a different host system.
- By file-level recovery.
- Exchange item-level recovery.

Restoring from Exchange at the Element Level The
second method is very simple and is performed in steps. Selected VM, virtual hard disk and files for recovery. Altaro VM Backup restores files to a special folder, after which it remains to copy them to the VM.

Altaro directly from the console, you can perform granular recovery of, for example, to restore a file or mailbox

Altaro VM Backup control panel in graphic form shows all the necessary information

Backup Plan
conclusions
What technology or VM backup product, which approach is best used in specific circumstances? What should I pay attention to first of all? There is no single answer to this question - it all depends on corporate policy, business procedures and requirements, company size and other factors. Altaro VM Backup definitely deserves to get to know him better . Give it a try!
You can download a free, fully functional version (demo, 30 days) here:
www.altaro.com/vm-backup/download.php
Post 1 - GFI LanGuard - virtual security consultant >>
Post 2 - GFI Archiver: storage for mail >>
Post 3 - GFI MailEssentials: mail is protected >>
