May 13, 2016 at 18:40
My epic history of setting site goals on Bitrix
Friends, do you like setting goals because I "love" her? For me, this business is always difficult and dreary, the Internet has almost no information about this, and the topic, in my opinion, is important. Today, my post is dedicated to setting the goals of the site on Bitrix, if I like the post, I’ll tell you about other CMS
1.1. Why do you need goals on the site?
The goals must be set up not just to look at the attendance schedule, but to understand which channel is effective and which is not.
Here is a quote from Google Help: “Goals are a great indicator of the performance of your website or application. A goal can be any action you’re interested in, called a conversion. Here are some examples of goals: buying (for an e-commerce site), completing the game level (for a mobile gaming application), sending contact information (for a site to attract customers).
Defining goals is an essential component of planning an analytical assessment. Properly selected goals allow you to get important information, such as the number of conversions and the conversion rate for the site or application. Without this information, it’s almost impossible to evaluate the effectiveness of online businesses and marketing campaigns. ” support.google.com/analytics/answer/1012040?hl=en
Set only those goals that you will really analyze and track. For example, registration, sending contact details, requesting a call back and other actions that potentially lead to a sale can be considered goals. The goal, which is triggered when the visitor views the two pages, or stays on the site for more than three minutes, is not really goals. "
1.2. What are my goals?
Main goals
- purchase of goods
- sending contact details
- call
Auxiliary purposes -
view of the product card -
view of contacts -
view of 3 pages
1.2. Nuuu ... I have counters, why do I need more goals?
Despite the fact that you have statistics counters configured, they will not be able to track everything. Services track mainly pageviews. And the tastiest thing is left behind, for example, clicks, form submissions, and other more complex events (for example, “registration on the site, confirmed by e-mail”)
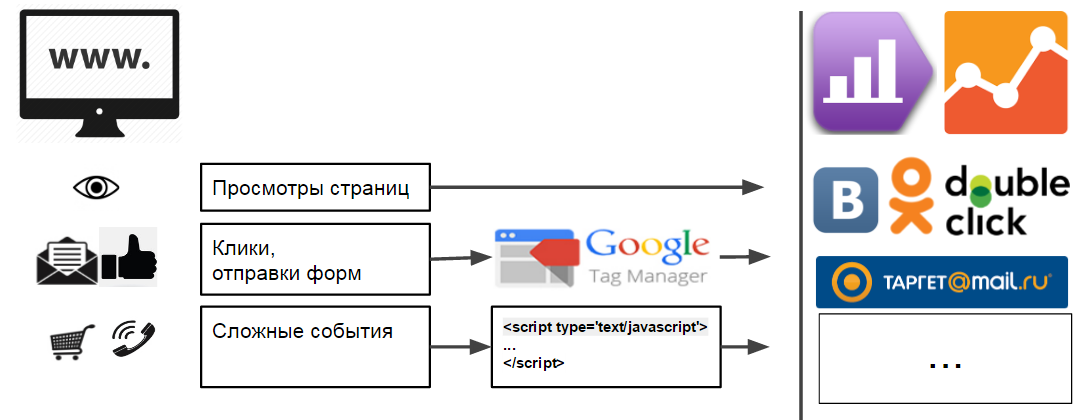
So, in the figure we see that
“page views” are immediately sent to analytics, and everything is fine here
“Clicks, form submissions” can be tracked using Google Tag Manager. In practice, it’s not always easy to set up tracking of valid form submissions.
“Complex events” is something that cannot be tracked by previous means. To track them, small java script codes are introduced into the site code in the right places, which send the necessary information to the analytics.
I want to note that for each system that needs information about the achievement of the goal, you need to insert your team in the code. And here we are in danger: after everything is already configured, debugged and verified, there is a need to send data somewhere else. And to do this, you will have to go wherever we already inserted the codes. In other words, do all the work twice.
It is in this case that Google Tag Manager comes to our aid.
1.3. Why do I need a Google Tag Manager?
Installing only one code, all the restMUST BE installed through it.
- Allows you to track clicks, clicks on links, form submission, etc.
- Allows you to create your own rules to call the right codes at the right time.
- Allows you to send data on achieving goals anywhere.
Thanks to Tag Manager, a more convenient and correct goal setting scheme emerges:
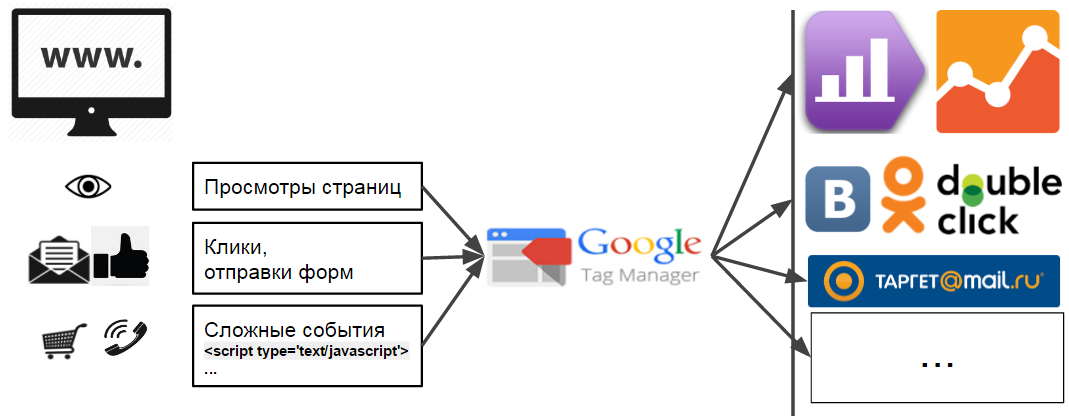
This method allows you to scale the work you have done to any systems that need data on achieving your goals.
1.3.1. How to install Google Tag Manager?
The only correct way is to install after the opening body tag and not include it in any other blocks.
Then the code will fire immediately. And all that needs to be activated at the end of the assembly of the DOM model or when the page is fully loaded can be easily configured using Tag Manager
1.3.2 rules . What is usually installed via GTM?
All third-party codes, for example:
- GA, YM counter codes
- Additional services UpToCall, Jivosite, etc.
- Retargeting codes for social networks.
and so on and so
1.4. What code should be inserted on the site to track the achievement of goals?
The commands you need to insert are very simple
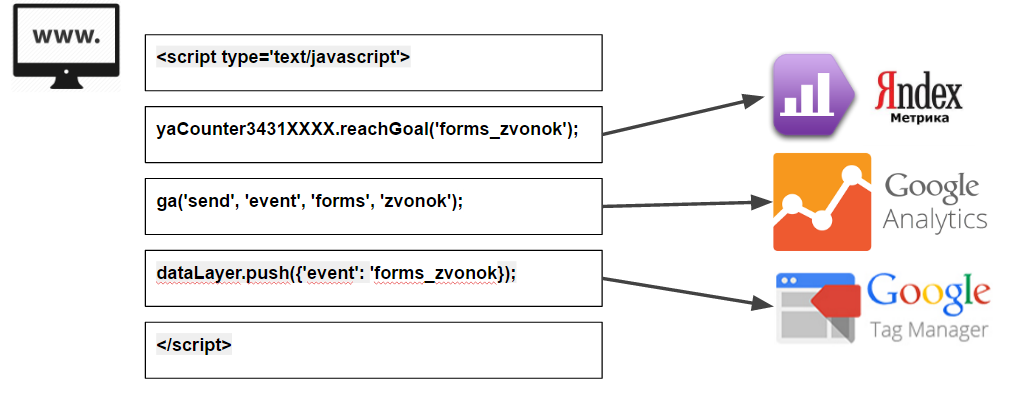
2. Setting up goals in Bitrix
Honestly, I would implement all the forms on the site through “attached services”, there would be less problems. Our site has a JotForm adverbs.ru/feedback handler and I can blindly configure all goals. On CMS, all forms are always implemented in different ways and sometimes, excuse me, in the wrong place :-) Here I will try to describe the steps in the process of setting up several goals using an example of a real project.
I must say right away that I am not a Bitrix programmer. If in my words below there will be errors in the terminology or proposed solutions, please do not throw me tomatoes, but suggest or correct me in the comments. I will be grateful :-)
2.1. Decide on a list of goals
Before you begin setting goals, you need to decide on the goals themselves.
Do not be lazy and make a list of goals with their name, description, links, screenshots and comments. I assure you in a month you will not remember what and why you did it. After several dozens of iterations, our goal file looks like this:
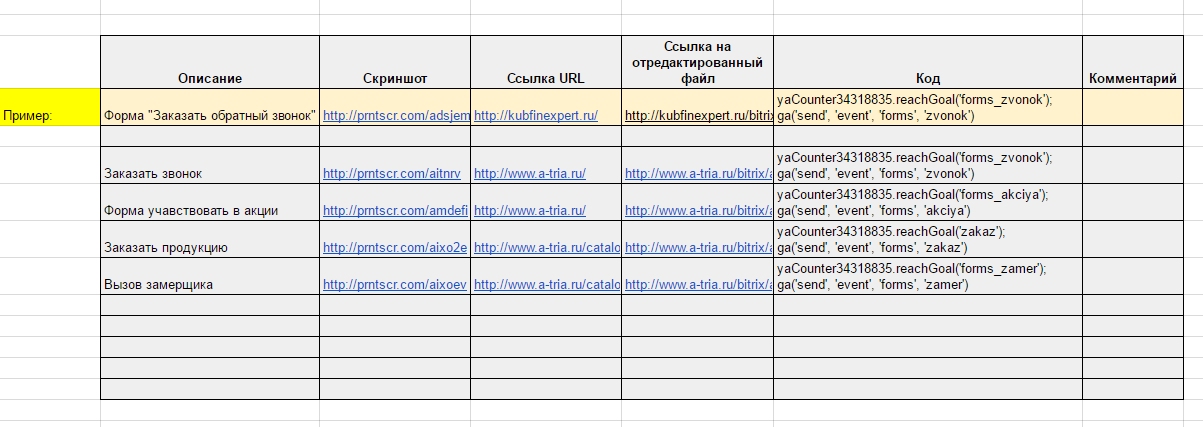
Looking ahead, I’ll say that Google Tag Manager allows you to track many different events without editing the site code. However, in practice, you still have to set many goals, adding additional codes to the source code of the site.
2.2. Where to embed code in bitrix?
On each site and in each CMS, this will have to be done in different places. If you do not understand anything in programming, then you definitely need a programmer.
Moreover, I will say that even for any site written in Bitrix, most likely you will have to insert codes in different places. And even for different forms of the same site, this will be different places, especially if several programmers conjured and shamanized the site at different times :)
So let's start, friends, to practice :-) We will analyze using the example of a “live” project a- tria.ru. The goals described in the table above are just for him. We enter the admin panel of the site.

2.3. Setting the goal “Order a call”
2.3.1. Inserting the goal code “Order a call”
The goal should not work when a button is clicked, but when the form data is sent successfully.
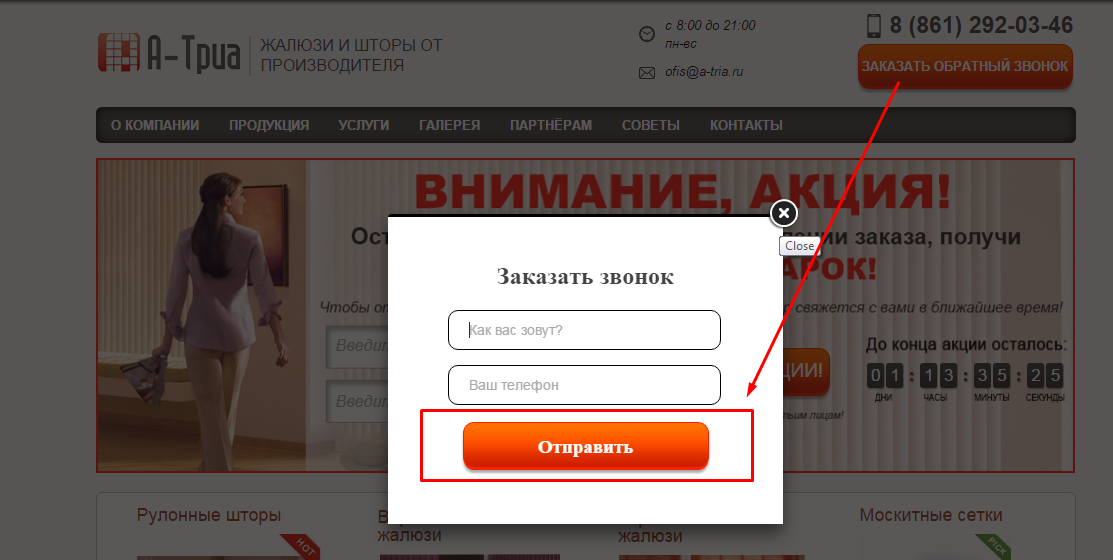
Usually, if some part of the site is a component, then when you hover over it with a mouse cursor, a pop-up menu appears. Like in the picture below.
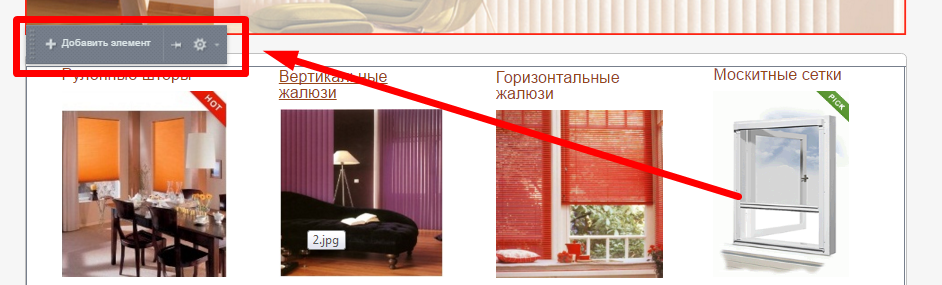
But when you hover over the call order form, nothing appears, so you can assume that the form is somehow “sewn” into the site template.
Open the site template for editing.

We find the text “Request a call back” in it.
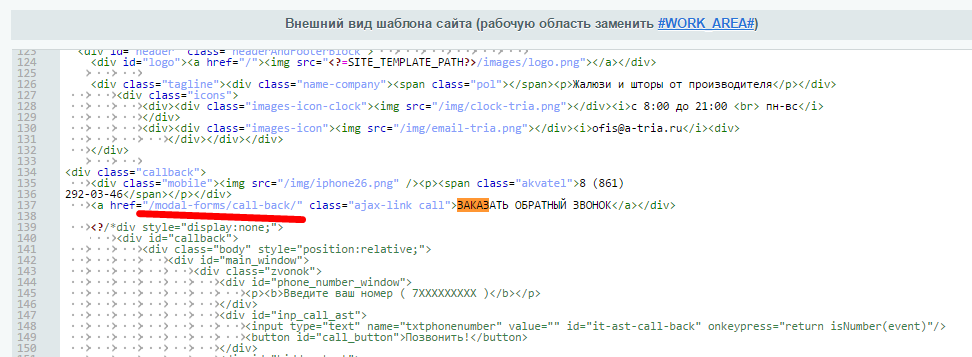
And we see that the link opens the page at the address / modal-forms / call-back /
Well, look there.
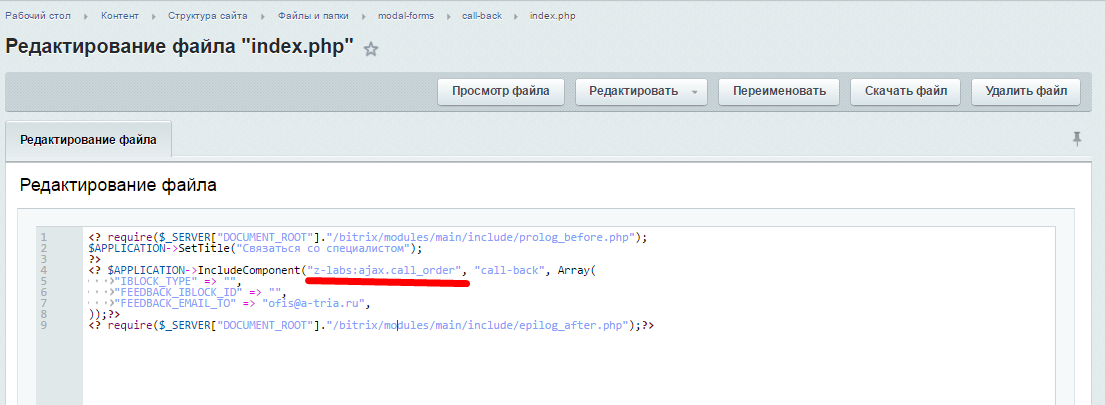
Here we see that the z-labs component is included in the template for this page: ajax.call_order
It can be found here along this path: /bitrix/components/z-labs/ajax.call_order
But what we need was found in the template for this component a little deeper, here: /bitrix/components/z-labs/ajax.call_order/ templates / call-back / template.php
After viewing the file, a place was found where a message about the successful submission of the form is displayed. Next to it, we inserted a code that sends data about the
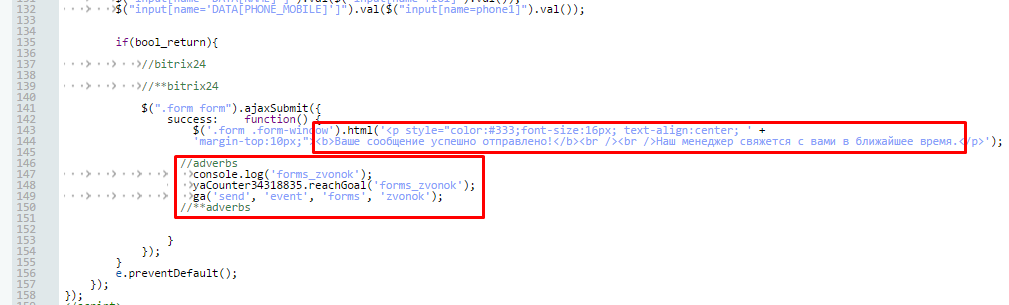
completion of the target action: yaCounterXXXXXXXX.reachGoal ('forms_zvonok'); where
XXXXXXXX is the number of your Yandex metric counter
forms_zvonok is the target identifier in your Yandex metric.
More information about transmitting information about achieving a goal to the Yandex metric: yandex.ru/support/metrika/objects/reachgoal.xml
ga ('send', 'event', 'forms', 'zvonok');
, where
'event' - of the ecent call type indicates that we send the event
'forms' - the category to the analytics ,
'zvonok' - the action for which the goals in your analytics are configured.
More information about event tracking in Google Analytics: developers.google.com/analytics/devguides/collection/analyticsjs/events?hl=en
2.3.2. Setting the goal “Order a call” in Google Analytics
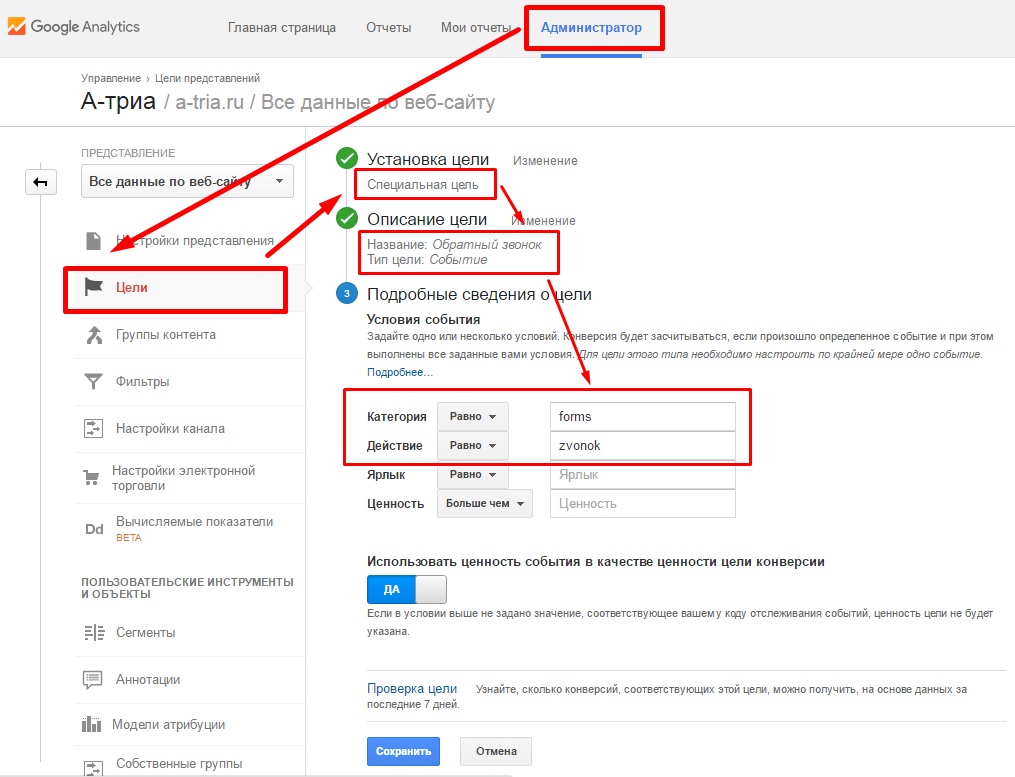
In Google Analytics, go to the tab “Admin” → “Goals”
- We indicate that the goal will be “Special”.
- We indicate the name: “Callback” and the type of target “Event”.
- Specify the details of the goal. Category “forms”, Action: “zvonok”
2.3.3. Setting the goal “Order a call” in the Yandex metric
In the Yandex metric, the process of setting the goal is no less simple. Go to the “Settings” → “Goals” section.
Specify “Name”: “Callback”, Condition type: “JavaScript event”, Target ID: “forms_zvonok”

2.4. Setting the goal “Form to participate in the action”
2.4.1. Insert the goal code “Form to participate in the action”

Edit the
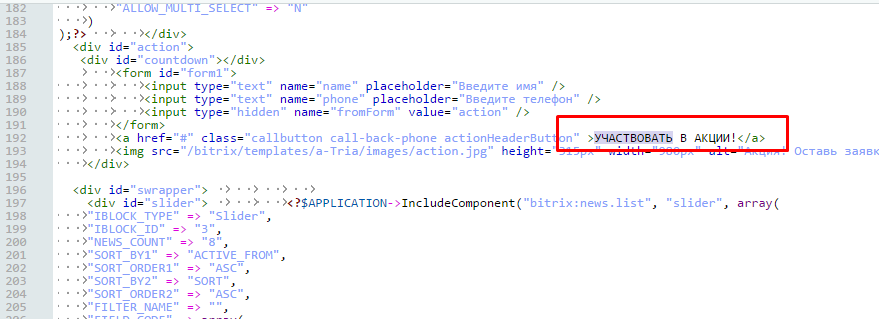
text “Participate in the action” text found, but there are no links like last time.
Perhaps the click is processed by a plug-in script. Let's see what connects to this file:
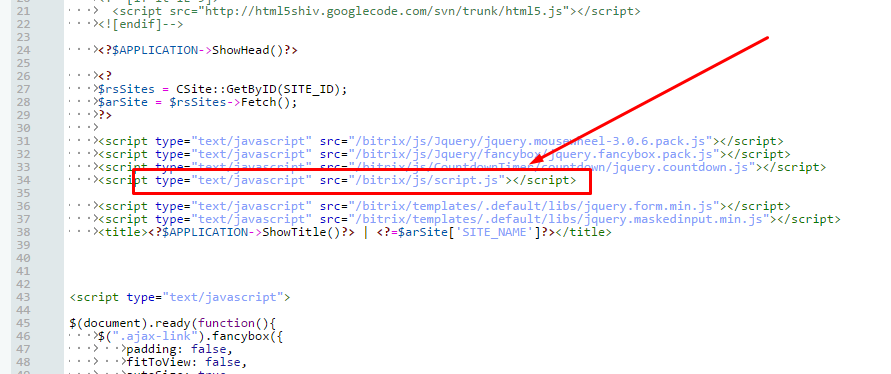
In addition to standard scripts, some script.js is connected.
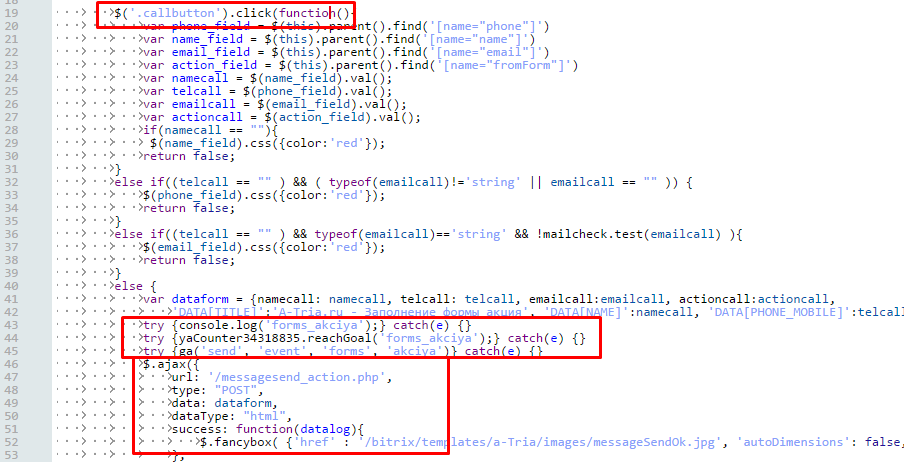
Here we find the definition of a function that will fire when a user clicks on an element with “callbutton” classes. This class is installed on the button we need.
Below we see the code responsible for sending the message.
We insert the code that sends data on achieving the goal.
2.4.2. Setting the “Form to participate in the promotion” goal in Google Analytics and Yandex metrics
Similarly, add goals to Yandex and Google. In Yandex metrics, the target identifier is “forms_akciya”, in Google analytics an event with the identifiers “forms”, “akciya”
2.5. How to understand that the code sends data?
I think that any programmer will tell you that it is impossible to write code if you do not have debugging tools. Not everyone knows about this, but there are debugging tools here.
2.5.1. Debugging in Yandex.Metric
In order to see if data is being sent to Yandex.Metrica, you need to enter the address of the site on which you set goals and add a debugging parameter in the address bar of the browser: www.site.ru/?_ym_debug=1
Open the code inspector , “Console” tab. When you perform a targeted action on the site, you will see messages that the data is being sent.

2.5.2. Debugging in Google Analytics
Google Analytics has a slightly different way to check if data is being sent to analytics. To do this, there are reports in “real time” -> “Events”
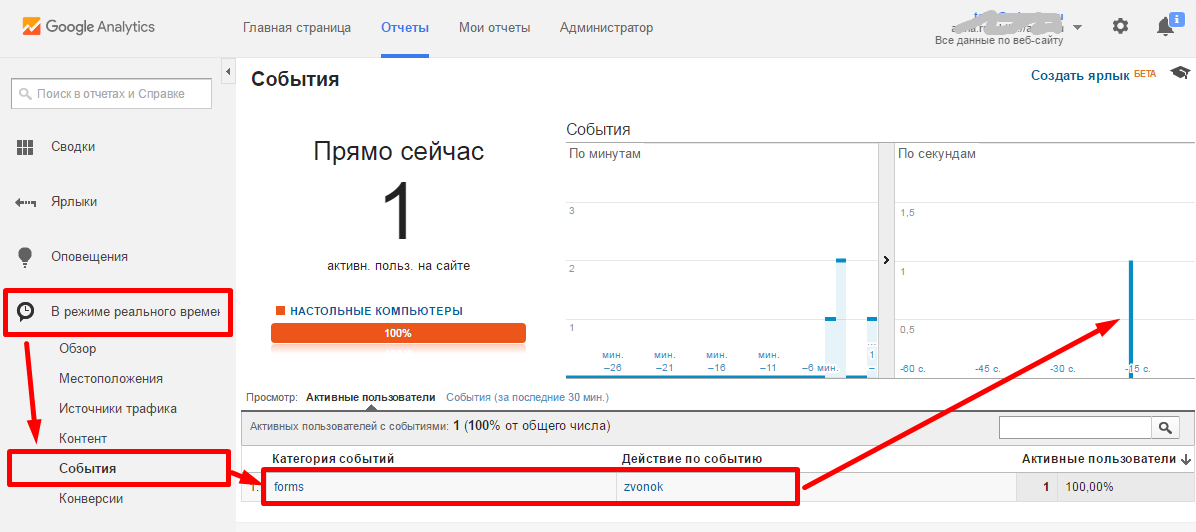
When viewing this report, we will almost immediately see a visual display when the target action on the site is completed. If it is not, then something is wrong.
2.5.3. Debugging in Google Tag Manager
Incredible, but the fact is that GTM also has a debugging system, which is pretty good.
In the interface next to the “Publish” button, click on the arrow. In the menu that opens, select “Preview and debug.”

After switching to debug mode, in the same browser you need to open the site for which you are setting goals. The GTM debug panel opens in the same window.
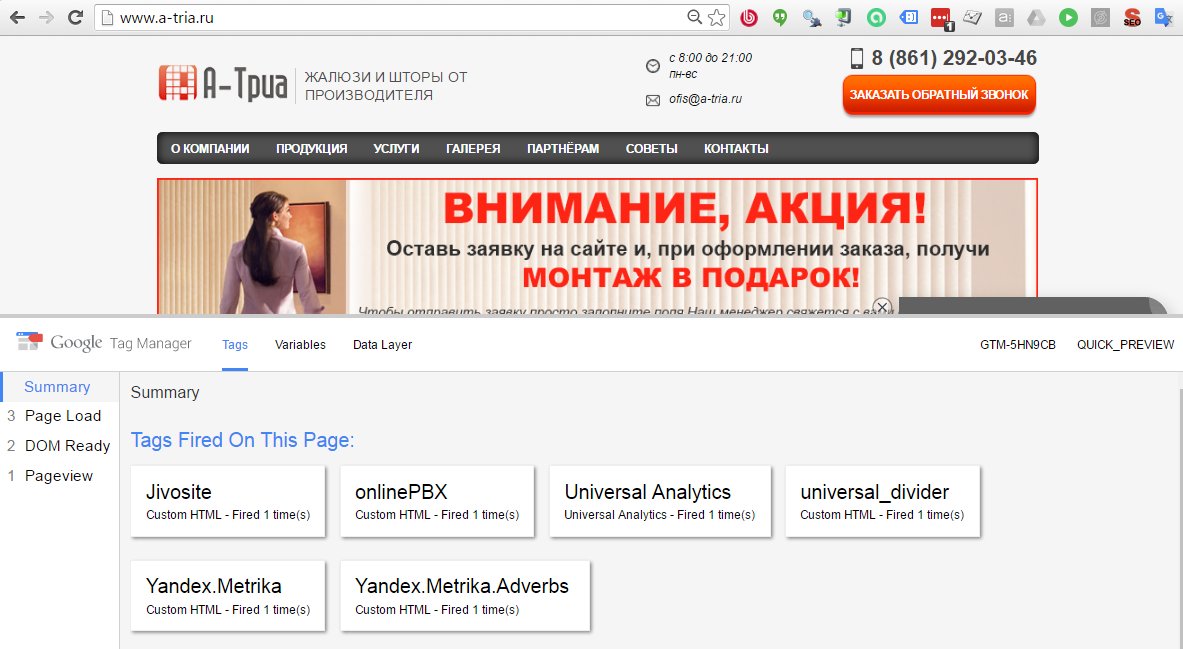
Here you will see all the events that Google Tag Manager captures, as well as which tags were activated for these actions.
3. Instead of an afterword ...
We figured out the general correct goal setting scheme and looked at the steps for setting up two goals for a real project.
In the end, I want to give some tips:
- Do everything gradually, after each step, checking that everything is done correctly and works.
- Identifiers for Google and Yandex do the same, with the same spelling. If the identifier for Yandex is “forms_zvonok”, then for Google the identifiers should be “forms”, “zvonok”, otherwise this will lead to confusion.
- Give understandable names for purposes, i.e. the names should be such that any person looking at them can tell you what these goals are. For example, if the target is triggered when sending the “order a call” form, then let the name be “Form - Order a call”. If the target is triggered when you click on the “Order Call” button, and it doesn’t matter whether he sent the form or not, then name the target “Button - Order a Call”. Or come up with any other clear naming principle.
- Use only latin small letters and underscore in the name of identifiers. So there will be less chances to make a mistake in writing and you will not spend an extra couple of hours searching for bugs.
- Be sure to write down everything that you have done, for example, in the goal setting table
- At first it’s better to do less, but that it works clearly, than a lot, but it works every other time and it’s not clear how.
PS: I will be grateful for any comments :-)
1.1. Why do you need goals on the site?
The goals must be set up not just to look at the attendance schedule, but to understand which channel is effective and which is not.
Here is a quote from Google Help: “Goals are a great indicator of the performance of your website or application. A goal can be any action you’re interested in, called a conversion. Here are some examples of goals: buying (for an e-commerce site), completing the game level (for a mobile gaming application), sending contact information (for a site to attract customers).
Defining goals is an essential component of planning an analytical assessment. Properly selected goals allow you to get important information, such as the number of conversions and the conversion rate for the site or application. Without this information, it’s almost impossible to evaluate the effectiveness of online businesses and marketing campaigns. ” support.google.com/analytics/answer/1012040?hl=en
Set only those goals that you will really analyze and track. For example, registration, sending contact details, requesting a call back and other actions that potentially lead to a sale can be considered goals. The goal, which is triggered when the visitor views the two pages, or stays on the site for more than three minutes, is not really goals. "
1.2. What are my goals?
Main goals
- purchase of goods
- sending contact details
- call
Auxiliary purposes -
view of the product card -
view of contacts -
view of 3 pages
1.2. Nuuu ... I have counters, why do I need more goals?
Despite the fact that you have statistics counters configured, they will not be able to track everything. Services track mainly pageviews. And the tastiest thing is left behind, for example, clicks, form submissions, and other more complex events (for example, “registration on the site, confirmed by e-mail”)
So, in the figure we see that
“page views” are immediately sent to analytics, and everything is fine here
“Clicks, form submissions” can be tracked using Google Tag Manager. In practice, it’s not always easy to set up tracking of valid form submissions.
“Complex events” is something that cannot be tracked by previous means. To track them, small java script codes are introduced into the site code in the right places, which send the necessary information to the analytics.
I want to note that for each system that needs information about the achievement of the goal, you need to insert your team in the code. And here we are in danger: after everything is already configured, debugged and verified, there is a need to send data somewhere else. And to do this, you will have to go wherever we already inserted the codes. In other words, do all the work twice.
It is in this case that Google Tag Manager comes to our aid.
1.3. Why do I need a Google Tag Manager?
Installing only one code, all the rest
- Allows you to track clicks, clicks on links, form submission, etc.
- Allows you to create your own rules to call the right codes at the right time.
- Allows you to send data on achieving goals anywhere.
Thanks to Tag Manager, a more convenient and correct goal setting scheme emerges:
This method allows you to scale the work you have done to any systems that need data on achieving your goals.
1.3.1. How to install Google Tag Manager?
The only correct way is to install after the opening body tag and not include it in any other blocks.
Then the code will fire immediately. And all that needs to be activated at the end of the assembly of the DOM model or when the page is fully loaded can be easily configured using Tag Manager
1.3.2 rules . What is usually installed via GTM?
All third-party codes, for example:
- GA, YM counter codes
- Additional services UpToCall, Jivosite, etc.
- Retargeting codes for social networks.
and so on and so
1.4. What code should be inserted on the site to track the achievement of goals?
The commands you need to insert are very simple
2. Setting up goals in Bitrix
Honestly, I would implement all the forms on the site through “attached services”, there would be less problems. Our site has a JotForm adverbs.ru/feedback handler and I can blindly configure all goals. On CMS, all forms are always implemented in different ways and sometimes, excuse me, in the wrong place :-) Here I will try to describe the steps in the process of setting up several goals using an example of a real project.
I must say right away that I am not a Bitrix programmer. If in my words below there will be errors in the terminology or proposed solutions, please do not throw me tomatoes, but suggest or correct me in the comments. I will be grateful :-)
2.1. Decide on a list of goals
Before you begin setting goals, you need to decide on the goals themselves.
Do not be lazy and make a list of goals with their name, description, links, screenshots and comments. I assure you in a month you will not remember what and why you did it. After several dozens of iterations, our goal file looks like this:
Looking ahead, I’ll say that Google Tag Manager allows you to track many different events without editing the site code. However, in practice, you still have to set many goals, adding additional codes to the source code of the site.
2.2. Where to embed code in bitrix?
On each site and in each CMS, this will have to be done in different places. If you do not understand anything in programming, then you definitely need a programmer.
Moreover, I will say that even for any site written in Bitrix, most likely you will have to insert codes in different places. And even for different forms of the same site, this will be different places, especially if several programmers conjured and shamanized the site at different times :)
So let's start, friends, to practice :-) We will analyze using the example of a “live” project a- tria.ru. The goals described in the table above are just for him. We enter the admin panel of the site.
2.3. Setting the goal “Order a call”
2.3.1. Inserting the goal code “Order a call”
The goal should not work when a button is clicked, but when the form data is sent successfully.
Usually, if some part of the site is a component, then when you hover over it with a mouse cursor, a pop-up menu appears. Like in the picture below.
But when you hover over the call order form, nothing appears, so you can assume that the form is somehow “sewn” into the site template.
Open the site template for editing.
We find the text “Request a call back” in it.
And we see that the link opens the page at the address / modal-forms / call-back /
Well, look there.
Here we see that the z-labs component is included in the template for this page: ajax.call_order
It can be found here along this path: /bitrix/components/z-labs/ajax.call_order
But what we need was found in the template for this component a little deeper, here: /bitrix/components/z-labs/ajax.call_order/ templates / call-back / template.php
After viewing the file, a place was found where a message about the successful submission of the form is displayed. Next to it, we inserted a code that sends data about the
completion of the target action: yaCounterXXXXXXXX.reachGoal ('forms_zvonok'); where
XXXXXXXX is the number of your Yandex metric counter
forms_zvonok is the target identifier in your Yandex metric.
More information about transmitting information about achieving a goal to the Yandex metric: yandex.ru/support/metrika/objects/reachgoal.xml
ga ('send', 'event', 'forms', 'zvonok');
, where
'event' - of the ecent call type indicates that we send the event
'forms' - the category to the analytics ,
'zvonok' - the action for which the goals in your analytics are configured.
More information about event tracking in Google Analytics: developers.google.com/analytics/devguides/collection/analyticsjs/events?hl=en
2.3.2. Setting the goal “Order a call” in Google Analytics
In Google Analytics, go to the tab “Admin” → “Goals”
- We indicate that the goal will be “Special”.
- We indicate the name: “Callback” and the type of target “Event”.
- Specify the details of the goal. Category “forms”, Action: “zvonok”
2.3.3. Setting the goal “Order a call” in the Yandex metric
In the Yandex metric, the process of setting the goal is no less simple. Go to the “Settings” → “Goals” section.
Specify “Name”: “Callback”, Condition type: “JavaScript event”, Target ID: “forms_zvonok”
2.4. Setting the goal “Form to participate in the action”
2.4.1. Insert the goal code “Form to participate in the action”
Edit the
text “Participate in the action” text found, but there are no links like last time.
Perhaps the click is processed by a plug-in script. Let's see what connects to this file:
In addition to standard scripts, some script.js is connected.
Here we find the definition of a function that will fire when a user clicks on an element with “callbutton” classes. This class is installed on the button we need.
Below we see the code responsible for sending the message.
We insert the code that sends data on achieving the goal.
2.4.2. Setting the “Form to participate in the promotion” goal in Google Analytics and Yandex metrics
Similarly, add goals to Yandex and Google. In Yandex metrics, the target identifier is “forms_akciya”, in Google analytics an event with the identifiers “forms”, “akciya”
2.5. How to understand that the code sends data?
I think that any programmer will tell you that it is impossible to write code if you do not have debugging tools. Not everyone knows about this, but there are debugging tools here.
2.5.1. Debugging in Yandex.Metric
In order to see if data is being sent to Yandex.Metrica, you need to enter the address of the site on which you set goals and add a debugging parameter in the address bar of the browser: www.site.ru/?_ym_debug=1
Open the code inspector , “Console” tab. When you perform a targeted action on the site, you will see messages that the data is being sent.
2.5.2. Debugging in Google Analytics
Google Analytics has a slightly different way to check if data is being sent to analytics. To do this, there are reports in “real time” -> “Events”
When viewing this report, we will almost immediately see a visual display when the target action on the site is completed. If it is not, then something is wrong.
2.5.3. Debugging in Google Tag Manager
Incredible, but the fact is that GTM also has a debugging system, which is pretty good.
In the interface next to the “Publish” button, click on the arrow. In the menu that opens, select “Preview and debug.”
After switching to debug mode, in the same browser you need to open the site for which you are setting goals. The GTM debug panel opens in the same window.
Here you will see all the events that Google Tag Manager captures, as well as which tags were activated for these actions.
3. Instead of an afterword ...
We figured out the general correct goal setting scheme and looked at the steps for setting up two goals for a real project.
In the end, I want to give some tips:
- Do everything gradually, after each step, checking that everything is done correctly and works.
- Identifiers for Google and Yandex do the same, with the same spelling. If the identifier for Yandex is “forms_zvonok”, then for Google the identifiers should be “forms”, “zvonok”, otherwise this will lead to confusion.
- Give understandable names for purposes, i.e. the names should be such that any person looking at them can tell you what these goals are. For example, if the target is triggered when sending the “order a call” form, then let the name be “Form - Order a call”. If the target is triggered when you click on the “Order Call” button, and it doesn’t matter whether he sent the form or not, then name the target “Button - Order a Call”. Or come up with any other clear naming principle.
- Use only latin small letters and underscore in the name of identifiers. So there will be less chances to make a mistake in writing and you will not spend an extra couple of hours searching for bugs.
- Be sure to write down everything that you have done, for example, in the goal setting table
- At first it’s better to do less, but that it works clearly, than a lot, but it works every other time and it’s not clear how.
PS: I will be grateful for any comments :-)