Julia. Report Generators and Documentation
- Tutorial

One of the most pressing problems at all times is the problem of preparing reports. Since Julia is a language whose users are directly connected with the tasks of data analysis, the preparation of articles and beautiful presentations with the results of calculations and reports, this topic simply cannot be ignored.
Initially, this article planned a set of recipes for generating reports, but next to the reports is the topic of documentation, with which report generators have many intersections. Therefore, it includes tools by the criterion of the possibility of embedding an executable code on Julia into a template with some markup. Finally, we note that the review includes report generators, both implemented on Julia itself, and tools written in other programming languages. And, of course, some key points of the Julia language itself were not ignored, without which it may not be clear in what cases and what means should be used.
Jupyter notebook
This tool, perhaps, should be attributed to the most popular among those who are engaged in data analysis. Due to the ability to connect various computational cores, it is popular with researchers and mathematicians who are used to their specific programming languages, one of which is Julia. The corresponding modules for the Julia language are implemented for Jupyter Notebook in full. And that is why Notebook is mentioned here.
The installation process of Jupyter Notebook is not complicated. See https://github.com/JuliaLang/IJulia.jl for the order. If Jupyter Notebook is already installed, you just need to install the Ijulia package and register the corresponding computational kernel.
Since the Jupyter Notebook product is sufficiently well known not to paint it in detail, we only mention a couple of points. Notepad (we will use notepad terminology) in Jupyter Notebook consists of blocks, each of which can contain either code or markup in its various forms (for example, Markdown). The result of processing is either visualization of the markup (text, formulas, etc.), or the result of the last operation. If at the end of the line with the code is a semicolon, the result will not be displayed.
Examples Notepad before execution is shown in the following figure:

The result of its execution is shown in the following figure.
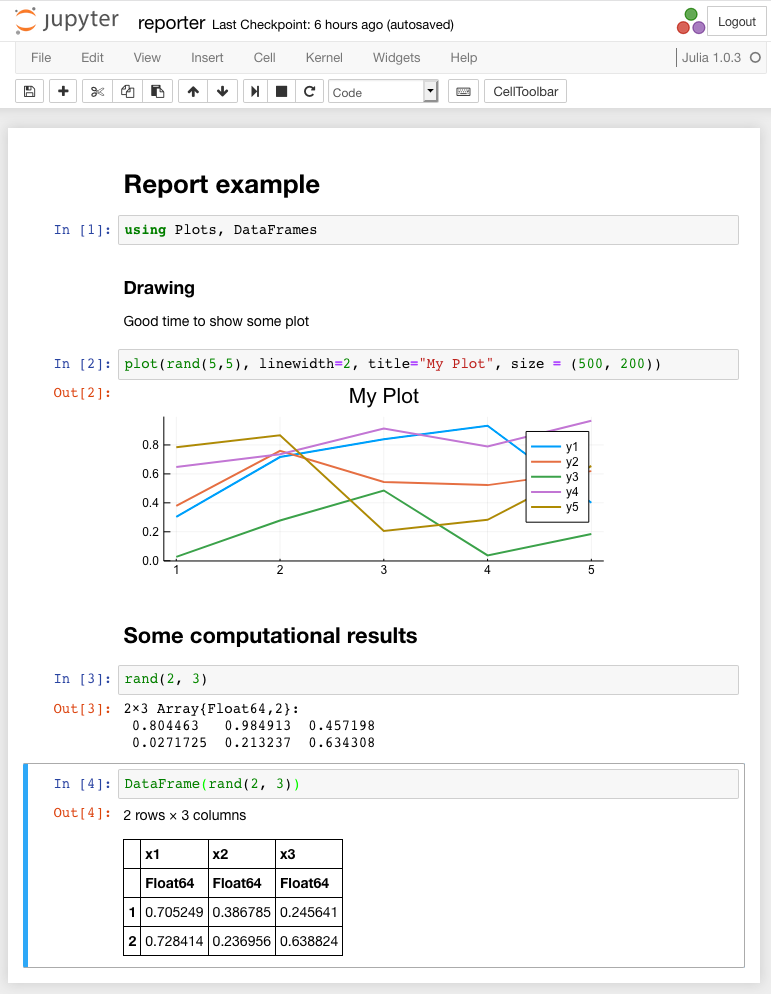
Notepad contains graphics and some text. Note that to display the matrix, it is possible to use a type DataFramefor which the result is displayed in the form of an html-table with explicit borders and a scroller, if needed.
Jupyter notebook can export the current notepad to a file in html format. With installed conversion tools, it can convert to pdf.
To build reports on a certain schedule, you can use the module nbconvertand the following command, called in the background on a schedule:jupyter nbconvert --to html --execute julia_filename.ipynb
When performing lengthy calculations, it is advisable to add an option indicating the timeout - --ExecutePreprocessor.timeout=180
An html report formed from this file will appear in the current directory. The option --executehere means a forced start of conversion.
For a complete set of module options, nbconvertsee
https://nbconvert.readthedocs.io/en/latest/usage.html
The result of the conversion to html is almost completely consistent with the previous figure, except that there is no menu bar and buttons.
Jupytext
Quite an interesting utility that allows you to convert already created ipynb notes into Markdown text or Julia code.
We can convert the previously considered example using the commandjupytext --to julia julia_filename.ipynb
As a result, we get a file julia_filename.jlwith a code for Julia and a special markup in the form of comments.
# ---
# jupyter:
#   jupytext:
#     text_representation:
#       extension: .jl
#       format_name: light
#       format_version: '1.3'
#       jupytext_version: 0.8.6
#   kernelspec:
#     display_name: Julia 1.0.3
#     language: julia
#     name: julia-1.0
# ---
# # Report example
using Plots, DataFrames
# ### Drawing
# Good time to show some plot
plot(rand(5,5), linewidth=2, title="My Plot", size = (500, 200))
# ## Some computational results
rand(2, 3)
DataFrame(rand(2, 3))
Note block delimiters are just a double line feed.
We can do the inverse transform using the command:jupytext --to notebook julia_filename.jl
As a result, an ipynb file will be generated, which, in turn, can be processed and converted into pdf or html.
See https://github.com/mwouts/jupytext for details.
A common drawback of jupytext and jupyter notebook is that the “beautiful” report is limited by the capabilities of these tools.
HTML self-generation
If for some reason we believe that Jupyter Notebook is too heavy a product, requiring the installation of numerous third-party packages that are not needed for Julia, or not flexible enough to build the required report form, then an alternative way is to generate the HTML page manually. However, here you have to immerse yourself in the features of image formation.
For Julia, the typical way to output something to the output stream is to use a function Base.write, and for decorating it Base.show(io, mime, x). Moreover, for various requested mime-output methods there can be various display options. For example, DataFramewhen outputting as text is displayed in a pseudo-table.
julia> show(stdout, MIME"text/plain"(), DataFrame(rand(3, 2)))
3×2 DataFrame
│ Row │ x1       │ x2        │
│     │ Float64  │ Float64   │
├─────┼──────────┼───────────┤
│ 1   │ 0.321698 │ 0.939474  │
│ 2   │ 0.933878 │ 0.0745969 │
│ 3   │ 0.497315 │ 0.0167594 │
If, however, mimeis specified as text/html, then the result is HTML markup.
julia> show(stdout, MIME"text/html"(), DataFrame(rand(3, 2)))
<table class="data-frame">
  <thead>
    <tr><th></th><th>x1</th><th>x2</th></tr>
    <tr><th></th><th>Float64</th><th>Float64</th></tr>
  </thead>
  <tbody><p>3 rows × 2 columns</p>
    <tr><th>1</th><td>0.640151</td><td>0.219299</td></tr>
    <tr><th>2</th><td>0.463402</td><td>0.764952</td></tr>
    <tr><th>3</th><td>0.806543</td><td>0.300902</td></tr>
  </tbody>
</table>
That is, using the function methods showdefined for the corresponding data type (third argument) and the corresponding output format, you can ensure the formation of the file in any desired data format.
The situation with images is more complicated. If we need to create a single html file, the image must be embedded in the page code.
Consider an example in which this is implemented. The output to the file will be performed by the function Base.writefor which we define the appropriate methods. So, the code:
#!/usr/bin/env julia
using Plots
using Base64
using DataFrames
# сформируем изображение и запомним его в переменной
p = plot(rand(5,5), linewidth=2,
         title="My Plot", size = (500, 200))
# распечатаем тип, чтобы видеть, кто формирует изображение
@show typeof(p)  # => typeof(p) = Plots.Plot{Plots.GRBackend}
# Определим три абстрактных типа, чтобы сделать 3 разных
#     метода функции преобразования изображений
abstract type Png end
abstract type Svg end
abstract type Svg2 end
# Функция Base.write используется для записи в поток
# Определим свои методы этой функции с разными типами
# Первый вариант — выводим растровое изображение, перекодировав
#  его в Base64-формат.
#  Используем HTML разметку  img src="data:image/png;base64,..."
function Base.write(file::IO, ::Type{Png}, p::Plots.Plot)
  local io = IOBuffer()
  local iob64_encode = Base64EncodePipe(io);
  show(iob64_encode, MIME"image/png"(), p)
  close(iob64_encode);
  write(file,
        string("<img src=\"data:image/png;base64, ",
               String(take!(io)),
               "\" alt=\"fig.png\"/>\n"))
end
# Два метода для вывода Svg
function Base.write(file::IO, ::Type{Svg}, p::Plots.Plot)
  local io = IOBuffer()
  show(io, MIME"image/svg+xml"(), p)
  write(file,
        replace(String(take!(io)),
                r"<\?xml.*\?>" => ""  ))
end
# выводим в поток XML-документ без изменений, содержащий SVG
Base.write(file::IO, ::Type{Svg2}, p::Plots.Plot) =
    show(file, MIME"image/svg+xml"(), p)
# Определим метод функции для DataFrame
Base.write(file::IO, df::DataFrame) =
    show(file, MIME"text/html"(), df)
# Пишем файл out.html простейший каркас HTML
open("out.html", "w") do file
  write(file, """
<!DOCTYPE html>
<html>
  <head><title>Test report</title></head>
  <body>
   <h1>Test html</h1>
  """)
  write(file, Png, p)
  write(file, "<br/>")
  write(file, Svg, p)
  write(file, "<br/>")
  write(file, Svg2, p)
  write(file, DataFrame(rand(2, 3)))
  write(file, """
  </body>
</html>
  """)
end
To generate images, the default engine is used Plots.GRBackend, which can perform raster or vector image output. Depending on what type is specified in the mimefunction argument show, the corresponding result is formed. MIME"image/png"()forms the image in a format png. MIME"image/svg+xml"()leads to svg-image generation. However, in the second case, you should pay attention to the fact that a completely independent xml-document is being formed, which can be written as a separate file. At the same time, our goal is to insert an image into an HTML page, which in HTML5 can be done by simply inserting SVG markup. That is why in the methodBase.write(file::IO, ::Type{Svg}, p::Plots.Plot)the xml header is cut, which, otherwise, will violate the structure of the HTML document. Although most browsers can correctly display an image even in this case.
With regards to the method for raster images Base.write(file::IO, ::Type{Png}, p::Plots.Plot), the introduction feature here is that we can insert binary data into HTML only in Base64 format. We do this with the help of the construction <img src="data:image/png;base64,"/>. And for transcoding use Base64EncodePipe.
The method Base.write(file::IO, df::DataFrame)provides an output in the format of the html-table of the object DataFrame.
The final page looks like this:
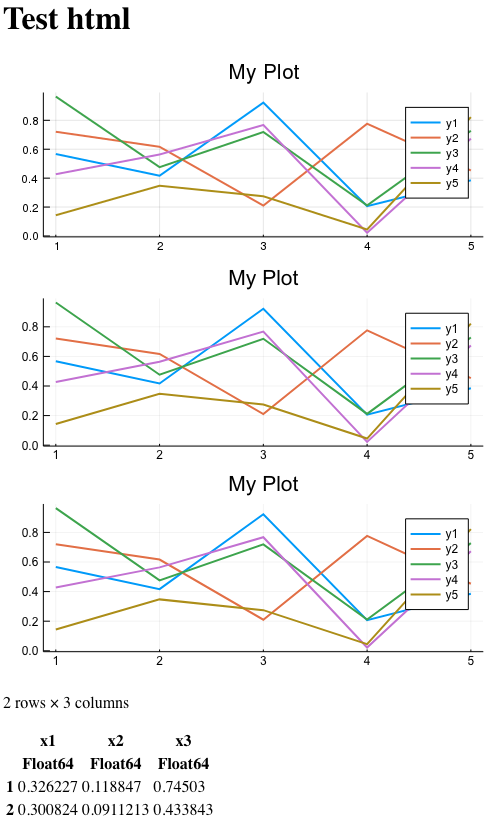
In the image, all three pictures look about the same, but remember that one of them is incorrectly inserted from the HTML point of view (extra xml header). One is raster, which means it cannot be increased without loss of detail. And only one of them is inserted as a valid svg fragment inside the HTML markup. And it can also be easily scaled without loss of detail.
Naturally, the page was very simple. But any visual improvements are possible with CSS.
This way of generating reports is useful, for example, when the number of output tables is determined by real data, and not by a template. For example, you need to group data by some field. And for each group to form separate blocks. Since when forming the page, the result is determined by the number of calls Base.write, it is obvious that there are no problems to wrap the necessary block in a cycle, make the output dependent on data, etc.
Code example:
using DataFrames
# Химические элементы и их аггрегатное состояние
ptable = DataFrame(
    Symbol = ["H",  "He", "C",    "O",  "Fe"  ],
    Room   = [:Gas, :Gas, :Solid, :Gas, :Solid]
)
res = groupby(ptable, [:Room])
# А теперь выведем группы раздельно
open("out2.html", "w") do f
  for df in (groupby(ptable, [:Room]))
    write(f, "<h2>$(df[1, :Room])</h2>\n")
    show(f, MIME"text/html"(), DataFrame(df))
    write(f, "\n")
  end
end
The result of this script is a fragment of the HTML page.
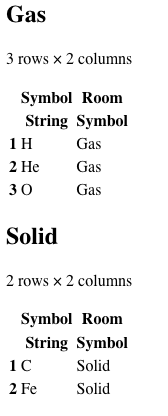
Please note that anything that does not require decorating / formatting is output directly through the function Base.write. At the same time, everything that requires conversion is output via Base.show.
Weave.jl
Weave is a science report generator that is implemented on Julia. Uses ideas from Pweave, Knitr, rmarkdown, Sweave generators. Its main task is to export the original markup in any of the proposed languages (Noweb, Markdown, script format) to LaTex, Pandoc, Github markdown, MultiMarkdown, Asciidoc, reStructuredText markup. And, even in iJulia Notebooks and back. In part of the latter, it looks like Jupytext.
That is, Weave is a tool that allows you to write templates that contain Julia-code in different markup languages, and on the output to have markup in another language (but already with the results of Julia-code execution). And this is a very useful tool for researchers. For example, you can prepare an article on Latex, which will have inserts on Julia with automatic calculation of the result and its substitution. Weave will generate a file for the final article.
There is support for the Atom editor with the appropriate plugin https://atom.io/packages/language-weave . This allows you to develop and debug Julia-embedded scripts on the markup, and then generate the target file.
The basic principle in Weave, as already mentioned, is the parsing of a template containing markup with text (formulas, etc.) and pasting the Julia code. The result of the code can be displayed in the final report. The output of text, code, output of results, the output of graphs - all this can be individually configured.
To process the templates, you need to run an external script that will collect everything into a single document and convert it to the desired output format. That is, templates are separate, handlers are separate.
An example of such a processing script:
# Обработать файлы и сгенерировать отчёты:
# Markdown
weave("w_example.jmd",
      doctype="pandoc"
      out_path=:pwd)
# HTML
weave("w_example.jmd",
      out_path=:pwd,
      doctype = "md2html")
# pdf
weave("w_example.jmd",
      out_path=:pwd,
      doctype = "md2pdf")
jmd file names are Julia Markdown.
Take the same example that we used in the previous tools. However, we’ll insert a title with author information that Weave understands.
---
title : Intro to Weave.jl with Plots
author : Anonymous
date : 06th Feb 2019
---# Intro## Plot` ``{julia;}
using Plots, DataFrames
plot(rand(5,5), linewidth=2, title="My Plot", size = (500, 200))
` ``
## Some computational results` ``julia
rand(2, 3)
` ``
` ``julia
DataFrame(rand(2, 3))
` ``
This fragment, being converted to pdf, looks something like this:

Fonts and design are well recognizable for Latex users.
For each piece of embedded code, you can determine how this code will be processed and what will be displayed in the end.
For example:
- echo = true - the code will be displayed
- eval = true - the result of the code execution will be displayed
- label - add a label. If Latex is used, it will be used as a fig: label
- fig_width, fig_height - image size
- and so forth
About noweb and script formats, and more about this tool, see http://weavejl.mpastell.com/stable/
Literate.jl
The authors of this package to the question why Literate, refer to the paradigm of the Literate Programming Donald Knutt. The task of this tool is to generate documents based on the Julia code containing comments in the markdown format. Unlike the previously reviewed Weave tool, it cannot do documents with the results of its execution. However, the tool is lightweight and, above all, focused on documenting code. For example, help in writing beautiful examples that can be placed on any markdown platform. Often used in a chain of other documentation tools, such as with Documenter.jl.
There are three possible output formats - markdown, notebook and script (pure Julia code). In none of them the implementation of the embedded code will not be carried out.
An example of a source file with Markdown comments (after the first # character):
#!/usr/bin/env julia
using Literate
Literate.markdown(@__FILE__, pwd()) # documenter=true
# # Intro
# ## Plot
using Plots, DataFrames
plot(rand(5,5), linewidth=2, title="My Plot", size = (500, 200))
# ## Some computational results
rand(2, 3)
DataFrame(rand(2, 3))
The result of his work will be a Markdown document and directives for Documenter, if their generation has not been explicitly disabled.
` ``@meta
EditURL = "https://github.com/TRAVIS_REPO_SLUG/blob/master/"
` ``
` ``@example literate_example
#!/usr/bin/env julia
using Literate
Literate.markdown(@__FILE__, pwd(), documenter=true)
` ``
# Intro## Plot` ``@example literate_example
using Plots, DataFrames
plot(rand(5,5), linewidth=2, title="My Plot", size = (500, 200))
` ``
## Some computational results` ``@example literate_example
rand(2, 3)
DataFrame(rand(2, 3))
` ``
*This page was generated using [Literate.jl](https://github.com/fredrikekre/Literate.jl).*
The code inserts inside the markdown here are intentionally set with a space between the first and subsequent apostrophes, so as not to deteriorate when the article is published.
See https://fredrikekre.github.io/Literate.jl/stable/ for details.
Documenter.jl
Generator documentation. Its main purpose is to form readable documentation packages written on Julia. Documenter converts to html or pdf as examples with Markdown-markup and embedded Julia-code, and the source files of the modules, extracting Julia-docstrings (Julia's own comments).
An example of a typical paperwork:

In this article we will not dwell on the principles of documentation, because, in an amicable way, this should be done in a separate article on the development of modules. However, some moments of the Documenter, we consider here.
First of all, you should pay attention to the fact that the screen is divided into two parts - the left side contains an interactive table of contents. The right side is actually the text of the documentation.
A typical directory structure with examples and documentation is as follows:
    docs/
        src/
        make.jl
    src/
        Example.jl
    ...
The directory docs/srcis markdown documentation. And the examples are somewhere in the general source directory src.
- key file for docuementer - docs/make.jl. The contents of this file for the documentation itself:
using Documenter, DocumenterTools
makedocs(
    modules = [Documenter, DocumenterTools],
    format = Documenter.HTML(
        # Use clean URLs, unless built as a "local" build
        prettyurls = !("local" in ARGS),
        canonical = "https://juliadocs.github.io/Documenter.jl/stable/",
    ),
    clean = false,
    assets = ["assets/favicon.ico"],
    sitename = "Documenter.jl",
    authors = "Michael Hatherly, Morten Piibeleht, and contributors.",
    analytics = "UA-89508993-1",
    linkcheck = !("skiplinks" in ARGS),
    pages = [
        "Home" => "index.md",
        "Manual" => Any[
            "Guide" => "man/guide.md",
            "man/examples.md",
            "man/syntax.md",
            "man/doctests.md",
            "man/latex.md",
            hide("man/hosting.md", [
                "man/hosting/walkthrough.md"
            ]),
            "man/other-formats.md",
        ],
        "Library" => Any[
            "Public" => "lib/public.md",
            hide("Internals" => "lib/internals.md", Any[
                "lib/internals/anchors.md",
                "lib/internals/builder.md",
                "lib/internals/cross-references.md",
                "lib/internals/docchecks.md",
                "lib/internals/docsystem.md",
                "lib/internals/doctests.md",
                "lib/internals/documenter.md",
                "lib/internals/documentertools.md",
                "lib/internals/documents.md",
                "lib/internals/dom.md",
                "lib/internals/expanders.md",
                "lib/internals/mdflatten.md",
                "lib/internals/selectors.md",
                "lib/internals/textdiff.md",
                "lib/internals/utilities.md",
                "lib/internals/writers.md",
            ])
        ],
        "contributing.md",
    ],
)
deploydocs(
    repo = "github.com/JuliaDocs/Documenter.jl.git",
    target = "build",
)
As you can see, the key methods here are makedocsand deploydocsthat determine the structure of future documentation and the place for its placement. makedocsprovides for the formation of markdown markup from all specified files, which includes both the implementation of embedded code and the extraction of docstrings comments.
Documenter supports a number of directives to insert code. Their format is `` `@something
@docs,@autodocs- links to docstrings documentation extracted from Julia files.@ref,@meta,@index,@contents- references indicate indekstyh pages and so on.@example,@repl,@eval- modes of execution of embedded code on Julia.- ...
The presence of directives @example, @repl, @eval, in fact, determined whether to include the Documenter in this review or not. Moreover, the previously mentioned Literate.jlone can automatically generate such markup, which was demonstrated earlier. That is, there are no fundamental limitations to using the documentation generator as a report generator.
For more information about Documenter.jl, see https://juliadocs.github.io/Documenter.jl/stable/
Conclusion
Despite the youth of the Julia language, already developed packages and tools for it, we can speak about full use in high-loaded services, and not just about the implementation of pilot projects. As you can see, the ability to generate various documents and reports, including the results of code execution both in text and in graphical form, is already provided. Moreover, depending on the complexity of the report, we can choose between the simplicity of creating a template and the flexibility of generating reports.
The article does not consider the Flax generator from the Genie.jl package. Genie.jl is an attempt to implement Julia on Rails, and Flax is a kind of analogue of eRubis with Julia code inserts. However, Flax is not provided as a separate package, and Genie is not included in the main package repository, so it was not included in this review.
I would like to separately mention the Makie.jl and Luxor.jl packages , which provide the formation of complex vector visualizations. The result of their work can also be used as part of the reports, but this should also be a separate article.