The story of how to run the Android emulator or save on intel processor
Hello! I want to share a solution to one problem. How to run the emulator on amd-shnom processor on Windows 10, using WHPX.
I assembled a home computer about 4 years ago that matched all my requests. I decided to save on the processor - I took amd. There are no questions to the computer.

Then I started developing for Android and a surprise was waiting for me here! The emulator was run only on the intel processor. It could be run without hardware virtualization, of course, using this advice www.youtube.com/watch?v=QTbjdBPKnnw&t=127s , but who used it knows that the emulator can run for a very long time. I have from 12GB reached 10 minutes. This may of course due to the integrated video card.
My main workplace was in the office, so I was particularly worried and tested at home on real devices. But a couple of months ago it became necessary to emulator. The first thought was, of course, to buy an intel processor. But it was necessary to buy another motherboard and video card. Most likely I would have done so if I had not stumbled upon the updated system requirements . The requirements say that the emulator can still be run on Windows 10 (with updates after April 2018) using the WHPX technology.
Now the main part of the story is how to do it. Everything was not so trivial. I apologize in advance for omissions, because I cannot call myself an expert either in hardware or in Windows.
After all the updates, the emulator naturally did not start. AndroidStudio tried to start the emulator using HAXM and threw out the error “Emulator: emulator: ERROR: x86 emulation currently requires hardware acceleration!”.
Next, I will provide instructions with links, missing a bunch of details and my “dances with a tambourine”.
Download utilities and check if the processor supports hyper-v.
Must support for working with hardware virtualization.
2. Update Windows 10 to version 1803 (April 2018):

3. Delete HAXM:

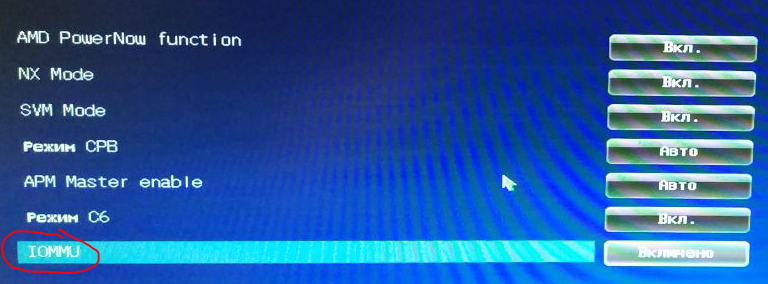
4. Turn on virtualization mode in bios. It can be called IOMMU there, not VT.
5. Downloading updates for bios from the official site. For my asus, for example, they were here .
6. We update bios oninstructions like this .
The Bios version should become something like 3001:

7. Go to the microsoft website and study the instructions for enabling the component.
8. You need to check the requirements of Hyper-V. To do this, type systeminfo in the command line. We check that these values are displayed:

Instead, I had a message:

On the official website it is written that the WHPX system will not work until Yes-Yes-Yes-Yes. My emulator starts up when the low-level shell is enabled.
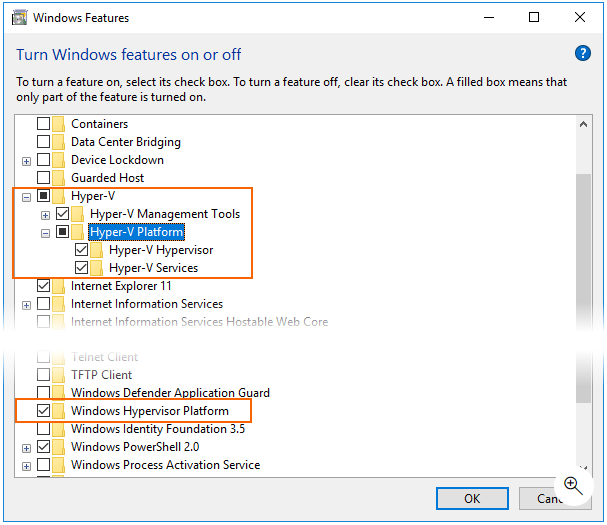
9. Further in the manual it is proposed to enable the hyper-v component (it is disabled by default):
In the Russian translation, the names are somewhat different:
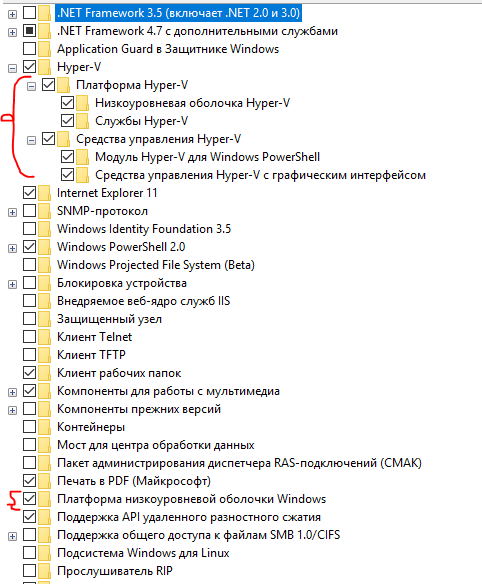
By the way, after disabling the component “Platform for Windows Low Level Shell”, “hyper-v Requirements” become Yes-Yes-Yes-Yes. I did not understand this moment. If someone understands write in the comments.
10. Determine if we need all this? Or it was easier to buy intel)
After these settings, everything should work:

I want to note, using the WHPX technology and the amd processor, the launch of the emulator takes about the same time as on the intel processor. Given that the rest of the "iron" is comparable in its parameters.
Prehistory
I assembled a home computer about 4 years ago that matched all my requests. I decided to save on the processor - I took amd. There are no questions to the computer.
Then I started developing for Android and a surprise was waiting for me here! The emulator was run only on the intel processor. It could be run without hardware virtualization, of course, using this advice www.youtube.com/watch?v=QTbjdBPKnnw&t=127s , but who used it knows that the emulator can run for a very long time. I have from 12GB reached 10 minutes. This may of course due to the integrated video card.
My main workplace was in the office, so I was particularly worried and tested at home on real devices. But a couple of months ago it became necessary to emulator. The first thought was, of course, to buy an intel processor. But it was necessary to buy another motherboard and video card. Most likely I would have done so if I had not stumbled upon the updated system requirements . The requirements say that the emulator can still be run on Windows 10 (with updates after April 2018) using the WHPX technology.
Now the main part of the story is how to do it. Everything was not so trivial. I apologize in advance for omissions, because I cannot call myself an expert either in hardware or in Windows.
Instruction
After all the updates, the emulator naturally did not start. AndroidStudio tried to start the emulator using HAXM and threw out the error “Emulator: emulator: ERROR: x86 emulation currently requires hardware acceleration!”.
Next, I will provide instructions with links, missing a bunch of details and my “dances with a tambourine”.
Download utilities and check if the processor supports hyper-v.
Must support for working with hardware virtualization.
2. Update Windows 10 to version 1803 (April 2018):
3. Delete HAXM:
4. Turn on virtualization mode in bios. It can be called IOMMU there, not VT.
5. Downloading updates for bios from the official site. For my asus, for example, they were here .
6. We update bios oninstructions like this .
The Bios version should become something like 3001:
7. Go to the microsoft website and study the instructions for enabling the component.
8. You need to check the requirements of Hyper-V. To do this, type systeminfo in the command line. We check that these values are displayed:
Instead, I had a message:
On the official website it is written that the WHPX system will not work until Yes-Yes-Yes-Yes. My emulator starts up when the low-level shell is enabled.
9. Further in the manual it is proposed to enable the hyper-v component (it is disabled by default):
In the Russian translation, the names are somewhat different:
By the way, after disabling the component “Platform for Windows Low Level Shell”, “hyper-v Requirements” become Yes-Yes-Yes-Yes. I did not understand this moment. If someone understands write in the comments.
10. Determine if we need all this? Or it was easier to buy intel)
After these settings, everything should work:
I want to note, using the WHPX technology and the amd processor, the launch of the emulator takes about the same time as on the intel processor. Given that the rest of the "iron" is comparable in its parameters.