Embedding pre-built dylib in the application
Before the start of the May holidays, I spent 5 busy days writing an application for iOS and Mac for the contest. The development was proceeding systematically, by the last day the application started to satisfy me more or less. I decided to postpone the departure on the morning of the very last day to do it with a fresh mind (there still had to be a text description attached). In the morning, a few hours before the train went on vacation, I sat down and calmly did the final run-in of the main functionality. And then it seemed to me a good idea to test how the application will behave on a completely different machine, which was not developed. I archive my application, transfer it to another Mac and ... it does not start. With a super-informative error "Image not found" and by explicitly indicating a problem with dylib. So: 3 hours to the train and the application does not start for unknown reasons. Why this happened, how this could have been avoided, and how I dealt with this problem - about all this under the cut.
In the essence of the problem, I figured out pretty quickly, but its solution took some time. Let's figure out what happened. My application used OpenCV. I collected it from the original sorts with a default config straight from the official site using CMake. After that, he pointed out a pair of Search Path in Xcode and development progressed, as they say, seamless. As you probably already understood, the problem was that on the working machine my application used the libraries that were at the address /usr/local/lib/.
This path was specified for search in Xcode, and since I linked them with the application, I mistakenly thought that all the necessary libraries would catch up during archiving, now I already know that this is not so. The first thought that came to me then: make an installer. In principle, this is a working solution and many do just that. However, there was no time for this, because in addition to spending time developing the installer itself, it also took testing, etc., and the train drove off after a couple of hours.
I started googling this problem and realized that I need to drop dylib into the application itself. Without thinking twice, I threw them into the Xcode project, added linkage, archived ... everything is ok on the working machine, on the third-party - the same error. The problem was in the dylib wired installation and dependency search paths. In my case it was monstrous
/Users/s1ddok/Downloads/opencv-3.1.0/build/lib/libopencv_core.3.1.dylibThis is because I added intermediate dylibs from the build folder to the project, these are the ones that are later installed by the team make install, but even if I took them from /usr/local/lib/, this did not solve the problem.
How could this problem be avoided? Indicate immediately the required installation paths during dylib compilation. If you compile your libraries, most likely you have everything installed correctly, if not, it is easy to do this in Xcode. Specifically, in the case of OpenCV, it was only necessary to change the default CMake config and add the prefix for installation dir there, but I did not have the opportunity to do this at that time.
So, I needed to somehow change the install path in ready-made dylibs so that they started. I will omit detailed descriptions of how I came to the result, only tell you what worked in the end.
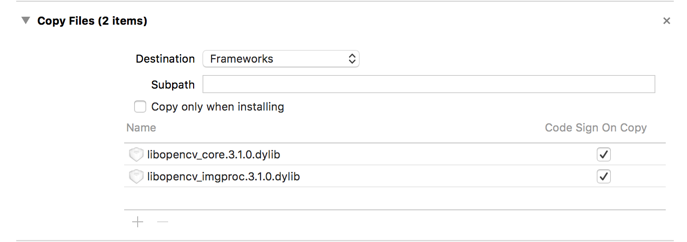
First of all, we need our dylibs that we added to the project to be copied to the bundle with our application. In principle, it’s all the same where, you can put them in the main bundle, but copying to the Frameworks folder seems logical. To do this, go to Xcode -> Target Settings -> Build Phases and add a new Copy Files phase. My application uses only 2 libraries from the OpenCV suite, so for me it looks like this:
Ok, now all the necessary dylibs are stored inside our application, however it falls out with the same error, because the paths to them are still old. Utilities like otooland come to our aid install_name_tool. The first was needed in order to find out which install path are “wired” into the existing libraries, and the second in order to change them. Add a new build phase to Xcode, this time Run Script. The script itself turned out like this:
# Говорим куда смотреть нашему приложению в поисках библиотек
install_name_tool -change lib/libopencv_core.3.1.dylib @executable_path/../Frameworks/libopencv_core.3.1.0.dylib $BUILT_PRODUCTS_DIR/$EXECUTABLE_PATH
install_name_tool -change lib/libopencv_imgproc.3.1.dylib @executable_path/../Frameworks/libopencv_imgproc.3.1.0.dylib $BUILT_PRODUCTS_DIR/$EXECUTABLE_PATH
# Переходим в папку Frameworks внутри нашего приложения
cd $BUILT_PRODUCTS_DIR
cd MyApp.app
cd Contents
cd Frameworks
# Здесь мы говорим библиотекам куда они установлены
install_name_tool -id @executable_path/../Frameworks/libopencv_core.3.1.0.dylib libopencv_core.3.1.0.dylib
install_name_tool -id @executable_path/../Frameworks/libopencv_imgproc.3.1.0.dylib libopencv_imgproc.3.1.0.dylib
# Следующей линией можно использоваться, чтобы посмотреть, какие зависимости имеет эта библиотека.
# otool -L libopencv_imgproc.3.1.0.dylib
# В моем случае она зависит от opencv-core и нам нужно сказать ей, где она лежит
install_name_tool -change /Users/s1ddok/Downloads/opencv-3.1.0/build/lib/libopencv_core.3.1.dylib @executable_path/../Frameworks/libopencv_core.3.1.0.dylib libopencv_imgproc.3.1.0.dylib
This, of course, is a terrible decision and the script will have to be redone for each library, it is not universal. At that time, I did not have time to develop a generic solution.
I hope my experience will be useful to someone, I dealt with all this in a very nervous and stressful environment, so I’m doubly glad that the application did start and I was able to send it successfully, though I had to write an essay in 20 minutes without checking, but this is already little things.