Vision-based SLAM: stereo and depth-SLAM
- Tutorial
After a short break, we continue our series of SLAM tutorials. In previous releases, we prepared the software environment , and also worked with monocular SLAM . Under the cut - a lesson on using SLAM based on a stereo camera and a depth camera. We will talk about configuring packages and equipment and give tips on using two ROS packages: the traditional RTAB-Map and the fresh, delicious ElasticFusion.
RTAB-Map (Real-Time Appearance-Based Mapping) is a visual graph SLAM algorithm based on a closure detector. The detector uses the bag-of-words algorithm to determine the degree of similarity of new camera images to images of already visited locations. Each such closure adds a new edge to the camera position graph, after which the graph is optimized. To achieve real time, the algorithm uses a tricky way to manage memory, limiting the number of locations used. The developer article details how this all works.
We examined the setup of RTAB-Map using the Kinect sensor in the first lesson , so here we are going to configure this package for use with a stereo camera. As such, we will use two ordinary USB webcams.
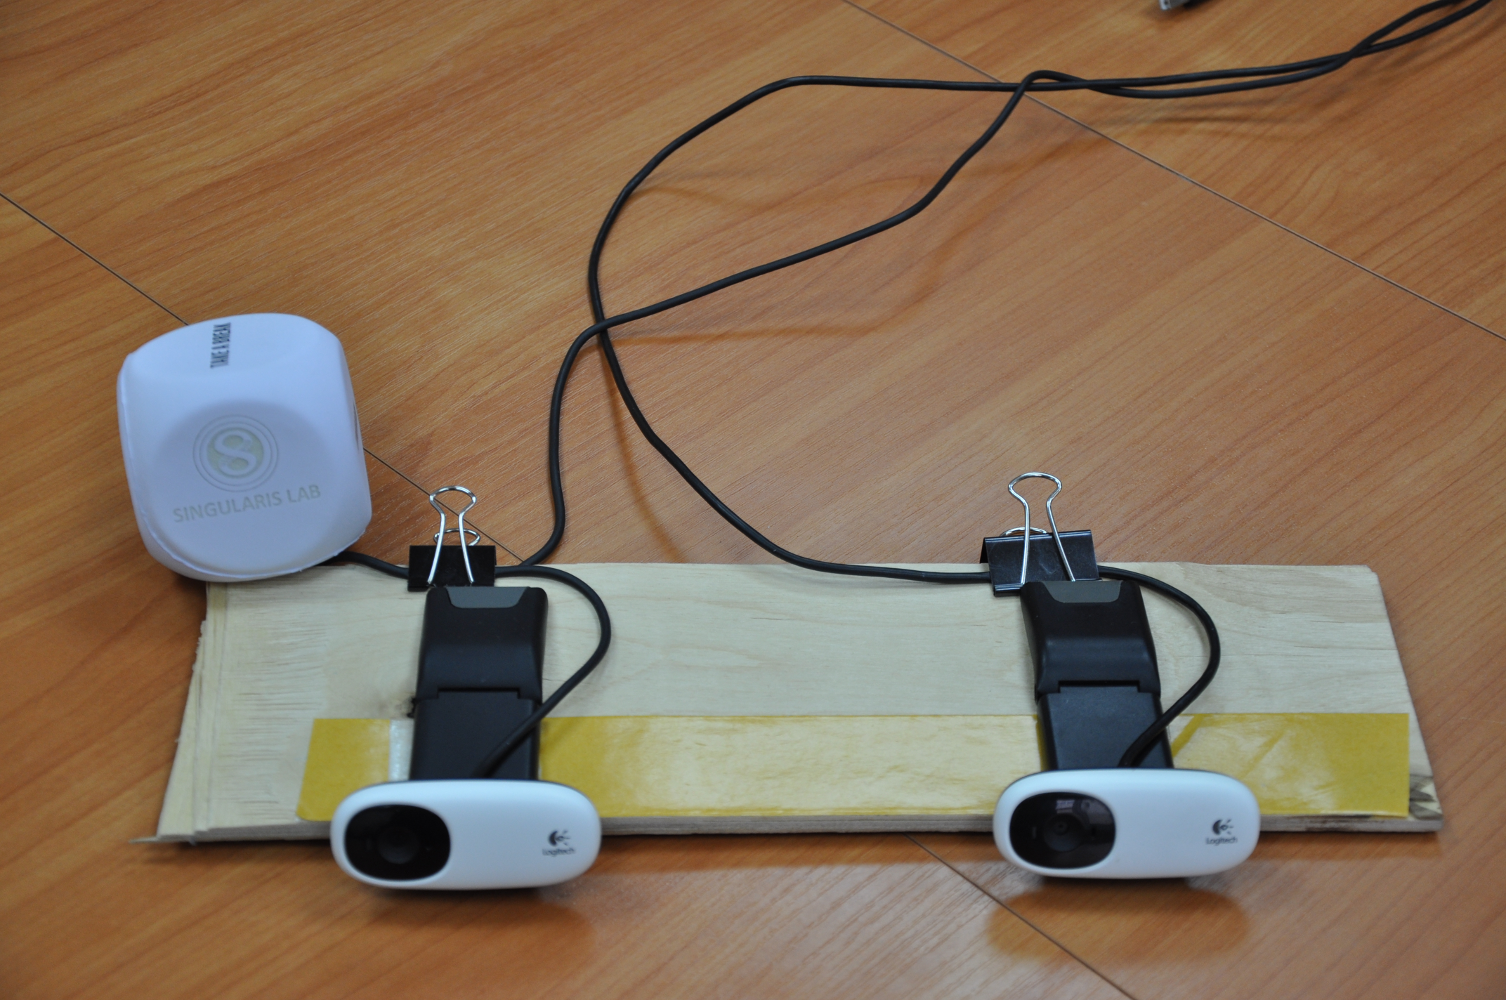
For correct operation, two cameras must be rigidly fixed relative to each other (for this you can use webcams on a clothespin :). It is desirable that the cameras were of the same model and did not have the ability to manually adjust the focus. We will use this horizontal “stereo camera”:
We will use the usb_cam package to receive a video stream from cameras. Create a stereo_camera.launch file with the following contents:
where / dev / video0 should be replaced with the identifier corresponding to the left / right camera.
If at startup an error of the form appears: then this means that the USB bandwidth is not enough for some reason. You need to try connecting the cameras to different USB hubs, this most often solves the problem. You can verify that both cameras work using the ROS utility rqt_image_view . The utility should show video for topics / stereo / left / image_raw and / stereo / right / image_raw.
The camera_calibration utility in ROS supports horizontal stereo camera calibration. Before starting, you need to prepare a calibration sample - print a chess marker. The utility is launched as follows:
where
--size 8x6 indicates the number of internal corners of the chess pattern (8x6 corresponds to a pattern of 9x7 black squares);
--square 0.054 - size (side) of the square of the chess pattern in meters;
--approximate = 0.01 - in our case, non-specialized cameras are used, therefore it is necessary to specify a parameter that sets the permissible time of desync between cameras in seconds.
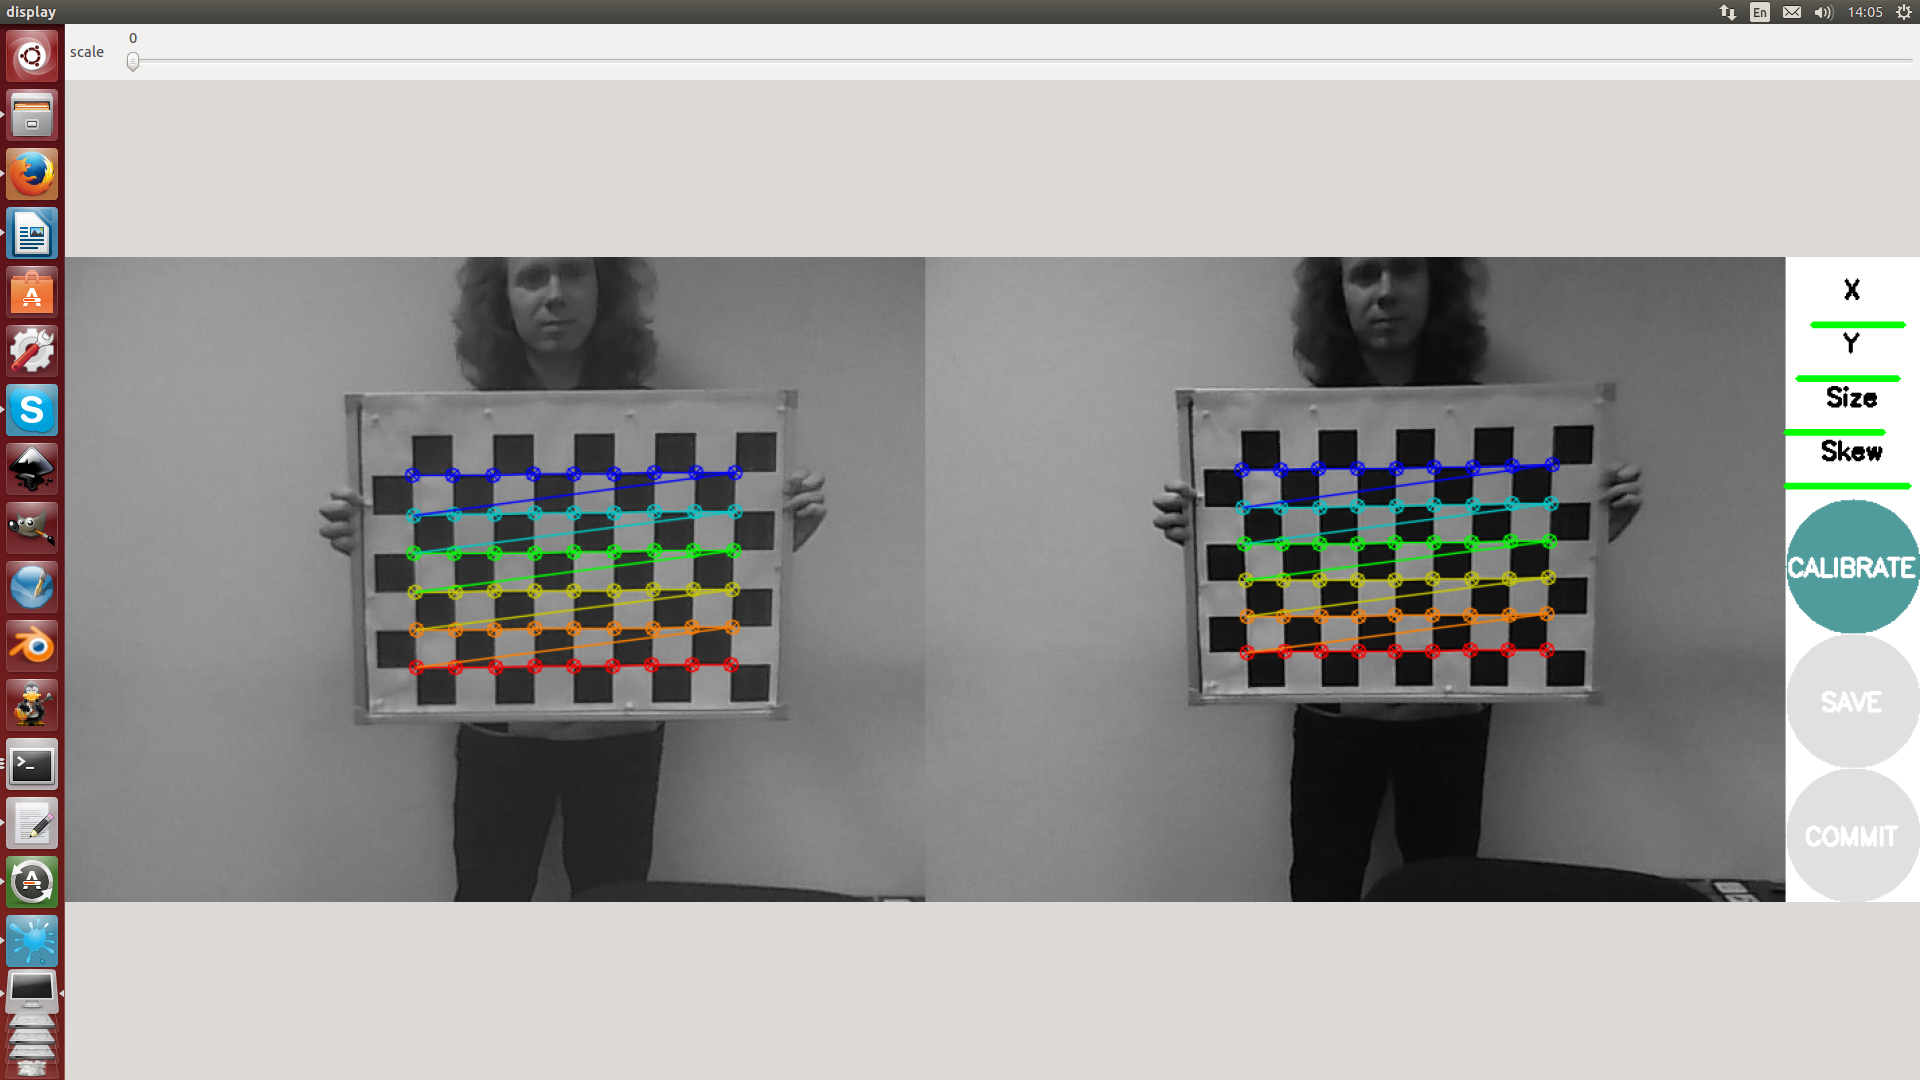
The process of calibrating a stereo pair using this utility is not much different from calibrating a single camera in the first article . Upon completion of the calibration, you must click the commit button to save the calibration data.
After calibrating the cameras, you can proceed to the processing of stereo images. The stereo_image_proc package performs rectification of images from cameras and builds a disparity map. The launch is as follows:
to check the health, you can run the image_view utility with the following parameters:
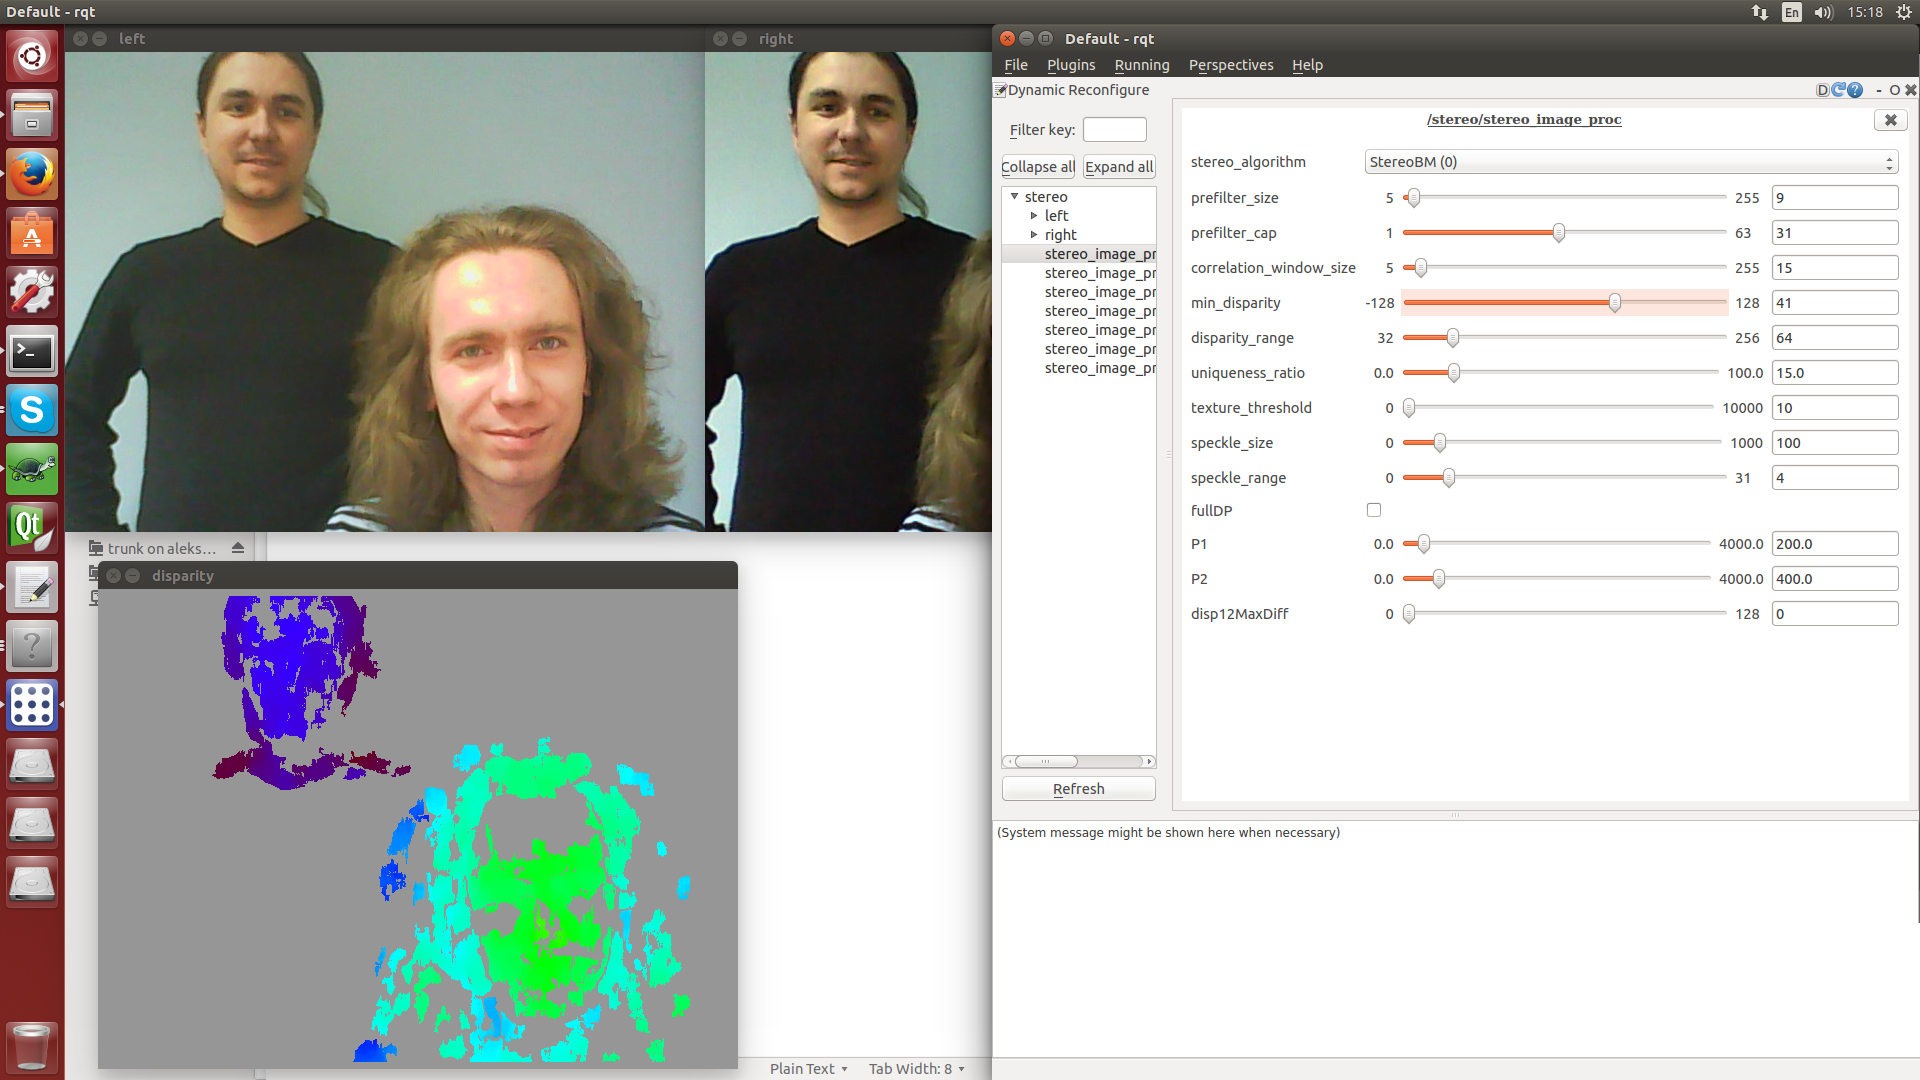
The parameters of the stereo image processing algorithm can be configured using the dynamic_reconfigure utility . To start, you need to run the command:
and select Dynamic reconfigure from the menu Plugins → Configuration .
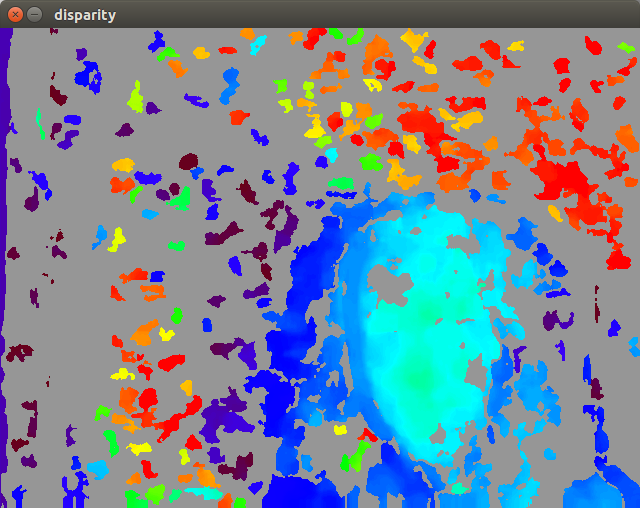
stereo_image_proc supports two processing algorithms: StereoBM (faster, first picture) and StereoSGBM (semi-global block matching, better, slower, second picture).
After the camera has been successfully calibrated and we have received an adequate disparity map, you can start the RTAB-Map. Prepare the rtabmap.launch launch file :
This file is based on the standard RTAB-Map configuration file for the Bumblebee camera. It sets the orientation of the camera coordinate system relative to the global coordinate system, launches odometry modules ( stereo_odometry in our case), SLAM ( rtabmap ) and visualization ( rtabmapviz or rviz ).
If an error is displayed at startup: then you need to swap the left and right cameras in the stereo_camera.launch file and calibrate them again. Run RTAB-Map (this command must be run from the folder containing rtabmap.launch ):
If everything went well, then we will see the RTAB-Map window:

RTAB-Map provides the following parameters for adjusting the operation of the algorithm (they can be changed in the launch file or transferred via the command line):
After working with monocular SLAMs, being able to use two cameras is simply a blessing, since there are no problems with determining the map scale and localization. If you have a stereo camera or at least two identical monocameras, use them with stereo SLAM. However, if you want to achieve good quality cards, then be sure to get a real stereo camera mounted in one case. Two webcams on scotch tape is a funny solution from the category of “I’m my mom’s engineer” for writing a lesson on SLAM, but for real tasks you need real equipment.
ElasticFusion allows you to build dense 3D-models of the environment on the basis of surfers (from the English surface element). The algorithm does not use the graph of visited locations and relies entirely on the constructed map when localizing and searching for closures. To search for faults, the algorithm randomly selects small parts of the map, with which new frames are subsequently compared. After finding a short circuit, the map section is deformed in accordance with the error. All other interesting things can be seen in the article developers . Just note that the algorithm is very demanding on hardware: for normal operation, you need an nVidia graphics card with a performance of more than 3.5 TFlOPS, as well as a CPU like Intel Core i5 - i7.
Clone the ElasticFusion repository in a folder convenient for you:
The project has many dependencies, and among them - CUDA. If you have already installed the video card driver, and this is not CUDA, then, unfortunately, you will have to dance a little with a tambourine. Dancing includes blacklisting video card drivers, installing when lightdm is stopped, and all sorts of other nasty things that you can read more about, for example, here . Follow all these procedures very carefully and with an understanding of what you are doing, otherwise you can easily say goodbye to the system.
The easiest way is to build ElasticFusion immediately with all the dependencies using a script kindly prepared by the developers. Let's go to the repository and execute the script:
The magic script will do almost everything for us. “Almost” - because out of the box, ElasticFusion only works with OpenNI2 drivers. We are using the first version of Kinect, and fortunately, there is an easy way to add support for it in OpenNI2. To do this, first collect libfreenect (clone it in the same folder as ElasticFusion, next to it):
Then add a link to the freenect driver in OpenNI2:
Hooray, now we can launch this miracle of technology if Kinect is connected to us:
If all is well, then this window will appear:
The algorithm provides a bunch of parameters for fine-tuning, which can be passed on the command line (and some can be twisted directly in the GUI). So far we have launched ElasticFusion with default settings. How well it will work this way depends on the configuration of your computing hardware, as well as the depth camera used. The algorithm can only work in real time; In general, you may expect such problems:
We also recommend that you enable relocalization ( -rl ) so that if the tracking is lost, the algorithm can recover itself, and also enable frame-to-frame RGB tracking ( -ftf ), which gives a smoother camera movement. In addition, you need to configure the percentage of use of the two trackers used by the algorithm, which is done by setting the -i parameter .
For our hardware (Core i5 + GeForce GTX Titan) and Kinect of the first version, we selected the following parameters, which allow us to achieve a very good operation of the algorithm:
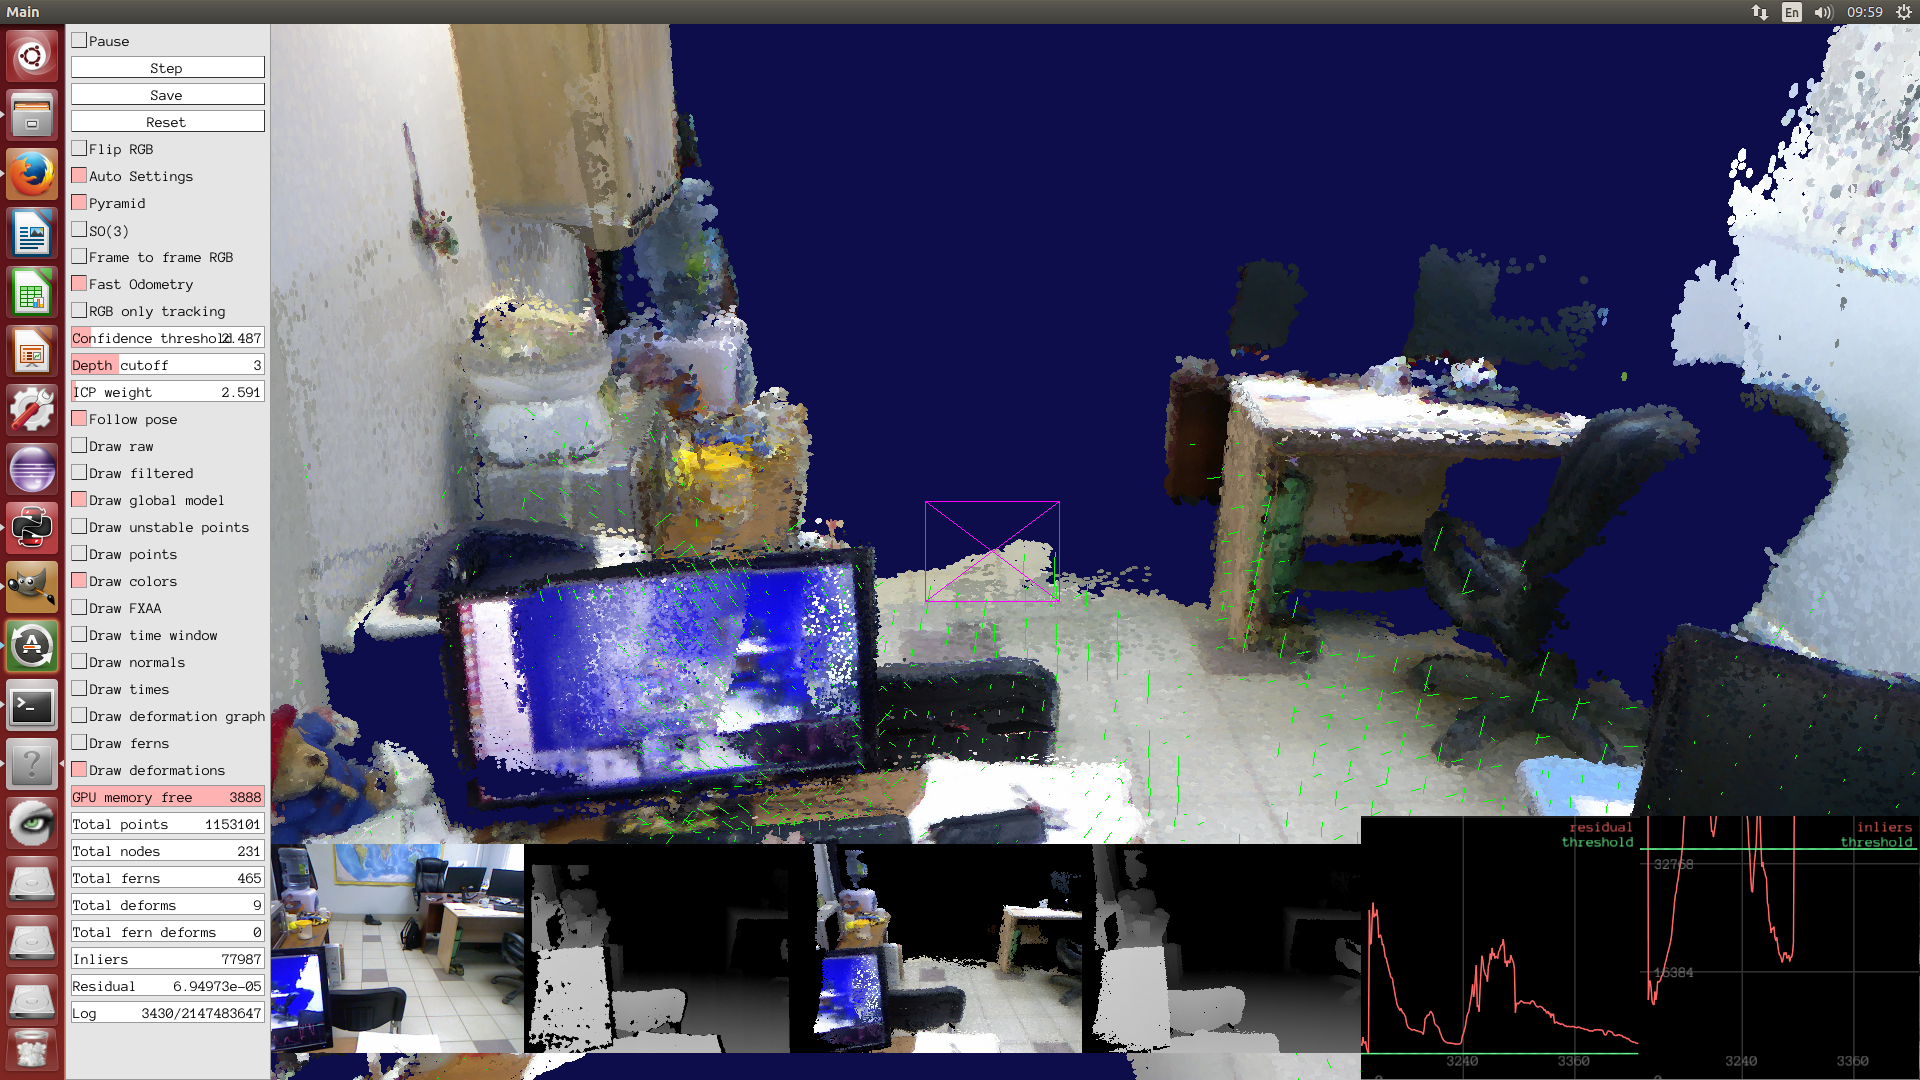
The -d parameter here sets the limit in meters beyond which the depth values obtained from the sensor will not be used. As a result, we got just such a reconstruction of one of the rooms of our office:
Very often, SLAM algorithms that use depth maps work with dense maps. This inevitably entails significant requirements for computing resources, so the use of this approach, for example, on small-sized robots is difficult. In addition, the scope of such sensors is not too large (of course, if you do not use the expensive 3D LiDAR), so the scope is narrowed a little more. If you are not very limited in computing resources, and you need to solve the problem of indoor navigation, then projects like ElasticFusion are perfect for you.
There are also less resource-intensive algorithms, for example, the same RTAB-Map can work with depth cameras. This solution is a compromise and will fit perfectly into the navigation system of a less intelligent robot.
This concludes our visual SLAM tutorial series. Feel free to clarify / ask / supplement / refute / debate, it is always pleasant for us :)
Article 1: setting up the environment for working with SLAM
Article 2: monocular SLAM
ElasticFusion page on the developers
site RTAB-Map website
RTAB-Map + stereo camera
Principle of operation
RTAB-Map (Real-Time Appearance-Based Mapping) is a visual graph SLAM algorithm based on a closure detector. The detector uses the bag-of-words algorithm to determine the degree of similarity of new camera images to images of already visited locations. Each such closure adds a new edge to the camera position graph, after which the graph is optimized. To achieve real time, the algorithm uses a tricky way to manage memory, limiting the number of locations used. The developer article details how this all works.
Launch
We examined the setup of RTAB-Map using the Kinect sensor in the first lesson , so here we are going to configure this package for use with a stereo camera. As such, we will use two ordinary USB webcams.
ROS stereo setup and calibration
For correct operation, two cameras must be rigidly fixed relative to each other (for this you can use webcams on a clothespin :). It is desirable that the cameras were of the same model and did not have the ability to manually adjust the focus. We will use this horizontal “stereo camera”:
Configuring cameras in ROS
We will use the usb_cam package to receive a video stream from cameras. Create a stereo_camera.launch file with the following contents:
where / dev / video0 should be replaced with the identifier corresponding to the left / right camera.
If at startup an error of the form appears: then this means that the USB bandwidth is not enough for some reason. You need to try connecting the cameras to different USB hubs, this most often solves the problem. You can verify that both cameras work using the ROS utility rqt_image_view . The utility should show video for topics / stereo / left / image_raw and / stereo / right / image_raw.
[ERROR] [1455879780.737902972]: VIDIOC_STREAMON error 28, No space left on device
Calibration
The camera_calibration utility in ROS supports horizontal stereo camera calibration. Before starting, you need to prepare a calibration sample - print a chess marker. The utility is launched as follows:
rosrun camera_calibration cameracalibrator.py --size 8x6 --square 0.054 right:=/stereo/right/image_raw left:=/stereo/left/image_raw left_camera:=/stereo/left right_camera:=/stereo/right --approximate=0.01
where
--size 8x6 indicates the number of internal corners of the chess pattern (8x6 corresponds to a pattern of 9x7 black squares);
--square 0.054 - size (side) of the square of the chess pattern in meters;
--approximate = 0.01 - in our case, non-specialized cameras are used, therefore it is necessary to specify a parameter that sets the permissible time of desync between cameras in seconds.
The process of calibrating a stereo pair using this utility is not much different from calibrating a single camera in the first article . Upon completion of the calibration, you must click the commit button to save the calibration data.
Stereo Image Processing
After calibrating the cameras, you can proceed to the processing of stereo images. The stereo_image_proc package performs rectification of images from cameras and builds a disparity map. The launch is as follows:
rosrun stereo_image_proc stereo_image_proc __ns:=stereo _approximate_sync:=true
to check the health, you can run the image_view utility with the following parameters:
rosrun image_view stereo_view stereo:=/stereo image:=image_rect_color _approximate_sync:=true
The parameters of the stereo image processing algorithm can be configured using the dynamic_reconfigure utility . To start, you need to run the command:
rqt
and select Dynamic reconfigure from the menu Plugins → Configuration .
stereo_image_proc supports two processing algorithms: StereoBM (faster, first picture) and StereoSGBM (semi-global block matching, better, slower, second picture).
RTAB-Map
After the camera has been successfully calibrated and we have received an adequate disparity map, you can start the RTAB-Map. Prepare the rtabmap.launch launch file :
rtabmap.launch
3D, 1:3D->2D (PnP) --> This file is based on the standard RTAB-Map configuration file for the Bumblebee camera. It sets the orientation of the camera coordinate system relative to the global coordinate system, launches odometry modules ( stereo_odometry in our case), SLAM ( rtabmap ) and visualization ( rtabmapviz or rviz ).
If an error is displayed at startup: then you need to swap the left and right cameras in the stereo_camera.launch file and calibrate them again. Run RTAB-Map (this command must be run from the folder containing rtabmap.launch ):
[FATAL] The stereo baseline (-0.177000) should be positive
roslaunch rtabmap.launch
If everything went well, then we will see the RTAB-Map window:
Settings and possible problems
RTAB-Map provides the following parameters for adjusting the operation of the algorithm (they can be changed in the launch file or transferred via the command line):
- strategy - odometry algorithm: 0 = bag-of-words 1 = optical flow
- feature - feature detector type: 0 = SURF 1 = SIFT 2 = ORB 3 = FAST / FREAK 4 = FAST / BRIEF 5 = GFTT / FREAK 6 = GFTT / BRIEF 7 = BRISK. Best of all, in our opinion, ORB shows itself, it is used by default.
- estimation - odometry mode: 0: 3D, 1: 2D.
- max_depth - maximum used feature depth from disparity map in meters.
- inlier_distance - maximum distance between features for RANSAC in meters.
- local_map - maximum number of features stored in the map.
When to use SLAM with a stereo camera?
After working with monocular SLAMs, being able to use two cameras is simply a blessing, since there are no problems with determining the map scale and localization. If you have a stereo camera or at least two identical monocameras, use them with stereo SLAM. However, if you want to achieve good quality cards, then be sure to get a real stereo camera mounted in one case. Two webcams on scotch tape is a funny solution from the category of “I’m my mom’s engineer” for writing a lesson on SLAM, but for real tasks you need real equipment.
ElasticFusion + RGB-D camera
Principle of operation
ElasticFusion allows you to build dense 3D-models of the environment on the basis of surfers (from the English surface element). The algorithm does not use the graph of visited locations and relies entirely on the constructed map when localizing and searching for closures. To search for faults, the algorithm randomly selects small parts of the map, with which new frames are subsequently compared. After finding a short circuit, the map section is deformed in accordance with the error. All other interesting things can be seen in the article developers . Just note that the algorithm is very demanding on hardware: for normal operation, you need an nVidia graphics card with a performance of more than 3.5 TFlOPS, as well as a CPU like Intel Core i5 - i7.
Installation and launch
Clone the ElasticFusion repository in a folder convenient for you:
git clone https://github.com/mp3guy/ElasticFusion.git
The project has many dependencies, and among them - CUDA. If you have already installed the video card driver, and this is not CUDA, then, unfortunately, you will have to dance a little with a tambourine. Dancing includes blacklisting video card drivers, installing when lightdm is stopped, and all sorts of other nasty things that you can read more about, for example, here . Follow all these procedures very carefully and with an understanding of what you are doing, otherwise you can easily say goodbye to the system.
The easiest way is to build ElasticFusion immediately with all the dependencies using a script kindly prepared by the developers. Let's go to the repository and execute the script:
cd ElasticFusion
./build.sh
The magic script will do almost everything for us. “Almost” - because out of the box, ElasticFusion only works with OpenNI2 drivers. We are using the first version of Kinect, and fortunately, there is an easy way to add support for it in OpenNI2. To do this, first collect libfreenect (clone it in the same folder as ElasticFusion, next to it):
git clone https://github.com/OpenKinect/libfreenect.git
cd libfreenect
mkdir build
cd build
cmake .. -DBUILD_OPENNI2_DRIVER=ON
make
Then add a link to the freenect driver in OpenNI2:
ln -s lib/OpenNI2-FreenectDriver/libFreenectDriver.so ../../ElasticFusion/deps/OpenNI2/Bin/x64-Release/OpenNI2/Drivers/
Hooray, now we can launch this miracle of technology if Kinect is connected to us:
cd ElasticFusion/GUI
./ElasticFusion
If all is well, then this window will appear:
Settings and possible problems
The algorithm provides a bunch of parameters for fine-tuning, which can be passed on the command line (and some can be twisted directly in the GUI). So far we have launched ElasticFusion with default settings. How well it will work this way depends on the configuration of your computing hardware, as well as the depth camera used. The algorithm can only work in real time; In general, you may expect such problems:
- slow “filling” the card with surfers. It is solved using a more powerful video adapter, as well as setting parameters:
- setting a lower Surfel confidence threshold ( -c parameter ), for example, to 2 instead of the default 10;
- enable Fast odometry ( -fo );
- There are a couple of options that can be viewed on the project page, but we do not recommend using them - the quality is greatly reduced.
- unstable finding faults. It is solved by tuning the parameters of the closure search module ( -ic, -cv, -pt ).
We also recommend that you enable relocalization ( -rl ) so that if the tracking is lost, the algorithm can recover itself, and also enable frame-to-frame RGB tracking ( -ftf ), which gives a smoother camera movement. In addition, you need to configure the percentage of use of the two trackers used by the algorithm, which is done by setting the -i parameter .
For our hardware (Core i5 + GeForce GTX Titan) and Kinect of the first version, we selected the following parameters, which allow us to achieve a very good operation of the algorithm:
./ElasticFusion -c 2 -d 4 -i 5 -fo -ftf -rl -ic 1000 -cv 1e-02 -pt 150
The -d parameter here sets the limit in meters beyond which the depth values obtained from the sensor will not be used. As a result, we got just such a reconstruction of one of the rooms of our office:
When to use SLAM with a depth camera?
Very often, SLAM algorithms that use depth maps work with dense maps. This inevitably entails significant requirements for computing resources, so the use of this approach, for example, on small-sized robots is difficult. In addition, the scope of such sensors is not too large (of course, if you do not use the expensive 3D LiDAR), so the scope is narrowed a little more. If you are not very limited in computing resources, and you need to solve the problem of indoor navigation, then projects like ElasticFusion are perfect for you.
There are also less resource-intensive algorithms, for example, the same RTAB-Map can work with depth cameras. This solution is a compromise and will fit perfectly into the navigation system of a less intelligent robot.
Conclusions and general recommendations for use
- Using a stereo camera or RGB-D sensor eliminates the main problem of monocular SLAM algorithms - the fundamental impossibility of determining the scale of the map.
- In general, the requirements of the algorithms for computing resources do not depend on whether you use a stereo or a depth camera.
- If you need to build a scene map with great depth (for example, outdoors), then you need a stereo camera (or LiDAR, which is much more expensive).
- Whenever possible, use stereo cameras that are already manufactured in one enclosure. This is the only normal way to get a reliable disparity map.
This concludes our visual SLAM tutorial series. Feel free to clarify / ask / supplement / refute / debate, it is always pleasant for us :)
Sources and links
Article 1: setting up the environment for working with SLAM
Article 2: monocular SLAM
ElasticFusion page on the developers
site RTAB-Map website