March 15, 2016 at 17:24
Juniper MX + IX + SynFlood
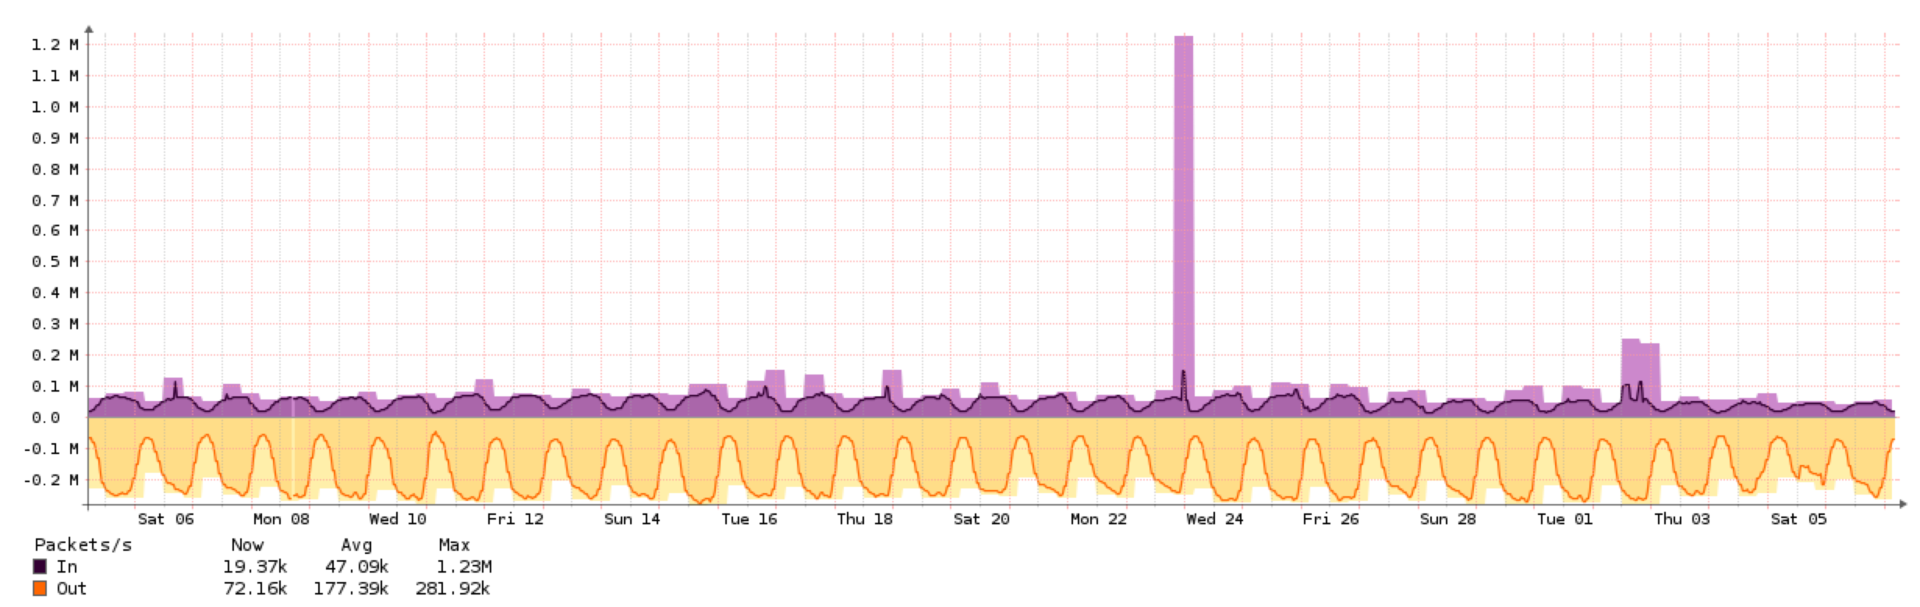
In this article, I would like to talk about one fairly simple method of protecting against Syn Flood attacks on Juniper MX series routers. This method can help under several conditions, which are described below. Of course, there are hardware and software solutions, Syn Cookies , Syn Proxy technologies and others. But, sometimes, it turns out to block most of the traffic on the router without the use of additional mechanisms or expensive devices. Since we used some articles of our colleagues to configure the router , we decided to share our experience, it is quite specific, but we hope it will be useful. An example of such an attack is shown in the graph below.
Syn Flood - one of the varieties of network attacks such as denial of service, which consists in sending a large number of SYN requests in a fairly short time. The SYN packet itself is small (with 54+ byte link-level headers), even with a 1G bandwidth, a large number of packets per second can be generated. Some providers do not prohibit sending packets with a substitute source address from their network, and even one server with a 1G band located at such a provider can generate an attack that will create many problems. Most Internet providers for end users do not release packets from their network with a fake source address and, as a result, most attacks come from DC clients, while the number of attacking machines is small.
Initially, you need to proceed from the fact that we have good connectivity and many traffic exchange points are connected. Of course, if you have the only UPLINK and, suppose, Syn Flood comes from one machine, you can try to analyze the traffic, and if the person who organizes DDOS is completely lazy and does not take care of different ttl , you can block traffic by ttl + dst ip. In this case, all traffic with this ttl will be cut off - this is certainly better than if the server was lying completely, but not optimally.
At the moment, at my work, in addition to backbone providers and providers providing incomplete connectivity, such traffic exchange points are connected as:
A fairly large number of providers, data centers and service providers are connected to IX data . Most of the bottoms provide L2 connectivity between the participants. Using these facts, you can simply localize the source of the attack if traffic goes through IX.
Initially, you need to connect IX to a separate virtual-switch - to be able to filter by MAC addresses. That is, even when replacing the src address, packets will come with the src MAC address of the border router. For example, we can assume that we only connected DataIX and the abnormal traffic goes through it.
Next, you can see the MAC addresses that came from this IX:
And, if there is an anomaly, we look at which IP address is associated with this MAC address, then we look at who it belongs to, and if it is not a gateway, set the reject policy. Thus minimizing the consequences of the attack.
Of course, this is not a panacea, part of the Internet is blocked, but, in most cases, these are data center boarders - they are not our traffic consumers. The lock is quite simple and, for example, if there are no other means, this protection is fully justified. When the process is fully automated, this allows you to understand where the attack is coming from and whether it is possible to deal with it with several teams, which greatly simplifies life.
ps. After installing DPCe and MPC in the same chassis, this scheme began to work not quite correctly, some of the packets in the filter simply could not be seen. If someone tells me why, I will be grateful.
Bit of theory
Syn Flood - one of the varieties of network attacks such as denial of service, which consists in sending a large number of SYN requests in a fairly short time. The SYN packet itself is small (with 54+ byte link-level headers), even with a 1G bandwidth, a large number of packets per second can be generated. Some providers do not prohibit sending packets with a substitute source address from their network, and even one server with a 1G band located at such a provider can generate an attack that will create many problems. Most Internet providers for end users do not release packets from their network with a fake source address and, as a result, most attacks come from DC clients, while the number of attacking machines is small.
What can be done on the Router?
Initially, you need to proceed from the fact that we have good connectivity and many traffic exchange points are connected. Of course, if you have the only UPLINK and, suppose, Syn Flood comes from one machine, you can try to analyze the traffic, and if the person who organizes DDOS is completely lazy and does not take care of different ttl , you can block traffic by ttl + dst ip. In this case, all traffic with this ttl will be cut off - this is certainly better than if the server was lying completely, but not optimally.
At the moment, at my work, in addition to backbone providers and providers providing incomplete connectivity, such traffic exchange points are connected as:
- DataIX
- Cloud IX
- Pirix
- Wix
- Spbix
- Mskix
- Codix
- Globalix
- Ihome
A fairly large number of providers, data centers and service providers are connected to IX data . Most of the bottoms provide L2 connectivity between the participants. Using these facts, you can simply localize the source of the attack if traffic goes through IX.
How to do it
Initially, you need to connect IX to a separate virtual-switch - to be able to filter by MAC addresses. That is, even when replacing the src address, packets will come with the src MAC address of the border router. For example, we can assume that we only connected DataIX and the abnormal traffic goes through it.
Connection Configuration IX
interfaces {
    xe-0/3/0 {
        description "UPLINK_IX: DATAIX XX.XX.XX.XX 255.255.252.0 (path XXX);";
        flexible-vlan-tagging;
        native-vlan-id 20;
        encapsulation flexible-ethernet-services;
        unit 0 {
            encapsulation vlan-bridge;
            vlan-id 20;
        }
    }
    irb {
        unit 20 {
            description "DataIX route interface";
            family inet {
                filter {
                    # стандартный набор фильтров
                }
                address XX.XX.XX.XX/22;
            }
        }
    }
}
firewall {
    family bridge {
        filter ix_mac_filter {
        # пока пустой
        }
    }
}
protocols {
    bgp {
        group dataix {
            # настройка BGP
        }
    }
}
routing-instances {
    switch_dataix {
        description "DATAIX - prometey XX.XX.XX.XX 255.255.252.0";
        instance-type virtual-switch;
        bridge-domains {
            switch_dataix_bridge {
                domain-type bridge;
                vlan-id 20;
                interface xe-0/3/0.0;
                routing-interface irb.20;
                forwarding-options {
                    filter {
                        input ix_mac_filter;
                    }
                }
            }
        }
    }
}
Next, you can see the MAC addresses that came from this IX:
root@rt01> show bridge mac-table
MAC flags (S -static MAC, D -dynamic MAC, L -locally learned, C -Control MAC
           SE -Statistics enabled, NM -Non configured MAC, R -Remote PE MAC)
Routing instance : switch_dataix
 Bridging domain : switch_dataix_bridge, VLAN : 20
   MAC                 MAC      Logical          NH     RTR
   address             flags    interface        Index  ID
   00:01:e8:a3:ed:20   D,SE     xe-0/3/0.0
   00:03:fe:0a:ac:00   D,SE     xe-0/3/0.0
   00:04:80:f4:bc:00   D,SE     xe-0/3/0.0
   00:04:96:51:ba:84   D,SE     xe-0/3/0.0
   00:04:96:52:05:a4   D,SE     xe-0/3/0.0
   00:04:96:52:05:ea   D,SE     xe-0/3/0.0
   00:04:96:52:06:14   D,SE     xe-0/3/0.0
   00:04:96:6d:13:a9   D,SE     xe-0/3/0.0
   00:04:96:6d:14:79   D,SE     xe-0/3/0.0
   00:04:96:6d:17:79   D,SE     xe-0/3/0.0
   00:04:96:6d:52:3e   D,SE     xe-0/3/0.0
   00:04:96:6d:5b:26   D,SE     xe-0/3/0.0
   00:04:96:6d:6f:f0   D,SE     xe-0/3/0.0
   00:04:96:7d:bf:68   D,SE     xe-0/3/0.0
   00:04:96:7d:f8:99   D,SE     xe-0/3/0.0
...filter ix_mac_filter {
term 00:01:e8:a3:ed:20 {
from {
source-mac-address {
00:01:e8:a3:ed:20/48;
}
ip-destination-address {
# адрес атакуемого сервера
}
}
then {
count 00:01:e8:a3:ed:20;
accept;
}
}
term 00:03:fe:0a:ac:00 {
from {
source-mac-address {
00:03:fe:0a:ac:00/48;
}
ip-destination-address {
# адрес атакуемого сервера
}
}
then {
count 00:03:fe:0a:ac:00;
accept;
}
}
term other {
then {
count other;
accept;
}
}root@rt01> clear firewall filter ix_mac_filter
root@rt01> show firewall filter ix_mac_filter
Filter: ix_mac_filter
Counters:
Name Bytes Packets
00:01:e8:a3:ed:20 142632382856 288079929
00:02:4a:2f:a0:1a 5159885 75880
00:03:fe:0a:ac:00 14915791420 72085522
00:04:96:6d:6f:f0 2508125168 35985837
00:04:96:7d:f8:99 362692758 5352205
00:04:96:82:4d:57 216046092 2851369
...
And, if there is an anomaly, we look at which IP address is associated with this MAC address, then we look at who it belongs to, and if it is not a gateway, set the reject policy. Thus minimizing the consequences of the attack.
Of course, this is not a panacea, part of the Internet is blocked, but, in most cases, these are data center boarders - they are not our traffic consumers. The lock is quite simple and, for example, if there are no other means, this protection is fully justified. When the process is fully automated, this allows you to understand where the attack is coming from and whether it is possible to deal with it with several teams, which greatly simplifies life.
ps. After installing DPCe and MPC in the same chassis, this scheme began to work not quite correctly, some of the packets in the filter simply could not be seen. If someone tells me why, I will be grateful.