February 4, 2016 at 16:02
Procedurally generated world maps on Unity C #, part 4 (traffic)
- Transfer
- Tutorial

This is the last article in a series about procedurally generated maps of the world using Unity and C #. Caution, under the cut 7 MB of pictures.
Contents
Part 1 :
Introduction
Noise generation
Getting started
Generating a height map
Part 2 :
Minimize a map on one axis
Minimize a map on both axes
Find neighboring elements
Bitmasks
Fill
Part 3 :
Generate a heat map
Generate a humidity map
Generate rivers Generate
Part 4 (this article):
Generate biomes
Generation of spherical maps
Generation of biomes
Biomes are a way of classifying the types of the earth's surface. Our biome generator will be based on the popular Whittaker model, in which biomes are classified by rainfall and temperature. We have already generated a heat map and a humidity map for our world, so determining biomes will be quite simple. The Whittaker classification scheme is presented in the following illustration:
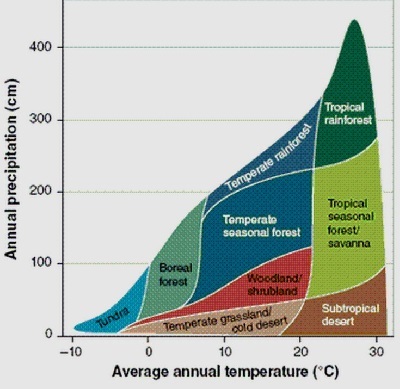
We can divide the different types of biomes according to a given temperature and humidity level. First, create a new enumeration in which these types of biomes will be stored:
public enum BiomeType
{
    Desert,
    Savanna,
    TropicalRainforest,
    Grassland,
    Woodland,
    SeasonalForest,
    TemperateRainforest,
    BorealForest,
    Tundra,
    Ice
}
Then we need to create a table that will help us determine the type of biome based on temperature and humidity. We already have HeatType and MoistureType. Each of these listings contains 6 specific types. To compare each of these types with the Whittaker scheme, the following table was created:
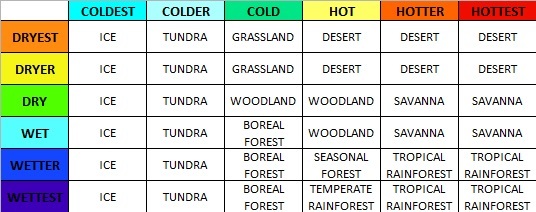
For the convenience of finding this data in the code, we transform the table into a two-dimensional array. It will be like this:
BiomeType[,] BiomeTable = new BiomeType[6,6] {
    //COLDEST        //COLDER          //COLD                  //HOT                          //HOTTER                       //HOTTEST
    { BiomeType.Ice, BiomeType.Tundra, BiomeType.Grassland,    BiomeType.Desert,              BiomeType.Desert,              BiomeType.Desert },              //DRYEST
    { BiomeType.Ice, BiomeType.Tundra, BiomeType.Grassland,    BiomeType.Desert,              BiomeType.Desert,              BiomeType.Desert },              //DRYER
    { BiomeType.Ice, BiomeType.Tundra, BiomeType.Woodland,     BiomeType.Woodland,            BiomeType.Savanna,             BiomeType.Savanna },             //DRY
    { BiomeType.Ice, BiomeType.Tundra, BiomeType.BorealForest, BiomeType.Woodland,            BiomeType.Savanna,             BiomeType.Savanna },             //WET
    { BiomeType.Ice, BiomeType.Tundra, BiomeType.BorealForest, BiomeType.SeasonalForest,      BiomeType.TropicalRainforest,  BiomeType.TropicalRainforest },  //WETTER
    { BiomeType.Ice, BiomeType.Tundra, BiomeType.BorealForest, BiomeType.TemperateRainforest, BiomeType.TropicalRainforest,  BiomeType.TropicalRainforest }   //WETTEST
};
To simplify the search even further, add a new function that returns the biome type of any tile. This part is quite simple, because each tile has already been assigned a type of heat and humidity.
public BiomeType GetBiomeType(Tile tile)
{
    return BiomeTable [(int)tile.MoistureType, (int)tile.HeatType];
}
This check is performed for each tile and sets the biome areas for the entire map.
private void GenerateBiomeMap()
{
    for (var x = 0; x < Width; x++) {
        for (var y = 0; y < Height; y++) {
            if (!Tiles[x, y].Collidable) continue;
            Tile t = Tiles[x,y];
            t.BiomeType = GetBiomeType(t);
        }
    }
}
Great, we identified all the biomes. However, we cannot visualize them yet. The next step is to assign a color to each type. This will allow us to visually display the area of each biome in the image. I chose the following colors:
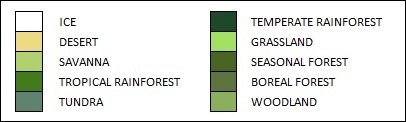
The color values are inserted into the TextureGenerator class along with the biome texture generation code:
//карта биомов
private static Color Ice = Color.white;
private static Color Desert = new Color(238/255f, 218/255f, 130/255f, 1);
private static Color Savanna = new Color(177/255f, 209/255f, 110/255f, 1);
private static Color TropicalRainforest = new Color(66/255f, 123/255f, 25/255f, 1);
private static Color Tundra = new Color(96/255f, 131/255f, 112/255f, 1);
private static Color TemperateRainforest = new Color(29/255f, 73/255f, 40/255f, 1);
private static Color Grassland = new Color(164/255f, 225/255f, 99/255f, 1);
private static Color SeasonalForest = new Color(73/255f, 100/255f, 35/255f, 1);
private static Color BorealForest = new Color(95/255f, 115/255f, 62/255f, 1);
private static Color Woodland = new Color(139/255f, 175/255f, 90/255f, 1);
    public static Texture2D GetBiomeMapTexture(int width, int height, Tile[,] tiles, float coldest, float colder, float cold)
{
    var texture = new Texture2D(width, height);
    var pixels = new Color[width * height];
    for (var x = 0; x < width; x++)
    {
        for (var y = 0; y < height; y++)
        {
            BiomeType value = tiles[x, y].BiomeType;
            switch(value){
            case BiomeType.Ice:
                pixels[x + y * width] = Ice;
                break;
            case BiomeType.BorealForest:
                pixels[x + y * width] = BorealForest;
                break;
            case BiomeType.Desert:
                pixels[x + y * width] = Desert;
                break;
            case BiomeType.Grassland:
                pixels[x + y * width] = Grassland;
                break;
            case BiomeType.SeasonalForest:
                pixels[x + y * width] = SeasonalForest;
                break;
            case BiomeType.Tundra:
                pixels[x + y * width] = Tundra;
                break;
            case BiomeType.Savanna:
                pixels[x + y * width] = Savanna;
                break;
            case BiomeType.TemperateRainforest:
                pixels[x + y * width] = TemperateRainforest;
                break;
            case BiomeType.TropicalRainforest:
                pixels[x + y * width] = TropicalRainforest;
                break;
            case BiomeType.Woodland:
                pixels[x + y * width] = Woodland;
                break;
            }
            // Тайлы воды
            if (tiles[x,y].HeightType == HeightType.DeepWater) {
                pixels[x + y * width] = DeepColor;
            }
            else if (tiles[x,y].HeightType == HeightType.ShallowWater) {
                pixels[x + y * width] = ShallowColor;
            }
            // рисуем реки
            if (tiles[x,y].HeightType == HeightType.River)
            {
                float heatValue = tiles[x,y].HeatValue;
                if (tiles[x,y].HeatType == HeatType.Coldest)
                    pixels[x + y * width] = Color.Lerp (IceWater, ColdWater, (heatValue) / (coldest));
                else if (tiles[x,y].HeatType == HeatType.Colder)
                    pixels[x + y * width] = Color.Lerp (ColdWater, RiverWater, (heatValue - coldest) / (colder - coldest));
                else if (tiles[x,y].HeatType == HeatType.Cold)
                    pixels[x + y * width] = Color.Lerp (RiverWater, ShallowColor, (heatValue - colder) / (cold - colder));
                else
                    pixels[x + y * width] = ShallowColor;
            }
            // добавляем контур
            if (tiles[x,y].HeightType >= HeightType.Shore && tiles[x,y].HeightType != HeightType.River)
            {
                if (tiles[x,y].BiomeBitmask != 15)
                    pixels[x + y * width] = Color.Lerp (pixels[x + y * width], Color.black, 0.35f);
            }
        }
    }
    texture.SetPixels(pixels);
    texture.wrapMode = TextureWrapMode.Clamp;
    texture.Apply();
    return texture;
}
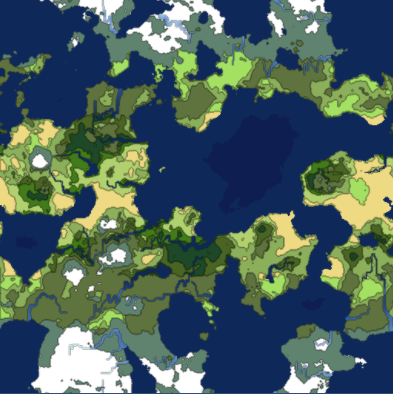
When rendering biome maps, beautiful collapsible maps of the world are obtained.

Generating spherical maps
Up to this point, we have created worlds collapsible along the X and Y axis. Such maps are great for games because the data is easily rendered into a game map.
If you try to design such collapsible textures on a sphere, they will look strange. So that our world can overlap with a sphere, it is necessary to write a generator of spherical textures. In this part, we will add such a function for the worlds we have generated.
Spherical generation is slightly different from the generation of collapsible maps, because it requires other noise schemes and texture mapping. For this reason, we will divide the generator class into two branches of subclasses: WrappableWorldGenerator and SphericalWorldGenerator. Each of them will inherit the base class Generator.
This will allow us to have a common functional core that provides advanced capabilities to each type of generator.
The original Generator class, as well as some of its functions, will become abstract:
protected abstract void Initialize();
protected abstract void GetData();
protected abstract Tile GetTop(Tile tile);
protected abstract Tile GetBottom(Tile tile);
protected abstract Tile GetLeft(Tile tile);
protected abstract Tile GetRight(Tile tile);
Our functions Initialize () and GetData () were created for collapsible worlds, so for a spherical generator, you need to write new ones. We will also create new classes for obtaining tiles, because coagulation will occur on the X axis with spherical projection.
Noise is initialized in a manner similar to the previously described, with the exception of one major difference. The heat map in the new generator will not collapse on the Y axis. Therefore, we cannot create the correct gradient for multiplication. We will have to do this manually during data generation.
protected override void Initialize()
    {
        HeightMap = new ImplicitFractal (FractalType.MULTI,
                                         BasisType.SIMPLEX,
                                         InterpolationType.QUINTIC,
                                         TerrainOctaves,
                                         TerrainFrequency,
                                         Seed);
        HeatMap = new ImplicitFractal(FractalType.MULTI,
                                      BasisType.SIMPLEX,
                                      InterpolationType.QUINTIC,
                                      HeatOctaves,
                                      HeatFrequency,
                                      Seed);
        MoistureMap = new ImplicitFractal (FractalType.MULTI,
                                           BasisType.SIMPLEX,
                                           InterpolationType.QUINTIC,
                                           MoistureOctaves,
                                           MoistureFrequency,
                                           Seed);
    }
The GetData function will change significantly. We will return to 3D noise sampling. Noise will be sampled based on a coordinate system with latitude and longitude.
I looked at how they performed a spherical projection in libnoise , and used the same concept. The basic code that converts the latitude and longitude coordinates to the Cartesian coordinates of a three-dimensional spherical map will be as follows:
void LatLonToXYZ(float lat, float lon, ref float x, ref float y, ref float z)
{
    float r = Mathf.Cos (Mathf.Deg2Rad * lon);
    x = r * Mathf.Cos (Mathf.Deg2Rad * lat);
    y = Mathf.Sin (Mathf.Deg2Rad * lon);
    z = r * Mathf.Sin (Mathf.Deg2Rad * lat);
}
The GetData function will cycle through all the coordinates using this conversion method to generate map data. Using this method, we create heat, height and humidity data. The biome map is generated in the same way as before - from the final heat map and humidity map.
protected override void GetData()
{
    HeightData = new MapData (Width, Height);
    HeatData = new MapData (Width, Height);
    MoistureData = new MapData (Width, Height);
    // Указываем область нашей карты по широте/долготе
    float southLatBound = -180;
    float northLatBound = 180;
    float westLonBound = -90;
    float eastLonBound = 90;
    float lonExtent = eastLonBound - westLonBound;
    float latExtent = northLatBound - southLatBound;
    float xDelta = lonExtent / (float)Width;
    float yDelta = latExtent / (float)Height;
    float curLon = westLonBound;
    float curLat = southLatBound;
    // Циклически перебираем все тайлы с помощью их координат широты/долготы
    for (var x = 0; x < Width; x++) {
        curLon = westLonBound;
        for (var y = 0; y < Height; y++) {
            float x1 = 0, y1 = 0, z1 = 0;
            // Преобразуем широту и долготу в x, y, z
            LatLonToXYZ (curLat, curLon, ref x1, ref y1, ref z1);
            // Тепловые данные
            float sphereValue = (float)HeatMap.Get (x1, y1, z1);
            if (sphereValue > HeatData.Max)
                HeatData.Max = sphereValue;
            if (sphereValue < HeatData.Min)
                HeatData.Min = sphereValue;
            HeatData.Data [x, y] = sphereValue;
           // Настройка тепла на основании широты
            float coldness = Mathf.Abs (curLon) / 90f;
            float heat = 1 - Mathf.Abs (curLon) / 90f;
            HeatData.Data [x, y] += heat;
            HeatData.Data [x, y] -= coldness;
            // Данные высоты
            float heightValue = (float)HeightMap.Get (x1, y1, z1);
            if (heightValue > HeightData.Max)
                HeightData.Max = heightValue;
            if (heightValue < HeightData.Min)
                HeightData.Min = heightValue;
            HeightData.Data [x, y] = heightValue;
            // Данные влажности
            float moistureValue = (float)MoistureMap.Get (x1, y1, z1);
            if (moistureValue > MoistureData.Max)
                MoistureData.Max = moistureValue;
            if (moistureValue < MoistureData.Min)
                MoistureData.Min = moistureValue;
            MoistureData.Data [x, y] = moistureValue;
            curLon += xDelta;
        }
        curLat += yDelta;
    }
}
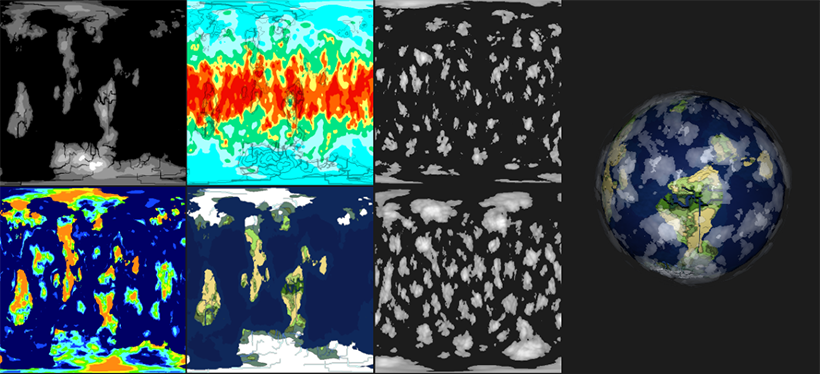
We get, respectively, a height map, a heat map, a moisture map, and a biome map:
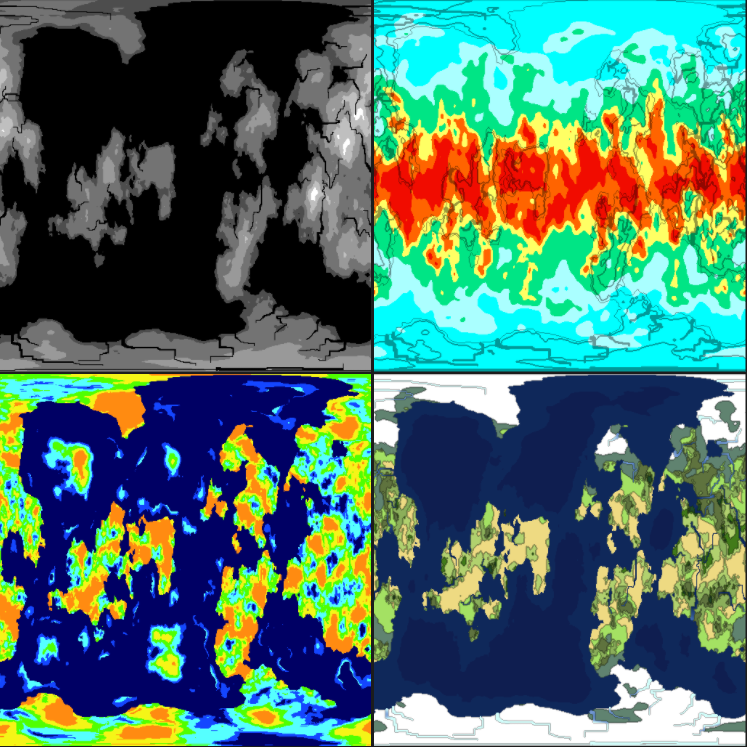
Note that the maps are bent near the corners. This is done on purpose, so spherical projection works. Let's apply the texture of the biomes to the sphere and see what happens:
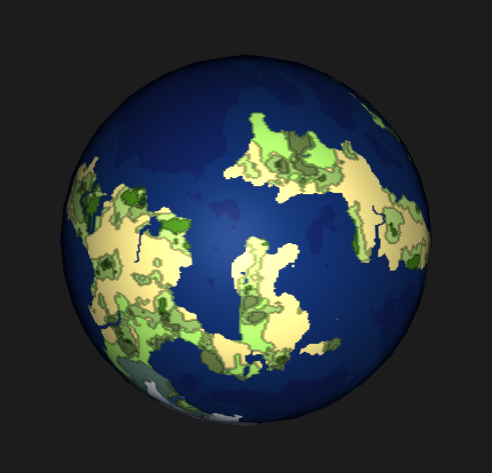
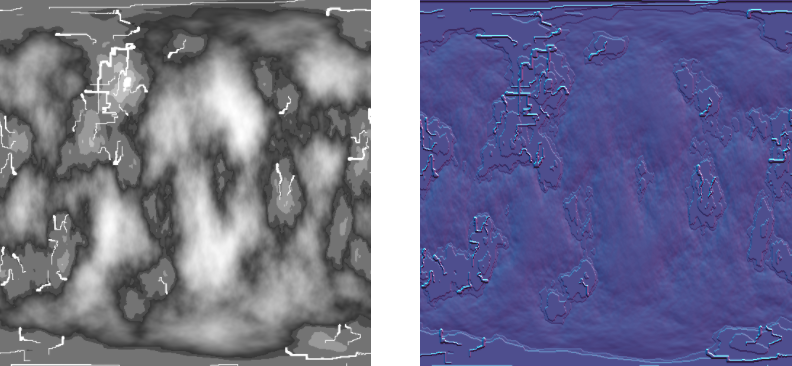
A good start. Please note our height map has become black and white. We did this in order to use the height map as a sphere shader. For the best effect, we need a relief texture, so we first render a black and white texture that displays the shifts we need. This texture will then be converted to a textured texture using the following code:
public static Texture2D CalculateBumpMap(Texture2D source, float strength)
{
    Texture2D result;
    float xLeft, xRight;
    float yUp, yDown;
    float yDelta, xDelta;
    var pixels = new Color[source.width * source.height];
    strength = Mathf.Clamp(strength, 0.0F, 10.0F);
    result = new Texture2D(source.width, source.height, TextureFormat.ARGB32, true);
    for (int by = 0; by < result.height; by++)
    {
        for (int bx = 0; bx < result.width; bx++)
        {
            xLeft = source.GetPixel(bx - 1, by).grayscale * strength;
            xRight = source.GetPixel(bx + 1, by).grayscale * strength;
            yUp = source.GetPixel(bx, by - 1).grayscale * strength;
            yDown = source.GetPixel(bx, by + 1).grayscale * strength;
            xDelta = ((xLeft - xRight) + 1) * 0.5f;
            yDelta = ((yUp - yDown) + 1) * 0.5f;
            pixels[bx + by * source.width] = new Color(xDelta, yDelta, 1.0f, yDelta);
        }
    }
    result.SetPixels(pixels);
    result.wrapMode = TextureWrapMode.Clamp;
    result.Apply();
    return result;
}
Passing the left texture to this function, we get the relief texture shown on the right:
Now if we apply this relief map along with the height map through the standard shader to our sphere, we get the following:

To further improve the image, we will add a couple of cloud layers. Generating clouds using noise is very simple, so why not. We use the billow noise module to create clouds.
Add two layers of clouds to give them depth. The code for the cloud noise generator is presented below:
Cloud1Map = new ImplicitFractal(FractalType.BILLOW,
                                BasisType.SIMPLEX,
                                InterpolationType.QUINTIC,
                                5,
                                1.65f,
                                Seed);
Cloud2Map = new ImplicitFractal (FractalType.BILLOW,
                                BasisType.SIMPLEX,
                                InterpolationType.QUINTIC,
                                6,
                                1.75f,
                                Seed);
We use the data in the same way. Cloud Texture Generator is a simple linear interpolator (lerp) from white to transparent white. We cut off the clouds to the set value, making everything else transparent. The code for the cloud texture generator is as follows:
public static Texture2D GetCloudTexture(int width, int height, Tile[,] tiles, float cutoff)
{
    var texture = new Texture2D(width, height);
    var pixels = new Color[width * height];
    for (var x = 0; x < width; x++)
    {
        for (var y = 0; y < height; y++)
        {
            if (tiles[x,y].CloudValue > cutoff)
                pixels[x + y * width] = Color.Lerp(new Color(1f, 1f, 1f, 0), Color.white, tiles[x,y].CloudValue);
            else
                pixels[x + y * width] = new Color(0,0,0,0);
        }
    }
    texture.SetPixels(pixels);
    texture.wrapMode = TextureWrapMode.Clamp;
    texture.Apply();
    return texture;
}
Create with it two different cloud textures. These textures are also created for spherical projection, so they have bends around the edges:
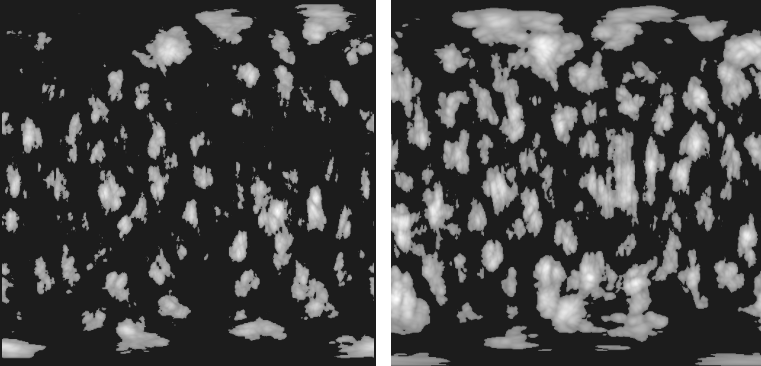
Now we add two spherical meshes slightly larger than the original sphere. Applying the cloud textures to the standard shader with the fade effect, we get a beautiful looking cloud:

In the end, I give a screenshot of all the generated textures used to create the final render of the planet:
This is the end of the series of articles. Source code for the entire github project: World Generator Final .