 January 25, 2016 at 08:27
An example of creating a web application using Vaadin libraries
In 2016, many of us promised ourselves new achievements, for example, reading a pending book, mastering a new sport or programming language, etc. Learning new technologies is somewhat akin to the above actions. So, for such enthusiasts a little review about convenient “tools” for developing web applications in the Java language.
A new series of articles will be devoted to Vaadin and Liquibase .
In the first article I want to tell you about several stages to start acquaintance with this FrameWork (Vaadin) . We’ll talk about “loading” the template and first adding elements to the “layout”. Let's talk a little about Liquibase. The following articles plan to add processing for xml files.
Vaadin .
For me, this is the "interpreter" of Java code in the user interface. In fact, I am reducing development to the level of control over the java layer. Thanks to the server-oriented architecture based on JavaEE, you can lay down a layer of complex logic without getting lost in the settings of individual parts. And the already prepared optimizations for browsers (I'm talking about cross-browser compatibility) will minimize this part of the work.
Server-based model allows you to quickly (see later) and create quality applications, reducing the risk of "getting stuck" at a certain stage. You are developing in Java, and on the client you will see JavaScript.
Additionally, I must say that the use of AJAX promises an increase in the exchange rate in the interface.
Many software products are being developed in this direction. Some of these are described in the first and fourth articles below.
If we talk about use, then for medium and large companies - this is an excellent choice (IMHO).
Essential information about Vaadin.
Official Vaadin website.
Here are some links to the video . I strongly advise you to look.
In Russian . It contains a story about the visual creation of a small application.
In a foreign language . Best practice is a very good story on how to properly create portions of the interface.
FrameWork articles .
Link to the first article . A small article about the differences between Vaadin and its "brothers."
Link to the second article. Overview of FrameWork features.
Link to the third article . Useful features.
Link to the fourth article . Here about GWT and Vaadin. Overview.
To create your first template, you can do the following.
The first is to install and configure several parts for proper development. If, for example, you use IntelliJ IDEA , then when creating a new project, select “Vaadin” in the “Additional Libraries and FrameWorks” section. After that, you will be asked to specify “Vaadin Distribution” and in addition you can put “Create sample application”, before these steps, be sure to specify the path to the Project SDK and Application Server (all these settings are made in one window).
By the way, there are templates for other IDEs.
Links to templates .
Vaadin Plug-in for Eclipse .
Vaadin Plug-in for NetBeans .
In the project, after launching TomCat, you can see such an inscription “Hello World”. This link allows you to see the process again.
What is Liquibase and why do we need it?
Link to the Liquibase website .
Good article about the features of the work.
Another well written material.
What is liquibase ? For me, this is a convenient mechanism for creating identical types of objects on different databases (Oracle, PostgreSQL and others). A very good choice for companies developing software.
If you try to describe it very briefly, then you describe tables, sequences, and other objects in xml. Further, the same file can be used for installation on different types of databases (with certain restrictions).
In this article, we will begin to create a user interface for, for example, creating Liquibase files (we restrict ourselves to the xml option).
It is thanks to the support of many databases that we will try to study and use this feature. I
forgot to mention Apache Tomcat. Link to Tomcat website .
In my proposed version in tests, you can use the built-in ability to run directly from the development environment.
Let's start with the user interface in Vaadin.
By the way, on the site itself you can find an example of construction"Address Book . "
We will try to go our own way and create a similar, but still “our” application.
Let's get started.
If you managed to load the template, then it looks something like this:
In the code you can see the line.
In fact, this is the “layout” on which we will add elements (now in addition to the main elements on the site, you can find a huge number of additional ones).
We will offer the future user two options, the first is to proceed to the creation of elements, the second is to follow the link to habrahabr.ru . Here you are free to use any resource in a real application - it may be a technical support site.
To do this, add a few elements. Here they are:
At startup (I am launching with Tomcat version - 7.0.65) you will have the following.

There are two options available to the future user, the first is to proceed to creating objects, the second is going to habrahabr.ru.
So, then the user clicks on the “The option to create” button. We offer a choice. To do this, we add addClickListener to the action. Something like this:
Because it is more convenient to use Lambda expressions; all the following handlers will be written using them. ->
Next, do the processing, add a Listener to the (buttonClick) button, and when clicked, draw another ComboBox element.
After restarting TomCat we get the result:

Here, the location of the buttons (“The option to create” and “Go habrahabr.ru”) is immediately evident. They are very close, in my opinion.
This is easy to fix.
We remove the addition of elements and add a new horizontal layer (“layout”), add buttons to it, and a new layer to the original layout.
This is what we get after restarting the application server (TomCat).

For “Create table”, add the following part.
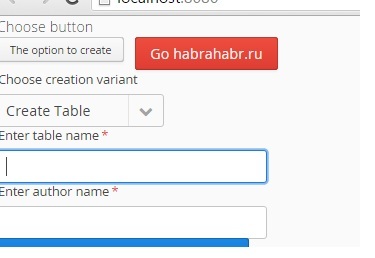
We make small changes. For example, once selected, the item will be read-only. Add fields to enter the name of the table and the author of the future file:
We get the result, which shows that after the choice there was an opportunity to enter the name of the table and the author of the changes. The length and other parameters of the input values can be limited or changed.
Here we dwell on the reasoning and writing code to summarize the subtotal. We sorted out the initial Vaadin layout a bit and tried to create some elements, and also added their processing.
From now on, dig a bit into Liquibase . For starters, it's worth looking at links with examples.
Creating a table - “Change: 'createTable'”
An example of creating.
To create a file, we need to add / write data to (id, author, tableName, name, type) and then collect separate “pieces” into a single file, because in a real situation, we can have a lot of different fields.
How are we going to do this? There are several options. We will try to parse them in the next article.
to be continued ...
A new series of articles will be devoted to Vaadin and Liquibase .
In the first article I want to tell you about several stages to start acquaintance with this FrameWork (Vaadin) . We’ll talk about “loading” the template and first adding elements to the “layout”. Let's talk a little about Liquibase. The following articles plan to add processing for xml files.
Vaadin .
For me, this is the "interpreter" of Java code in the user interface. In fact, I am reducing development to the level of control over the java layer. Thanks to the server-oriented architecture based on JavaEE, you can lay down a layer of complex logic without getting lost in the settings of individual parts. And the already prepared optimizations for browsers (I'm talking about cross-browser compatibility) will minimize this part of the work.
Server-based model allows you to quickly (see later) and create quality applications, reducing the risk of "getting stuck" at a certain stage. You are developing in Java, and on the client you will see JavaScript.
Additionally, I must say that the use of AJAX promises an increase in the exchange rate in the interface.
Many software products are being developed in this direction. Some of these are described in the first and fourth articles below.
If we talk about use, then for medium and large companies - this is an excellent choice (IMHO).
Essential information about Vaadin.
Official Vaadin website.
Here are some links to the video . I strongly advise you to look.
In Russian . It contains a story about the visual creation of a small application.
In a foreign language . Best practice is a very good story on how to properly create portions of the interface.
FrameWork articles .
Link to the first article . A small article about the differences between Vaadin and its "brothers."
Link to the second article. Overview of FrameWork features.
Link to the third article . Useful features.
Link to the fourth article . Here about GWT and Vaadin. Overview.
To create your first template, you can do the following.
The first is to install and configure several parts for proper development. If, for example, you use IntelliJ IDEA , then when creating a new project, select “Vaadin” in the “Additional Libraries and FrameWorks” section. After that, you will be asked to specify “Vaadin Distribution” and in addition you can put “Create sample application”, before these steps, be sure to specify the path to the Project SDK and Application Server (all these settings are made in one window).
By the way, there are templates for other IDEs.
Links to templates .
Vaadin Plug-in for Eclipse .
Vaadin Plug-in for NetBeans .
In the project, after launching TomCat, you can see such an inscription “Hello World”. This link allows you to see the process again.
What is Liquibase and why do we need it?
Link to the Liquibase website .
Good article about the features of the work.
Another well written material.
What is liquibase ? For me, this is a convenient mechanism for creating identical types of objects on different databases (Oracle, PostgreSQL and others). A very good choice for companies developing software.
If you try to describe it very briefly, then you describe tables, sequences, and other objects in xml. Further, the same file can be used for installation on different types of databases (with certain restrictions).
In this article, we will begin to create a user interface for, for example, creating Liquibase files (we restrict ourselves to the xml option).
It is thanks to the support of many databases that we will try to study and use this feature. I
forgot to mention Apache Tomcat. Link to Tomcat website .
In my proposed version in tests, you can use the built-in ability to run directly from the development environment.
Let's start with the user interface in Vaadin.
By the way, on the site itself you can find an example of construction"Address Book . "
We will try to go our own way and create a similar, but still “our” application.
Let's get started.
If you managed to load the template, then it looks something like this:
package com;
import com.vaadin.server.VaadinRequest;
import com.vaadin.ui.*;
/**
 * Created by Terran on 20.01.2016.
 */
public class MyVaadinApplication extends UI {
    @Override
    public void init(VaadinRequest request) {
        VerticalLayout layout = new VerticalLayout();
        setContent(layout);
        layout.addComponent(new Label("Hello, world!"));
    }
}
In the code you can see the line.
final VerticalLayout layout = new VerticalLayout();
In fact, this is the “layout” on which we will add elements (now in addition to the main elements on the site, you can find a huge number of additional ones).
We will offer the future user two options, the first is to proceed to the creation of elements, the second is to follow the link to habrahabr.ru . Here you are free to use any resource in a real application - it may be a technical support site.
To do this, add a few elements. Here they are:
final Label startVariant = new Label();
   startVariant.setValue("Choose button");
layout.addComponent(startVariant);
Button buttonClick = new Button("The option to create");
   buttonClick.setStyleName(ValoTheme.BUTTON_TINY);
layout.addComponent(buttonClick);
Button buttonHabrahabr = new Button("Go habrahabr.ru");
   buttonHabrahabr.setStyleName(ValoTheme.BUTTON_DANGER);
layout.addComponent(buttonHabrahabr);
At startup (I am launching with Tomcat version - 7.0.65) you will have the following.
There are two options available to the future user, the first is to proceed to creating objects, the second is going to habrahabr.ru.
So, then the user clicks on the “The option to create” button. We offer a choice. To do this, we add addClickListener to the action. Something like this:
buttonHabrahabr.addClickListener(new Button.ClickListener() {
    @Override
    public void buttonClick(Button.ClickEvent clickEvent) {
    }
});
Because it is more convenient to use Lambda expressions; all the following handlers will be written using them. ->
buttonHabrahabr.addClickListener((Button.ClickListener) clickEvent -> {
});
Next, do the processing, add a Listener to the (buttonClick) button, and when clicked, draw another ComboBox element.
buttonClick.addClickListener((Button.ClickListener) clickEvent -> {
    final ComboBox boxChange;
    layout.addComponent(boxChange = new ComboBox("Choose creation variant "));
    boxChange.addItems("Create Table", "Create PrimaryKey");
After restarting TomCat we get the result:
Here, the location of the buttons (“The option to create” and “Go habrahabr.ru”) is immediately evident. They are very close, in my opinion.
This is easy to fix.
We remove the addition of elements and add a new horizontal layer (“layout”), add buttons to it, and a new layer to the original layout.
layout.addComponent(buttonClick); layout.addComponent(buttonHabrahabr);
final HorizontalLayout horizontalLayoutForButton = new HorizontalLayout();
   horizontalLayoutForButton.addComponents(buttonClick,buttonHabrahabr);
   horizontalLayoutForButton.setSpacing(true);
layout.addComponent(horizontalLayoutForButton);
This is what we get after restarting the application server (TomCat).
For “Create table”, add the following part.
boxChange.addValueChangeListener((Property.ValueChangeListener) valueChangeEvent -> {
  if (Objects.equals(boxChange.getValue(), "Create Table")) {
      }
  else if (Objects.equals(boxChange.getValue(), "Create PrimaryKey")) {
    }
}
We make small changes. For example, once selected, the item will be read-only. Add fields to enter the name of the table and the author of the future file:
boxChange.addValueChangeListener((Property.ValueChangeListener) valueChangeEvent -> {
  if (Objects.equals(boxChange.getValue(), "Create Table")) {
      boxChange.setReadOnly(true);
      final TextField tableName = new TextField("Enter table name");
      tableName.setWidth("300px");
      tableName.setRequired(true);
      tableName.addValueChangeListener(event -> {
          String value = (String) event.getProperty().getValue();
          Notification.show("Value is: " + value);
      });
      tableName.setImmediate(true);
      final TextField authorName = new TextField("Enter author name");
      authorName.setWidth("300px");
      authorName.setRequired(true);
      authorName.addValueChangeListener(event -> {
          String authorNameValue = (String) event.getProperty().getValue();
          Notification.show("Value is: " + authorNameValue);
      });
      authorName.setImmediate(true);
      layout.addComponent(tableName);
      layout.addComponent(authorName);
We get the result, which shows that after the choice there was an opportunity to enter the name of the table and the author of the changes. The length and other parameters of the input values can be limited or changed.
Here we dwell on the reasoning and writing code to summarize the subtotal. We sorted out the initial Vaadin layout a bit and tried to create some elements, and also added their processing.
From now on, dig a bit into Liquibase . For starters, it's worth looking at links with examples.
Creating a table - “Change: 'createTable'”
An example of creating.
To create a file, we need to add / write data to (id, author, tableName, name, type) and then collect separate “pieces” into a single file, because in a real situation, we can have a lot of different fields.
How are we going to do this? There are several options. We will try to parse them in the next article.
to be continued ...
Only registered users can participate in the survey. Please come in.
Have you used these “tools” to create applications?
- 25% Yes 7
- 14.2% No 4
- 60.7% Plan 17









