January 26, 2016 at 06:07
Custom gestures, Kinect + Unity. Part 1
- Tutorial
Hello, today we will learn how to use custom gestures in our Unity applications, we will do it with Kinect'a v2. Gestures can be used for a wide range of tasks: moving around the stage, managing objects, working with the user interface, etc. In the first part we will consider the process of learning gestures, in the second we will use the model obtained from the training in Unity. We also learn about possible problems and solutions.
What we need:
1. Unity 5.0 Pro
2. Kinect v2 SDK
3. Kinect v2 Unity plugin
After we have downloaded and installed the Kinect SDK, you need to make sure that everything works for us. Open the Kinect SDK Browser and run the Body basic WPF example - you should see the skeleton of the person Kinect sees. If everything is fine, go ahead, if not, open the first example in the SDK Browser, the Kinect Configuration Verifier, and see what does not work for us.
Our example will be built around teaching a discrete gesture to wave your hand from top to bottom. “Discrete” here means that our trained model will allow us to detect the fact of a gesture (returning the degree of confidence whether there was a gesture at a given time). In contrast to the discrete one, it is possible to learn a continuous gesture. The main difference here is that in a continuous gesture we can find out the relative position between the initial and final phases of the gesture. Long gestures are beyond the scope of our tutorial.
To record training videos, we need Kinect Studio V2.0 . Let's look at the interface:

If you don’t see the output from Kinect, click on the button in the upper left corner to connect. On the left we see a list of streams that will be recorded. By default, the audio and color camera streams are turned off, which suits us, since we do not need them for training. To start recording a movie, click on the button
  to record.
Recommendations for recording a video: the video should contain both “positives” and “negatives”, so it makes sense to first record a few correctly executed gestures, and then several incorrect ones - this will facilitate marking up the video in the future. It’s better to record videos with different people, otherwise it’s possible to learn how to perform a specific person’s gesture
Finally, we recorded several videos for training, for our educational purposes 3-4 videos are enough. Now let's move on to learning. To do this, use the utility Visual Gesture Builder . It looks like this:
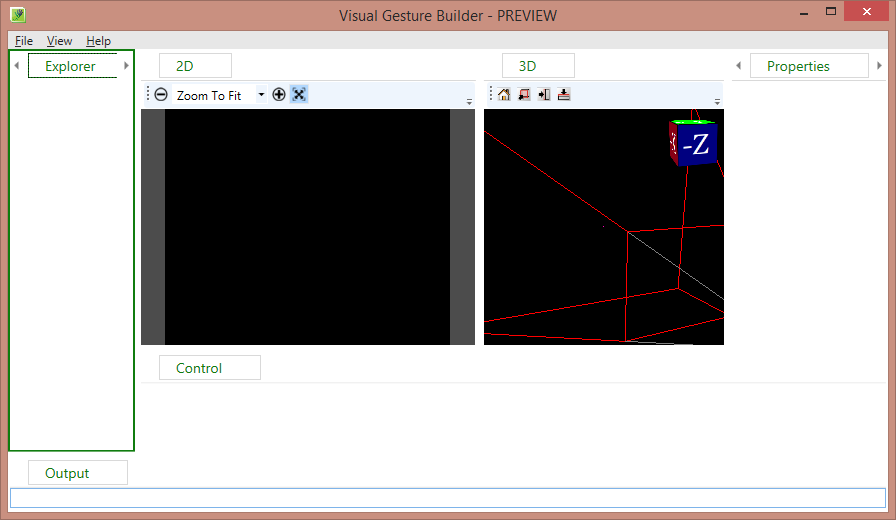
Let's proceed, create a new solution, File -> New Solution, select the folder and specify the name.
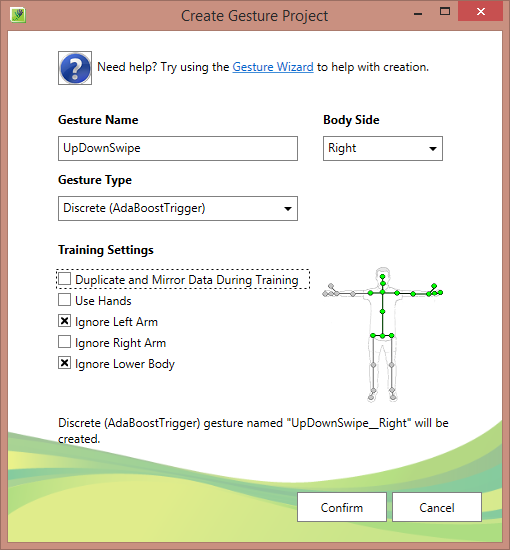
Now RMB according to the created solution and “Create New Project”, the logic is similar to Visual Studio - one solution can contain several projects, each project is a certain gesture. The setup of the project is quite clear, we are interested in the discrete gesture of the right hand, so we remove the mirroring (Duplicate and Mirror Data During Training) and ignore the lower body (Ignore Lower Body) and the left hand (Ignore Left Arm). Use Hands setting is used when hands are important to us. Ignoring here means that we will not take into account these parts of the body in the learning process.
Now we add our videos to the project (I recommend copying the videos to the project folder):

Select the video, we are interested in this panel:
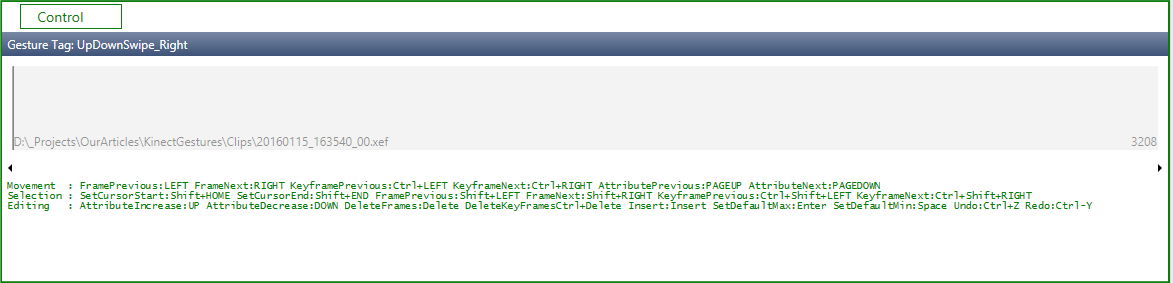
This is the panel for marking the video into positive sections and negative sections. Management: move left-right - with arrows, with shift it will stand out, set the selection to negative - space, to positive - enter.
To begin, select everything and set it to negative, for this, set the cursor to the beginning of the strip, press shift + end (the entire timeline is highlighted), press the spacebar. Next, move the arrows on our video and look for moments with our gestures, select each correct execution of the gesture (remember, with shift) and press enter.
After all the manipulations, you should get something like the following:
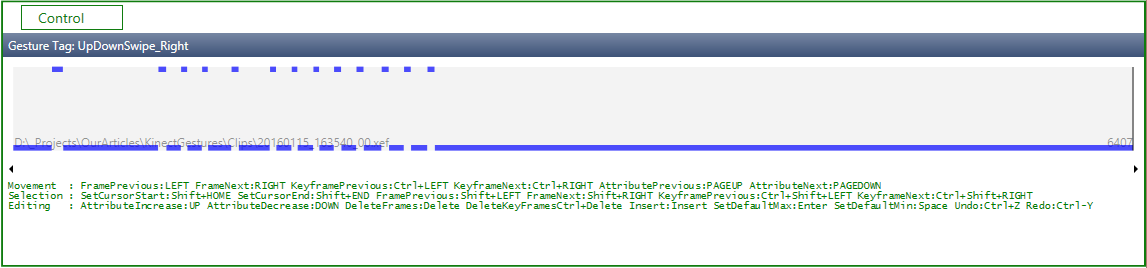
Where the blue at the top is positive, at the same time the right gesture is made, everything that is below is negative, there is no gesture of ours
and the last is the solution (we right-click on the decision -> Build), you can drink tea, depending on the number of clips the process may be delayed. A file with the extension .gdb will appear on the output in our folder with clips (therefore, we copied the clips to the project folder so that everything would be together). This file is a trained model that we will use in the future.
Let's see what we taught. Run Visual gesture builder , press “O” and select our .gdb file, on the left there is an output from the depth camera, on the right there is one window for each gesture (we have one), when we execute it, standing in front of Kinect, we should get something like a "herringbone":

This graph shows the degree of confidence that the gesture is at a point in time (the abscissa axis is time, the ordinate is the degree of confidence)
That's all with the first part. In the second part, we will look at how to use our trained model in Unity.
In practice, we ( Singularis lab ) used custom gestures in a real project and encountered a number of problems during development:
- Kinect is quite demanding on hardware - it does not work with all usb3 controllers. In addition, on one machine we had to torment drivers with the controller, despite the recommendation “update drivers to the latest version”, it didn’t work with the latest drivers, but it started up with older drivers.
- When recording a training sample, you do not need to rush to extremes: it is equally harmful to try to make a gesture identically and make it as diverse as possible. At one stage, we had a lot of videos with a lot of people and a very diverse execution of the same gesture (swipe hand), as a result, after training there were many false positives. In addition, Kinect is sensitive to relative position and tilt, that is, if you shot videos at a height of half a meter, and then use the trained model with a device already at a height of two meters, then the results may unpleasantly surprise you.
- Movies from Microsoft training with Kinect'om v2
- Blog Evangelist Microsoft, Peter Daukintis, where there are many articles as Kinect'e as a whole, and on learning gestures and integration with Unity
What we need:
1. Unity 5.0 Pro
2. Kinect v2 SDK
3. Kinect v2 Unity plugin
Prelude. Kinect Check
After we have downloaded and installed the Kinect SDK, you need to make sure that everything works for us. Open the Kinect SDK Browser and run the Body basic WPF example - you should see the skeleton of the person Kinect sees. If everything is fine, go ahead, if not, open the first example in the SDK Browser, the Kinect Configuration Verifier, and see what does not work for us.
Training sample
Our example will be built around teaching a discrete gesture to wave your hand from top to bottom. “Discrete” here means that our trained model will allow us to detect the fact of a gesture (returning the degree of confidence whether there was a gesture at a given time). In contrast to the discrete one, it is possible to learn a continuous gesture. The main difference here is that in a continuous gesture we can find out the relative position between the initial and final phases of the gesture. Long gestures are beyond the scope of our tutorial.
To record training videos, we need Kinect Studio V2.0 . Let's look at the interface:
If you don’t see the output from Kinect, click on the button
in the upper left corner to connect. On the left we see a list of streams that will be recorded. By default, the audio and color camera streams are turned off, which suits us, since we do not need them for training. To start recording a movie, click on the button to record. Recommendations for recording a video: the video should contain both “positives” and “negatives”, so it makes sense to first record a few correctly executed gestures, and then several incorrect ones - this will facilitate marking up the video in the future. It’s better to record videos with different people, otherwise it’s possible to learn how to perform a specific person’s gesture
Example movie for training
Training
Finally, we recorded several videos for training, for our educational purposes 3-4 videos are enough. Now let's move on to learning. To do this, use the utility Visual Gesture Builder . It looks like this:
Let's proceed, create a new solution, File -> New Solution, select the folder and specify the name.
Now RMB according to the created solution and “Create New Project”, the logic is similar to Visual Studio - one solution can contain several projects, each project is a certain gesture. The setup of the project is quite clear, we are interested in the discrete gesture of the right hand, so we remove the mirroring (Duplicate and Mirror Data During Training) and ignore the lower body (Ignore Lower Body) and the left hand (Ignore Left Arm). Use Hands setting is used when hands are important to us. Ignoring here means that we will not take into account these parts of the body in the learning process.
Now we add our videos to the project (I recommend copying the videos to the project folder):
Select the video, we are interested in this panel:
This is the panel for marking the video into positive sections and negative sections. Management: move left-right - with arrows, with shift it will stand out, set the selection to negative - space, to positive - enter.
To begin, select everything and set it to negative, for this, set the cursor to the beginning of the strip, press shift + end (the entire timeline is highlighted), press the spacebar. Next, move the arrows on our video and look for moments with our gestures, select each correct execution of the gesture (remember, with shift) and press enter.
Layout Process Example
After all the manipulations, you should get something like the following:
Where the blue at the top is positive, at the same time the right gesture is made, everything that is below is negative, there is no gesture of ours
and the last is the solution (we right-click on the decision -> Build), you can drink tea, depending on the number of clips the process may be delayed. A file with the extension .gdb will appear on the output in our folder with clips (therefore, we copied the clips to the project folder so that everything would be together). This file is a trained model that we will use in the future.
Check
Let's see what we taught. Run Visual gesture builder , press “O” and select our .gdb file, on the left there is an output from the depth camera, on the right there is one window for each gesture (we have one), when we execute it, standing in front of Kinect, we should get something like a "herringbone":
This graph shows the degree of confidence that the gesture is at a point in time (the abscissa axis is time, the ordinate is the degree of confidence)
That's all with the first part. In the second part, we will look at how to use our trained model in Unity.
Remarks
In practice, we ( Singularis lab ) used custom gestures in a real project and encountered a number of problems during development:
- Kinect is quite demanding on hardware - it does not work with all usb3 controllers. In addition, on one machine we had to torment drivers with the controller, despite the recommendation “update drivers to the latest version”, it didn’t work with the latest drivers, but it started up with older drivers.
- When recording a training sample, you do not need to rush to extremes: it is equally harmful to try to make a gesture identically and make it as diverse as possible. At one stage, we had a lot of videos with a lot of people and a very diverse execution of the same gesture (swipe hand), as a result, after training there were many false positives. In addition, Kinect is sensitive to relative position and tilt, that is, if you shot videos at a height of half a meter, and then use the trained model with a device already at a height of two meters, then the results may unpleasantly surprise you.
Usefulness
- Movies from Microsoft training with Kinect'om v2
- Blog Evangelist Microsoft, Peter Daukintis, where there are many articles as Kinect'e as a whole, and on learning gestures and integration with Unity