December 21, 2015 at 14:38
CHEFa Recipes: Automated Deployment of Business Application Environments Using HPE OneView
Information technology is becoming an integral part of the products and services of the new IT style, in which the business expects to receive the requested resources for new applications almost instantly. IT resources, in the paradigm of new requirements from modern applications, should be automatically allocated, used, returned and reused from a common pool of nodes of computing, storage, and network.

Such an infrastructure can have various types of hardware platforms, abstracted under a single management system. This approach is called infrastructure-as-code. Hewlett Packard Enterprise's vision is to move towards Composable (Composed) Infrastructure, a flexible resource pool from which, under the management of the HPE OneView Manager, using templates and APIs, applications are deployed, maintained and controlled.
To implement the Composable Infrastructure concept and automate the deployment of environments for business applications, HPE has combined its expertise with the renowned application configuration manager CHEF Software.
CHEF (Chef) - a configuration management system written in Ruby and Erlang, using a subject-oriented language to describe configurations. It is used to simplify the tasks of configuring and supporting multiple servers and can be integrated into cloud platforms to automate the management of current and automate the process of setting up new servers.
The CHEF user creates certain “recipes” with a description of how to manage server applications (for example, Apache, MySQL or Hadoop) and their settings.
A “recipe” is a description of the state of the system’s resources in which it should be located at a specific point in time, including installed packages, running services, and created files. CHEF verifies that each of the system resources is configured correctly and tries to correct the state of the resource if it does not meet the expected one.
Recipes are used both for managing Linux nodes and Windows (in recent releases)
The CHEF deployment driver for HPE OneView allows IT administrators to use CHEF recipes to automate the physical deployment of both the physical environment, including servers, network connections, storage, and the deployment of operating systems and applications. Such integration increases the speed of return for business and increases the reliability of deployment by automating all steps.
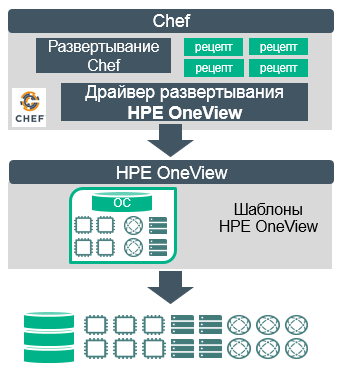
Figure 1 - Interaction diagram of the CHEF driver with the HPE OneView
To create a fast and efficient IT infrastructure, an organization must transform traditional physical systems into flexible pools of physical and virtual resources.
With this transformation, the organization often faces difficulties in automating the deployment of bare metal physical equipment. Deployment is always a complex process. It requires the installation and preparation of hardware, connections, an OS, and an application stack on suitable equipment for this task. These processes often require manual control and monitoring, which takes a lot of time and can lead to errors.
This is where the idea of a Composable infrastructure comes in. Such an infrastructure has a flexible pool of calculators, storage, and networks; resources in it are allocated, increased, decreased, and reused dynamically using a software-defined approach. In the Hewlett Packard Enterprise portfolio of solutions, all server, storage, and data network products are specifically designed to be embedded in such a software-defined infrastructure.
For example, each server is equipped with an iLO chip, which allows you to collect the state of all hardware components and configure interaction with the server without installing agents in the OS. Storage and network devices in the Hewlett Packard Enterprise portfolio of solutions understand the open API RESTful standard. It remained to create a product that would be able to combine all the developments in the hardware of the portfolio and create a full-fledged orchestrator that can manage the entire infrastructure of the data center. Such products became OneView, released in October 2013.
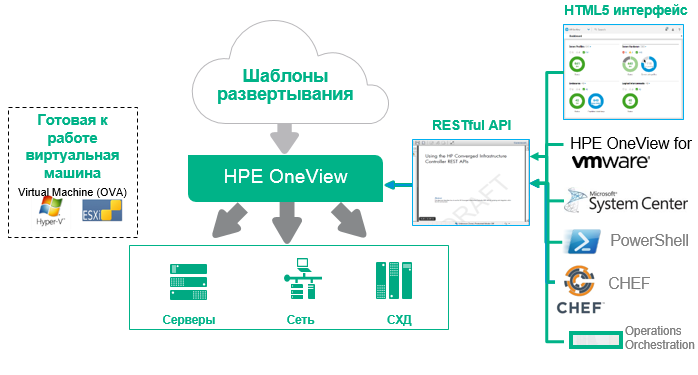
Fig. 2 - HPE OneView environment HPE OneView
is a full-cycle data center management software product: it uses connectors to manage the network, servers and storage systems built on Hewlett Packard Enterprise, Brocade products, some Cisco switches, integrates into all known hypervisors and can Access them to deploy virtual environments.
It comes in the form of a virtual machine image Vmware or Hyper-v and can be deployed on any equipment that supports these hypervisors. HPE OneView has an intuitive and easy to learn interface that can be adapted to specific groups of administrators by adding or removing components in the graphical console. In addition, HPE OneView can integrate with the data center infrastructure - UPS, PDU (Schneider Electric, Eaton, etc.), racks, allowing you to get a three-dimensional picture of what is happening in the server rooms and control the movement of applications or virtual machines based on the received data.
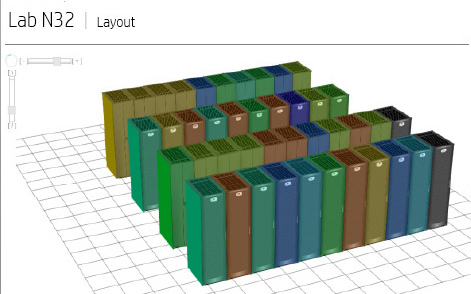
Fig. 3 - Temperature chart of the data center in OneView.
The administrator can build a map of the interaction of devices in the OneView interface:
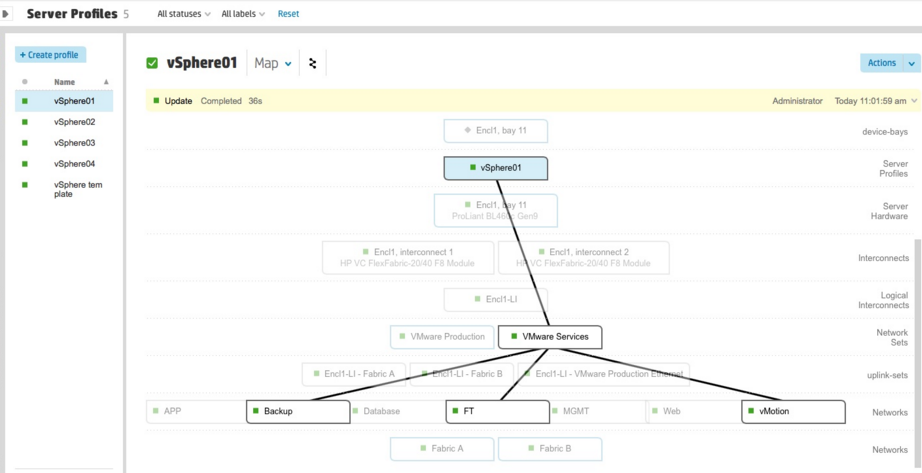
Fig. 4 - Links of server architecture elements
HPE OneView completely replaces the 5 previous products of server infrastructure management: HP SIM, Insight Control, Onboard Administrator, VCM, HPSUM.
In version 2.0, HPE OneView expanded its capabilities - there was a functionality for migrating profiles (IP, WWN, MAC address settings and other parameters) of a server from one blade compartment to another, as between compartments with the same blade servers (the same processor types, memory, network adapters), and between compartments with different generations of blade servers with different generations of CPUs, such as LAN and FC adapters. Moreover, such migration is now possible not only within the framework of one blade basket, but also between several.
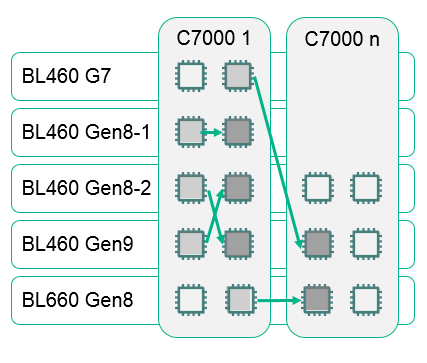
Fig. 5 - New opportunities for profile migration in OneView 2.0
HPE OneView allows administrators to use templates and profiles to implement the idea of software-defined architecture or infrastructure-as-code in their enterprise.
The templates supplied with OneView can be easily adapted and modified for various applications and based on the specifics of the equipment in each case.
These templates are recommended for use in the DevOps approach because they reduce the infrastructure deployment time for developers and eliminate inconsistencies between IT representatives, allowing you to start testing applications in minutes.
In order to show the possibility of automated deployment of applications from scratch, using the capabilities of OneView and CHEF, you need to perform several steps.
Deploying a physical server using HPE OneView
To do this, go to the HPE OneView console - Server Profiles - Create Profile. And we get something like this window:
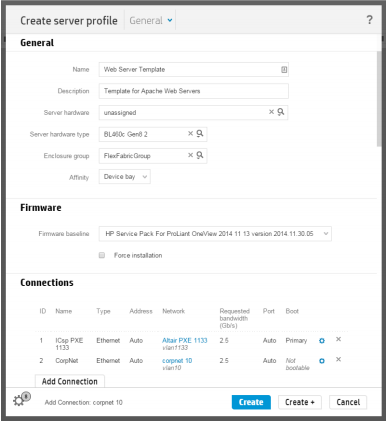
Fig.6 - Creating a profile in OneView
In this scenario, the profile name is set to “Web Server Template”, the parameters of the blade basket, blade server, network connections are filled in, based on specific equipment models in your data center.
Click "Create" and save the profile. Next, you need to install the CHEF and OneView integration driver.
Deploying the OS using the template in OneView
Download the “chef-settings-Linux®” script from the GitHub website . Change the following values in the script:
This script must be built into the OS deployment package - OS Build Plan. Read more about creating the OS Build Plan here and here .
Configuring the application stack using a CHEF
cookbook Next, create a cookbook and recipe in CHEF. What is the main tool of a chef? Knife!
The first recipe file will have the same name, find it https://github.com/HewlettPackard/chef-provisioning-oneview#prerequisites and fill in all the parameters of your environment.
The next step is to create the recipe itself, replacing the parameters of the code below with the actual ones for your environment:
Deploy! Now that everything is ready, proceed to the final part. CHEF will use the recipe created and, together with the OneView driver, the web server will be fully deployed from scratch.
In the CHEF console, you need to go to the directory containing the recipe and run the command:
Take a look at the OneView console and see how our application is deployed:
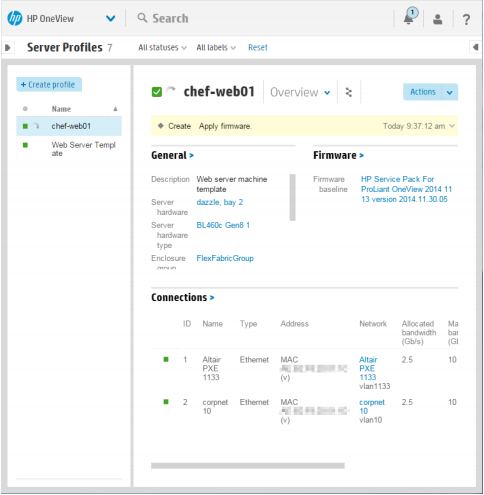
Figure 7 - Quiet, deployment is in progress!
When the deployment is complete, verify that all components are installed and configured correctly:
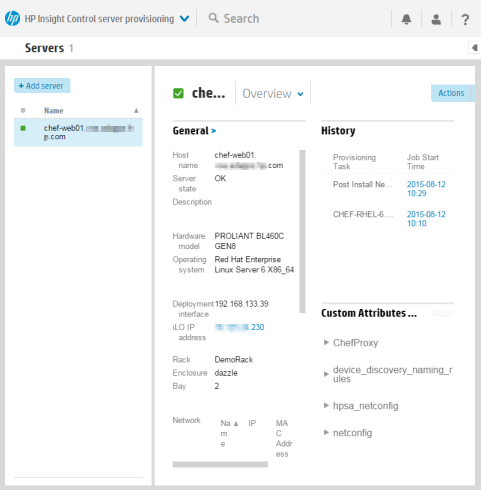
Fig. 8 - Checking the parameters
Now we switch to the CHEF console and verify that the node is actually created using the CHEF recipe:
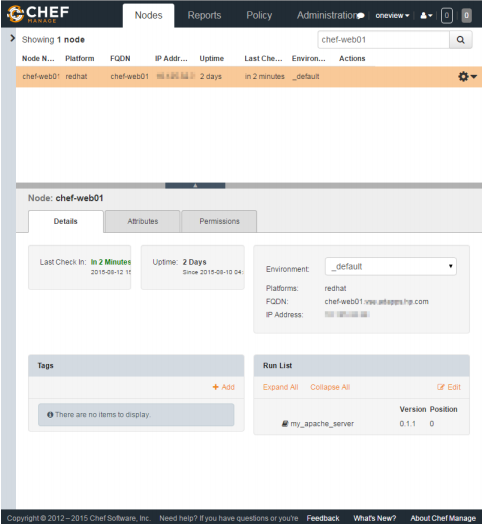
Fig. 9 - CHEF also knows about this node.
We also verify that the serial number is assigned to the server, Apache is configured on it and Apache Webserver is up, how long it took and what steps were taken:
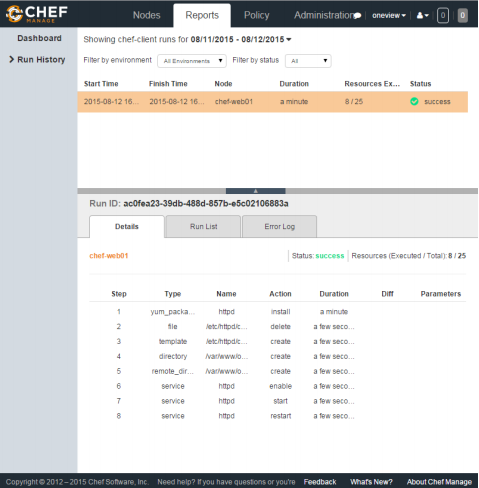
Fig. 10 - Most components are initialized in seconds!
The fact that this server is now visible in the console means that it is correctly configured and sends information about itself. It's time to make sure that the application really works, for this we turn to Webserver in the browser:
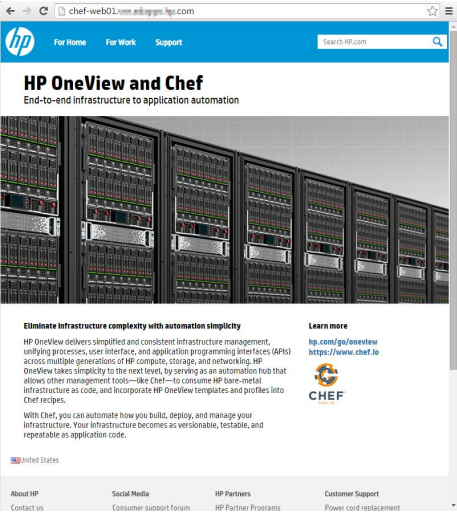
Fig. 11 - Webserver is alive and ready to work!
The deployment mechanism in HPE OneView consists of 5 steps:
1. We select compatible server hardware from the pool of available servers managed by HPE OneView using the HPE OneView REST API search.
2. Create a new server profile template using the HPE OneView REST API and assign:
A. Firmware version, BIOS, local storage configuration: HPE OneView uses the built-in HP Intelligent Provisioning (IP), Linux environment for PXE boot, which is already built into the iLO baseboard management card (BMC) processor, SmartStart.
B.Network Connections: HPE OneView uses the virtual connect network platform to dynamically present network connections for servers from a network connection pool.
C. SAN: HPE OneView automates the presentation of SANs for HPE 3PAR storage and for Fiber Channel switches, including Brocade, Cisco, and HPE Networking.
3. The selected OS is deployed as soon as the provision of physical resources is completed:
A. The server profile is configured to download the installation image over the network.
B. The server turns on and the PXE boot starts.
C. The OneView driver launches the OS installation using the HPE OneView REST API (Insight Control server provisioning).
4. Network parameters are set
A. IP addresses, subnets, hostnames, etc. for various network adapters and virtual network adapters, allowing you to create complex network configurations.
5. CHEF deploys the application stack on top of the deployed OS
A. Download the CHEF client to the server, after which the CHEF client registers with the CHEF server.
B. Launching the CHEF client on a new server, which pulls up the necessary cookbook from the CHEF server and applies the recipe for configuring the Web server.
Deployment process video:
As you can see, using CHEF recipes, together with the hardware and software products of Hewlett Packard Enterprise, you can get a simple, open and fully automated infrastructure-as-a-code for deploying applications. Do not be afraid to experiment, the only way you can become a real chef of IT kitchen!
For independent study: Van - Tu - Free - Fo
Thank you for your attention!
Such an infrastructure can have various types of hardware platforms, abstracted under a single management system. This approach is called infrastructure-as-code. Hewlett Packard Enterprise's vision is to move towards Composable (Composed) Infrastructure, a flexible resource pool from which, under the management of the HPE OneView Manager, using templates and APIs, applications are deployed, maintained and controlled.
To implement the Composable Infrastructure concept and automate the deployment of environments for business applications, HPE has combined its expertise with the renowned application configuration manager CHEF Software.
CHEF (Chef) - a configuration management system written in Ruby and Erlang, using a subject-oriented language to describe configurations. It is used to simplify the tasks of configuring and supporting multiple servers and can be integrated into cloud platforms to automate the management of current and automate the process of setting up new servers.
The CHEF user creates certain “recipes” with a description of how to manage server applications (for example, Apache, MySQL or Hadoop) and their settings.
A “recipe” is a description of the state of the system’s resources in which it should be located at a specific point in time, including installed packages, running services, and created files. CHEF verifies that each of the system resources is configured correctly and tries to correct the state of the resource if it does not meet the expected one.
Recipes are used both for managing Linux nodes and Windows (in recent releases)
The CHEF deployment driver for HPE OneView allows IT administrators to use CHEF recipes to automate the physical deployment of both the physical environment, including servers, network connections, storage, and the deployment of operating systems and applications. Such integration increases the speed of return for business and increases the reliability of deployment by automating all steps.
Figure 1 - Interaction diagram of the CHEF driver with the HPE OneView
To create a fast and efficient IT infrastructure, an organization must transform traditional physical systems into flexible pools of physical and virtual resources.
With this transformation, the organization often faces difficulties in automating the deployment of bare metal physical equipment. Deployment is always a complex process. It requires the installation and preparation of hardware, connections, an OS, and an application stack on suitable equipment for this task. These processes often require manual control and monitoring, which takes a lot of time and can lead to errors.
This is where the idea of a Composable infrastructure comes in. Such an infrastructure has a flexible pool of calculators, storage, and networks; resources in it are allocated, increased, decreased, and reused dynamically using a software-defined approach. In the Hewlett Packard Enterprise portfolio of solutions, all server, storage, and data network products are specifically designed to be embedded in such a software-defined infrastructure.
For example, each server is equipped with an iLO chip, which allows you to collect the state of all hardware components and configure interaction with the server without installing agents in the OS. Storage and network devices in the Hewlett Packard Enterprise portfolio of solutions understand the open API RESTful standard. It remained to create a product that would be able to combine all the developments in the hardware of the portfolio and create a full-fledged orchestrator that can manage the entire infrastructure of the data center. Such products became OneView, released in October 2013.
HPE OneView
Fig. 2 - HPE OneView environment HPE OneView
is a full-cycle data center management software product: it uses connectors to manage the network, servers and storage systems built on Hewlett Packard Enterprise, Brocade products, some Cisco switches, integrates into all known hypervisors and can Access them to deploy virtual environments.
It comes in the form of a virtual machine image Vmware or Hyper-v and can be deployed on any equipment that supports these hypervisors. HPE OneView has an intuitive and easy to learn interface that can be adapted to specific groups of administrators by adding or removing components in the graphical console. In addition, HPE OneView can integrate with the data center infrastructure - UPS, PDU (Schneider Electric, Eaton, etc.), racks, allowing you to get a three-dimensional picture of what is happening in the server rooms and control the movement of applications or virtual machines based on the received data.
Fig. 3 - Temperature chart of the data center in OneView.
The administrator can build a map of the interaction of devices in the OneView interface:
Fig. 4 - Links of server architecture elements
HPE OneView completely replaces the 5 previous products of server infrastructure management: HP SIM, Insight Control, Onboard Administrator, VCM, HPSUM.
In version 2.0, HPE OneView expanded its capabilities - there was a functionality for migrating profiles (IP, WWN, MAC address settings and other parameters) of a server from one blade compartment to another, as between compartments with the same blade servers (the same processor types, memory, network adapters), and between compartments with different generations of blade servers with different generations of CPUs, such as LAN and FC adapters. Moreover, such migration is now possible not only within the framework of one blade basket, but also between several.
Fig. 5 - New opportunities for profile migration in OneView 2.0
HPE OneView allows administrators to use templates and profiles to implement the idea of software-defined architecture or infrastructure-as-code in their enterprise.
The templates supplied with OneView can be easily adapted and modified for various applications and based on the specifics of the equipment in each case.
These templates are recommended for use in the DevOps approach because they reduce the infrastructure deployment time for developers and eliminate inconsistencies between IT representatives, allowing you to start testing applications in minutes.
Deployment Steps
In order to show the possibility of automated deployment of applications from scratch, using the capabilities of OneView and CHEF, you need to perform several steps.
Deploying a physical server using HPE OneView
To do this, go to the HPE OneView console - Server Profiles - Create Profile. And we get something like this window:
Fig.6 - Creating a profile in OneView
In this scenario, the profile name is set to “Web Server Template”, the parameters of the blade basket, blade server, network connections are filled in, based on specific equipment models in your data center.
Click "Create" and save the profile. Next, you need to install the CHEF and OneView integration driver.
Deploying the OS using the template in OneView
Download the “chef-settings-Linux®” script from the GitHub website . Change the following values in the script:
CHEF_PROXYSERVER: the proxy server address
YUM_REPOSITORY_INFO: the yum repository information
CHEF_CERT: the SSH certificate information to be copied into the authorization files
LOGIN_DISABLED: should be set to YES/yes to disable user login and NO/no if LOGIN using username/password should not be disabled
This script must be built into the OS deployment package - OS Build Plan. Read more about creating the OS Build Plan here and here .
Configuring the application stack using a CHEF
cookbook Next, create a cookbook and recipe in CHEF. What is the main tool of a chef? Knife!
The first recipe file will have the same name, find it https://github.com/HewlettPackard/chef-provisioning-oneview#prerequisites and fill in all the parameters of your environment.
The next step is to create the recipe itself, replacing the parameters of the code below with the actual ones for your environment:
require 'chef/provisioning'
with_driver 'oneview'
with_chef_server "https://my-chef.my-domain.com/organizations/my-org",
 :client_name => Chef::Config[:node_name],
 :signing_key_filename => Chef::Config[:client_key]
machine 'web01' do
 recipe 'my_server_cookbook::default'
 machine_options :driver_options => {
 :server_template => 'Web Server Template',
 :os_build => 'CHEF-RHEL-6.5-x64',
 :host_name => 'chef-web01',
 :ip_address => 'xx.xx.xx.xx',
 :domainType => 'workgroup',
 :domainName => 'sub.domain.com',
 :mask => '255.255.255.0',
 :dhcp => false,
 :gateway => 'xx.xx.xx.1',
 :dns => 'xx.xx.xx.xx,xx.xx.xx.xx,xx.xx.xx.xx',
 :connections => {
 #1 => { ... } (Reserved for PXE on our setup)
 2 => {
 :ip4Address => 'xx.xx.xx.xx',
 :mask => '255.255.254.0', # Optional
 :dhcp => false
 :gateway => 'xx.xx.xx.1' # Optional
 :dns => 'xx.xx.xx.xx' # Optional
 }
 },
 :custom_attributes => {
 :chefCert => 'ssh-rsa AA...' # Optional
 }
 },
 :transport_options => {
 :user => 'root', # Optional. Defaults to 'root'
 :ssh_options => {
 :password => Chef::Config.knife[:node_root_password]
 }
 },
 :convergence_options => {
 :ssl_verify_mode => :verify_none, # Optional
 :bootstrap_proxy => 'http://proxy.domain.com:8080' # Optional
 }
 chef_environment '_default'
 converge true
end
Deploy! Now that everything is ready, proceed to the final part. CHEF will use the recipe created and, together with the OneView driver, the web server will be fully deployed from scratch.
In the CHEF console, you need to go to the directory containing the recipe and run the command:
$ bundle exec chef-client -z путь_к_рецепту.rbTake a look at the OneView console and see how our application is deployed:
Figure 7 - Quiet, deployment is in progress!
When the deployment is complete, verify that all components are installed and configured correctly:
Fig. 8 - Checking the parameters
Now we switch to the CHEF console and verify that the node is actually created using the CHEF recipe:
Fig. 9 - CHEF also knows about this node.
We also verify that the serial number is assigned to the server, Apache is configured on it and Apache Webserver is up, how long it took and what steps were taken:
Fig. 10 - Most components are initialized in seconds!
The fact that this server is now visible in the console means that it is correctly configured and sends information about itself. It's time to make sure that the application really works, for this we turn to Webserver in the browser:
Fig. 11 - Webserver is alive and ready to work!
The deployment mechanism in HPE OneView consists of 5 steps:
1. We select compatible server hardware from the pool of available servers managed by HPE OneView using the HPE OneView REST API search.
2. Create a new server profile template using the HPE OneView REST API and assign:
A. Firmware version, BIOS, local storage configuration: HPE OneView uses the built-in HP Intelligent Provisioning (IP), Linux environment for PXE boot, which is already built into the iLO baseboard management card (BMC) processor, SmartStart.
B.Network Connections: HPE OneView uses the virtual connect network platform to dynamically present network connections for servers from a network connection pool.
C. SAN: HPE OneView automates the presentation of SANs for HPE 3PAR storage and for Fiber Channel switches, including Brocade, Cisco, and HPE Networking.
3. The selected OS is deployed as soon as the provision of physical resources is completed:
A. The server profile is configured to download the installation image over the network.
B. The server turns on and the PXE boot starts.
C. The OneView driver launches the OS installation using the HPE OneView REST API (Insight Control server provisioning).
4. Network parameters are set
A. IP addresses, subnets, hostnames, etc. for various network adapters and virtual network adapters, allowing you to create complex network configurations.
5. CHEF deploys the application stack on top of the deployed OS
A. Download the CHEF client to the server, after which the CHEF client registers with the CHEF server.
B. Launching the CHEF client on a new server, which pulls up the necessary cookbook from the CHEF server and applies the recipe for configuring the Web server.
Deployment process video:
As you can see, using CHEF recipes, together with the hardware and software products of Hewlett Packard Enterprise, you can get a simple, open and fully automated infrastructure-as-a-code for deploying applications. Do not be afraid to experiment, the only way you can become a real chef of IT kitchen!
For independent study: Van - Tu - Free - Fo
Thank you for your attention!