Android video recording and processing
Writing Android applications related to recording and processing videos is a rather difficult task. Using standard tools such as MediaRecorder is not very difficult, but if you try to do something that goes beyond the usual, the real “fun” begins.
What's wrong with Android video
The functionality for working with video in Android up to version 4.3 is very scarce: it is possible to record video from the camera using Camera and MediaRecorder , apply standard camera color filters (sepia, black and white, etc.) and that’s all, perhaps.
Starting with version 4.1, it became possible to use the MediaCodec class , which gives access to low-level codecs and the MediaExtractor class , which allows you to extract encoded media from a source.
Scheme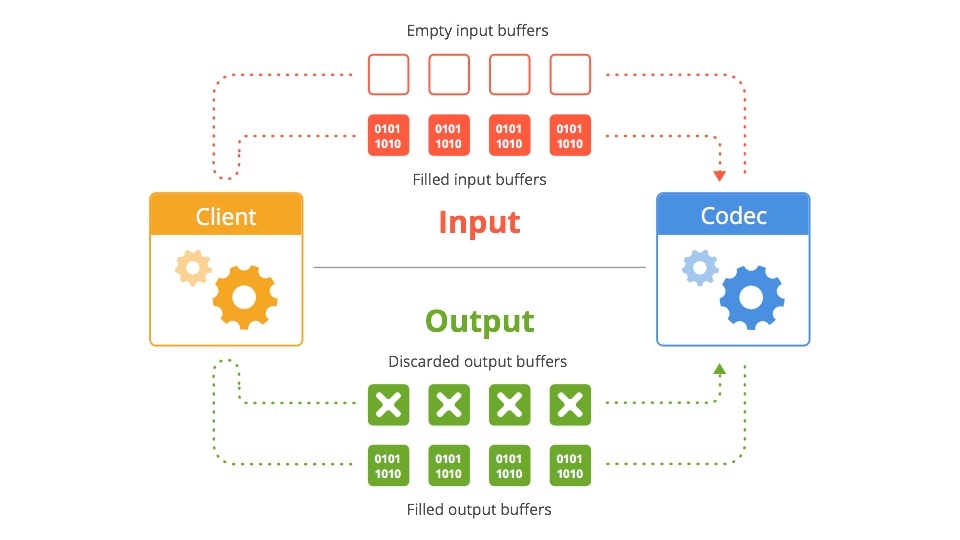
Android 4.3 introduced the MediaMuxer class , which can record multiple video and audio streams into a single file.
Scheme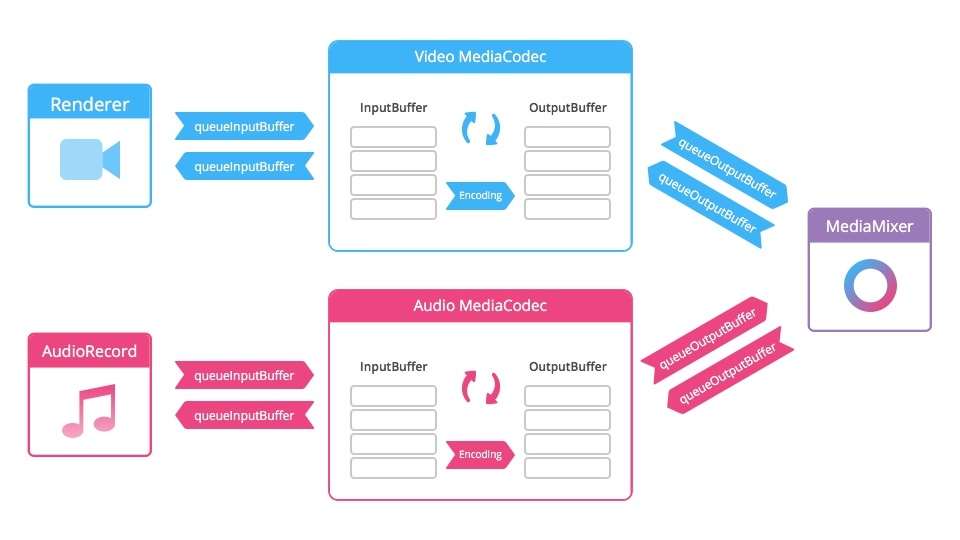
Here we already have more opportunities for creativity: the functionality allows not only to encode and decode video streams, but also to perform some video processing during recording.
The project I was working on had several requirements for the application:
- Record multiple chunks of videos with a total duration of up to 15 seconds
- "Gluing" recorded chunks into a single file
- “Fast Motion” - time-lapse effect
- “Slow Motion” - Slow Motion Effect
- “Stop Motion” - recording very short videos (consisting of a couple of frames), almost a photo in video format
- Crop a video and overlay a watermark (watermark) to upload to the social. the network
- Overlaying music on a video
- Reverse video
Instruments
Initially, video was recorded using MediaRecorder. This method is the easiest, has long been used, has many examples and is supported by all versions of Android. But it does not lend itself to customization. In addition, recording starts when using MediaRecorder'a with a delay of about 700 milliseconds. An almost second delay is not acceptable for recording small pieces of video.
Therefore, it was decided to increase the minimum compatible version of Android 4.3 and use MediaCodec and MediaMuxer to record video. This solution allowed us to get rid of the delay in recording initialization. To render and modify frames captured from the camera, OpenGL was used in conjunction with shaders.
The examples were taken from Google. The project is called Grafika and is a compilation of
For post-processing video was used FFmpeg . The main difficulty with ffmpeg is building the necessary modules and connecting to your project. This is a long process requiring certain skills, so we used a ready-made build for Android. The peculiarity of working with most of these ffmpeg assemblies is that it must be used as an executable command line file: pass a string command with input parameters and parameters that should be applied to the final video. The lack of the ability to debug, and indeed to find out what the mistake is, if something went wrong, is also very depressing. The only source of information is the log file, which is recorded while ffmpeg is running. Therefore, in the beginning, it takes a lot of time to figure out how one or another team works, how to make compound commands that will perform several actions at once, etc.
Slow motion
At the moment, they refused to implement Slow Motion, because the vast majority of Android devices do not have hardware support for recording video with a sufficient frame rate. There is also no normal ability to “activate” this function even on that small fraction of devices on which there is hardware support.
You can make a program slow-mo, for this there are options:
- Duplicate frames during recording, or extend their duration (time that the frame is displayed).
- Record a video and then process - again - duplicating or extending each frame.
But the result is pretty poor quality:
Fast motion
But there is no problem with recording time-lapse video. When recording using MediaRecorder, you can set the frame rate, for example, 10 (the standard frame rate for video recording is 30), and every third frame will be recorded. As a result, the video will be accelerated 3 times.
The code
    private boolean prepareMediaRecorder() {
        if (camera == null) {
            return false;
        }
        camera.unlock();
        if (mediaRecorder == null) {
            mediaRecorder = new MediaRecorder();
            mediaRecorder.setCamera(camera);
        }
        mediaRecorder.setVideoSource(MediaRecorder.VideoSource.CAMERA);
        mediaRecorder.setOutputFormat(MediaRecorder.OutputFormat.MPEG_4);
        CamcorderProfile profile = getCamcorderProfile(cameraId);
        mediaRecorder.setCaptureRate(10);        // Здесь мы задаем частоту кадров при записи видео
        mediaRecorder.setVideoSize(profile.videoFrameWidth, profile.videoFrameHeight);
        mediaRecorder.setVideoFrameRate(30);
        mediaRecorder.setVideoEncodingBitRate(profile.videoBitRate);
        mediaRecorder.setOutputFile(createVideoFile().getPath());
        mediaRecorder.setPreviewDisplay(cameraPreview.getHolder().getSurface());
        mediaRecorder.setVideoEncoder(MediaRecorder.VideoEncoder.H264);
        try {
            mediaRecorder.prepare();
        } catch (Exception e) {
            releaseMediaRecorder();
            return false;
        }
        return true;
    }
Stop motion
For instant recording of several frames, the standard version with MediaRecorder is not suitable because of the long delay before starting recording. But using MediaCodec and MediaMuxer solves the performance issue.
Gluing recorded pieces into a single file
This is one of the main features of the application. As a result, after recording several chunks, the user should receive one complete video file.
Initially, ffmpeg was used for this, but I had to abandon this idea, since ffmpeg glued the video with transcoding, and the process turned out to be quite long (on Nexus 5, gluing 7-8 chunks in one 15 second video took more than 15 seconds, and for 100 chunks time increased to a minute or more). If you use a higher bitrate or codecs, which give better results with the same bitrate, then the process took even longer.
Therefore, now the mp4parser library is used, which, in essence, pulls encoded data from container files, creates a new container, and puts the data one after another in a new container. Then it writes information to the container’s headers and that’s all, at the output we get a whole video. The only limitation in this approach: all chunks must be encoded with the same parameters (codec type, resolution, aspect ratio, etc.). This approach works in 1-4 seconds depending on the number of chunks.
An example of using mp4parser to glue several video files into one
public void merge(List parts, File outFile) {
  try {
    Movie finalMovie = new Movie();
    Track[] tracks = new Track[parts.size()];
    for (int i = 0; i < parts.size(); i++) {
      Movie movie = MovieCreator.build(parts.get(i).getPath());
      tracks[i] = movie.getTracks().get(0);
    }
    finalMovie.addTrack(new AppendTrack(tracks));
    FileOutputStream fos = new FileOutputStream(outFile);
    BasicContainer container = (BasicContainer) new DefaultMp4Builder().build(finalMovie);
    container.writeContainer(fos.getChannel());
  } catch (IOException e) {
    Log.e(TAG, "Merge failed", e);
  }
}
Video overlay, video crop, and watermark
Ffmpeg is not enough here. For example, here is a command that overlays an audio track with a video:
ffmpeg -y -ss 00:00:00.00 -t 00:00:02.88 -i input.mp4 -ss 00:00:00.00 -t 00:00:02.88 -i tune.mp3 -map 0:v:0 -map 1:a:0 -vcodec copy -r 30 -b:v 2100k -acodec aac -strict experimental -b:a 48k -ar 44100 output.mp4
-ss 00: 00: 00.00 - the time from which you want to start processing in this case
-t 00: 00: 02.88 - the time by which you need to continue processing the input file
-i input.mp4 - input video file
-i tune.mp3 - input audio file
-map - mapping of the video channel and audio channel
-vcodec - installation of the video codec (in this case, the same codec that encoded the video is used)
-r - setting the frame rate
-b: v - setting the bitrate for the video -channel
-acodec - installation of audio codec (in this case we use the AAC encoding)
-ar - sample -rate channel audio
-b: a - audio channel bitrate
Command to apply watermarks and crop video:
ffmpeg -y -i input.mp4 -strict experimental -r 30 -vf movie=watermark.png, scale=1280*0.1094:720*0.1028 [watermark]; [in][watermark] overlay=main_w-overlay_w:main_h-overlay_h, crop=in_w:in_w:0:in_h*in_h/2 [out] -b:v 2100k -vcodec mpeg4 -acodec copy output.mp4
movie = watermark.png - set the path to watermark
scale = 1280 * 0.1094: 720 * 0.1028 - specify the size
[in] [watermark] overlay = main_w-overlay_w: main_h-overlay_h, crop = in_w: in_w: 0: in_h * in_h / 2 [out] - apply watermark and crop the video.
Reverse video
To create a reverse video, you need to perform several manipulations:
- Extract all frames from a video file, write them to internal storage (for example, in jpg files)
- Rename frames so they are in reverse order.
- Collect from video files
The solution does not look elegant or productive, but there are no particular alternatives.
Example command for splitting video into files with frames:
ffmpeg -y -i input.mp4 -strict experimental -r 30 -qscale 1 -f image2 -vcodec mjpeg %03d.jpg
After that, you need to rename the frame files so that they are in reverse order (i.e., the first frame will be the last, the last one will be the first; the second frame will be the penultimate one, the penultimate one will be the second, etc.)
Then, using the following command, you can collect video from frames:
ffmpeg -y -f image2 -i %03d.jpg -r 30 -vcodec mpeg4 -b:v 2100k output.mp4
Video GIF
Also, one of the functionalities of the application is the creation of short videos consisting of several frames, which creates a GIF effect when looping. This topic is now in demand: Instagram even recently launched Boomerang - a special application for creating such "gifs".
The process is quite simple - we take 8 photos with an equal period of time (in our case, 125 milliseconds), then we duplicate all frames except the first and last in order to achieve a smooth reverse effect, and collect the frames in the video.
For example, using ffmpeg:
ffmpeg -y -f image2 -i %02d.jpg -r 15 -filter:v setpts=2.5*PTS -vcodec libx264 output.mp4
-f - input file format
-i% 02d.jpg - input files with dynamic name format (01.jpg, 02.jpg, etc.)
-filter: v setpts = 2.5 * PTS extend the duration of each frame by 2.5 times
On At the moment, to optimize UX (so that the user does not wait for a long video processing) we create the video file itself already at the stage of saving and sharing the video. Prior to this, work takes place with photos that are loaded into RAM and drawn on Canvas'e TextureView .
Drawing process
    private long drawGif(long startTime) {
        Canvas canvas = null;
        try {
            if (currentFrame >= gif.getFramesCount()) {
                currentFrame = 0;
            }
            Bitmap bitmap = gif.getFrame(currentFrame++);
            if (bitmap == null) {
                handler.notifyError();
                return startTime;
            }
            destRect(frameRect, bitmap.getWidth(), bitmap.getHeight());
            canvas = lockCanvas();
            canvas.drawBitmap(bitmap, null, frameRect, framePaint);
            handler.notifyFrameAvailable();
            if (showFps) {
                canvas.drawBitmap(overlayBitmap, 0, 0, null);
                frameCounter++;
                if ((System.currentTimeMillis() - startTime) >= 1000) {
                    makeFpsOverlay(String.valueOf(frameCounter) + "fps");
                    frameCounter = 0;
                    startTime = System.currentTimeMillis();
                }
            }
        } catch (Exception e) {
            Timber.e(e, "drawGif failed");
        } finally {
            if (canvas != null) {
                unlockCanvasAndPost(canvas);
            }
        }
        return startTime;
    }
    public class GifViewThread extends Thread {
        public void run() {
            long startTime = System.currentTimeMillis();
            try {
                if (isPlaying()) {
                    gif.initFrames();
                }
            } catch (Exception e) {
                Timber.e(e, "initFrames failed");
            } finally {
                Timber.d("Loading bitmaps in " + (System.currentTimeMillis() - startTime) + "ms");
            }
            long drawTime = 0;
            while (running) {
                if (paused) {
                    try {
                        Thread.sleep(10);
                    } catch (InterruptedException ignored) {}
                    continue;
                }
                if (surfaceDone && (System.currentTimeMillis() - drawTime) > FRAME_RATE_BOUND) {
                    startTime = drawGif(startTime);
                    drawTime = System.currentTimeMillis();
                }
            }
        }
    }
Conclusion
In general, working with video on the Android platform is still a pain. Implementing more or less advanced applications requires a lot of time,