Application implementation - device owner for Android
This article is an instruction for writing and installing on the target device application - device owner. I was prompted to write this article by the fact that when I began to study this issue myself, it turned out that there was no good official documentation with examples, but I had to collect information using Google.
Android OS, starting with version 5.0 of Lollipop (API 21), has a great opportunity to manage the device programmatically while in device owner mode. For example, it became possible to “silently” install / uninstall applications, “hide” applications (moreover, they hide in a qualitative way, that is, disappear from the list of applications in the settings, disappear from the launcher and the list of recently used applications), and much more. These are very useful features for implementing MDM. An overview of all the features provided by the device owner is beyond the scope of the article, you can read about them here and here .
First, let's define the terms. Device owner is obviously the owner of the device. Usually the owner of the device becomes the first user created during the initial setup of the device, which occurs after the device is first turned on after purchase. But in our case, we will make it so that the device will be owned by our application, which will gain access to the use of advanced device management capabilities. Unprovisioned state - the state of the device before the initial configuration. The device is in this state after the first power-up and after wipe. Provisioned state - the state of the device after the initial configuration.
For our experiments, we will need two devices on which there is NFC and we will have to wipe one of these devices. In order to install the application - device owner on the target device, you need to download it to the server so that it is accessible at the URL of the target device, for example
I wrote an example of device owner and installer applications. Below are the most interesting code snippets. It makes no sense to write all the code in the article, at the end of the article there will be links to projects with full source code.
Application - device owner will control the visibility of other applications. Those. with it you can hide / show other applications. There is an AppsManager class in the application; it encapsulates list building and application management. The list is obtained in AsyncTaske:
Management takes place through DevicePolicyManager:
The basis of the UI is RecyclerView, everything is trivial, I will give the adapter code:
The peculiarity of the application is that it needs to implement some kind of reciever to get administrator rights, even if it is empty:
In the manifest, you need to specify this receiver with the appropriate settings:
In order for these settings to work, you must also put the device_owner_receiver.xml file in the “xml” resource directory with a description of what the application is going to manage as an administrator:
As a result, the application must be assembled and the apk file posted on the server.
An installer application is simply an application that, after combining with the target device, transmits via NFC data which contains information from where the target device should take the application - device owner, below the code that generates the NFC message:
Pay attention to the following points:
Both applications must be assembled, the installer must be installed on one device, the device owner must be uploaded to the server, the target device wipe-thread. After that, you can start the experiments.
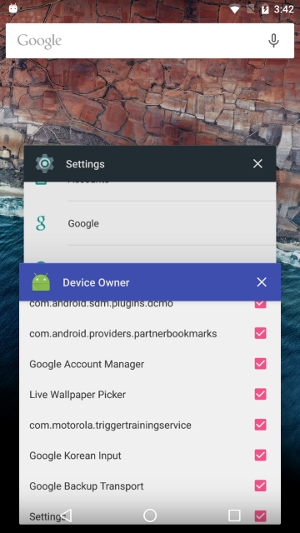
To demonstrate the function of hiding the application, I will hide the system settings on the target device:

Here we see that the settings are in the list of applications.
Here we see that the settings are in the list of recently used applications.
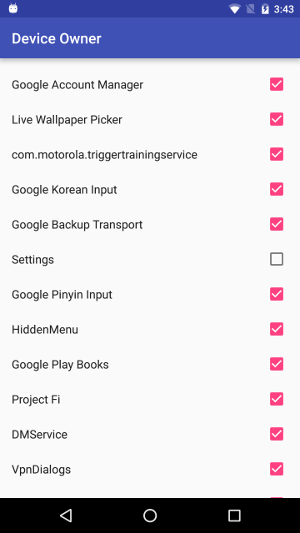
Turn off the application - settings.
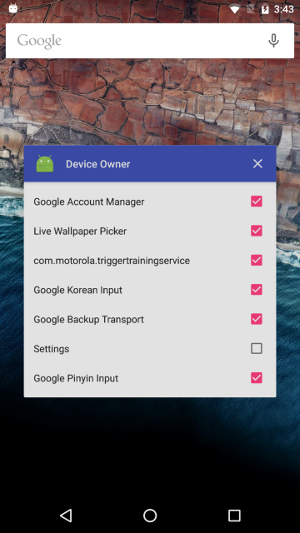
Settings disappeared from the list of recently used applications.
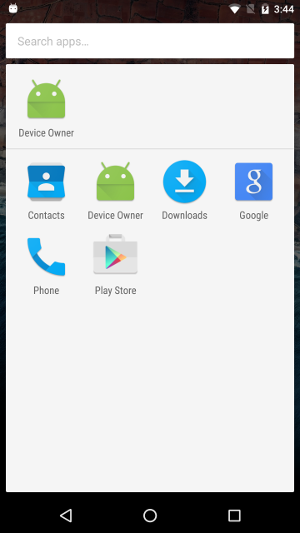
And from the list of applications.
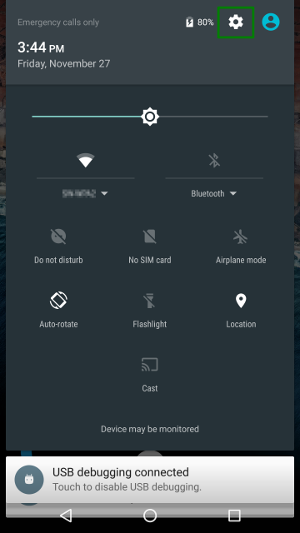
Even if you try to start the settings from the “curtain” (circled by a green rectangle) and in other ways, you will not succeed.
Application project source code:
github.com/raynor73/DeviceOwner
github.com/raynor73/NfcProvisioning
Android OS, starting with version 5.0 of Lollipop (API 21), has a great opportunity to manage the device programmatically while in device owner mode. For example, it became possible to “silently” install / uninstall applications, “hide” applications (moreover, they hide in a qualitative way, that is, disappear from the list of applications in the settings, disappear from the launcher and the list of recently used applications), and much more. These are very useful features for implementing MDM. An overview of all the features provided by the device owner is beyond the scope of the article, you can read about them here and here .
Terminology
First, let's define the terms. Device owner is obviously the owner of the device. Usually the owner of the device becomes the first user created during the initial setup of the device, which occurs after the device is first turned on after purchase. But in our case, we will make it so that the device will be owned by our application, which will gain access to the use of advanced device management capabilities. Unprovisioned state - the state of the device before the initial configuration. The device is in this state after the first power-up and after wipe. Provisioned state - the state of the device after the initial configuration.
What is required?
For our experiments, we will need two devices on which there is NFC and we will have to wipe one of these devices. In order to install the application - device owner on the target device, you need to download it to the server so that it is accessible at the URL of the target device, for example
example.com/deviceowner.apk(I only tried the http protocol). Next, you need to bring the target device to an unprovisioned state, for example, make wipe. After that, you need to install the installer application on another device. Then you need to combine these two devices so that NFC data exchange is possible, usually you just need to attach the devices to each other with their back surfaces, then you need to confirm the transfer via NFC by tapping on the device’s screen with the installer application. After this, the initial configuration of the target device will continue and you will need to configure the network so that the device can download the apk file with the application - device owner. After completing the initial setup, the application - device owner will be available for launch and use and it will be impossible to stop / remove it in any way but the device wipe.Application - device owner
I wrote an example of device owner and installer applications. Below are the most interesting code snippets. It makes no sense to write all the code in the article, at the end of the article there will be links to projects with full source code.
Application - device owner will control the visibility of other applications. Those. with it you can hide / show other applications. There is an AppsManager class in the application; it encapsulates list building and application management. The list is obtained in AsyncTaske:
private class LoadingTask extends AsyncTask> {
	@Override
	protected List doInBackground(final Void... params) {
		final PackageManager packageManager = mContext.getPackageManager();
		return packageManager.getInstalledApplications(
				PackageManager.GET_META_DATA | PackageManager.GET_UNINSTALLED_PACKAGES
		);
	}
	@Override
	protected void onPostExecute(final List result) {
		if (result != null) {
			mAppsList = result;
		} else {
			mAppsList = Lists.newArrayList();
		}
		mStateObservable.setValue(State.IDLE);
	}
}
Management takes place through DevicePolicyManager:
mDevicePolicyManager = (DevicePolicyManager) context.getSystemService(Context.DEVICE_POLICY_SERVICE);
public void showApp(final ApplicationInfo app) {
	if (mStateObservable.getValue() != State.IDLE) {
		return;
	}
	mDevicePolicyManager.setApplicationHidden(mAdminComponent, app.packageName, false);
}
public void hideApp(final ApplicationInfo app) {
	if (mStateObservable.getValue() != State.IDLE) {
		return;
	}
	mDevicePolicyManager.setApplicationHidden(mAdminComponent, app.packageName, true);
}
public boolean isAppHidden(final ApplicationInfo app) {
	return mDevicePolicyManager.isApplicationHidden(mAdminComponent, app.packageName);
}
The basis of the UI is RecyclerView, everything is trivial, I will give the adapter code:
private static class AppsListAdapter extends RecyclerView.Adapter {
	private final Context mContext;
	private final LayoutInflater mInflater;
	private final PackageManager mPackageManager;
	private List mAppsList;
	private final AdministrationModeManager mAdministrationModeManager = AdministrationModeManager.getInstance();
	private final AppsManager mAppsManager = AppsManager.getInstance();
	public AppsListAdapter(final Context context) {
		mContext = context;
		mInflater = LayoutInflater.from(mContext);
		mPackageManager = mContext.getPackageManager();
	}
	@Override
	public ViewHolder onCreateViewHolder(final ViewGroup parent, final int viewType) {
		final View layout = mInflater.inflate(android.R.layout.simple_list_item_multiple_choice, parent, false);
		return new ViewHolder(layout);
	}
	@Override
	public void onBindViewHolder(final ViewHolder holder, final int position) {
		holder.mAppTitleTextView.setText(mAppsList.get(position).loadLabel(mPackageManager));
		if (mAdministrationModeManager.isAdministrator() && mAdministrationModeManager.isDeviceOwner()) {
			holder.mAppTitleTextView.setChecked(!mAppsManager.isAppHidden(mAppsList.get(position)));
		}
	}
	@Override
	public int getItemCount() {
		return mAppsList == null ? 0 : mAppsList.size();
	}
	public void setAppsList(final List appsList) {
		mAppsList = appsList;
	}
	public class ViewHolder extends RecyclerView.ViewHolder {
		public final CheckedTextView mAppTitleTextView;
		public ViewHolder(final View itemView) {
			super(itemView);
			mAppTitleTextView = (CheckedTextView) itemView.findViewById(android.R.id.text1);
			mAppTitleTextView.setOnClickListener(new View.OnClickListener() {
				@Override
				public void onClick(final View v) {
					if (mAdministrationModeManager.isAdministrator() &&
							mAdministrationModeManager.isDeviceOwner()) {
						if (mAppTitleTextView.isChecked()) {
							mAppsManager.hideApp(mAppsList.get(getAdapterPosition()));
						} else {
							mAppsManager.showApp(mAppsList.get(getAdapterPosition()));
						}
						notifyDataSetChanged();
					}
				}
			});
		}
	}
}
The peculiarity of the application is that it needs to implement some kind of reciever to get administrator rights, even if it is empty:
public class AdminReceiver extends DeviceAdminReceiver {
	// do nothing
}
In the manifest, you need to specify this receiver with the appropriate settings:
In order for these settings to work, you must also put the device_owner_receiver.xml file in the “xml” resource directory with a description of what the application is going to manage as an administrator:
As a result, the application must be assembled and the apk file posted on the server.
Application - installer
An installer application is simply an application that, after combining with the target device, transmits via NFC data which contains information from where the target device should take the application - device owner, below the code that generates the NFC message:
private class NdefMessageCallback implements NfcAdapter.CreateNdefMessageCallback {
	@Override
	public NdefMessage createNdefMessage(final NfcEvent event) {
		final ByteArrayOutputStream outputStream = new ByteArrayOutputStream();
		final Properties properties = new Properties();
		properties.put(DevicePolicyManager.EXTRA_PROVISIONING_DEVICE_ADMIN_PACKAGE_NAME, "com.example.deviceowner");
		// Make sure to put local time in the properties. This is necessary on some devices to
		// reliably download the device owner APK from an HTTPS connection.
		properties.put(
				DevicePolicyManager.EXTRA_PROVISIONING_LOCAL_TIME,
				String.valueOf(System.currentTimeMillis())
		);
		// To calculate checksum execute command (taken from http://stackoverflow.com/questions/26509770/checksum-error-while-provisioning-android-lollipop):
		// cat Something.apk | openssl dgst -binary -sha1 | openssl base64 | tr '+/' '-_' | tr -d '='
		properties.put(
				DevicePolicyManager.EXTRA_PROVISIONING_DEVICE_ADMIN_PACKAGE_CHECKSUM,
				"[Device owner app checksum]"
		);
		properties.put(
				DevicePolicyManager.EXTRA_PROVISIONING_DEVICE_ADMIN_PACKAGE_DOWNLOAD_LOCATION,
				"[Device owner app URL]"
		);
		try {
			properties.store(outputStream, getString(R.string.nfc_comment));
			final NdefRecord record = NdefRecord.createMime(
					DevicePolicyManager.MIME_TYPE_PROVISIONING_NFC,
					outputStream.toByteArray()
			);
			return new NdefMessage(new NdefRecord[]{record});
		} catch (final IOException e) {
			throw new RuntimeException(e);
		}
	}
}
Pay attention to the following points:
- Remember to add
- You need to specify the package name of your application - device owner-a (in our case, it is "com.example.deviceowner")
- You need to specify the correct URL at which the apk file of the application is available - device owner-a (instead of [Device owner app URL])
- And also you need to specify a checksum (instead of [Device owner app checksum]). Checksum counts as a
cat Something.apk | openssl dgst -binary -sha1 | openssl base64 | tr '+/' '-_' | tr -d '='command (command taken from here )
The experiments
Both applications must be assembled, the installer must be installed on one device, the device owner must be uploaded to the server, the target device wipe-thread. After that, you can start the experiments.
To demonstrate the function of hiding the application, I will hide the system settings on the target device:
Here we see that the settings are in the list of applications.
Here we see that the settings are in the list of recently used applications.
Turn off the application - settings.
Settings disappeared from the list of recently used applications.
And from the list of applications.
Even if you try to start the settings from the “curtain” (circled by a green rectangle) and in other ways, you will not succeed.
Project Links
Application project source code:
github.com/raynor73/DeviceOwner
github.com/raynor73/NfcProvisioning