November 3, 2015 at 00:07
Enabling BitLocker on Exchange Servers
The optimal security architecture of Exchange for both Exchange Server 2013 and Exchange Server 2016 recommends enabling BitLocker on fixed data drives that store Exchange database files. To configure disk encryption, we first determine:
What is BitLocker?
BitLocker is a built-in solution for Microsoft Windows volume encryption that provides enhanced protection against data theft, for example, in cases of theft or loss of computers or hard drives.
BitLocker was first introduced in Windows Vista and Windows Server 2008. Several improvements have been made to BitLocker since its first release, including encryption of data volumes, encryption of disk space only, and backup flexibility.
By default, BitLocker uses the AES cipher block chaining (CBC) encryption algorithm with a 128-bit (default) or 256-bit key.
For more information, see the BitLocker Overview on Microsoft TechNet .
How can BitLocker be deployed?
There are several ways to deploy BitLocker on Exchange servers.
1. Encryption of the operating system volume and Exchange data volumes using either network unlock, Data Recovery Agent and PKI infrastructure or using TPM (recommended approach).
2. Encryption of only Exchange data volumes.
To use BitLocker for FIPS compliance, keep in mind:
Volume Encryption Method
There are two ways to encrypt a volume:
1. Encrypt the entire volume. Use this option if you need to encrypt volumes that already contain existing messaging data. For example, it takes more than 8 hours to encrypt an entire 3 TB disk.
2. Encryption only used space. Use this option for new installations or new drives that do not yet have data.
Before you begin encrypting the entire volume, make sure that the servers are in maintenance mode.to prevent exposure to end users. You can notice a significant decrease in performance (~ 90% of processor utilization) and a decrease in the free space of the volume from the OS (~ 2 GB) while the volume is being encrypted. Also, make sure that you deploy BitLocker at the same time on no more than one DAG server to maintain availability.
The encryption script for OS volumes and Exchange
BitLocker data volumes provides maximum protection when used with TPM. The TPM is a hardware component installed on the server, and we recommend using the TPM version 2.0 chip. It works with BitLocker, helping to protect user data, and also ensuring that the server was not tampered with while it was unavailable.
In particular, BitLocker can use TPM to verify the integrity of early-boot components and download configuration data. This helps ensure that BitLocker makes an encrypted drive available only if these components have not been tampered with and the encrypted drive is in the source server.
BitLocker helps ensure the integrity of the startup process by doing the following:
Setting up the environment
The following steps assume that Windows Server 2012 R2 or later is installed on the Exchange server.
1. Create an organizational unit (OU) containing Exchange servers, if one does not exist.
Start PowerShell with the appropriate Active Directory permissions.
2. Create a GPO and associate it with an OU containing Exchange servers.
3. Install the BitLocker module on the Exchange servers.
4. Enable TPM on the Exchange servers.
5. Allow the storage of TPM recovery information in Active Directory.
6. Configure Bitlocker settings in the GPO.
Encryption scenario for Exchange data volumes
In a situation where TPM cannot be used (for example, the server does not have TPM, or is virtualized), encryption of the OS system volume requires the use of a password or USB key to allow the operating system to boot correctly. Since this can adversely affect Exchange services, you can opt out of encrypting the OS system volume. Instead, you can encrypt data volumes. Since the OS system volume is not encrypted, the OS cannot automatically unlock encrypted volumes at boot time. Thus, one of two conditions must be met:
1. The administrator manually enters the recovery key and unlocks each disk after the OS boots.
2. A scheduled task is being performed to unlock encrypted volumes during OS boot.
The following steps describe how to set up a scheduled task and assume that Windows Server 2012 R2 or later is installed on the Exchange server.
What is BitLocker?
BitLocker is a built-in solution for Microsoft Windows volume encryption that provides enhanced protection against data theft, for example, in cases of theft or loss of computers or hard drives.
BitLocker was first introduced in Windows Vista and Windows Server 2008. Several improvements have been made to BitLocker since its first release, including encryption of data volumes, encryption of disk space only, and backup flexibility.
By default, BitLocker uses the AES cipher block chaining (CBC) encryption algorithm with a 128-bit (default) or 256-bit key.
For more information, see the BitLocker Overview on Microsoft TechNet .
How can BitLocker be deployed?
There are several ways to deploy BitLocker on Exchange servers.
1. Encryption of the operating system volume and Exchange data volumes using either network unlock, Data Recovery Agent and PKI infrastructure or using TPM (recommended approach).
2. Encryption of only Exchange data volumes.
To use BitLocker for FIPS compliance, keep in mind:
- Trusted Platform Module (TPM) version 1.2 is not FIPS-compatible and uses SHA1. You must use TPM version 2.0 to comply with FIPS.
- To use the unlock network function effectively, you must take into account the basic requirements .
- If you are not using Windows Server 2012 R2 or later as the base operating system, then you cannot use recovery passwords for BitLocker. See What's New in BitLocker and KB 947249 for more information .
Volume Encryption Method
There are two ways to encrypt a volume:
1. Encrypt the entire volume. Use this option if you need to encrypt volumes that already contain existing messaging data. For example, it takes more than 8 hours to encrypt an entire 3 TB disk.
2. Encryption only used space. Use this option for new installations or new drives that do not yet have data.
Before you begin encrypting the entire volume, make sure that the servers are in maintenance mode.to prevent exposure to end users. You can notice a significant decrease in performance (~ 90% of processor utilization) and a decrease in the free space of the volume from the OS (~ 2 GB) while the volume is being encrypted. Also, make sure that you deploy BitLocker at the same time on no more than one DAG server to maintain availability.
The encryption script for OS volumes and Exchange
BitLocker data volumes provides maximum protection when used with TPM. The TPM is a hardware component installed on the server, and we recommend using the TPM version 2.0 chip. It works with BitLocker, helping to protect user data, and also ensuring that the server was not tampered with while it was unavailable.
In particular, BitLocker can use TPM to verify the integrity of early-boot components and download configuration data. This helps ensure that BitLocker makes an encrypted drive available only if these components have not been tampered with and the encrypted drive is in the source server.
BitLocker helps ensure the integrity of the startup process by doing the following:
- Checks that the integrity of the early boot files is preserved and helps to ensure that there are no malicious changes to these files (for example, infection by the boot sector virus or rootkits).
- Enhances protection to mitigate software attacks during server inaccessibility. Any alternative software that can run the system does not have access to decryption keys for the Windows system volume.
- System lock in case of fake. If any of the monitored files have been changed, then the system simply will not start. If the system does not start in normal mode, then this is a signal to the administrator about falsification. In the event that a system lock occurs, follow the BitLocker recovery procedure, which includes the process of unlocking the system with a password or USB key.
Important: TPM can only be used on physical servers. Virtual servers are not able to use TPM. If you have encrypted the system volume of the guest operating system, then without fail, use a password or a USB key to load the guest operating system.
Setting up the environment
The following steps assume that Windows Server 2012 R2 or later is installed on the Exchange server.
Important: When you enable BitLocker on existing Exchange servers, it is important to put the servers in maintenance mode in order to avoid the effect of the encryption process on end users.
1. Create an organizational unit (OU) containing Exchange servers, if one does not exist.
Start PowerShell with the appropriate Active Directory permissions.
New-ADOrganizationalUnit "Exchange Servers" -path "dc=contoso,dc=com"
$ExchangeOU = Get-ADOrganizationalUnit -Filter ‘Name -like "Exchange Servers"’
Get-ADComputer "Exchange Server" | Move-ADObject -TargetPath $ExchangeOU.DistinguishedName
2. Create a GPO and associate it with an OU containing Exchange servers.
Import-Module grouppolicy #RSAT должен быть установлен
New-GPO -Name "Exchange Server BitLocker Policy" -Domain contoso.com
New-GPLink -Name "Exchange Server BitLocker Policy" -Enforced "yes" -Target $ExchangeOU.DistinguishedName
3. Install the BitLocker module on the Exchange servers.
- Launch PowerShell with local administrator privileges.
- Run Install-WindowsFeature BitLocker -Restart.
- Reboot the server.
4. Enable TPM on the Exchange servers.
- Contact your hardware BIOS manufacturer for details on how to enable / activate TPM.
- Verify TPM status using the Trusted Platform Module Management tool (tpm.msc).
5. Allow the storage of TPM recovery information in Active Directory.
- Open the Exchange console with an account that has the necessary permissions in Active Directory to apply access control entries.
- Run:
Add-ADPermission $ExchangeOU.DistinguishedName -User "NT AUTHORITY\SELF" -AccessRights ReadProperty,WriteProperty -Properties msTPM-OwnerInformation,msTPM-TpmInformationForComputer -InheritedObjectType Computer -InheritanceType Descendents
6. Configure Bitlocker settings in the GPO.
- Open the Group Policy Management Console (gpmc.msc).
- Navigate through the hierarchy to the OU that contains the Exchange servers.
- Right-click Exchange Server BitLocker Policy and select Edit.
- Open Computer Configuration, open Policies, open Administrative Templates, open Windows Components, and open BitLocker Drive Encryption.
In the right pane, double-click Choose drive encryption method and cipher strength. Select the Enabled option. If you want to use the AES algorithm with 256-bit encryption, select it and click OK.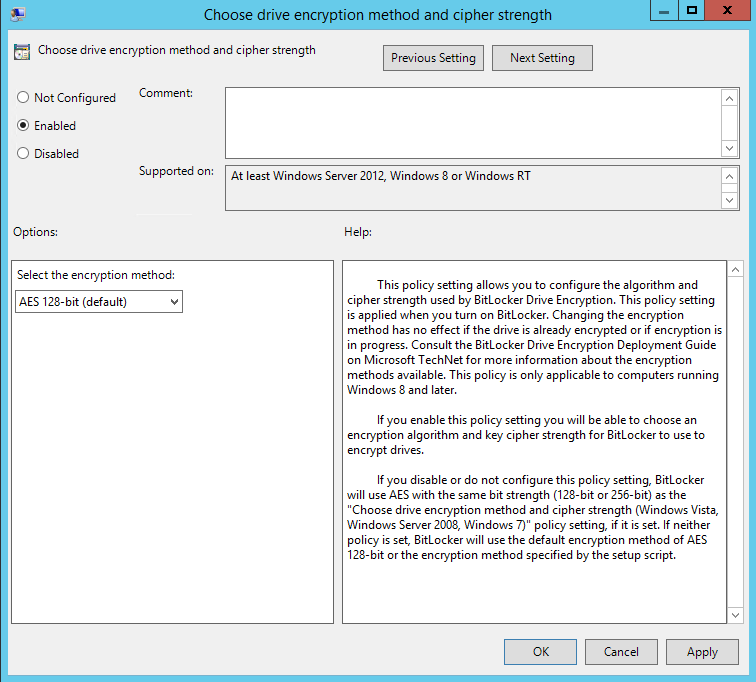
- Open Computer Configuration, open Policies, open Administrative Templates, open Windows Components, open BitLocker Drive Encryption, open Operating System Drives.
In the right pane, double-click Require additional authentication at startup. Select the Enabled option. If you want to disable or change any of the authentication methods, do this and click OK.
- In the right pane, double-click Choose how BitLocker-protected operating system drives can be recovered. Select the Enabled option. Select Do not enable BitLocker until recovery information is stored to AD DS for operating system drives. Click OK.

- In the right pane, double-click Enforce drive encryption type on operating system drives. Select the Enabled option. Select the Used Space Only encryption option for the encryption type. Click OK.

- Open Computer Configuration, open Policies, then Administrative Templates, then Windows Components, then BitLocker Drive Encryption, now open Fixed Data Drives
In the right pane, double-click Choose how BitLocker-protected fixed drives can be recovered. Select Enabled. Select Do not enable BitLocker until recovery information is stored to AD DS for fixed data drives. Click OK.
- In the right pane, double-click Enforce drive encryption type on fixed drives. Select Enabled. Select the Used Space Only encryption option for the encryption type. Click OK.

- Open Computer Configuration, the next step Policies, then Administrative Templates, then open System, then Trusted Platform Module Services.
In the right pane, double-click Turn on TPM backup to Active Directory Domain Services. Select Enabled. Click OK.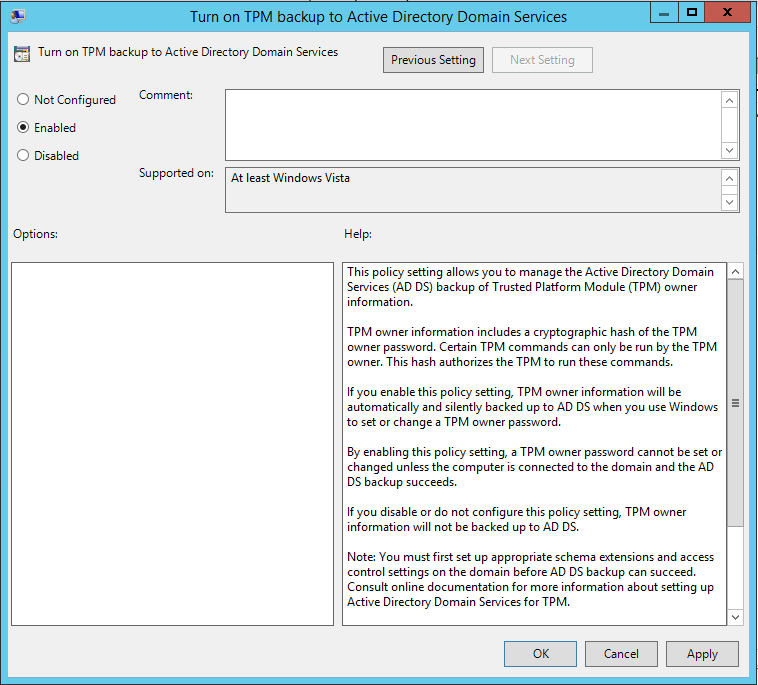
- Verify that Group Policy is applied to the Exchange servers.
$Servers = Get-AdComputer -SearchBase $ExchangeOU.DistinguishedName -Filter Foreach ($Server in $Servers) {invoke-gpupdate -Computer $Servers.Name -Force -Target Computer} - Enable OS encryption.
Create a recovery key: manage-bde -protectors -add -RecoveryPassword C:
Run the following command on the OS system drive: manage-bde -on C: –usedspaceonly - Enable data volume encryption (C: \ ExchangeVolumes \ ExVol1 defines the mount point for the Exchange data volume, replace if necessary).
Create a recovery key: manage-bde -protectors -add -RecoveryPassword “C: \ ExchangeVolumes \ ExVol1”
Follow these steps for each volume of the Exchange database: manage-bde -on “C: \ ExchangeVolumes \ ExVol1” –usedspaceonly
Follow these steps for each Exchange database volume to enable automatic unlock: Enable-BitLockerAutoUnlock -MountPoint "C: \ ExchangeVolumes \ ExVol1"Note: Bad disk sectors can lead to volume encryption failures with BitLocker. For more information, please see Event ID 24588 .
Encryption scenario for Exchange data volumes
In a situation where TPM cannot be used (for example, the server does not have TPM, or is virtualized), encryption of the OS system volume requires the use of a password or USB key to allow the operating system to boot correctly. Since this can adversely affect Exchange services, you can opt out of encrypting the OS system volume. Instead, you can encrypt data volumes. Since the OS system volume is not encrypted, the OS cannot automatically unlock encrypted volumes at boot time. Thus, one of two conditions must be met:
1. The administrator manually enters the recovery key and unlocks each disk after the OS boots.
2. A scheduled task is being performed to unlock encrypted volumes during OS boot.
The following steps describe how to set up a scheduled task and assume that Windows Server 2012 R2 or later is installed on the Exchange server.
- Create an organizational unit (OU) that contains the Exchange servers, if one does not exist.
New-ADOrganizationalUnit "Exchange Servers" -path "dc=contoso,dc=com" $ExchangeOU = Get-ADOrganizationalUnit "Exchange Servers" Get-ADComputer "Exchange Server" | Move-ADObject -TargetPath ExchangeOU.DistinguishedName - Create a GPO and associate it with the OU that contains the Exchange server.
Import-Module grouppolicy #RSAT должен быть установлен New-GPO -Name "Exchange Server BitLocker Policy" -Domain contoso.com New-GPLink -Name "Exchange Server BitLocker Policy" -Enforced "yes" -Target $ExchangeOU.DistinguishedName - Create a BitLocker service account for the scheduled task (_bitlockersvc).
- Create a security group to manage BitLocker by placing the security group in a secure container.
New-ADGroup -name "Exchange BitLocker Management" -groupscope Universal -path "cn=users,dc=coe,dc=local" Add-ADGroupMember "Exchange BitLocker Management" -members "_bitlockersvc", "Organization Management" - Install BitLocker on Exchange Servers
Install-WindowsFeature BitLocker - Reboot the server.
- Add the BitLocker security group to the local administrators group on all Exchange servers
- Grant BitLocker security group access to the msFVE-RecoveryPassword AD object . This allows accounts to access the recovery password.
$ExchangeOU = Get-OrganizationalUnit "Exchange Servers" DSACLS $ExchangeOu.DistinguishedName /I:T /G "contoso\Exchange BitLocker Management:CA;msFVE-RecoveryPassword" - Configure BitLocker encryption settings in the GPO.
- Verify that Group Policy is applied to the Exchange servers.
$Servers = Get-AdComputer -SearchBase $ExchangeOU.DistinguishedName -Filter Foreach ($Server in $Servers) {invoke-gpupdate -Computer $Servers.Name -Force -Target Computer} - Enable data volume encryption (C: \ ExchangeVolumes \ ExVol1 defines the mount point for the Exchange data volume, replace if necessary).
Complete the following steps for each volume in the Exchange database: Manage-bde -on “C: \ ExchangeVolumes \ ExVol1” -rp -usedspaceonly - Verify that recovery keys are stored in Active Directory.
a. Download the BitLocker Drive Encryption Configuration Guide: Backing Up BitLocker and TPM Recovery Information to Active Directory
b. Run Get-BitLockerRecoveryInfo.vbs
c. If the script does not return any data, back up the recovery keys by downloading and executing BDEAdBackup.vbs . - Create a script that unlocks data volumes when the OS boots.
Save the file below in the scripts directory (for example, c: \ bitlocker).UnlockDrives.ps1 $computer = Get-ADComputer $env:computername $RecoveryInformations = get-ADObject -ldapfilter "(msFVE-Recoverypassword=*)" -Searchbase $computer.distinguishedname -properties * $vols = gwmi win32_encryptablevolume -Namespace "Root\CIMV2\Security\MicrosoftVolumeEncryption" $lockedvols = $vols | ? {$_.GetLockStatus().LockStatus -eq 1} $vols[0].GetKeyProtectors().VolumeKeyProtectorID foreach($lockedvol in $lockedvols) { $RecoveryInformations | % {$lockedvol.UnlockWithNumericalPassword($_."msFVE-RecoveryPassword")} } - Create a scheduled task that will be launched at system startup and unlock data volumes by replacing items highlighted in bold.
a. Save the file in the script directory.
b. Run schtasks / create / s $ env: computername / ru contoso \ _svcexbitlocker / rp / XML c: \ Bitlocker \ UnlockDrivesAtStart.xml / TN UnlockDrivesAtStartSpoiler heading2015-04-16T12:07:14.9465954 contoso\exadmin Script unlocks Exchange data drives at OS startup true contoso\_bitlockersvc Password HighestAvailable IgnoreNew true true true false false true false true true false false false P3D 7 C:\Windows\System32\WindowsPowerShell\v1.0\powershell.exe -Command .\UnlockDrives.ps1 DIRECTORY_FOR_UNLOCKDRIVES.PS1
System Changes
It is important to remember that any of the following system changes can cause integrity checks to fail and prevent TPM from issuing a BitLocker key to decrypt protected volumes:- Moving a BitLocker-encrypted drive to a new computer.
- Installing a new motherboard with a new TPM module.
- Turn off, turn off, or clear TPM.
- Change any boot configuration settings.
- Changing the BIOS, UEFI firmware, master boot record, boot sector, boot manager, additional ROM or other components at the start of the boot or boot configuration data.
- Applying BIOS / UEFI firmware updates.
As part of your standard operating procedure, it is best to suspend BitLocker encryption (via the Suspend-BitLocker cmdlet) before making any changes to the server. Also, make sure that any hardware and software configuration changes have been successfully tested in a test environment (with BitLocker enabled) before deploying to a production environment.
In addition, make sure that you have developed a standard operating recovery procedure in case you need to recover BitLocker. This will minimize downtime. For more information, refer to the BitLocker Recovery Guide .
Disk Maintenance Work
During the server life cycle, disks fail. As part of your standard operating procedures, you must ensure that when the disk is replaced with a new one, the volume is formatted and encrypted using BitLocker.
In case you use AutoReseed to recover failed drives, you have two options: format and encrypt drives before use or encrypt after failures.
Formatting and encrypting disks before use
In this case, your standard procedure will be to prevent the formatting of backup disks through Disk Reclaimer . Instead, you format and encrypt all backup disks before use.
1. Disable Disk Reclaimer on the DAG: Set-DatabaseAvailabilityGroup -AutoDagDiskReclaimerEnabled $ false
2. Format and encrypt all backup disks. You should not assign mount points or drive letters.
3. Once the drives fail, AutoReseed will designate the backup drives, replacing the failed volumes, and re-fill the damaged copies of the databases.
4. Schedule service time. Replace the failed drives. Format and encrypt new ones.
Encryption After Failure
In this case, your standard procedure will allow Disk Reclaimer to format backup disks (default behavior). After the backup disk is formatted and the databases are full, you encrypt the disk.
1. In the event of a drive failure, AutoReseed allocates, redistributes, and formats the spare drive.
2. AutoReseed initiates a refill operation.
3. Using SCOM, or another management tool, you track events 1127 (initiates the database refill operation) and 826 (completion of the database refill process), which are located in the Microsoft-Exchange-HighAvailability / Seeding channel.
4. Schedule maintenance for the affected server and encrypt the new volume.
Conclusion
I hope this information helps you better understand BitLocker encryption and settings on Exchange servers. As indicated, the recommended approach is to use TPM to store recovery information, which allows the operating system to unlock data volumes automatically at boot time. However, if your servers do not have access to TPM, you can use encryption of only data volumes and develop a mechanism to unlock volumes at the OS boot stage.
We will be happy to answer any of your questions.
Article blogs.technet.com/b/exchange/archive/2015/10/20/enabling-bitlocker-on-exchange-servers.aspx
Respectfully the staff of the company Servilon