How to create an augmented reality application using ARCore
- Transfer

In this guide you will learn how to add 3D models to the real world. The ARCore library from Google allows you to add full-fledged 3D models to a 2D image (picture or video).
You need to provide the system with a kind of reference image that ARCore will look for in the real world in order to add a 3D model to the image. Augmented reality is already widely used, for example, in books, newspapers, magazines, etc.
Before diving into this tutorial, you should read the previous two articles on this topic, which will introduce you to the main AR-terms:
What are augmented reality images?
According to developer documentation , ARCore's augmented reality images allow you to create augmented reality applications that can “animate” 2D images, such as posters or product packaging.
You load some reference images into ARCore, and he then tells you about their detection during an AR session, for example, during a video shoot. And this information is used to position the 3D model on a 2D image.
Limitations on the use of augmented reality images
Here are some limitations you may encounter when using augmented reality images:
- ARCore can only process up to 20 reference images at a time.
- The physical plane in the real world should be flat, and its area should be more than 15 cm x 15 cm.
- ARCore cannot track moving images and objects.
Choosing the right reference image
Here are some tips for choosing a good reference image for ARCore:
- Augmented reality images support PNG, JPEG and JPG formats.
- It doesn’t matter if there is a color image or black and white, the main thing is that it has high contrast.
- Image resolution should be at least 300 x 300 pixels.
- Using high resolution images does not mean improved performance.
- Images with repeating patterns (such as patterns or peas) should be avoided.
- Use the arcoreimg tool to evaluate how suitable your image is for work. A score of at least 75 points is recommended.
How to use the arcoreimg tool:
- Download the ARCore SDK for Android from this link .
- Unzip the file to any location.
- In the extracted folder, go to the path tools> arcoreimg> windows (even if you have Linux or macOS).
- Open a command prompt in this directory.
- And enter this command:
arcoreimg.exe eval-img --input_image_path=dog.pngReplace dog.png with the full path to your image.
Getting started with the Augmented Reality application
Now that you have read ARCore and selected a good image with a rating of 75+, it's time to start writing the application code.
Creating a fragment
We will create a snippet and add it to our Activity. Create a class with the name CustomArFragmentand inherit it from ArFragment. Here is the code for CustomArFragment:
package com.ayusch.augmentedimages;
import android.util.Log;
import com.google.ar.core.Config;
import com.google.ar.core.Session;
import com.google.ar.sceneform.ux.ArFragment;
publicclassCustomArFragmentextendsArFragment{
    @Overrideprotected Config getSessionConfiguration(Session session){
        getPlaneDiscoveryController().setInstructionView(null);
        Config config = new Config(session);
        config.setUpdateMode(Config.UpdateMode.LATEST_CAMERA_IMAGE);
        session.configure(config);
        getArSceneView().setupSession(session);
        return config;
    }
}
First of all, we disable plane detection. By doing this, we remove the hand icon from the screen, which appears immediately after fragment initialization and tells the user to move his smartphone to search for the plane. We do not need this anymore, since we find not a random plane, but a specific image.
Then we set the update mode for the session LATEST_CAMERA_IMAGE. This ensures that we will find out about image updates every time the camera frame is updated.
Image Database Setup
Add the selected reference image (which you want to find in the physical world) to the assets folder (create it if it does not already exist). Now we can add images to our database.
We will create this database as soon as the fragment is created. In the logs we display the result of this operation:
if ((((MainActivity) getActivity()).setupAugmentedImagesDb(config, session))) {
    Log.d("SetupAugImgDb", "Success");
} else {
    Log.e("SetupAugImgDb","Faliure setting up db");
}
Here is what it will look like CustomArFragment:
package com.ayusch.augmentedimages;
import android.util.Log;
import com.google.ar.core.Config;
import com.google.ar.core.Session;
import com.google.ar.sceneform.ux.ArFragment;
publicclassCustomArFragmentextendsArFragment{
    @Overrideprotected Config getSessionConfiguration(Session session){
        getPlaneDiscoveryController().setInstructionView(null);
        Config config = new Config(session);
        config.setUpdateMode(Config.UpdateMode.LATEST_CAMERA_IMAGE);
        session.configure(config);
        getArSceneView().setupSession(session);
        if ((((MainActivity) getActivity()).setupAugmentedImagesDb(config, session))) {
            Log.d("SetupAugImgDb", "Success");
        } else {
            Log.e("SetupAugImgDb","Faliure setting up db");
        }
        return config;
    }
}
Soon we will add a method setupAugmentedImagesDbto MainActivity. Now let's add CustomArFragmentto our activity_main.xml:
<?xml version="1.0" encoding="utf-8"?><android.support.constraint.ConstraintLayoutxmlns:android="http://schemas.android.com/apk/res/android"xmlns:app="http://schemas.android.com/apk/res-auto"xmlns:tools="http://schemas.android.com/tools"android:layout_width="match_parent"android:layout_height="match_parent"tools:context=".MainActivity"><fragmentandroid:id="@+id/sceneform_fragment"android:name="com.ayusch.augmentedimages.CustomArFragment"android:layout_width="match_parent"android:layout_height="match_parent" /></android.support.constraint.ConstraintLayout>Add image to database
Now we will set up our image database, find the reference image in the real world and add a 3D model to the image.
Let's start by setting up our database. Create a public method setupAugmentedImagesDbin the class MainActivity:
publicbooleansetupAugmentedImagesDb(Config config, Session session){
    AugmentedImageDatabase augmentedImageDatabase;
    Bitmap bitmap = loadAugmentedImage();
    if (bitmap == null) {
        returnfalse;
    }
    augmentedImageDatabase = new AugmentedImageDatabase(session);
    augmentedImageDatabase.addImage("tiger", bitmap);
    config.setAugmentedImageDatabase(augmentedImageDatabase);
    returntrue;
}
private Bitmap loadAugmentedImage(){
    try (InputStream is = getAssets().open("blanket.jpeg")) {
        return BitmapFactory.decodeStream(is);
    } catch (IOException e) {
        Log.e("ImageLoad", "IO Exception", e);
    }
    returnnull;
}
We also created a method loadAugmentedImagethat loads an image from the resource folder and returns a bitmap image.
At setupAugmentedImagesDbfirst we initialize our database for the current session, and then add the image to the database. We called our image tiger . Then we set this database to the config and return true, reporting that the image has been successfully added.
Detecting reference images in the real world
Now we will begin to detect our reference images in the real world. To do this, we will create a listener that will be called each time the video frame is updated, and this frame will be analyzed for the presence of the reference image there.
Add this line to the method onCreate()in MainActivity:
arFragment.getArSceneView().getScene().addOnUpdateListener(this::onUpdateFrame);Now add the method onUpdateFrameto MainActivity:
@RequiresApi(api = Build.VERSION_CODES.N)
privatevoidonUpdateFrame(FrameTime frameTime){
    Frame frame = arFragment.getArSceneView().getArFrame();
    Collection<AugmentedImage> augmentedImages = frame.getUpdatedTrackables(AugmentedImage.class);
    for (AugmentedImage augmentedImage : augmentedImages) {
        if (augmentedImage.getTrackingState() == TrackingState.TRACKING) {
            if (augmentedImage.getName().equals("tiger") && shouldAddModel) {
                placeObject(arFragment, augmentedImage.createAnchor(augmentedImage.getCenterPose()), Uri.parse("Mesh_BengalTiger.sfb"));
                shouldAddModel = false;
            }
        }
    }
}
In the first line we get the frame itself. The frame can be represented as a regular screenshot from the video. If you are familiar with how video works, you know that this is just a collection of images that very quickly replace each other, giving the impression of something moving. We just take one of these pictures.
After we have received the frame, we analyze it for the presence of our reference image on it. We take a list of all the items tracked by ARCore using frame.getUpdatedTrackables. Then we loop through it and check if our tiger image is in the frame .
If a match is found, then we simply take and place the 3D model on top of the detected image.
Note. The flag is shouldAddModelused so that we add a 3D model only once.Place the 3D model above the reference image.
Now that we have found our reference image in the real world, we can add a 3D model on top of it. Add methods placeObjectand addNodeToScene:
placeObject: This method is used to build a rendered object for a givenUri. Once rendering is completed, the object is passed to the methodaddNodeToScenewhere the object is attached to the node, and this node is placed on the stage.addNodeToScene: this method creates a node from the resulting anchor, creates another node to which the rendered object is attached, then adds this node to the anchor node and places it on the scene.
This is how it looks like now MainActivity:
package com.ayusch.augmentedimages;
import android.graphics.Bitmap;
import android.graphics.BitmapFactory;
import android.net.Uri;
import android.os.Build;
import android.support.annotation.RequiresApi;
import android.support.v7.app.AppCompatActivity;
import android.os.Bundle;
import android.util.Log;
import android.widget.Toast;
import com.google.ar.core.Anchor;
import com.google.ar.core.AugmentedImage;
import com.google.ar.core.AugmentedImageDatabase;
import com.google.ar.core.Config;
import com.google.ar.core.Frame;
import com.google.ar.core.Session;
import com.google.ar.core.TrackingState;
import com.google.ar.sceneform.AnchorNode;
import com.google.ar.sceneform.FrameTime;
import com.google.ar.sceneform.rendering.ModelRenderable;
import com.google.ar.sceneform.rendering.Renderable;
import com.google.ar.sceneform.ux.ArFragment;
import com.google.ar.sceneform.ux.TransformableNode;
import java.io.IOException;
import java.io.InputStream;
import java.util.Collection;
publicclassMainActivityextendsAppCompatActivity{
ArFragment arFragment;
boolean shouldAddModel = true;
@OverrideprotectedvoidonCreate(Bundle savedInstanceState){
super.onCreate(savedInstanceState);
setContentView(R.layout.activity_main);
arFragment = (CustomArFragment) getSupportFragmentManager().findFragmentById(R.id.sceneform_fragment);
arFragment.getPlaneDiscoveryController().hide();
arFragment.getArSceneView().getScene().addOnUpdateListener(this::onUpdateFrame);
}
@RequiresApi(api = Build.VERSION_CODES.N)
privatevoidplaceObject(ArFragment arFragment, Anchor anchor, Uri uri){
ModelRenderable.builder()
.setSource(arFragment.getContext(), uri)
.build()
.thenAccept(modelRenderable -> addNodeToScene(arFragment, anchor, modelRenderable))
.exceptionally(throwable -> {
Toast.makeText(arFragment.getContext(), "Error:" + throwable.getMessage(), Toast.LENGTH_LONG).show();
returnnull;
}
);
}
@RequiresApi(api = Build.VERSION_CODES.N)
privatevoidonUpdateFrame(FrameTime frameTime){
Frame frame = arFragment.getArSceneView().getArFrame();
Collection<AugmentedImage> augmentedImages = frame.getUpdatedTrackables(AugmentedImage.class);
for (AugmentedImage augmentedImage : augmentedImages) {
if (augmentedImage.getTrackingState() == TrackingState.TRACKING) {
if (augmentedImage.getName().equals("tiger") && shouldAddModel) {
placeObject(arFragment, augmentedImage.createAnchor(augmentedImage.getCenterPose()), Uri.parse("Mesh_BengalTiger.sfb"));
shouldAddModel = false;
}
}
}
}
publicbooleansetupAugmentedImagesDb(Config config, Session session){
AugmentedImageDatabase augmentedImageDatabase;
Bitmap bitmap = loadAugmentedImage();
if (bitmap == null) {
returnfalse;
}
augmentedImageDatabase = new AugmentedImageDatabase(session);
augmentedImageDatabase.addImage("tiger", bitmap);
config.setAugmentedImageDatabase(augmentedImageDatabase);
returntrue;
}
private Bitmap loadAugmentedImage(){
try (InputStream is = getAssets().open("blanket.jpeg")) {
return BitmapFactory.decodeStream(is);
} catch (IOException e) {
Log.e("ImageLoad", "IO Exception", e);
}
returnnull;
}
privatevoidaddNodeToScene(ArFragment arFragment, Anchor anchor, Renderable renderable){
AnchorNode anchorNode = new AnchorNode(anchor);
TransformableNode node = new TransformableNode(arFragment.getTransformationSystem());
node.setRenderable(renderable);
node.setParent(anchorNode);
arFragment.getArSceneView().getScene().addChild(anchorNode);
node.select();
}
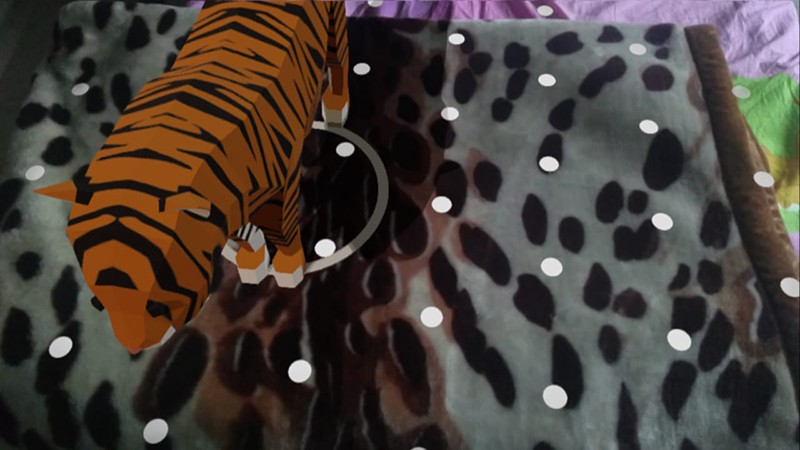
}Now run your application. You should see the screen as shown below. Move the phone slightly above the reference object. And as soon as ARCore detects a reference image in the real world, it will add your 3D model to it.
See also: Creating your first ARCore application