 September 29, 2015 at 10:12
Creating a JavaScript Synthesizer
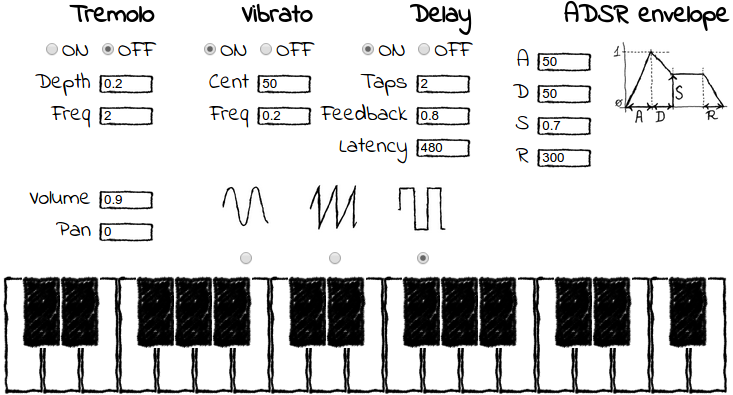
The idea of creating a browser synthesizer came to me a long time ago, even when the Audio API was in its infancy and almost the only chance to extract sound from the browser (except for playing ready-made files) was the generation of WAV with its subsequent encoding in base64 and recording in an audio tag. And if synthesis and coding worked without problems (the WAV format is quite simple), then with streaming audio for playing music in real time, everything was worse and no tricks were able to achieve seamless buffering, and therefore the idea died out before it was born. Over the years, browsers in support of the Audio API have added significantly, which in turn inspired me to new experiments in this area. This article step by step describes the process of creating a browser synthesizer using HTML5, starting with the generation of a simple sine wave,
As a hobby musician, but a full-time programmer, I often overtake musical ideas right at work, when there is no musical instrument at hand to estimate the implementation, and ideally also to record. Thus, at first the idea of an online MIDI sequencer was born, which would allow you to sketch and save most of the ideas. But what kind of sequencer without the ability to play and record the melody that came to mind in real time "without leaving the cash desk", using at least a mouse with a keyboard? As a result, in the process of working on the simplest synthesizer, a little thought crept in, and not whether we should sway at something bigger. Of course, the idea of a JavaScript synthesizer is not new, and implementations of varying degrees of persuasion have arisen every now and then.here and there, but at least here on the hub, I found only a few articles on the topic of the Audio API and not a single one concerning synthesis, which prompted me to sit down for this text.
As was briefly noted in the preface, the first thing I thought about was synthesizing and processing sound completely analytically followed by encoding directly to the WAV format, however, in the process of struggling with streaming playback of this format and combing documentation on related topics, I suddenly got the idea to try if the implementation is good Audio API browsers, as described in MDN. The Audio API without unnecessary tricks and minimal means makes it possible to create a virtual audio path from functional blocks, tuning and switching them to your taste. Almost all the necessary basic elements are presented in the API: oscillators, amplifiers, splitters, etc., for a complete list and examples of use, I recommend that you refer to the corresponding MDN sectionThus, the main issue is the correct and convenient switching and creation and management of effects.
For the first version, we need to determine the minimum of functionality that we would like to implement. As for me, it is absolutely necessary to choose a waveform (sinusoid, sawtooth, meander), as well as effects such as vibrato (fluctuation of tone), tremolo (fluctuation of volume) and echo. In addition, from classical functions I would like to see the ADSR envelope setting, which is a simplified approximation of the phases of the intensity of the sound of a note played on a real musical instrument.
Given that tremolo and vibrato are modulating effects (amplitudes and pitch, respectively), the implementation of a universal modulator for any of the system parameters seems to be the most natural and flexible solution. The whole salt of modulators is that they can influence not only directly on the signal parameters, but also on the parameters of other self-similar modulators, receiving possibilities limited to imagination for the formation of sounds. At one time, this idea also laid the foundation for analog synthesizers, but then switching looked like this:
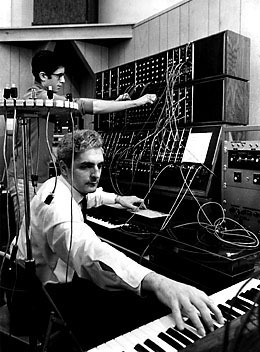
With us, it will look like this:
synth.connect(volume);
volume.connect(delay.input);
delay.connect(pan);
pan.connect(audioCtx.destination);
var vibrato = new SineModulator();
vibrato.modulate(synth, 'pitchShift');
Let's start with a simple sound synthesis, for which we construct an AudioContext object, within which we create an oscillator, set its frequency, connect it to the audio output and then make it oscillate, thereby producing sound.
  audioContext = new AudioContext();
  var oscillator = audioContext.createOscillator() ;
  oscillator.frequency.value = 440;
  oscillator.connect(audioContext.destination);
  oscillator.start(0);
If everything is done correctly, a pleasant sound should be heard in the speakers / headphones to everyone familiar with the frequency of the telephone beep (well, or a tuning fork - it’s closer to anyone). This process can be stopped by calling the corresponding .stop () honey of the same object. By the way, the parameter passed to the start and stop functions is the time in seconds, after which the specified actions should be carried out with respect to the signal. We don’t need it yet, so we set the parameter to 0, but we can omit it at all. It is also necessary to pay attention to the .connect () and .disconnect () methods, which are part of the AudioNode interface common to all nodes and serve to switch their inputs and outputs. By calling the .connect () of the oscillator, we indicate that the resulting audio signal should be sent to the node passed as a parameter, in this case audioContext.destination,
As the first function of our synthesizer, we realize the choice of the waveform. The most common waveforms (e.g. saw or meander) are available as part of the API and can be used by specifying the appropriate parameter for the oscillator (e.g. audioContext.createOscillator ('square')). For more interesting cases, there is a PeriodicWave interface that allows you to specify an arbitrary waveform. Two arrays with Fourier coefficients are transmitted to the input of the function, the process of calculating which for an arbitrary waveform can easily be found in the literature (for example, briefly here) So, let's say, for the same sawtooth wave, which is the sum of all harmonics of the signal with a proportional decrease in amplitude, the coefficients for cosines (real in complex notation) will be 0, and for sines (imaginary) 1 / nn, i.e., the function can look like this:

Naturally, for greater sharpness of the saw, it is necessary to increase the number of added harmonics. The process is illustrated in the animation:
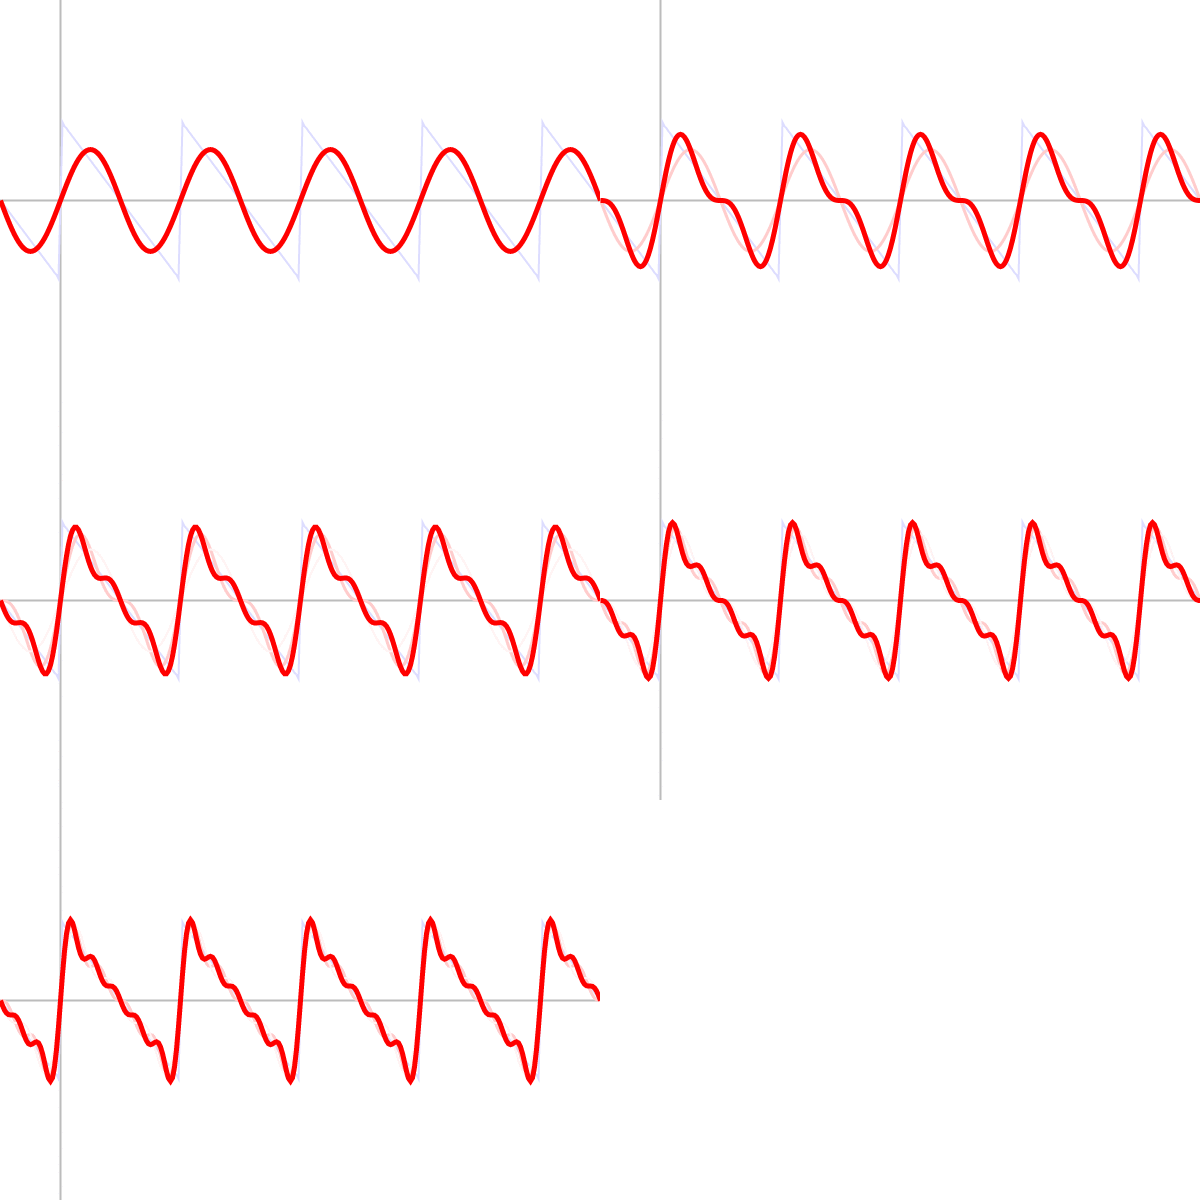
Therefore, calculating the coefficients and transmitting them PeriodicWave for a given signal will look like this:
var context = new global.AudioContext();
var steps = 128;
var imag = new global.Float32Array(steps);
var real = new global.Float32Array(steps);
for (var i = 1; i < steps; i++) {
    imag[i] = 1 / (i * Math.PI);
}
var wave = context.createPeriodicWave(real, imag);
module.exports = wave;
The next step is the ability to select the pitch. In real synthesizers, this is done using the keyboard, but for starters we will construct an ersatz keyboard on the monitor screen. I’m not a designer and I still couldn’t make a high-quality design, so I draw all the graphics by hand to mask the scarcity of my design thoughts. As a result, we have a keyboard with basic functions, as well as three waveforms to choose from:
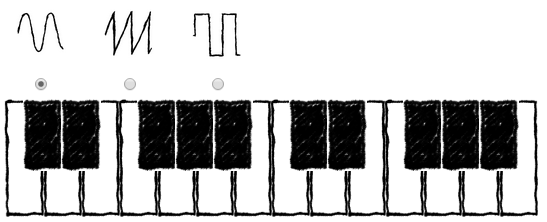
Each keystroke should send a signal to the synthesizer with information about the serial number of the note to be played. The same is true for the key release event. Although classical synthesizers had at first one oscillator modulated by pitch by pressing a key, due to the lack of technical limitations, I decided not to complicate my life and make as many oscillators as needed to play an arbitrary number of notes at the same time. For convenient switching with subsequent modules, we agree to have one common output node, to which all oscillators will be connected and which will mix all their signals into one stream. The rule of one entry point and one exit point will be applied in the future for all subsequent modules. As such a point, the simplest GainNode node with a gain of 1 (default) is used. Schematically, it looks like this:
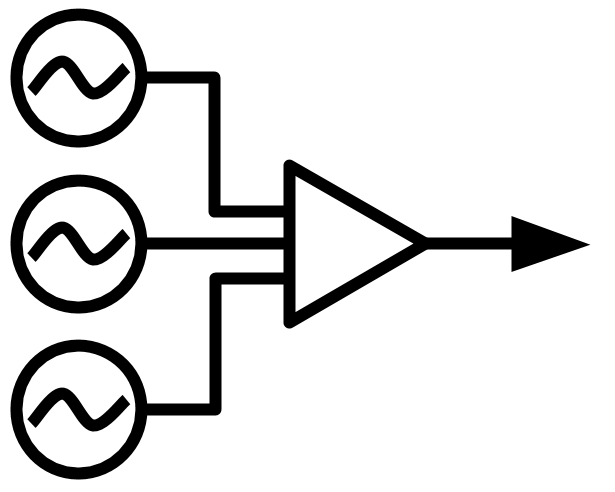
And in the code like this:
function Synth(context) {
  this.audioContext = context;
  this.output = context.createGain();
  this._oscillators = {};
}
Synth.prototype.play = function(note) {
  var oscillator;
  oscillator = this._oscillators[note.pitch] = this.audioContext.createOscillator();
  oscillator.frequency.value = note.frequency;
  oscillator.connect(this.output);
  oscillator.start(0);
  return oscillator;
};
Synth.prototype.stop = function(note) {
  this._oscillators[note.pitch].stop(0);
};
One of the basic functions, without which it is impossible to imagine any device designed to make sounds, is to adjust the volume and balance of the channels, for this the Audio API provides GainNode and StereoPanner interfaces, respectively. Add them to the circuit, commuting using the same connect method:
var audioContext = new AudioContext();
var volume = audioContext.createGain();
var pan = audioContext.createStereoPanner();
volume.gain.value = 1;
pan.pan.value = 0;
synth.output.connect(volume);
volume.connect(pan);
pan.connect(audioContext.destination);
To adjust the parameters, we create two input fields and directly connect them to the corresponding nodes. To read and pass values, I created a simple controls object that implements the mediator pattern and sends out the field values to those interested when they change. There is no point in dwelling on its implementation, we better concentrate on what happens when a value changes in any field:
controls.on('volume-change', function(value) {
  volume.gain.value = value;
});
controls.on('pan-change', function(value) {
  pan.pan.value = value;
});
Thinking in advance about the development of the vibrato effect, as well as about controlling the pitch by means of a physical lever on a MIDI device, we add the ability to change the pitch for all sounds generated by the Synth module. The function is implemented as an admixture to the original module:
PitchShifter Code
function PitchShifter() {
  this._pitchShift = 0;
  var oscillators = {};
  Object.defineProperty(this, "pitchShift", {
    set: function (ps) {
      this._pitchShift = ps;
      for(var pitch in oscillators) {
        oscillators[pitch].frequency.value =
          oscillators[pitch].baseFrequency * Math.pow(2, this._pitchShift/1200);
      }
    },
    get: function() {
      return this._pitchShift;
    }
  });
  var old = {
    play: this.play,
    stop: this.stop
  };
  this.play = function(note) {
    var osc = oscillators[note.pitch] = old.play.call(this, note);
    osc.baseFrequency = note.frequency;
    osc.frequency.value = osc.baseFrequency * Math.pow(2, this._pitchShift/1200);
    return osc;
  };
  this.stop = function(note) {
    delete oscillators[note.pitch];
    old.stop.apply(this, arguments);
  };
}
So we are close to realizing the first effect - vibrato, i.e. periodic pitch changes in pitch. For these purposes, as mentioned, we concoct a modulator, and, as planned, the modulator must be implemented in such a way that it can modulate any parameter of the system, including the properties of other modulators, such as amplitude and frequency.
( UPD : in the comments, they rightly hinted at the non-optimality of the approach at intervals, especially since the oscillators are able to directly control the parameters, which I did not know at the time of writing, so the part about modulators is more theoretical than practical)
The first problem that there is a risk of colliding with frequency changes “in the forehead” is a jump between signal levels, which, unfortunately, is as clearly audible as can be seen in the following illustration:
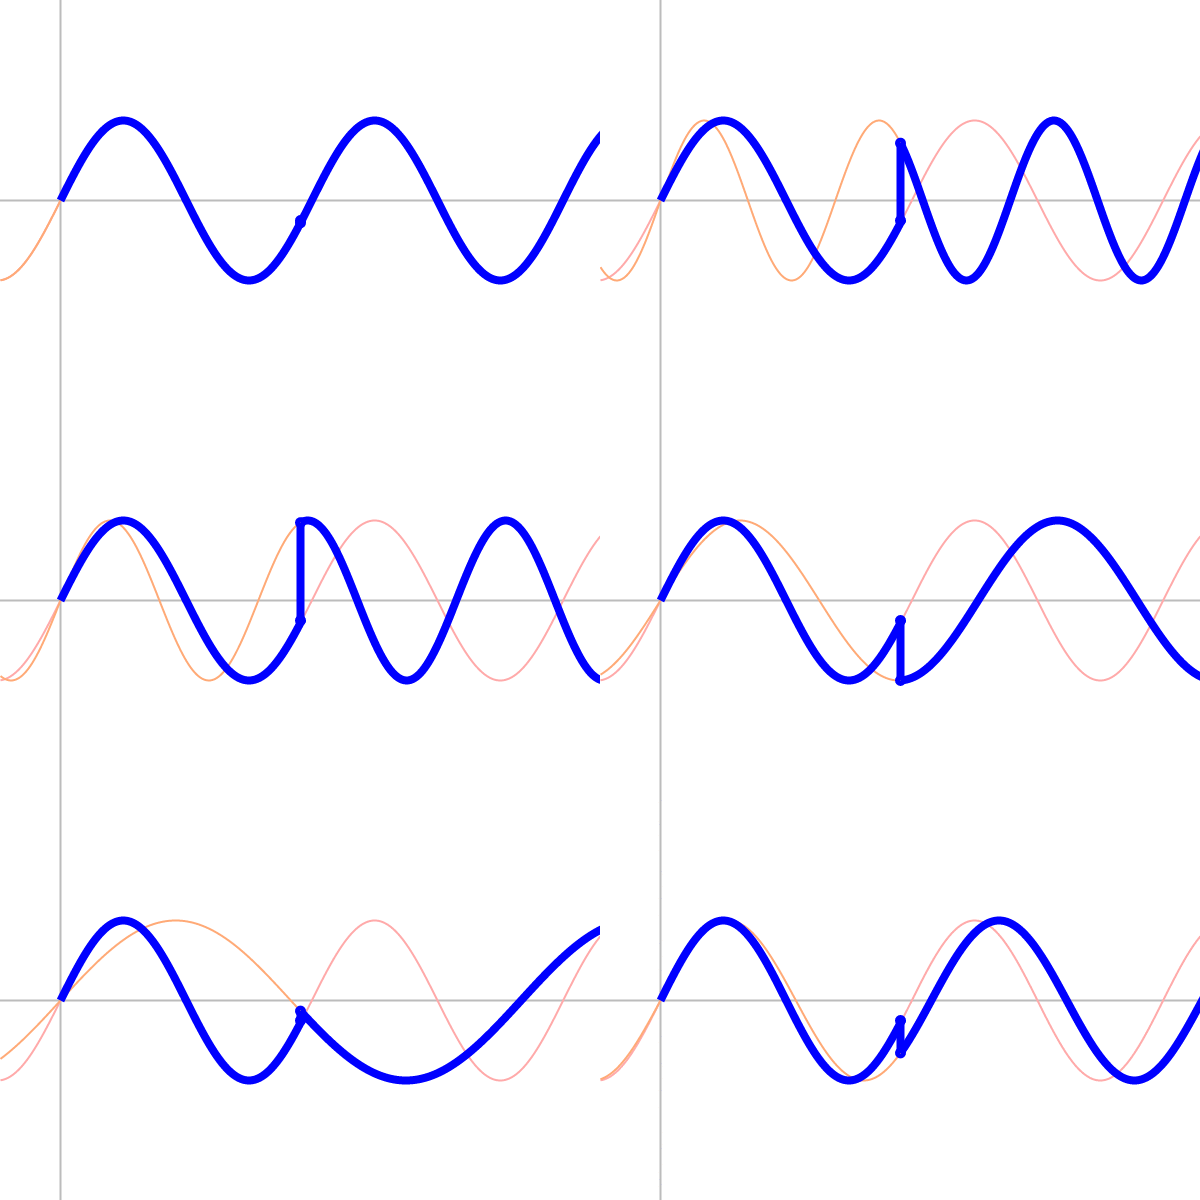
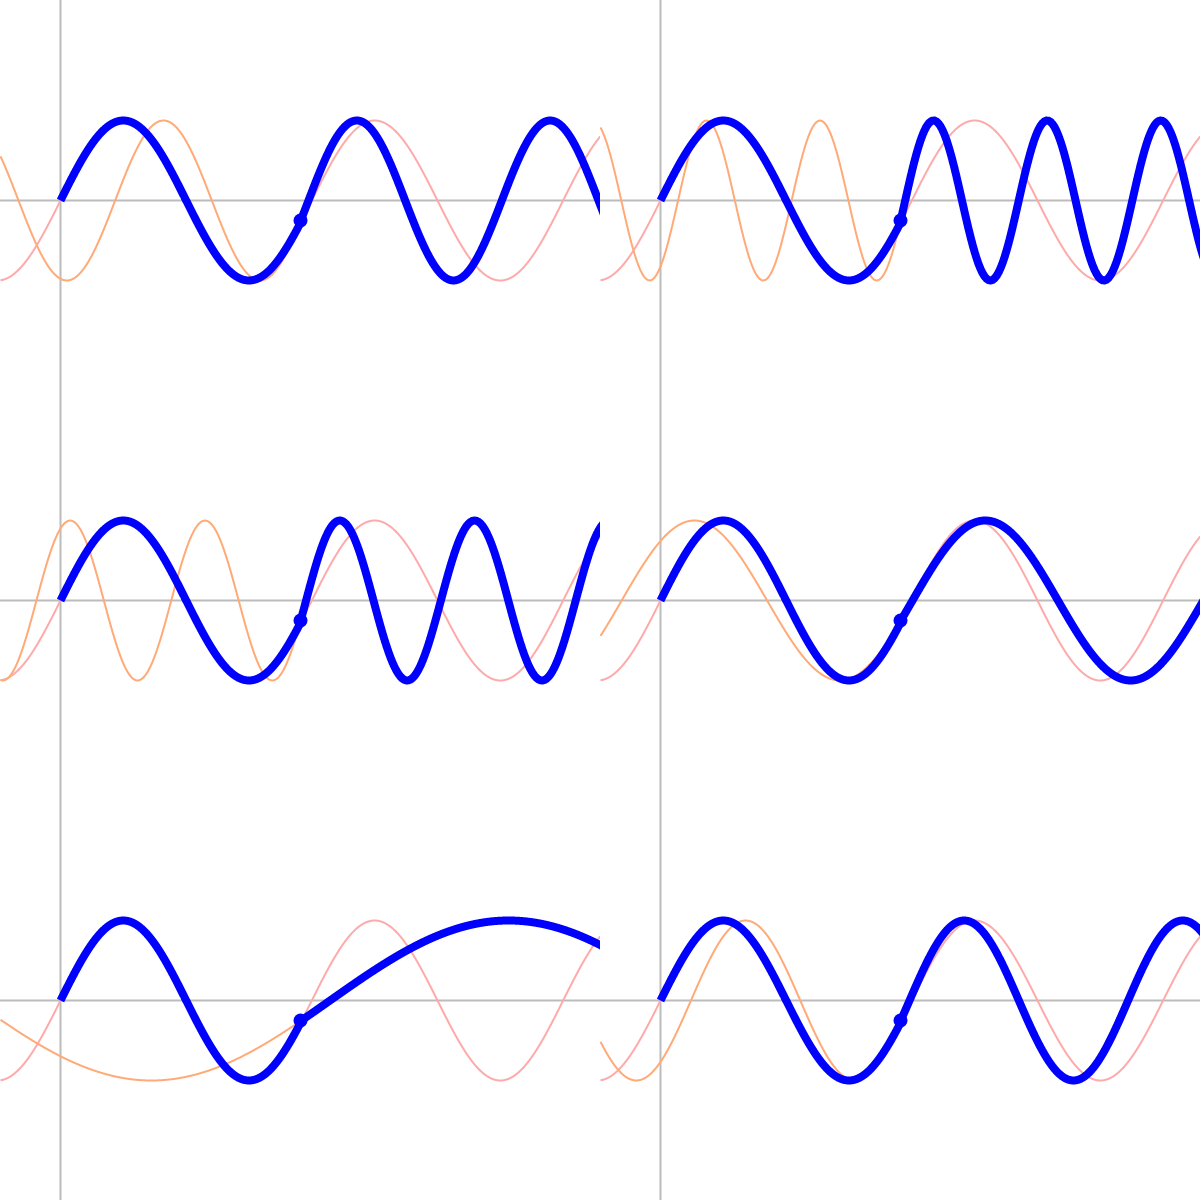
Moreover, the phase difference of the previous and subsequent sine waves depends on the current point in time, which makes it very unsightly. To avoid this undesirable effect, when changing the frequency, it is necessary to compress or stretch the sinusoid not relative to zero, but relative to the current point along the X axis, for this the signal phase will be constantly stored in the object and used as a reference point in calculating further amplitude values.
The second important point in the implementation of modulators is their additivity. Since theoretically the waveform obtained as a result of adding an arbitrary number of sinusoids has no restrictions, having modulators satisfying the additivity condition, we get additional scope for creativity.
Taking into account the above conditions, we implement the modulator we need:
Modulator code
function SineModulator (options) {
  options = options || {};
  this._frequency = options.frequency || 0;
  this._phaseOffset = 0;
  this._startedAt = 0;
  this._interval = null;
  this._prevValue = 0;
  this.depth = options.depth || 0;
  Object.defineProperty(this, "frequency", {
    set: function (frequency) {
      frequency = parseFloat(frequency);
      this._phaseOffset = this._phaseNow();
      this._startedAt = Date.now();
      this._frequency = frequency;
    },
    get: function() {
      return this._frequency;
    }
  });
}
SineModulator.prototype.modulate = function(object, property) {
  this._objToModulate = object;
  this._propertyToModulate = property;
};
SineModulator.prototype.start = function() {
  this._startedAt = Date.now();
  var this_ = this;
  this._interval = setInterval(function() {
    var value = this_._modValueNow();
    var diff = value - this_._prevValue;
    this_._objToModulate[this_._propertyToModulate] += diff;
    this_._prevValue = value;
  }, 10);
};
SineModulator.prototype._phaseNow = function() {
  var timeDiff = (Date.now() - this._startedAt) / 1000;
  var phase = this._phaseOffset + timeDiff * this.frequency % 1;
  return phase;
};
SineModulator.prototype._modValueNow = function() {
  var phase = this._phaseNow();
  return Math.sin((phase) * 2 * Math.PI) * this.depth;
};
SineModulator.prototype.stop = function() {
  clearInterval(this._interval);
}
module.exports = SineModulator;
Now, having a modulator, we will try to make a cyclic change in the pitch, at the same time adding input fields for the effect parameters to the interface and linking them to the corresponding properties of the modulator.
var vibrato = new SineModulator();
vibrato.modulate(synth, 'pitchShift');
controls.on('vibrato-on-change', function(value) {
  parseInt(value) ? vibrato.start() : vibrato.stop();
});
controls.on('vibrato-depth-change', function(value) {
  vibrato.depth = value;
});
controls.on('vibrato-freq-change', function(value) {
  vibrato.frequency = value;
});
We start and analyze the resulting signal, we note the presence of vibration. The effect is achieved:

The next item in the list - tremolo - will be similar in principle, the only difference is the modulated parameter, this time the volume. The code for this effect is just as minimalistic and almost identical:
var tremolo = new SineModulator();
tremolo.modulate(volume.gain, 'value');
controls.on('tremolo-on-change', function(value) {
  parseInt(value) ? tremolo.start() : tremolo.stop();
});
controls.on('tremolo-depth-change', function(value) {
  tremolo.depth = value;
});
controls.on('tremolo-freq-change', function(value) {
  tremolo.frequency = value;
});
Having two modulation data and combining, or, on the contrary, breeding, their frequencies, you can already get effects that are quite interesting in sound, and by making periods mutually simple and amplitudes wide, you can even catch an unprepared listener by the effect of chaos and unpredictability!
The next logical step will be to try to go up a level and modulate one of the parameters of some of the modulators available, for example, the vibrato frequency, as a result of which the effect of the game should be the speed of vibration. To achieve this, we will create two modulators and assign one of them, as a modulated parameter, the frequency property of the second:
var vibrato = new SineModulator();
vibrato2.modulate(synth, 'pitchShift')
vibrato2.frequency = 5;
vibrato2.depth = 50;
vibrato.modulate(synth, 'pitchShift');
vibrato.start();
vibrato2 = new SineModulator();
vibrato2.modulate(vibrato, 'frequency');
vibrato2.frequency = 0.2;
vibrato2.depth = 3;
vibrato2.start();
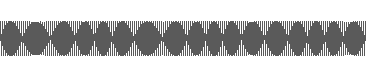
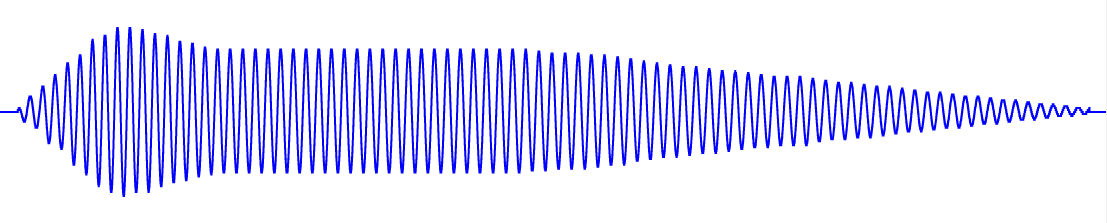
A cyclic change in the frequency of the tone change is heard with the naked ear, the resulting signal recorded and opened in the audio editor looks appropriate (in areas with a higher density there is a sound with a higher frequency):
On this, experiments with modulations can be considered successful, and the effects are realized. Although modulations by an arbitrary signal can be achieved by adding sinusoids, in the future it would be much more convenient to have a set of prepared modulators, at least for the most commonly used waveforms (saw, square wave), for this scenario, you can create a set of constructors by analogy with the existing ones SineModulator, and use the mechanism for setting the waveform through the Fourier coefficients, which we used when specifying the waveform of the oscillator. This task is no longer directly related to the Audio API, so for now I propose to complete this topic and move on to implementing the first non-modulating effect, namely echo.
In most cases, this effect is characterized by three parameters: the number of responses, response time, and attenuation coefficient. Working with the number of responses other than zero and one involves branching the signal and creating delay lines for each branch. The delay line is a node that delays the passage of a signal for a certain period of time. We will use the delay lines provided by the Audio API and created by the AudioContext.createDelay function. The presence of the attenuation coefficient turns each of the branches into a delay line circuit - an amplifier. In addition, we need to switch between a pure signal and a signal with an effect, as well as providing the possibility of simple switching with the previous and subsequent links of the path (we remember the agreement to have one input and one output),
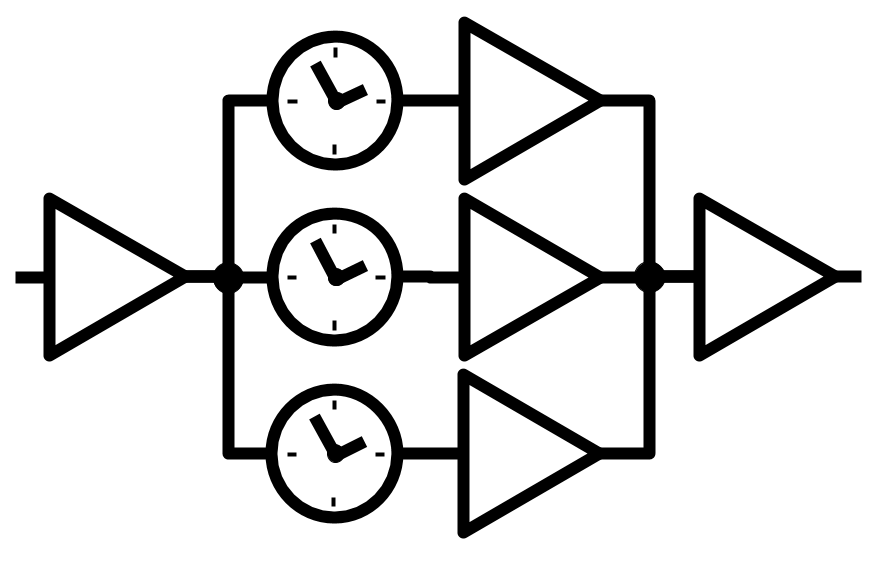
Unfortunately, I did not find a way to create elements that would fully implement the AudioNode interface and which could be directly used as parameters for the connect method of other nodes. A search on the Internet also did not give a result, so in the end I followed the advice given by supposedly knowledgeable people on the Internet, the essence of which is that the object is a container for a set of standard nodes, and the connection to the input is not directly, but through the input property, being the base node of the GainNode.
Tests, implementation, run. We have a wave of the following form:
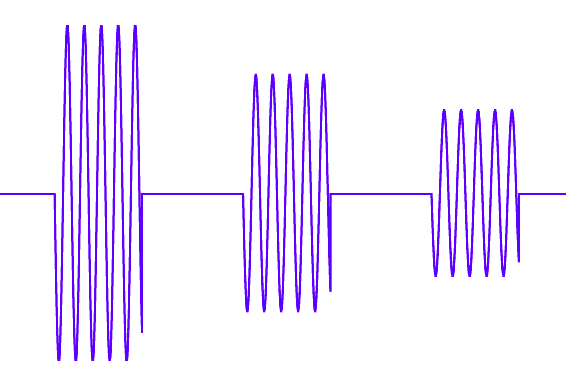
Achieved by this code:
Echo implementation
function Delay(audioCtx) {
  this._audioCtx = audioCtx;
  this.input = audioCtx.createGain();
  this._delayLines = [];
  this._gainNodes = [];
  this._delayLinesInput = audioCtx.createGain();
  this._output = audioCtx.createGain();
  this._taps = 0;
  this._latency = 0;
  this._feedback = 0;
  Object.defineProperty(this, "feedback", {
    set: function (freq) {
      this._feedback = freq;
      this._applyParams();
    },
    get: function() {
      return this._feedback;
    }
  });
  Object.defineProperty(this, "latency", {
    set: function (freq) {
      this._latency = freq;
      this._applyParams();
    },
    get: function() {
      return this._latency;
    }
  });
  Object.defineProperty(this, "taps", {
    set: function (value) {
      var prevTaps = this._taps;
      var diff = value - this._taps;
      for(var i = 0; i < diff; i++) {
        diff < 0 ? this._popTap() : this._pushTap();
      }
      this._taps = value;
    },
    get: function() {
      return this._taps;
    }
  });
  this.input.connect(this._output);
}
Delay.prototype._applyParams = function() {
  for(var i = 0; i < this._delayLines.length; i++) {
    this._delayLines[i].delayTime.value = this._latency / 1000 * (i + 1);
    this._gainNodes[i].gain.value = Math.pow(this._feedback, (1 + i))
  }
};
Delay.prototype._pushTap = function() {
  var delay = this._audioCtx.createDelay(10.0);
  this._delayLines.push(delay);
  var gainNode = this._audioCtx.createGain();
  this._gainNodes.push(gainNode);
  gainNode.connect(this._output);
  delay.connect(gainNode);
  this._delayLinesInput.connect(delay);
};
Delay.prototype._popTap = function() {
  var lastDelayLine = this._delayLines.pop();
  var lastGainNode = this._gainNodes.pop();
  lastDelayLine.disconnect(lastGainNode);
  lastGainNode.disconnect(this._output);
  this._delayLinesInput.disconnect(lastDelayLine);
};
Delay.prototype.start = function() {
  if (!this._started) {
    this.input.connect(this._delayLinesInput);
    this._started = true;
  }
}
Delay.prototype.stop = function() {
  if (this._started) {
    this.input.disconnect(this._delayLinesInput);
    this._started = false;
  }
};
Delay.prototype.connect = function(target) {
  this._output.connect(target);
};
module.exports = Delay;
Progress is evident: the sounds resulting from the application of effects to a large extent possess the musicality
To overcome this effect in particular, but to give dynamics in its main function, the so-called ADSR-envelope (Attack-Decay-Sustain-Release), which characterizes the shape of the synthesized wave in time, approximately describes the behavior of sound taken on a real musical instrument, will help us.
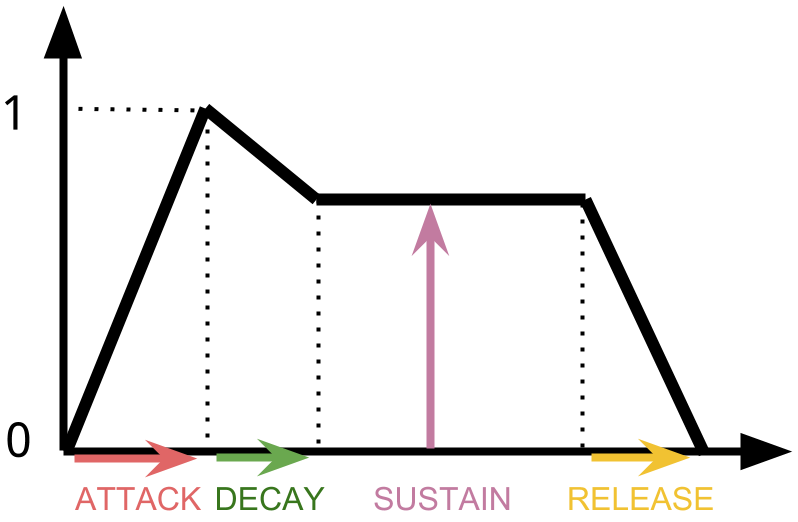
Applying such an envelope to each reproduced note, as a result of a smooth increase and decay of the volume, we remove the jump-like stall with a vertical front, which is perceived by the ear as a high-frequency click. The implementation, as in the case of pitch shift, is an admixture directly to the synthesizer. When creating each of the oscillators, we wedge the amplifier between it and the output node, subsequently controlling the gain in accordance with the specified parameters of the ADSR envelope:
A piece of code is more authentic
function ADSR() {
  this.ADSR = {
    A: null,
    D: null,
    S: null,
    R: null
  };
  var oscillators = {};
  var gainNodes = {};
  var old = {
    play: this.play,
    stop: this.stop
  };
  this.play = function(note) {
    var osc = oscillators[note.pitch] = old.play.call(this, note);
    var gain = gainNodes[note.pitch] = this.audioContext.createGain();
    osc.disconnect(this.output);
    osc.connect(gain);
    gain.connect(this.output);
    gain.gain.value = 0;
    this.ADSR.A = parseInt(this.ADSR.A);
    this.ADSR.D = parseInt(this.ADSR.D);
    this.ADSR.S = parseFloat(this.ADSR.S);
    this.ADSR.R = parseInt(this.ADSR.R);
    var this_ = this;
    var startedAt = Date.now();
    var interval = setInterval(function() {
      var diff = Date.now() - startedAt;
      if (diff < this_.ADSR.A) {
        gain.gain.value = diff / this_.ADSR.A;
      } else if (diff < this_.ADSR.A + this_.ADSR.D) {
        gain.gain.value = 1 - (diff - this_.ADSR.A) / (this_.ADSR.D / (1 - this_.ADSR.S));
      } else {
        gain.gain.value = this_.ADSR.S;
        clearInterval(interval);
      }
    }, 10);
    return osc;
  };
  this.stop = function(note) {
    var releasedAt = Date.now();
    var this_ = this;
    var arguments_ = arguments;
    var gain = gainNodes[note.pitch];
    var osc = oscillators[note.pitch];
    var gainOnRelease = gain.gain.value;
    var interval = setInterval(function() {
      var diff = Date.now() - releasedAt;
      if (diff < this_.ADSR.R) {
        gain.gain.value = gainOnRelease * (1 - diff / this_.ADSR.R);
      } else {
        clearInterval(interval);
        gain.gain.value = 0;
        old.stop.apply(this_, arguments_);
        osc.disconnect(gainNodes[note.pitch]);
        gain.disconnect(this.output);
        delete oscillators[note.pitch];
        delete gain[note.pitch];
      }
    }, 20);
  };
}
module.exports = ADSR;
So, introducing this stroke, we got a fully functional basic synthesizer that generates sounds suitable for human listening. Further improvement steps could be such interface changes as, for example, visual creation, tuning and switching of oscillators and modulators, and with regards to the synthesis itself, adding filters, introducing harmonics, nonlinear distortions, etc., however, this is a topic for further research. In the following articles, it is planned to connect MIDI instruments, in particular a keyboard and a guitar, to the resulting synthesizer, as well as switch to recording sound and real audio effects. All this, of course, in the browser!
A demonstration of the program is available at the following link: miroshko.github.io/Synzer
All source code is available on github:github.com/miroshko/Synzer , I will be happy with the stars, forks and pull requests.









