September 23, 2015 at 11:41
Writing Unit Tests. Mocking objects
- Transfer
- Tutorial
Who needs unit tests? Not for you - your code is perfect. But still, you just need to read this article, which should tell more about writing unit tests on Swift. Suddenly this will come in handy later on.
Unit testing is a great way to write flawless code; testing will help you find the majority of errors at an early stage of writing a project. As experience shows: if you have difficulties in testing the code, then you will have difficulties with its support or debugging.
Unit testing works with isolated “microcomponents”. Often you need to “wet” classes - that is, provide a fake functional implementation to isolate a specific microcomponent, so it can be tested. In Objective-CThere are several third-party frameworks that help implement this. But they are not yet available in Swift .
In this tutorial, you will learn how to write your own mock objects, fakes and stubs in order to cover a fairly simple application with tests that will help you remember your friends' birthdays.
Let's get started.
Download the starter project. This is a contact storage application. You will not work on the functionality of the base application; rather, you will write some tests for it to make sure that the application is working properly.
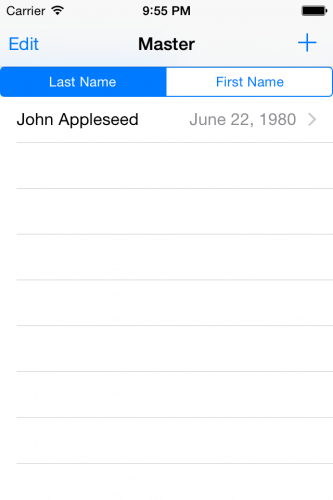
Compile and run the application, and then test how it works. Click the plus button and then add John Appleseedto general contact list:
To store contacts, the application uses Core Data .

Do not panic! You do not need Core Data experience for this tutorial; for this you do not need to have any special skills.
The advantages and disadvantages of unit testing
When it comes to writing tests, you will come across both good and bad news. The bad news is that unit testing has the following disadvantages:
Although there is no perfect solution, there is a bright side - writing tests has the following advantages:
The basic structure of applications
A large amount of code in applications is based on the Master-Detail Application template with Core Data enabled . But there are some significant improvements to the code template. Open the project in Xcode and look at the project navigator:
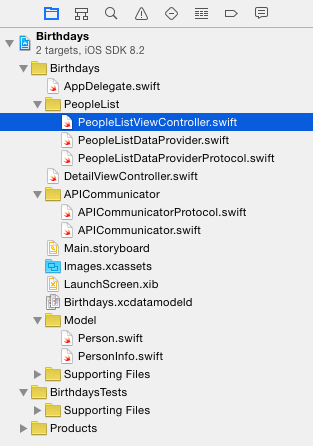
Take into account the following details:
A collection of files in PeopleList to avoid large view controllers. In order to avoid large view controllers, you can shift some responsibilities to other classes that connect to view controllers through a simple protocol. You can learn more about large view controllers and how to avoid them by reading this interesting, albeit older article .
In this case, the protocol is defined in PeopleListDataProviderProtocol.swift ; open it and look. A class conforming to this protocol must have the properties managedObjectContext and tableView , and must define the addPerson (_ :) andfetch () . In addition, it must conform to the UITableViewDataSource protocol .
The PeopleListViewController has a dataProvider property that conforms to the PeopleListDataProviderProtocol protocol . This property is set to an instance of a file PeopleListDataProvider AppDelegate.swift .
Add new people to your contact list using ABPeoplePickerNavigationController . This class allows you, as a developer, to have access to user contacts without the need for permission.
PeopleListDataProvider is responsible for populating the table view and accessing Core Data.
Note: Several classes and methods in the project are declared as public; so that the test target can access classes and methods. The test target is outside the application module. If you do not add an access modifier, classes and methods are defined as internal . This means that they are only available in the same module. To access them outside the module (for example, from the target for tests), you must add the public access modifier .
Well then, it's time to write some tests!
Writing Mock
Objects Mock objects allow you to check whether a method call is made or a property is set. For example, on viewDidLoad () fromPeopleListViewController , the table view is set to the tableView property of dataProvider .
You write a test to check what is actually happening.
Preparing the application for testing
First, you need to prepare a project for writing tests.
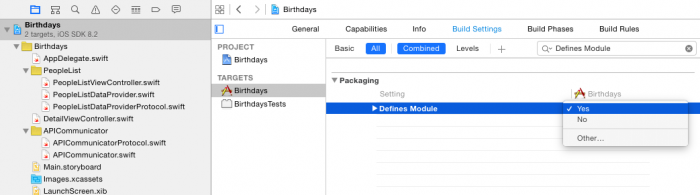
Select the project in the project navigator, then select the Build Settings in Target testing Birthdays . Locate the Defines Module , and change the settings to Yes , as shown below:
Then select the BirthdaysTests folder and go to File \ New \ File .... Select iOS\Source\Test Case Class, затем нажмите Next, назовите его PeopleListViewControllerTests, убедитесь, что вы создаёте файл Swift, снова нажмите Next, затем нажмите Create.
Если Xcode предлагает Вам создавать объединяющий заголовок, выберите No. Это — ошибка в Xcode, которая происходит, когда нет файлов в таргете, и Вы добавляете новый Swift файл.
Откройте недавно созданный PeopleListViewControllerTests.swift. Импортируйте модуль, который вы только что включили, добавив оператор import Birthdays прямо после других операторов импорта, как показано ниже:
Remove the following two boilerplate methods:
You now need an instance of PeopleListViewController , so you can use it in tests.
Add the following line to the top of the PeopleListViewControllerTests
Then replace the setUp () method with the following code:
It uses the storyboard to instantiate the PeopleListViewController , and assigns it to the viewController .
Select Product \ Test ; Xcode compiles the project and runs any existing tests. Although you do not have tests yet, this will allow you to make sure that everything is configured correctly. After a few seconds, Xcode should report that all tests were successful.
You are now on your way to creating your first mock object.
Writing the first Mock object
Since you are going to work with Core Data , add the following import up PeopleListViewControllerTests.swiftimmediately after the import Birthdays line :
Then, add the following code to the PeopleListViewControllerTests class definition :
This seems like a pretty complicated mock object. However, this is simply the absolute minimum required, since you are going to assign an instance of this mock class to the PeopleListViewController dataProvider property . Your mock class must also comply with PeopleListDataProviderProtocol , as well as the UITableViewDataSource protocol .
Select Product \ Test ; the project will be compiled again, and your tests passed on ur. But now you have everything configured for the first unit testing using the mock object.
Unit testing should be divided into three parts, naming them, given , when , and then . ' Given'sets up the environment; ' when ' executes the code you need to test; and 'then' checks the expected result.
Your test will verify that the tableView property of the data provider is set after the viewDidLoad () method has been executed.
Add the following test to PeopleListViewControllerTests:
Here's how the above test works:
Then select Product \ Test again ; as soon as the tests are completed, open the navigator ( Cmd + 5 - a convenient shortcut key). And you should see the following:
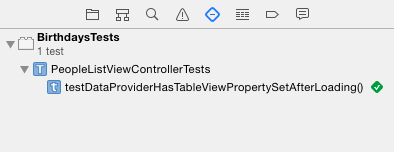
Your first test with a mock object was successful!
Testing the addPerson (_ :) method
The next test is to make sure that selecting a contact from the list will call the addPerson (_ :) method
Add the following property to the MockDataProvider class :
Then replace the addPerson (_ :) method with the following:
Now, when you call addPerson (_ :) , you register it in the instance by setting true to MockDataProvider .
You will have to import the AddressBookUI framework before you can add a method to test this behavior.
Add the following import to PeopleListViewControllerTests.swift :
Now add the following test method to the rest of the test scripts:
So what is going on here?
Select Product \ Test to run the tests. It turns out that this is a pretty easy task!
But wait! Do not hurry! How do you know that tests actually test what you think they test?

Testing your tests A
quick way to verify that a test is actually checking something is to remove the object that tests the test.
Open PeopleListViewController.swift and comment out the following line peoplePickerNavigationController (_: didSelectPerson :) :
Run the tests again; the last test you just wrote should now fail. Masterpiece - you know that your tests are actually testing something. Check your tests; at least you need to check the most complex tests to make sure they work.

Uncomment the line to return the code to working condition; run the tests again to make sure everything is working.
Mocking Apple Framework Classes
You could use singletones like NSUserDefaults.standardUserDefaults () and NSNotificationCenter.defaultCenter () , but how would you test the default value? Apple does not allow you to check the status of these classes.
You could add a test class as an observer for the expected result. But this can slow down your tests and make them unreliable, since they depend on the implementation of those classes. Or the value could be set from another part of your code, and you did not test the isolated behavior.
To get around these limitations, you can use mock objects instead of these singletones.
Note: When replacing Apple classes with a mock object, it is very important to check the interaction with that class, and not with the behavior of that class, since implementation details can change at any time.
Compile and run the application; add John Appleseed and David Taylor to the list of people and switch the sorting between"Last Name" and "First Name" . You will see that the order of the contacts in the list depends on the sorting.
The code that is responsible for sorting is in the changeSort () method in PeopleListViewController.swift :
It adds the selected segment index to sort by key in NSUserDefaults and calls the fetch () method . The fetch () method should read this new sort order with NSUserDefaults and update the contact list demonstrated in PeopleListDataProvider :
PeopleListDataProvider uses the NSFetchedResultsController to fetch data from Core Data . To replace list sorting, fetch () creates an array using sorting descriptors and sets it to the select query of the selected result controller. It then fetch to refresh the list and call the reloadData () method on the table.
You will now add a test to verify that the user's preferred sort order is set correctly in NSUserDefaults .
Open PeopleListViewControllerTests.swift and add the following class definition below the Mockdataprovider class definition :
MockUserDefaults is a subclass of NSUserDefaults ; it has a boolean property sortWasChanged with a default value of false . It also overrides the setInteger (_: forKey :) method , which changes the value of sortWasChanged to true .
Add the following test below the last test in the PeopleListViewControllerTests class :
Here is the report of this check:
Run your test suite - all of them should complete successfully.
What about the case when you have a really complex API or framework, but you really want to test a small component, do not "dig" deep into the framework!
That's when you “fake” it, and not create it! :]
Writing Fakes objects
Fakes objects behave like the full implementation of the classes they fake. You use them as substitutes for classes or structures that are too difficult to work with.
In the case of the application, you do not need to add records and select them with Core Data . So, instead, you fake Core Data . That sounds a little frightening, right?
Choose folderBirthdaysTests and go to File \ New \ File .... Select the iOS \ Source \ Test Case Class template and click Next . Name your class PeopleListDataProviderTests , click Next and then Create .
Delete unnecessary tests in the created test class again:
Add the following two imports to the new class:
Then add the following properties:
Properties contain the main components that are used in the Core Data stack . To get started with Core Data , check out our Core Data Tutorial: Getting Started
Add the following code to the setUp () method :
Here is what happens in the above code:
Add the following two properties to PeopleListDataProviderTests :
Now add the following code to the end of the setUp () method :
This sets up the table view by instantiating the view controller with the storyboard and creates an instance of PersonInfo to be used in the tests.
When the test is completed, you will need to "reset" the context of the managed entity.
Replace the tearDown () method with the following code:
This code sets managedObjectContext to nil to free up memory, and remove the persistent store from the store coordinator. You can run each test with a new test repository.
Now - you can write a test! Add the following test to your test class:
This test verifies that the storage is not nil. Run a new test - everything should succeed.
The following test will check if the data source provides the expected number of rows.
Add the following test to the test class:
First add the contact to the test repository, then confirm that the number of lines is 1.
Run the tests - they should all succeed.
By creating a fake “persistent” storage, you provide quick testing and let the disk stay clean, so you can be sure that the application will work as expected as it starts.
Wrote a test You can also check the number of sections and lines after you have added two or more test contacts; it all depends on the level of confidence that you are trying to achieve in the project.
If you have ever worked with several teams on a project at once, you know that not all parts of the project are ready at the same time, but you already need to test your code. But how can you test part of your code for something that does not exist, such as a web service?
Stubs will come to your aid!
Writing Stubs
Stubs fake response to object method calls. You will use stubs to test your web service call code, which may still be in development.
The web team for your project was tasked with creating a web service with the same functionality as the application. The user creates an account on the service and can then synchronize data between the application and the service. But the web team did not even begin its part of the work, and you are almost done. It looks like you should write stub to replace the web server component.
In this section, you will focus on writing tests of two methods: one to select contacts added on the site and one to add contacts from your application to the web service. In a real scenario, you will need a username and account and error handling, but we'll do it another time.
Open APICommunicatorProtocol.swift; this protocol declares two methods for receiving contacts from a web service and adding contacts.
You could move instances of Person, but you would need a different managed entity context for this. Using structures has become much easier in this case.
You will now create stubs to support the interaction of the view controller with the APICommunicator instance .
Open PeopleListViewControllerTests.swift and add the following class definition within the PeopleListViewControllerTests class :
Something to note:
Now it's time to test your Stub API to make sure all the contacts that are returned from the API are added to the repository when you call the addPerson ()
method Add the following test method to PeopleListViewControllerTests :
Here is what happens in the above code:
Compile and run the tests.
So what's next?
Download the final version of the project , this version also includes some additional tests that were not covered in this article.
You learned how to write mock objects, fakes and stubs for testing micro-components in your application and figured out how XCTest works in Swift .
This article presents only an initial understanding of tests; I'm sure that you already have ideas for writing tests for your applications.
For more on unit testing, check out Test Driven Development (TDD) and Behavior Driven Development (BDD). These are application development methodologies (and, frankly, represent a whole new way of thinking) where you write tests before you write code.
Unit testing is only one part of a complete test suite; comprehensive testing is the next logical step. An easy way to get started with complex testing is to use UIAutomation . If you are serious about testing your applications, then you need to use UIAutomation !
ps Since the article was written before 09.09.2015, Swift versions 1.2 were used to write examples. I made some changes to the examples in connection with the release of a new version of the Swift language. The source code of the projects can be found here and here..
Unit testing is a great way to write flawless code; testing will help you find the majority of errors at an early stage of writing a project. As experience shows: if you have difficulties in testing the code, then you will have difficulties with its support or debugging.
Unit testing works with isolated “microcomponents”. Often you need to “wet” classes - that is, provide a fake functional implementation to isolate a specific microcomponent, so it can be tested. In Objective-CThere are several third-party frameworks that help implement this. But they are not yet available in Swift .
In this tutorial, you will learn how to write your own mock objects, fakes and stubs in order to cover a fairly simple application with tests that will help you remember your friends' birthdays.
Let's get started.
Download the starter project. This is a contact storage application. You will not work on the functionality of the base application; rather, you will write some tests for it to make sure that the application is working properly.
Compile and run the application, and then test how it works. Click the plus button and then add John Appleseedto general contact list:
To store contacts, the application uses Core Data .
Do not panic! You do not need Core Data experience for this tutorial; for this you do not need to have any special skills.
The advantages and disadvantages of unit testing
When it comes to writing tests, you will come across both good and bad news. The bad news is that unit testing has the following disadvantages:
- A large amount of code: In projects with a large test coverage, you may have more tests than functional code.
- More support: The more code, the more support it needs.
- There is no right solution: Unit testing is not guaranteed, and cannot guarantee that your code will be error free.
- Takes more time: Writing tests takes some time - the time you could spend learning new information on habrahabr.ru !
Although there is no perfect solution, there is a bright side - writing tests has the following advantages:
- Confidence: You can make sure your code works.
- Quick reviews: You can use unit testing to quickly verify code that is hidden under many layers of navigation — too many components that need to be checked manually.
- Modularity: Unit testing helps you focus on writing more modular code.
- Orientation: Writing tests for microcomponents will help you focus on small details.
- Regression: Make sure that the errors that you corrected earlier remain fixed - and that subsequent corrections are not violated.
- Refactoring: Until Xcode becomes smart enough to rewrite code on its own, you will need unit testing to verify refactoring.
- Documentation: Unit testing describes what you think the code should do; It is another way of writing code.
The basic structure of applications
A large amount of code in applications is based on the Master-Detail Application template with Core Data enabled . But there are some significant improvements to the code template. Open the project in Xcode and look at the project navigator:
Take into account the following details:
- You have a Person.swift file and a PersonInfo.swift file . The Person class is the descendant of NSManagedObject , which contains some basic information about each person. The PersonInfo structure contains the same information, but can be updated from the address book.
- The PeopleList folder has three files: a view controller, a data provider, and a data provider protocol.
A collection of files in PeopleList to avoid large view controllers. In order to avoid large view controllers, you can shift some responsibilities to other classes that connect to view controllers through a simple protocol. You can learn more about large view controllers and how to avoid them by reading this interesting, albeit older article .
In this case, the protocol is defined in PeopleListDataProviderProtocol.swift ; open it and look. A class conforming to this protocol must have the properties managedObjectContext and tableView , and must define the addPerson (_ :) andfetch () . In addition, it must conform to the UITableViewDataSource protocol .
The PeopleListViewController has a dataProvider property that conforms to the PeopleListDataProviderProtocol protocol . This property is set to an instance of a file PeopleListDataProvider AppDelegate.swift .
Add new people to your contact list using ABPeoplePickerNavigationController . This class allows you, as a developer, to have access to user contacts without the need for permission.
PeopleListDataProvider is responsible for populating the table view and accessing Core Data.
Note: Several classes and methods in the project are declared as public; so that the test target can access classes and methods. The test target is outside the application module. If you do not add an access modifier, classes and methods are defined as internal . This means that they are only available in the same module. To access them outside the module (for example, from the target for tests), you must add the public access modifier .
Well then, it's time to write some tests!
Writing Mock
Objects Mock objects allow you to check whether a method call is made or a property is set. For example, on viewDidLoad () fromPeopleListViewController , the table view is set to the tableView property of dataProvider .
You write a test to check what is actually happening.
Preparing the application for testing
First, you need to prepare a project for writing tests.
Select the project in the project navigator, then select the Build Settings in Target testing Birthdays . Locate the Defines Module , and change the settings to Yes , as shown below:
Then select the BirthdaysTests folder and go to File \ New \ File .... Select iOS\Source\Test Case Class, затем нажмите Next, назовите его PeopleListViewControllerTests, убедитесь, что вы создаёте файл Swift, снова нажмите Next, затем нажмите Create.
Если Xcode предлагает Вам создавать объединяющий заголовок, выберите No. Это — ошибка в Xcode, которая происходит, когда нет файлов в таргете, и Вы добавляете новый Swift файл.
Откройте недавно созданный PeopleListViewControllerTests.swift. Импортируйте модуль, который вы только что включили, добавив оператор import Birthdays прямо после других операторов импорта, как показано ниже:
import UIKit
import XCTest
import Birthdays
Remove the following two boilerplate methods:
func testExample() {
  // This is an example of a functional test case.
  XCTAssert(true, "Pass")
}
func testPerformanceExample() {
  // This is an example of a performance test case.
  self.measureBlock() {
    // Put the code you want to measure the time of here.
  }
}
You now need an instance of PeopleListViewController , so you can use it in tests.
Add the following line to the top of the PeopleListViewControllerTests
var viewController: PeopleListViewController!
Then replace the setUp () method with the following code:
override func setUp() {
  super.setUp()
  viewController = UIStoryboard(name: "Main", bundle: nil).instantiateViewControllerWithIdentifier("PeopleListViewController") as! PeopleListViewController
}
It uses the storyboard to instantiate the PeopleListViewController , and assigns it to the viewController .
Select Product \ Test ; Xcode compiles the project and runs any existing tests. Although you do not have tests yet, this will allow you to make sure that everything is configured correctly. After a few seconds, Xcode should report that all tests were successful.
You are now on your way to creating your first mock object.
Writing the first Mock object
Since you are going to work with Core Data , add the following import up PeopleListViewControllerTests.swiftimmediately after the import Birthdays line :
import CoreData
Then, add the following code to the PeopleListViewControllerTests class definition :
class MockDataProvider: NSObject, PeopleListDataProviderProtocol {
  var managedObjectContext: NSManagedObjectContext?
  weak var tableView: UITableView!
  func addPerson(personInfo: PersonInfo) { }
  func fetch() { }
  func tableView(tableView: UITableView, numberOfRowsInSection section: Int) -> Int { return 1 }
  func tableView(tableView: UITableView, cellForRowAtIndexPath indexPath: NSIndexPath) -> UITableViewCell {
    return UITableViewCell()
  }
}
This seems like a pretty complicated mock object. However, this is simply the absolute minimum required, since you are going to assign an instance of this mock class to the PeopleListViewController dataProvider property . Your mock class must also comply with PeopleListDataProviderProtocol , as well as the UITableViewDataSource protocol .
Select Product \ Test ; the project will be compiled again, and your tests passed on ur. But now you have everything configured for the first unit testing using the mock object.
Unit testing should be divided into three parts, naming them, given , when , and then . ' Given'sets up the environment; ' when ' executes the code you need to test; and 'then' checks the expected result.
Your test will verify that the tableView property of the data provider is set after the viewDidLoad () method has been executed.
Add the following test to PeopleListViewControllerTests:
func testDataProviderHasTableViewPropertySetAfterLoading() {
  // given
  // 1
  let mockDataProvider = MockDataProvider()
  viewController.dataProvider = mockDataProvider
  // when
  // 2
  XCTAssertNil(mockDataProvider.tableView, "Before loading the table view should be nil")
  // 3
  let _ = viewController.view
  // then
  // 4
  XCTAssertTrue(mockDataProvider.tableView != nil, "The table view should be set")
  XCTAssert(mockDataProvider.tableView === viewController.tableView,
    "The table view should be set to the table view of the data source")
}
Here's how the above test works:
- Creates an instance of MockDataProvider and sets it to the view controller property for dataProvider.
- Confirms that the tableView property is nil before the start of the test.
- Has access to the view to run viewDidLoad () .
- Confirms that the property of the test class tableView is not nil and the property is set to the tableView of the view controller.
Then select Product \ Test again ; as soon as the tests are completed, open the navigator ( Cmd + 5 - a convenient shortcut key). And you should see the following:
Your first test with a mock object was successful!
Testing the addPerson (_ :) method
The next test is to make sure that selecting a contact from the list will call the addPerson (_ :) method
Add the following property to the MockDataProvider class :
var addPersonGotCalled = false
Then replace the addPerson (_ :) method with the following:
func addPerson(personInfo: PersonInfo) { addPersonGotCalled = true }
Now, when you call addPerson (_ :) , you register it in the instance by setting true to MockDataProvider .
You will have to import the AddressBookUI framework before you can add a method to test this behavior.
Add the following import to PeopleListViewControllerTests.swift :
import AddressBookUI
Now add the following test method to the rest of the test scripts:
func testCallsAddPersonOfThePeopleDataSourceAfterAddingAPersion() {
  // given
  let mockDataSource = MockDataProvider()
  // 1
  viewController.dataProvider = mockDataSource
  // when
  // 2
  let record: ABRecord = ABPersonCreate().takeRetainedValue()
  ABRecordSetValue(record, kABPersonFirstNameProperty, "TestFirstname", nil)
  ABRecordSetValue(record, kABPersonLastNameProperty, "TestLastname", nil)
  ABRecordSetValue(record, kABPersonBirthdayProperty, NSDate(), nil)
  // 3
  viewController.peoplePickerNavigationController(ABPeoplePickerNavigationController(),
    didSelectPerson: record)
  // then
  // 4
  XCTAssert(mockDataSource.addPersonGotCalled, "addPerson should have been called")
}
So what is going on here?
- First, you install the view controller data provider to an instance of your fake data provider.
- Then you create a contact using ABPersonCreate () .
- Here you manually call the delegate method peoplePickerNavigationController (_: didSelectPerson :) . Manually calling delegate methods manually is a sign of bad code, but good for testing purposes.
- Finally, you confirm that addPerson (_ :) was called, checking that addPersonGotCalled is true.
Select Product \ Test to run the tests. It turns out that this is a pretty easy task!
But wait! Do not hurry! How do you know that tests actually test what you think they test?
Testing your tests A
quick way to verify that a test is actually checking something is to remove the object that tests the test.
Open PeopleListViewController.swift and comment out the following line peoplePickerNavigationController (_: didSelectPerson :) :
dataProvider?.addPerson(person)
Run the tests again; the last test you just wrote should now fail. Masterpiece - you know that your tests are actually testing something. Check your tests; at least you need to check the most complex tests to make sure they work.
Uncomment the line to return the code to working condition; run the tests again to make sure everything is working.
Mocking Apple Framework Classes
You could use singletones like NSUserDefaults.standardUserDefaults () and NSNotificationCenter.defaultCenter () , but how would you test the default value? Apple does not allow you to check the status of these classes.
You could add a test class as an observer for the expected result. But this can slow down your tests and make them unreliable, since they depend on the implementation of those classes. Or the value could be set from another part of your code, and you did not test the isolated behavior.
To get around these limitations, you can use mock objects instead of these singletones.
Note: When replacing Apple classes with a mock object, it is very important to check the interaction with that class, and not with the behavior of that class, since implementation details can change at any time.
Compile and run the application; add John Appleseed and David Taylor to the list of people and switch the sorting between"Last Name" and "First Name" . You will see that the order of the contacts in the list depends on the sorting.
The code that is responsible for sorting is in the changeSort () method in PeopleListViewController.swift :
@IBAction func changeSorting(sender: UISegmentedControl) {
    userDefaults.setInteger(sender.selectedSegmentIndex, forKey: "sort")
    dataProvider?.fetch()
}
It adds the selected segment index to sort by key in NSUserDefaults and calls the fetch () method . The fetch () method should read this new sort order with NSUserDefaults and update the contact list demonstrated in PeopleListDataProvider :
let sortKey = NSUserDefaults.standardUserDefaults().integerForKey("sort") == 0 ? "lastName" : "firstName"
let sortDescriptor = NSSortDescriptor(key: sortKey, ascending: true)
let sortDescriptors = [sortDescriptor]
fetchedResultsController.fetchRequest.sortDescriptors = sortDescriptors
var error: NSError? = nil
if !fetchedResultsController.performFetch(&error) {
  println("error: \(error)")
}
tableView.reloadData()
}
PeopleListDataProvider uses the NSFetchedResultsController to fetch data from Core Data . To replace list sorting, fetch () creates an array using sorting descriptors and sets it to the select query of the selected result controller. It then fetch to refresh the list and call the reloadData () method on the table.
You will now add a test to verify that the user's preferred sort order is set correctly in NSUserDefaults .
Open PeopleListViewControllerTests.swift and add the following class definition below the Mockdataprovider class definition :
class MockUserDefaults: NSUserDefaults {
  var sortWasChanged = false
  override func setInteger(value: Int, forKey defaultName: String) {
    if defaultName == "sort" {
      sortWasChanged = true
    }
  }
}
MockUserDefaults is a subclass of NSUserDefaults ; it has a boolean property sortWasChanged with a default value of false . It also overrides the setInteger (_: forKey :) method , which changes the value of sortWasChanged to true .
Add the following test below the last test in the PeopleListViewControllerTests class :
func testSortingCanBeChanged() {
  // given
  // 1
  let mockUserDefaults = MockUserDefaults(suiteName: "testing")!
  viewController.userDefaults = mockUserDefaults
  // when
  // 2
  let segmentedControl = UISegmentedControl()
  segmentedControl.selectedSegmentIndex = 0
  segmentedControl.addTarget(viewController, action: "changeSorting:", forControlEvents: .ValueChanged)
  segmentedControl.sendActionsForControlEvents(.ValueChanged)
  // then
  // 3
  XCTAssertTrue(mockUserDefaults.sortWasChanged, "Sort value in user defaults should be altered")
}
Here is the report of this check:
- You first assign an instance of MockUserDefaults to userDefaults of the view controller; this technique is known as dependency injection.
- Then create an instance of UISegmentedControl , add a view controller as a terget for .ValueChanged .
- Finally, you confirm that setInteger (_: forKey :) the user’s mock was called by default. Notice that you are checking to see if the value was actually stored in NSUserDefaults .
Run your test suite - all of them should complete successfully.
What about the case when you have a really complex API or framework, but you really want to test a small component, do not "dig" deep into the framework!
That's when you “fake” it, and not create it! :]
Writing Fakes objects
Fakes objects behave like the full implementation of the classes they fake. You use them as substitutes for classes or structures that are too difficult to work with.
In the case of the application, you do not need to add records and select them with Core Data . So, instead, you fake Core Data . That sounds a little frightening, right?
Choose folderBirthdaysTests and go to File \ New \ File .... Select the iOS \ Source \ Test Case Class template and click Next . Name your class PeopleListDataProviderTests , click Next and then Create .
Delete unnecessary tests in the created test class again:
func testExample() {
  // ...
}
func testPerformanceExample() {
  // ...
}
Add the following two imports to the new class:
import Birthdays
import CoreData
Then add the following properties:
var storeCoordinator: NSPersistentStoreCoordinator!
var managedObjectContext: NSManagedObjectContext!
var managedObjectModel: NSManagedObjectModel!
var store: NSPersistentStore!
var dataProvider: PeopleListDataProvider!
Properties contain the main components that are used in the Core Data stack . To get started with Core Data , check out our Core Data Tutorial: Getting Started
Add the following code to the setUp () method :
// 1
managedObjectModel = NSManagedObjectModel.mergedModelFromBundles(nil)
storeCoordinator = NSPersistentStoreCoordinator(managedObjectModel: managedObjectModel)
store = storeCoordinator.addPersistentStoreWithType(NSInMemoryStoreType,
  configuration: nil, URL: nil, options: nil, error: nil)
managedObjectContext = NSManagedObjectContext()
managedObjectContext.persistentStoreCoordinator = storeCoordinator
// 2
dataProvider = PeopleListDataProvider()
dataProvider.managedObjectContext = managedObjectContext
Here is what happens in the above code:
- setUp () creates a context for managed objects using in-memory storage. Typically, Core Data is a file in the file system of a device. For these tests, you create 'permanent' storage in the device’s memory.
- Then you create an instance of PeopleListDataProvider and a managed object context with storage in memory that is set as managedObjectContext. This means that your new data provider will work as real, but will not add or remove objects in Core Data.
Add the following two properties to PeopleListDataProviderTests :
var tableView: UITableView!
var testRecord: PersonInfo!
Now add the following code to the end of the setUp () method :
let viewController = UIStoryboard(name: "Main", bundle: nil).instantiateViewControllerWithIdentifier("PeopleListViewController") as! PeopleListViewController
viewController.dataProvider = dataProvider
tableView = viewController.tableView
testRecord = PersonInfo(firstName: "TestFirstName", lastName: "TestLastName", birthday: NSDate())
This sets up the table view by instantiating the view controller with the storyboard and creates an instance of PersonInfo to be used in the tests.
When the test is completed, you will need to "reset" the context of the managed entity.
Replace the tearDown () method with the following code:
override func tearDown() {
  managedObjectContext = nil
  var error: NSError? = nil
  XCTAssert(storeCoordinator.removePersistentStore(store, error: &error), "couldn't remove persistent store: \(error)")
  super.tearDown()
}
This code sets managedObjectContext to nil to free up memory, and remove the persistent store from the store coordinator. You can run each test with a new test repository.
Now - you can write a test! Add the following test to your test class:
func testThatStoreIsSetUp() {
  XCTAssertNotNil(store, "no persistent store")
}
This test verifies that the storage is not nil. Run a new test - everything should succeed.
The following test will check if the data source provides the expected number of rows.
Add the following test to the test class:
func testOnePersonInThePersistantStoreResultsInOneRow() {
  dataProvider.addPerson(testRecord)
  XCTAssertEqual(tableView.dataSource!.tableView(tableView, numberOfRowsInSection: 0), 1, "After adding one person number of rows is not 1")
}
First add the contact to the test repository, then confirm that the number of lines is 1.
Run the tests - they should all succeed.
By creating a fake “persistent” storage, you provide quick testing and let the disk stay clean, so you can be sure that the application will work as expected as it starts.
Wrote a test You can also check the number of sections and lines after you have added two or more test contacts; it all depends on the level of confidence that you are trying to achieve in the project.
If you have ever worked with several teams on a project at once, you know that not all parts of the project are ready at the same time, but you already need to test your code. But how can you test part of your code for something that does not exist, such as a web service?
Stubs will come to your aid!
Writing Stubs
Stubs fake response to object method calls. You will use stubs to test your web service call code, which may still be in development.
The web team for your project was tasked with creating a web service with the same functionality as the application. The user creates an account on the service and can then synchronize data between the application and the service. But the web team did not even begin its part of the work, and you are almost done. It looks like you should write stub to replace the web server component.
In this section, you will focus on writing tests of two methods: one to select contacts added on the site and one to add contacts from your application to the web service. In a real scenario, you will need a username and account and error handling, but we'll do it another time.
Open APICommunicatorProtocol.swift; this protocol declares two methods for receiving contacts from a web service and adding contacts.
You could move instances of Person, but you would need a different managed entity context for this. Using structures has become much easier in this case.
You will now create stubs to support the interaction of the view controller with the APICommunicator instance .
Open PeopleListViewControllerTests.swift and add the following class definition within the PeopleListViewControllerTests class :
// 1
class MockAPICommunicator: APICommunicatorProtocol {
  var allPersonInfo = [PersonInfo]()
  var postPersonGotCalled = false
  // 2
  func getPeople() -> (NSError?, [PersonInfo]?) {
    return (nil, allPersonInfo)
  }
  // 3
  func postPerson(personInfo: PersonInfo) -> NSError? {
    postPersonGotCalled = true
    return nil
  }
}
Something to note:
- Even if the APICommunicator is a structure, the mock implementation is a class. In this case, it will be more convenient to use the class, because your tests require that you modify the data. This is a little easier to do in class than in structure.
- The getPeople () method returns what is stored in allPersonInfo. Instead of downloading data from the network, you simply store contact information in a simple array.
- The postPerson (_ :) method sets true to postPersonGotCalled.
Now it's time to test your Stub API to make sure all the contacts that are returned from the API are added to the repository when you call the addPerson ()
method Add the following test method to PeopleListViewControllerTests :
func testFetchingPeopleFromAPICallsAddPeople() {
  // given
  // 1
  let mockDataProvider = MockDataProvider()
  viewController.dataProvider = mockDataProvider
  // 2
  let mockCommunicator = MockAPICommunicator()
  mockCommunicator.allPersonInfo = [PersonInfo(firstName: "firstname", lastName: "lastname",
    birthday: NSDate())]
  viewController.communicator = mockCommunicator
  // when
  viewController.fetchPeopleFromAPI()
  // then
  // 3
  XCTAssert(mockDataProvider.addPersonGotCalled, "addPerson should have been called")
}
Here is what happens in the above code:
- Сначала вы настраиваете имитирующие объекты mockDataProvider и mockCommunicator, которые вы будете использовать в тесте.
- Затем вы устанавливаете некоторые фейковые контакты и вызываете метод fetchPeopleFromAPI(), чтобы выполнить фейковый сетевой вызов.
- Наконец тестируете метод addPerson(_:).
Compile and run the tests.
So what's next?
Download the final version of the project , this version also includes some additional tests that were not covered in this article.
You learned how to write mock objects, fakes and stubs for testing micro-components in your application and figured out how XCTest works in Swift .
This article presents only an initial understanding of tests; I'm sure that you already have ideas for writing tests for your applications.
For more on unit testing, check out Test Driven Development (TDD) and Behavior Driven Development (BDD). These are application development methodologies (and, frankly, represent a whole new way of thinking) where you write tests before you write code.
Unit testing is only one part of a complete test suite; comprehensive testing is the next logical step. An easy way to get started with complex testing is to use UIAutomation . If you are serious about testing your applications, then you need to use UIAutomation !
ps Since the article was written before 09.09.2015, Swift versions 1.2 were used to write examples. I made some changes to the examples in connection with the release of a new version of the Swift language. The source code of the projects can be found here and here..