Android Testing: Robolectric + Jenkins + JaСoСo
Testing Android applications is a large and capacious topic, you can talk about it endlessly. We at Rambler & Co love, write and actively use autotests for all our applications. In this article we will tell you how to get and analyze the results of testing android (and not only) applications. Let’s show how to set up Robolectric, JaCoCo and Jenkins so that it is like this:
Robolectric is a library that allows you to run tests for android applications on the local JVM. Yes, yes, that’s right, you don’t have to wait until apk loads and installs, while the application starts on the phone, just click run and the JVM quickly scrolls through all the tests. Android environment is emulated, there is access to the main functions.
Robolectric is actively developing, but it still has a lot of problems, so we use robolectric for testing business objects, application logic, data storage and processing. Where pure jUnit is already scarce, and a real device is still not needed. For ui testing, we recommend Espresso from Google .
There are not enough materials on the network about this wonderful library in Russian, so we’ll attach a little setup guide.
With the release of version 3.0, the installation of the library fits on one line (previously, a plug-in was also required), add to dependencies:
Note that we specified testCompile, not androidTestCompile. testCompile indicates that these dependencies are needed for Unit Tests, and androidTestCompile for Android Instrumentation Test. We select build Variants, Test Artifact - Android Instrumentation Test in the window, wait until the studio is updated, and voila ... the tests are gone! What to do?
The fact is that for unit tests (by default) src / test is used, and for android test - src / androidTest. Create the following folders in the src \ folder: \ test \ java and \ test \ resources. The first is used for tests, the second for resources. Here is an example of access to resources:
Writing tests under robolectric is very simple: we create tests, write code, use annotations. Access to activity through setupActivity \ buildActivity. More details about all the features can be found on the website, robolectric.org/writing-a-test
Robolectric test examples (from the robolectric team):
github.com/robolectric/robolectric-samples
robolectric + espresso test examples:
github.com/robolectric/deckard
To run the tests, we need a new configuration. We right-click on the test, select Create “testName”, if necessary, change the configuration, click “OK”, the test is ready. Attention, you may need to add the application folder (\ app) to the working directory. You can run all tests, or tests from a separate package.
Next, run the test:
Mentions about this wonderful tool in RuNet are also very few, we are correcting.
JaCoCo is used to calculate and display code coverage with tests.
For example, as in the screenshot:
Website: www.eclemma.org/jacoco
To add a library to android, you need to update your gradle file:
Be careful when specifying executionData. This is the location of the exec file that contains all the data about the coverage of the code by tests.
Now you can check the work with the gradlew jacocoTestReport command. Reports should be in the folder: build \ reports \ tests
If it does not start, run the command:
gradlew clean assemble test jacocoTestReport
The test results are presented in the form of an html report, screenshots:
For Jenkins, a code coverage trend is added:
It is assumed that you already have Jenkins configured. If not, then here is a good article about initial setup: habrahabr.ru/post/205308
Let's pump our Jenkins a bit: teach him how to run tests, build reports and check the percentage of code coverage:
Results Processing Setup
1) Turn on archiving artifacts and the Publish html reports plugin
2) Configure the jUnit plugin (or xUnit Plugin ).
3) Turn on the JaCoCo Plugin . We need to specify the paths for exec files, to classes and resources. Almost the same as what we pointed out in build.gradle
Using these tools will allow you to reduce time and reduce costs when writing and analyzing tests. Thanks for attention!
Robolectric
Robolectric is a library that allows you to run tests for android applications on the local JVM. Yes, yes, that’s right, you don’t have to wait until apk loads and installs, while the application starts on the phone, just click run and the JVM quickly scrolls through all the tests. Android environment is emulated, there is access to the main functions.
Robolectric is actively developing, but it still has a lot of problems, so we use robolectric for testing business objects, application logic, data storage and processing. Where pure jUnit is already scarce, and a real device is still not needed. For ui testing, we recommend Espresso from Google .
There are not enough materials on the network about this wonderful library in Russian, so we’ll attach a little setup guide.
Installation
With the release of version 3.0, the installation of the library fits on one line (previously, a plug-in was also required), add to dependencies:
testCompile 'org.robolectric:robolectric:3.0'
Note that we specified testCompile, not androidTestCompile. testCompile indicates that these dependencies are needed for Unit Tests, and androidTestCompile for Android Instrumentation Test. We select build Variants, Test Artifact - Android Instrumentation Test in the window, wait until the studio is updated, and voila ... the tests are gone! What to do?
Build variants
The fact is that for unit tests (by default) src / test is used, and for android test - src / androidTest. Create the following folders in the src \ folder: \ test \ java and \ test \ resources. The first is used for tests, the second for resources. Here is an example of access to resources:
InputStream stream = getClass().getClassLoader().getResourceAsStream("habr.txt");
First test
Writing tests under robolectric is very simple: we create tests, write code, use annotations. Access to activity through setupActivity \ buildActivity. More details about all the features can be found on the website, robolectric.org/writing-a-test
@RunWith(RobolectricTestRunner.class)
public class MyActivityTest {
  @Test
  public void clickingButton_shouldChangeResultsViewText() throws Exception {
    MyActivity activity = Robolectric.setupActivity(MyActivity.class);
    Button button = (Button) activity.findViewById(R.id.button);
    TextView results = (TextView) activity.findViewById(R.id.results);
    button.performClick();
    assertThat(results.getText().toString()).isEqualTo("Robolectric Rocks!");
  }
}
Another example (www.vogella.com)
package com.vogella.android.test.robolectric;
import static org.hamcrest.CoreMatchers.equalTo;
import static org.junit.Assert.*;
import static org.junit.Assert.assertNotNull;
import static org.junit.Assert.assertThat;
import com.example.BuildConfig;
import org.junit.Test;
import org.junit.runner.RunWith;
import org.robolectric.Robolectric;
import org.robolectric.RobolectricGradleTestRunner;
import org.robolectric.annotation.Config;
import org.junit.Before;
import org.junit.Test;
import org.junit.runner.RunWith;
import org.robolectric.shadows.ShadowToast;
import android.content.Intent;
import android.widget.Button;
@RunWith(RobolectricGradleTestRunner.class)
@Config(constants = BuildConfig.class, sdk = 21, manifest = "src/main/AndroidManifest.xml")
public class MyActivityTest {
  private MainActivity activity;
  @Test
  public void shouldHaveHappySmiles() throws Exception {
    String hello = new MainActivity().getResources().getString(R.string.hello_world);
    assertThat(hello, equalTo("Hello world!"));
  }
  @Before
  public void setup()  {
    activity = Robolectric.buildActivity(MainActivity.class)
        .create().get();
  }
  @Test
  public void checkActivityNotNull() throws Exception {
    assertNotNull(activity);
  }
  @Test
  public void buttonClickShouldStartNewActivity() throws Exception
  {
      Button button = (Button) activity.findViewById(R.id.button2);
      button.performClick();
      Intent intent = Robolectric.shadowOf(activity).peekNextStartedActivity();
      assertEquals(SecondActivity.class.getCanonicalName(), intent.getComponent().getClassName());
  }
  @Test
  public void testButtonClick() throws Exception {
    MainActivity activity = Robolectric.buildActivity(MainActivity.class)
        .create().get();
    Button view = (Button) activity.findViewById(R.id.button1);
    assertNotNull(view);
    view.performClick();
    assertThat(ShadowToast.getTextOfLatestToast(), equalTo("Lala"));
  }
}
Robolectric test examples (from the robolectric team):
github.com/robolectric/robolectric-samples
robolectric + espresso test examples:
github.com/robolectric/deckard
Running tests
To run the tests, we need a new configuration. We right-click on the test, select Create “testName”, if necessary, change the configuration, click “OK”, the test is ready. Attention, you may need to add the application folder (\ app) to the working directory. You can run all tests, or tests from a separate package.
Create configuration
Next, run the test:
Test run
And we get the result in the run window:Test results
Running all tests from the console: gradlew test
Jacoco
Mentions about this wonderful tool in RuNet are also very few, we are correcting.
JaCoCo is used to calculate and display code coverage with tests.
For example, as in the screenshot:
JaCoCo code coverage with tests
Website: www.eclemma.org/jacoco
To add a library to android, you need to update your gradle file:
apply plugin: 'jacoco'
jacoco {
    toolVersion = "0.7.1.201405082137"
}
def coverageSourceDirs = [
        '../app/src'
]
task jacocoTestReport(type: JacocoReport, dependsOn: "testDebug") {
    group = "Reporting"
    description = "Generate Jacoco coverage reports"
    classDirectories = fileTree(
            dir: '../app/build/intermediates/classes',
            excludes: ['**/R.class',
                       '**/R$*.class',
                       '**/*$ViewInjector*.*',
                       '**/BuildConfig.*',
                       '**/Manifest*.*']
    )
    additionalSourceDirs = files(coverageSourceDirs)
    sourceDirectories = files(coverageSourceDirs)
    executionData = files('../app/build/jacoco/testDebug.exec')
    reports {
        xml.enabled = true
        html.enabled = true
    }
}
Be careful when specifying executionData. This is the location of the exec file that contains all the data about the coverage of the code by tests.
Now you can check the work with the gradlew jacocoTestReport command. Reports should be in the folder: build \ reports \ tests
If it does not start, run the command:
gradlew clean assemble test jacocoTestReport
The test results are presented in the form of an html report, screenshots:
Report Example

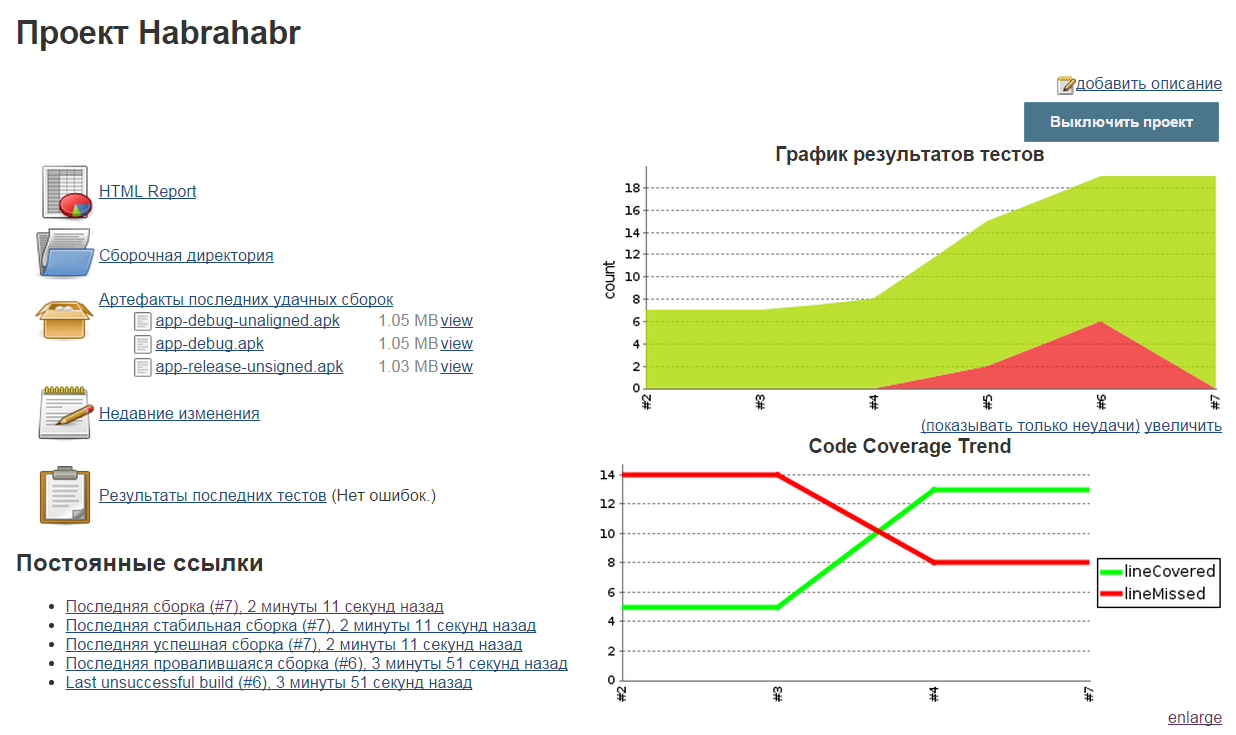
For Jenkins, a code coverage trend is added:
Jenkins Sample Reports

Jenkins setup
It is assumed that you already have Jenkins configured. If not, then here is a good article about initial setup: habrahabr.ru/post/205308
Let's pump our Jenkins a bit: teach him how to run tests, build reports and check the percentage of code coverage:
Jenkins without plugins
Jenkins with plugins
Results Processing Setup
1) Turn on archiving artifacts and the Publish html reports plugin
2) Configure the jUnit plugin (or xUnit Plugin ).
3) Turn on the JaCoCo Plugin . We need to specify the paths for exec files, to classes and resources. Almost the same as what we pointed out in build.gradle
Set up Publish html reports and save artifacts
Setting up jUnit test result report and JaCoCo Plugin
Using these tools will allow you to reduce time and reduce costs when writing and analyzing tests. Thanks for attention!