 July 24, 2015 at 18:09
Displaying data from Serial in Chrome Application

Hello, Habr!
I want to share the experience of creating a small application for Google Chrome that interacts with the serial port.
Brief background. Many times I wanted the computer and the Arduino connected to it to work as a single system, in which the microcontroller would be an intermediary for communicating with sensors and actuators, and the computer would be a large convenient console.
For this to happen, on the computer you need to either hack in the console terminal or write some small GUI'shka. Even the most primitive GUI's require some disproportionate effort to create. You need to choose a framework, implement a bunch of side GUI logic, compile for all kinds of platforms, deal with dependencies, pack .exe, check on the poppy and wend, etc.
I have long heard that the API for Google Chrome applications gives access to Serial. I wanted to try and at the same time master the creation of Chrome applications as such. The result was a Serial Projector - a replacement for the regular Serial Monitor for the Arduino IDE.
The bottom line is simple to disgrace: the application displays the last text line that came through the serial port in full screen. This allows, for example, to display device readings large and soft. It may be useful for any exhibitions, presentations, installations.
Details of the source code and a demonstration of work - under the cut.
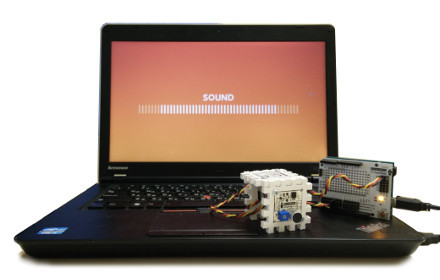
How the application works
Let's take a look at the Serial Projector. All sources are on GitHub .
So what is a Google Chrome app? By and large it is just a dynamic web page. Exactly the same as if you made it for your site. You can and should use the same JavaScript, CSS, HTML5, connect third-party libraries and lotions. I used jQuery, Backbone.js, Underscore.js. The difference is that such a page can use an additional "unsafe" API to work with the user's computer. In particular, there is an API for reading and writing to the serial port .
And such an application can be easily published in the Chrome Web Store, and your users can easily install it.
Just like this happens on mobile phones, during installation, the application will ask for confirmation that you trust it with access to one or another unsafe API. Their list is set in the manifest.json application description file:
//...
  "permissions": [
      "serial",
      "fullscreen"
  ]
//...
Serial Port Operation
The most interesting is in the connection.js file. The following is a model class for interacting with a serial connection. You should not carefully read from top to bottom to understand everything. I will give comments below.
var RETRY_CONNECT_MS = 1000;
var Connection = Backbone.Model.extend({
    defaults: {
        connectionId: null,
        path: null,
        bitrate: 9600,
        autoConnect: undefined,
        ports: [],
        buffer: null,
        text: '...',
        error: '',
    },
    initialize: function() {
        chrome.serial.onReceive.addListener(this._onReceive.bind(this));
        chrome.serial.onReceiveError.addListener(this._onReceiveError.bind(this));
    },
    enumeratePorts: function() {
        var self = this;
        chrome.serial.getDevices(function(ports) {
            self.set('ports', ports);
            self._checkPath();
        });
    },
    hasPorts: function() {
        return this.get('ports').length > 0;
    },
    autoConnect: function(enable) {
        this.set('autoConnect', enable);
        if (enable) {
            this._tryConnect();
        } else {
            this._disconnect();
        }
    },
    _tryConnect: function() {
        if (!this.get('autoConnect')) {
            return;
        }
        var path = this.get('path');
        var bitrate = this.get('bitrate');
        if (path) {
            var self = this;
            chrome.serial.connect(path, {bitrate: bitrate}, function(connectionInfo) {
                self.set('buffer', new Uint8Array(0));
                self.set('connectionId', connectionInfo.connectionId);
            });
        } else {
            this.enumeratePorts();
            setTimeout(this._tryConnect.bind(this), RETRY_CONNECT_MS);
        }
    },
    _disconnect: function() {
        var cid = this.get('connectionId');
        if (!cid) {
            return;
        }
        var self = this;
        chrome.serial.disconnect(cid, function() {
            self.set('connectionId', null);
            self.enumeratePorts();
        });
    },
    _checkPath: function() {
        var path = this.get('path');
        var ports = this.get('ports');
        if (ports.length == 0) {
            this.set('path', null);
            return;
        }
        for (var i = 0; i < ports.length; ++i) {
            var port = ports[i];
            if (port.path == path) {
                return;
            }
        }
        this.set('path', ports[0].path);
    },
    _onReceive: function(receiveInfo) {
        var data = receiveInfo.data;
        data = new Uint8Array(data);
        this.set('buffer', catBuffers(this.get('buffer'), data));
        var lbr = findLineBreak(this.get('buffer'));
        if (lbr !== undefined) {
            var txt = this.get('buffer').slice(0, lbr);
            this.set('buffer', this.get('buffer').slice(lbr + 1));
            this.set('text', uintToString(txt));
        }
    },
    _onReceiveError: function(info) {
        this._disconnect();
        this.set('error', info.error);
        this.enumeratePorts();
    }
});
Direct interaction with the Serial API can be seen in three places. Firstly, in the class constructor:
    initialize: function() {
        chrome.serial.onReceive.addListener(this._onReceive.bind(this));
        chrome.serial.onReceiveError.addListener(this._onReceiveError.bind(this));
    }
Here we define event handlers traditional for JS. Upon successful receipt of a chunk of data, we will call the _onReceive method, and for any error, _onReceiveError. Connections are established, but there is no connection yet. First you need to find out which Serial ports on the user's computer Chrome now sees:
    enumeratePorts: function() {
        var self = this;
        chrome.serial.getDevices(function(ports) {
            self.set('ports', ports);
            self._checkPath();
        });
    },
After polling the OS, the function passed as a parameter will be called with an array of ports found. Each element is a dictionary containing the system path to the port, human-readable name, USB VID & PID hardware.
Having the system path in hand, you can finally connect:
            chrome.serial.connect(path, {bitrate: bitrate}, function(connectionInfo) {
                self.set('buffer', new Uint8Array(0));
                self.set('connectionId', connectionInfo.connectionId);
            });
After establishing a connection, again, the provided callback with connection parameters will be called. In particular, with connectionId, which will be needed for most port interaction operations.
Now consider the process of obtaining and parsing data. All of it fits in one class method:
    _onReceive: function(receiveInfo) {
        var data = receiveInfo.data;
        data = new Uint8Array(data);
        this.set('buffer', catBuffers(this.get('buffer'), data));
        var lbr = findLineBreak(this.get('buffer'));
        if (lbr !== undefined) {
            var txt = this.get('buffer').slice(0, lbr);
            this.set('buffer', this.get('buffer').slice(lbr + 1));
            this.set('text', uintToString(txt));
        }
    },
Each time you receive a chunk of data, Chrome will call this function and pass information on the received packet to it. The data itself is transferred to the data field. It has an ArrayBuffer type, with which you can’t do anything directly. This is not a string, this is not an array, it is just a briquette of bytes "as is".
In order to disassemble the cake, you need to create a projection (view) ArrayBuffer'a that knows how to interpret the raw data. In the case of the Arduino, the compiler is AVR GCC, the sources are written in UTF-8, and therefore the data that is sent by regular Serial.println is transmitted in the form of UTF-8 lines.
Further, everything is trivial:
- Get a chunk of data
- We translate into a byte array through the projection
- Glue to what is already in memory
- Looking for a line break character code
- If found - cut the buffer on the "before" and "after". “Before” translate into a string and display, “after” leave in memory
- Repeat forever
Assistants couple
To my surprise, projections, including our Uint8Array, began to support slice'ing only in recent versions of Chrome. For compatibility with older versions, the method can be implemented independently:
Uint8Array.prototype.slice = function(begin, end) {
    if (typeof begin === 'undefined') {
        begin = 0;
    }
    if (typeof end === 'undefined') {
        end = Math.max(this.length, begin);
    }
    var result = new Uint8Array(end - begin);
    for (var i = begin; i < end; ++i) {
        result[i - begin] = this[i];
    }
    return result;
}
There were also no functions for gluing arrays and converting them into regular lines in a box, therefore:
function catBuffers(a, b) {
    var result = new Uint8Array(a.length + b.length);
    result.set(a);
    result.set(b, a.length);
    return result;
}
function uintToString(uintArray) {
    var encodedString = String.fromCharCode.apply(null, uintArray),
        decodedString = decodeURIComponent(escape(encodedString));
    return decodedString;
}
I will not provide the code for interacting with the HTML content of the page because it is extremely prosaic: a couple of triples of jQuery and Backbone model event handlers.
Total
In total, if you need to quickly cook up a console for your hardware project and not worry about cross-platform, creating an installer and delivering updates and fixes, Chrome Applications is a great choice.
I hope the article showed you the big picture and now you have something to push from. And what finally happened with us, you can watch in the next video on our YouTube channel :









