Create Android Wear watch faces on OpenGL ES 2.0
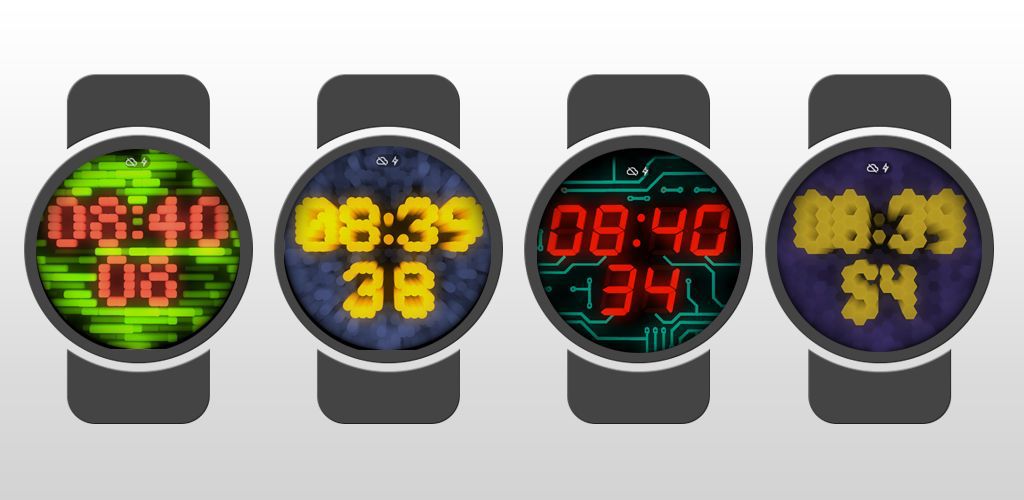
As soon as Google announced the possibility of creating custom dials in the new Android 5.0 for Android Wear, we ordered the new ASUS ZenWatch in the nearest online store in order to experience this latest feature. It was decided not to port one of the existing three-dimensional live wallpapers, but to create a new scene specifically for the clock. As a result, a concept was invented and an application was created with a set of five digital dials, implemented in 3D using OpengGL ES 2.0.
The idea of the dial was inspired by this work (by beeple):
The video looks cool and does not seem complicated at first glance. However, we found some technical limitations that prevented us from creating the same scene as in the video. It's not so easy to make numbers from lines (wireframes) that would correctly overlap each other. In short, this would require a large number of draw calls and the very limited clock hardware could not cope with so many draw calls. So we moved on to another idea - add depth to numbers from pixel fonts from old computers.
The Gles2WatchFaceService class from the Android Wear API does not provide access to all the features necessary to create a full three-dimensional scene of the dial. The main problem that we immediately faced was the inability to select the necessary OpenGL ES configuration. In fact, this class does not provide access to EGL at all. It is enough to run the 'Tilt' dial from the sample API, but it does not have any flexibility to configure the EGL. This example does not require a depth buffer, as it does not contain any overlapping geometry. The Gles2WatchFaceService simply selects a configuration without EGL_DEPTH_SIZE and the API does not allow you to change it.
Due to the discovery of such a significant limitation, it was decided to decompile the source code and create its own implementation of Gles2WatchFaceService with blackjack and the correct EGL configuration.
Also a very well-known developer of live wallpapers and dials, Kittehface Software reported on their blog that the Moto360 does not work with the completely correct 16-bit EGL configuration. Therefore, on all devices, our application always uses 32-bit color. Many thanks to Kittehface Software for warning us and other developers about this - finding the cause of the crash on the Moto360 could take days, and we didn't have the clock itself at that time.
We will not give the full code of the decompiled class Gles2WatchFaceService because it will still change with the release of the new API. Here are the changes we made in the decompiled Gles2WatchFaceService :
1. Update the search for a suitable config with the depth component:
2. Make the mInsetBottom and mInsetLeft variables available from the child classes. They will be used to correctly update the viewport. For example, make them protected :
The official documentation has very scarce and vague references to how to work with devices with different screens using the onApplyWindowInsets () method . It says that this method must be used in order to adapt to screens with a cropped bottom edge. This is necessary in order to adjust the view on devices such as the Moto 360.
Without the Moto360 in hand, it was not clear how to use this method so that our first attempts to launch the application on this watch would result in the view being shifted - shifted up to the size of the cropped part of the screen. It was rather strange that this problem was not in the example of the Tilt dial- He was correctly centered. To understand this, I had to look again at the decompiled code of the Gles2WatchFaceService service . The reason was the use of glViewport () . To implement the bloom effect, we used a render in a texture and called glViewport () to switch the rendering to a texture or screen. In order to avoid shifting the image, you need to take into account the value of the lower indent for cropped screens when specifying glViewport () .
For unknown reasons, it is impossible to draw opaque notification cards (peek cards) in screen saver mode (ambient mode). In normal mode, you can specify the type of cards, but in saving mode, they are always completely transparent. You will have to draw the black rectangle yourself in the place where the card will be displayed above it using the getPeekCardPosition () method . In our case, it was enough to use small-sized cards and they did not overlap with the numbers, but in general it would be desirable to reduce the size of the drawing area in order to fit the size of the card.
In our implementation of the watch tuning application, we use HoloColorPicker to select the colors of the numbers and the background. The color change on the watch occurs in real time as soon as the user changes color (in the ColorPicker.OnColorChangedListener eventcolor selection control). However, this causes some problems. The user can change color very quickly (an event occurs when you move your finger along the color selection ring), which leads to an overflow of the color change message queue. The Wearable Data Layer API is not designed to send messages so intensively. Nothing falls, but some of the latest messages may simply not reach the clock. To avoid this, we limit sending color updates to 500 ms. Such an insignificant delay does not cause any inconvenience and allows us not to overload the capabilities of the Wearable Data Layer API:
Most Android Wear watches are based on the Snapdragon 400 chip - ASUS, Sony, Samsung and LG use it in all of their watches. This chip has an impressive quad-core processor with a frequency of up to 1.2 Hz, which is more than enough for a watch. His video card Adreno 305 may seem a little outdated at first glance. But the watch has a rather small resolution of 320x320 pixels, so its power is enough to render complex 3D scenes at 60 frames per second. Even the Moto 360 with its outdated OMAP3630 chip has a fairly powerful PowerVR SGX530 graphics card that delivers enough performance with the available screen resolution.
For example, the additional bloom effect in 128x128 resolution with a four-pass blur did not cause any performance drop - Adreno 305 easily coped with this additional task. However, for the clock it turned out to be sufficient to use the lower resolution of the bloom 64x64 with two blur cycles.
There are many videos where people show games like Temple Run 2 or GTA running on an Android watch that work without lag - this once again demonstrates the performance of video cards in these devices.
To reduce the number of rendering commands and the work being done by the CPU, the animation of the numbers is done in the vertex shader. To illustrate this, here is an example of a transition model between the numbers “5” and “0”:
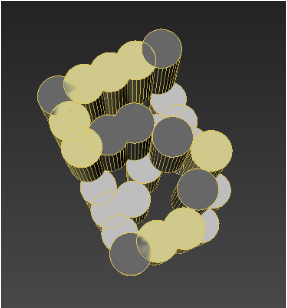
As you can see, the vertices of the model are divided into 3 groups:
This information is entered in the texture coordinates - the V coordinate is set to 0 for fixed parts, 1 for those that rise up, and -1 for those that fall down. In addition to this, the U-coordinate sets the phase of the animation, so that the cylinders do not move all together, but with a slight lag from each other: The
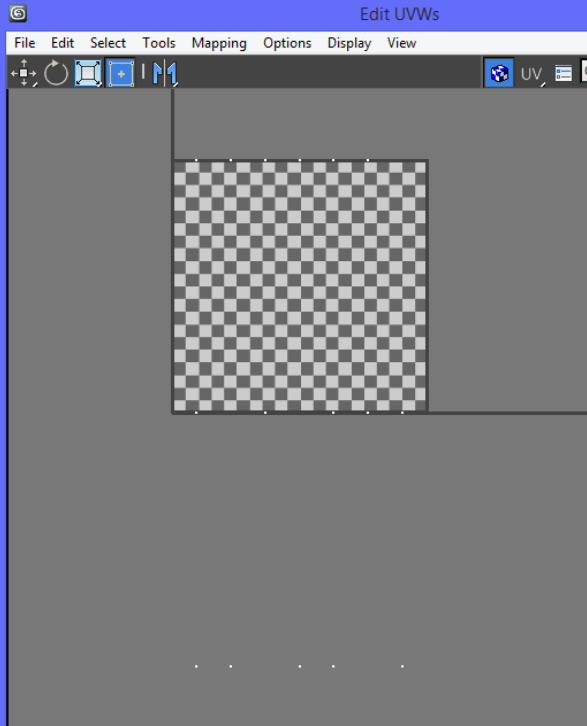
fragment shader is very simple - the smaller the Z-coordinate of the vertex, the blacker the final pixel is drawn. Here is the transition between the numbers “3” and “4” (the models are mirrored due to RenderMonkey) - you can see how the parts from “4” are shifted down and the parts “3” are raised up:

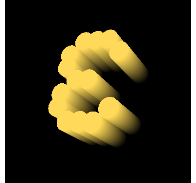
Here is the final result when the bottom of the model merges with a black background :
uHeight sets the height of the animation - the value depends on the "font" and sets the height of an individual column of the model - equal to 40 units for the font shown in the pictures.
uHeightColor and uHeightOffset allow you to vary the color transition to black. The values uHeightColor = 40 and uHeightOffset = 0 were used for examples in the pictures, but they are different for different fonts.
Link to the archive with shaders for the RenderMonkey program: dl.dropboxusercontent.com/u/20585920/shaders_watchface.rar
When publishing an Android Wear app on Google Play, check the box next to “Distribute your app on Android Wear” . This initiates the app’s moderation process for compliance with Wear App Quality requirements . In our case, this process took only a few hours.
Initial concept
The idea of the dial was inspired by this work (by beeple):
The video looks cool and does not seem complicated at first glance. However, we found some technical limitations that prevented us from creating the same scene as in the video. It's not so easy to make numbers from lines (wireframes) that would correctly overlap each other. In short, this would require a large number of draw calls and the very limited clock hardware could not cope with so many draw calls. So we moved on to another idea - add depth to numbers from pixel fonts from old computers.
OpenGL ES configuration without depth component
The Gles2WatchFaceService class from the Android Wear API does not provide access to all the features necessary to create a full three-dimensional scene of the dial. The main problem that we immediately faced was the inability to select the necessary OpenGL ES configuration. In fact, this class does not provide access to EGL at all. It is enough to run the 'Tilt' dial from the sample API, but it does not have any flexibility to configure the EGL. This example does not require a depth buffer, as it does not contain any overlapping geometry. The Gles2WatchFaceService simply selects a configuration without EGL_DEPTH_SIZE and the API does not allow you to change it.
Due to the discovery of such a significant limitation, it was decided to decompile the source code and create its own implementation of Gles2WatchFaceService with blackjack and the correct EGL configuration.
Also a very well-known developer of live wallpapers and dials, Kittehface Software reported on their blog that the Moto360 does not work with the completely correct 16-bit EGL configuration. Therefore, on all devices, our application always uses 32-bit color. Many thanks to Kittehface Software for warning us and other developers about this - finding the cause of the crash on the Moto360 could take days, and we didn't have the clock itself at that time.
We will not give the full code of the decompiled class Gles2WatchFaceService because it will still change with the release of the new API. Here are the changes we made in the decompiled Gles2WatchFaceService :
1. Update the search for a suitable config with the depth component:
private static final int [] EGL_CONFIG_ATTRIB_LIST = new int [] {
    EGL14.EGL_RENDERABLE_TYPE, 4,
    EGL14.EGL_RED_SIZE, 8,
    EGL14.EGL_GREEN_SIZE, 8,
    EGL14.EGL_BLUE_SIZE, 8,
    EGL14.EGL_ALPHA_SIZE, 8,
    EGL14.EGL_DEPTH_SIZE, 16, // this was not enough
    EGL14.EGL_NONE};
2. Make the mInsetBottom and mInsetLeft variables available from the child classes. They will be used to correctly update the viewport. For example, make them protected :
protected int mInsetBottom = 0;
protected int mInsetLeft = 0;
glViewport ()
The official documentation has very scarce and vague references to how to work with devices with different screens using the onApplyWindowInsets () method . It says that this method must be used in order to adapt to screens with a cropped bottom edge. This is necessary in order to adjust the view on devices such as the Moto 360.
Without the Moto360 in hand, it was not clear how to use this method so that our first attempts to launch the application on this watch would result in the view being shifted - shifted up to the size of the cropped part of the screen. It was rather strange that this problem was not in the example of the Tilt dial- He was correctly centered. To understand this, I had to look again at the decompiled code of the Gles2WatchFaceService service . The reason was the use of glViewport () . To implement the bloom effect, we used a render in a texture and called glViewport () to switch the rendering to a texture or screen. In order to avoid shifting the image, you need to take into account the value of the lower indent for cropped screens when specifying glViewport () .
Transparency in normal and ambient mode
For unknown reasons, it is impossible to draw opaque notification cards (peek cards) in screen saver mode (ambient mode). In normal mode, you can specify the type of cards, but in saving mode, they are always completely transparent. You will have to draw the black rectangle yourself in the place where the card will be displayed above it using the getPeekCardPosition () method . In our case, it was enough to use small-sized cards and they did not overlap with the numbers, but in general it would be desirable to reduce the size of the drawing area in order to fit the size of the card.
Sending messages with settings for updating the watch face
In our implementation of the watch tuning application, we use HoloColorPicker to select the colors of the numbers and the background. The color change on the watch occurs in real time as soon as the user changes color (in the ColorPicker.OnColorChangedListener eventcolor selection control). However, this causes some problems. The user can change color very quickly (an event occurs when you move your finger along the color selection ring), which leads to an overflow of the color change message queue. The Wearable Data Layer API is not designed to send messages so intensively. Nothing falls, but some of the latest messages may simply not reach the clock. To avoid this, we limit sending color updates to 500 ms. Such an insignificant delay does not cause any inconvenience and allows us not to overload the capabilities of the Wearable Data Layer API:
Handler handlerUpdateColorBackground = new Handler ();
Runnable runnableUpdateColorBackground = new Runnable () {
    @Override
    public void run () {
        // update only if color was changed
        if (pickedColorBackground! = lastSentColorBackground) {
            sendConfigUpdateMessage (KEY_BACKGROUND_COLOR, pickedColorBackground);
        }
        handlerUpdateColorBackground.postDelayed (this, 500);
        // update last color sent to watch
        lastSentColorBackground = pickedColorBackground;
    }
};
General Android Wear experience
Most Android Wear watches are based on the Snapdragon 400 chip - ASUS, Sony, Samsung and LG use it in all of their watches. This chip has an impressive quad-core processor with a frequency of up to 1.2 Hz, which is more than enough for a watch. His video card Adreno 305 may seem a little outdated at first glance. But the watch has a rather small resolution of 320x320 pixels, so its power is enough to render complex 3D scenes at 60 frames per second. Even the Moto 360 with its outdated OMAP3630 chip has a fairly powerful PowerVR SGX530 graphics card that delivers enough performance with the available screen resolution.
For example, the additional bloom effect in 128x128 resolution with a four-pass blur did not cause any performance drop - Adreno 305 easily coped with this additional task. However, for the clock it turned out to be sufficient to use the lower resolution of the bloom 64x64 with two blur cycles.
There are many videos where people show games like Temple Run 2 or GTA running on an Android watch that work without lag - this once again demonstrates the performance of video cards in these devices.
Shaders used in the application
To reduce the number of rendering commands and the work being done by the CPU, the animation of the numbers is done in the vertex shader. To illustrate this, here is an example of a transition model between the numbers “5” and “0”:
As you can see, the vertices of the model are divided into 3 groups:
- yellow parts that are not animated - they represent parts common between the numbers "5" and "0";
- dark gray parts will be omitted during the animation - they are not used in the number "0";
- light gray parts will rise during the animation; they are used in the number “0” but not in “5”.
This information is entered in the texture coordinates - the V coordinate is set to 0 for fixed parts, 1 for those that rise up, and -1 for those that fall down. In addition to this, the U-coordinate sets the phase of the animation, so that the cylinders do not move all together, but with a slight lag from each other: The
fragment shader is very simple - the smaller the Z-coordinate of the vertex, the blacker the final pixel is drawn. Here is the transition between the numbers “3” and “4” (the models are mirrored due to RenderMonkey) - you can see how the parts from “4” are shifted down and the parts “3” are raised up:
Here is the final result when the bottom of the model merges with a black background :
Vertex shader code
uAnim controls the animation, is set in the range [-1..1] uniform mat4 view_proj_matrix;
uniform float uAnim;
uniform float uHeight;
uniform float uHeightColor;
uniform float uHeightOffset;
varying vec2 Texcoord;
varying float vColor;
void main (void)
{
vec2 uv = gl_MultiTexCoord0.xy;
vec4 pos = rm_Vertex;
pos.z + = uHeight * uv.y * clamp (uAnim + uv.x, 0.0, 1.0);
gl_Position = view_proj_matrix * pos;
Texcoord = uv;
vColor = (uHeightColor + pos.z + uHeightOffset) / uHeightColor;
}
uHeight sets the height of the animation - the value depends on the "font" and sets the height of an individual column of the model - equal to 40 units for the font shown in the pictures.
uHeightColor and uHeightOffset allow you to vary the color transition to black. The values uHeightColor = 40 and uHeightOffset = 0 were used for examples in the pictures, but they are different for different fonts.
Fragment Shader Code
As you can see, almost all the calculations have already been done in the vertex shader - the fragment one only interpolates the colors. uniform vec4 uColor;
uniform vec4 uColorBottom;
varying float vColor;
void main (void)
{
gl_FragColor = mix (uColorBottom, uColor, clamp (vColor, 0.0, 1.0));
}
Link to the archive with shaders for the RenderMonkey program: dl.dropboxusercontent.com/u/20585920/shaders_watchface.rar
Publication
When publishing an Android Wear app on Google Play, check the box next to “Distribute your app on Android Wear” . This initiates the app’s moderation process for compliance with Wear App Quality requirements . In our case, this process took only a few hours.









