Power Button for Raspberry Pi
- Tutorial
GPIO ports are one of the main advantages of the Raspberry Pi , not without reason in later versions of the board their number was increased from 26 to 40. Unfortunately, most of the boards connected to them (touch screens, LED arrays, expansion cards, etc.), In order to be compatible with all Malinka models, they use only the first 26 contacts, leaving the remaining 14 “overboard”. But we will not give the abyss good! In this article I will tell you how to make the power off or reset button on two unused ports. In fact, the functionality of the button can be any, depending on your imagination and needs.

This is my first experience with GPIO, so it was important to understand the logic. Almost any GPIO pin (there are several reserved ones) can be set to one of two states: “output” (aka OUT or logical 1) or “input” (IN or logical 0). The output voltage is 3.3V. You can work with GPIO ports both directly from the terminal, and from any programming language. This is described in great detail here .
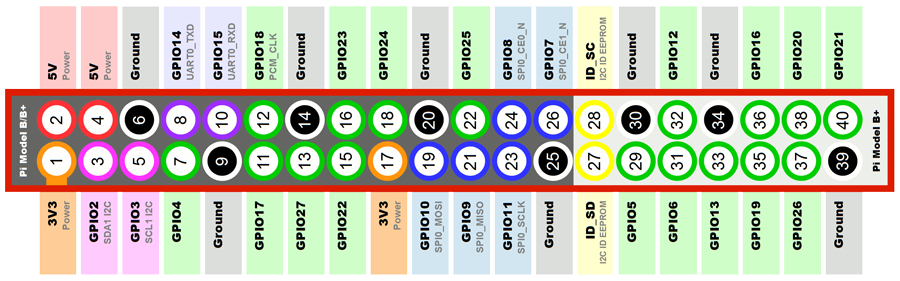
For my button, I decided to use the two right-most pins in the top row. Connector # 38 (GPIO20) will be set to “output”, and connector # 40 (GPIO21) will be set to “input”. Further, the cycle repeating once per second will “listen” to connector # 40 and, as soon as a signal arrives at it, the ports used will be “cleaned” and a console command will be launched to shut down. As mentioned above, the team can be any other. For the sake of interest, I accomplished this task in two ways: in Python and a bash script. Below is the code for both options:
I repeat, both scripts do the same thing, for the button to work, one of them (any) is needed. They can also be downloaded:
In the case of the Python script, there is one caveat: the RPi.GPIO class is required to work, which must be downloaded and installed separately. It is done like this:
Actually, the last thing left to do is add the script to autoload. There are several ways to do this, I chose cron . To do this, run the sudo crontab -e command and add one of the following lines in the file that opens:
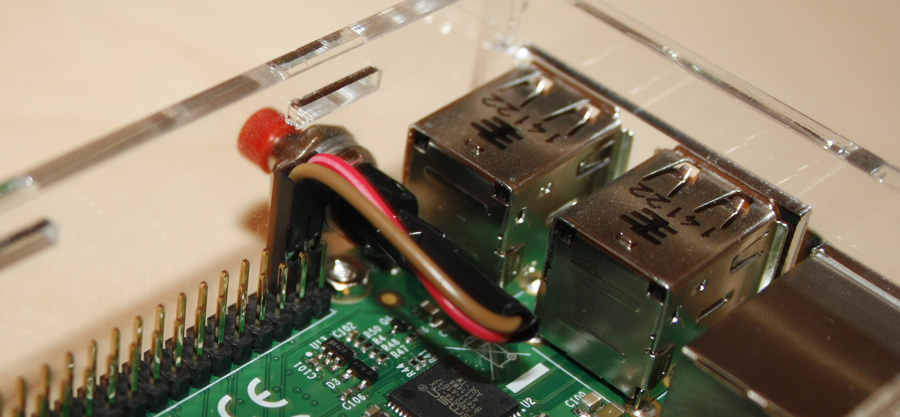
That's all. From myself I’ll say that using this button is very convenient.
This is my first experience with GPIO, so it was important to understand the logic. Almost any GPIO pin (there are several reserved ones) can be set to one of two states: “output” (aka OUT or logical 1) or “input” (IN or logical 0). The output voltage is 3.3V. You can work with GPIO ports both directly from the terminal, and from any programming language. This is described in great detail here .
For my button, I decided to use the two right-most pins in the top row. Connector # 38 (GPIO20) will be set to “output”, and connector # 40 (GPIO21) will be set to “input”. Further, the cycle repeating once per second will “listen” to connector # 40 and, as soon as a signal arrives at it, the ports used will be “cleaned” and a console command will be launched to shut down. As mentioned above, the team can be any other. For the sake of interest, I accomplished this task in two ways: in Python and a bash script. Below is the code for both options:
shutdown.py
import RPi.GPIO as GPIO
from time import sleep
import os
GPIO.setmode(GPIO.BOARD)
GPIO.setwarnings(False)  # Turn off warnings output
GPIO.setup(38, GPIO.OUT) # Set pin #38 (GPIO20) to output
GPIO.setup(40, GPIO.IN)  # Set pin #40 (GPIO21) to inputwhileTrue:
    buttonIn = GPIO.input(40)
    if buttonIn == True:
        print'System shuts down'
        GPIO.cleanup()
        os.system("sudo shutdown -h now")
        break
    sleep(1)
shutdown.sh
#! /bin/bash
# Set up GPIO20 and set to outputecho"20" > /sys/class/gpio/exportecho"out" > /sys/class/gpio/gpio20/direction
echo"1" > /sys/class/gpio/gpio20/value
# Set up GPIO21 and set to inputecho"21" > /sys/class/gpio/exportecho"in" > /sys/class/gpio/gpio21/direction
while ( true )
do# check if the pin is connected to GND and, if so, halt the systemif [ $(</sys/class/gpio/gpio21/value) == 1 ]
    thenecho"20" > /sys/class/gpio/unexport
        echo"21" > /sys/class/gpio/unexport
        shutdown -h now "System halted by a GPIO action"fi
    sleep 1
done
I repeat, both scripts do the same thing, for the button to work, one of them (any) is needed. They can also be downloaded:
In the case of the Python script, there is one caveat: the RPi.GPIO class is required to work, which must be downloaded and installed separately. It is done like this:
wget http://pypi.python.org/packages/source/R/RPi.GPIO/RPi.GPIO-0.5.11.tar.gz
tar zxf RPi.GPIO-0.5.11.tar.gz
cd RPi.GPIO-0.5.11
sudo python setup.py install
Actually, the last thing left to do is add the script to autoload. There are several ways to do this, I chose cron . To do this, run the sudo crontab -e command and add one of the following lines in the file that opens:
@reboot python /home/pi/lentyay/poweroff.py &
@reboot sudo /home/pi/lentyay/shutdown.sh &
That's all. From myself I’ll say that using this button is very convenient.