 March 27, 2015 at 15:39
Decryption of TLS traffic of Java applications using logs
Debugging SSL / TLS-protected integrations in Java applications sometimes becomes a very non-trivial task: the connection is not made / breaks, and application logs may be scarce, there may be no access to editing the source codes, wiretapping traffic and trying to decrypt with the server’s private key ( even if it exists) may fail if the channel used the cipher with PFS ; a proxy server like Fiddler or Burp may not be suitable, because the application does not know how to go through a proxy or refuses to believe a certificate slipped into it ...
Recently , a publication from ValdikSS appeared on Habréabout how you can decrypt any traffic from Firefox and Chrome browsers using Wireshark without having a private server key, without spoofing certificates and without a proxy. She prompted the author of this article to think - is it possible to apply this approach to Java applications by using JVM debugging entries instead of a session key file? It turned out - it is possible, and today, dear lopsided, I will tell you how to do it.
Recipe idea
Since recent versions, the Firefox and Chrome browsers have learned to output data sufficient for the derivation (receipt) of session keys that encrypt the traffic they transmit (as well as received traffic, because symmetric encryption is used inside SSL / TLS) into a specially defined file. Strictly speaking, this is not done by the browsers themselves, but by the NSS library in their composition; it is she who sets the format of the recorded files. This format can be read and used by Wireshark to decrypt SSL records encrypted with the corresponding keys. The idea of our “dish” is to learn how to create such files independently for Java applications for the same purpose, relying on debugging logs as a source, which are written to standard output with a JVM optionjavax.net.debug .
Ingredients
We will need:
- A Java application for which we can set startup parameters (JVM options).
For definiteness, we believe that the application acts as a client when establishing a connection .
It is desirable to have the JDK (JRE) version 1.6 or 1.7; on others (so far) it has not been tested; - Wireshark version 1.6.0 or higher;
- Text editor , for example, Notepad ++;
- A pinch of patience, mindfulness and time.
Kneading
Launch parameters
Since logs will be one of the main sources of information for us, the first thing to do is to correctly configure their receipt. A fully working option would be the JVM option javax.net.debug = ssl: handshake: data . We’ll make a reservation right away that it doesn’t have to have such a value, you can (probably) do without the universal javax.net.debug = all , but working with the results of such a choice can be difficult (the volume of logs can be gigantic). Our choice is explained by the following:
- ssl - so that messages regarding only SSL are logged;
- handshake - to see each message within the main stage for us - handshake ;
- data - for the lazy, so as not to manually translate some values from the decimal number system to hexadecimal (hex);
The presence of such an option should provide us with output to the log (or standard output) of debugging information, which we will return to later.
Sniffer setting
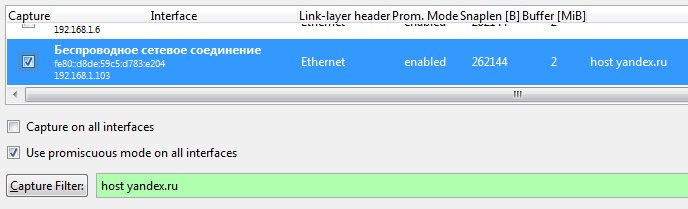
You can only sniff the traffic of the target application by Wireshark after setting the above option, because otherwise we will not have session keys. In addition, we must remember that the keys are “ephemeral” - they are suitable for only one SSL session, that is, the log from one communication session is not suitable for decrypting the traffic of another session. Well, in order to breathe very easily, I recommend that you immediately specify the host with which you plan to exchange data at the start of the sniffer; this will allow you to discard unnecessary packets passing through the listening network interface even “ashore”:
Recording and recording
After setting the necessary launch application parameters and sniffer settings, you can start the application itself and enable packet capture in Wireshark. Then, when an application tries to reach a (secure) connection with a server, our "pots" will begin to fill up. From the point of view of Wireshark, it will look something like this:

As you can see, Wireshark explicitly defines some SSL records as encrypted; records with Application Data type are the same .
And from the standpoint of the standard output (logs) of the application - something like this:
...
*** ClientHello, TLSv1
RandomCookie:  GMT: 1427238714 bytes = { 246, 5, 6, 214, 168, 159, ... , 140, 141, 50, 196 }
Session ID:  {}
Cipher Suites: [SSL_RSA_WITH_RC4_128_MD5, SSL_RSA_WITH_RC4_128_SHA, ..., SSL_DHE_DSS_EXPORT_WITH_DES40_CBC_SHA]
Compression Methods:  { 0 }
...
In fact, much more will be logged (the format of the debug output is not specified anywhere and changes from the Java version to the version), but for now we need only see at least that.
"Proofing"
Having debug records from the SSL / TLS communication session, we can create a session key file in the NSS format. To do this, we first need to determine which method of distributing session keys was used in our communication session: exchange method (aka RSA) or generation method (aka DH or PFS, although these are different things). What is their essence and differences can be found in the wonderful work of Sally Vandeven . It’s enough for us to know only the method itself, and it can be determined, at least in two ways:
- By the name of the cipher displayed in the log or defined by the sniffer. For example, according to this conclusion
it can be seen that the cipher does not have any mention of DH in the name, but it clearly calls itself RSA. However, such clarity is not always present, so you can use plan B:*** ServerHello, TLSv1 RandomCookie: GMT: 1037995915 bytes = { 168, 183, ... 204, 178 } Session ID: {141, 155, ... 214, 36} Cipher Suite: SSL_RSA_WITH_RC4_128_SHA ... - By the presence of ServerKeyExchange SSL message in the interception of traffic in Wireshark (see the screenshot in the subsection “Removing and recording”) - it is present for DH methods and not for RSA (explanation of why is beyond the scope of this article). Of course, the presence of this message can be determined by the same logs.
Having defined the method of distributing session keys, let us turn to the description of the NSS file format , which instructs us to distinguish the lines of each file by just these two methods. Let's consider each of them in more detail.
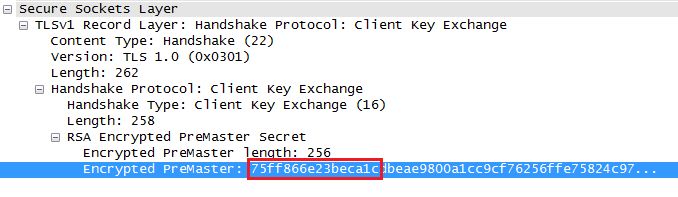
To begin with, let’s say that in our communication session, we used some kind of RSA-based cipher. According to the format description, the corresponding file line should begin with RSA text , followed by 16 bytes of the HEX-encoded PreMasterSecret encrypted key , followed by a space, 96 bytes of the HEX-encoded, non- encrypted PreMasterSecret key(i.e. him). This key is the basis for generating the master key - MasterSecret and is transmitted from the client to the server in the ClientKeyExchange message , being the encrypted public key of the server. This means that the first part of the line (the encrypted representation of this key) should be visible in Wireshark. We find the desired message and make sure - yes, it is:
Note bookworm guide
An experienced habroologist has the right to interrupt the story with the question - why in the NSS file format only 16 bytes are required , while the length of the encrypted key is 256 bytes?
This is explained by the fact that the encrypted value is used by Wireshark just as an index - it is only necessary in order to find exactly the record that contains the appropriate MasterSecret from the potential set of lines in the NSS file. This can be done by sequentially matching the encrypted version of this key (taken from intercepted traffic) with the first (after "RSA") element of each line of the file. Actually, this is what Wireshark does, and it is not necessary to compare the key along the entire length in this case, 16 bytes are quite enough.
This is explained by the fact that the encrypted value is used by Wireshark just as an index - it is only necessary in order to find exactly the record that contains the appropriate MasterSecret from the potential set of lines in the NSS file. This can be done by sequentially matching the encrypted version of this key (taken from intercepted traffic) with the first (after "RSA") element of each line of the file. Actually, this is what Wireshark does, and it is not necessary to compare the key along the entire length in this case, 16 bytes are quite enough.
By the way, the same value can also be obtained from the application logs, and here the JVM option " : data " is just useful to us :

The found value (16 bytes) can be inserted into the generated NSS file. Now let's do a similar operation for the second element of the row - the eigenvalue of the PreMasterSecret key . Since it, obviously, is never transmitted over the network in an open form (in fact, that's why it is called ... Secret ), it will only have to be fished out from the logs. Fortunately, it isn’t very difficult to do this with explicit hints from the JVM:
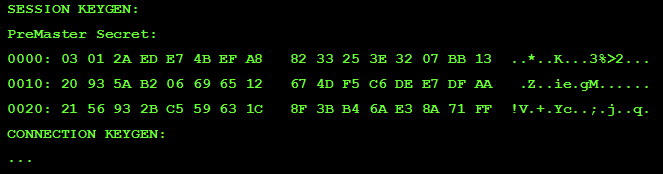
Now you need to add this value to the line of the NSS file we are creating and “comb” the line so that something like this turns out (comments in standard notation are quite acceptable):
# SSL/TLS secrets log file, generated by Toparvion
RSA 75ff866e23beca1c 03012aede74befa88233253e3207bb1320935ab206696512674df5c6dee7dfaa2156932bc559631c8f3bb46ae38a71ff
Those for whom RSA is “just that case” (as a rule, these are applications before Java 7), you can already proceed to the “Tasting” section. Those who happen to encounter PFS (often Java 7 or later) will have to read further ...
Like the RSA method, a line for decrypting records based on PSF should consist of three elements separated by a space:
- Record type; in this case, it should be equal to CLIENT_RANDOM;
- 64 bytes of HEX-encoded client random number Random ;
- 96 bytes of HEX-encoded MasterSecret master key ;
The data sources for the second and third element are also similar to the previous method, but there are some subtleties. A client random number is a concatenation of the current time in milliseconds GMT and the random value itself. In the case of Wireshark, this is clearly visible:

But when accessing the logs it’s easy to make a mistake, but you can use this hint:
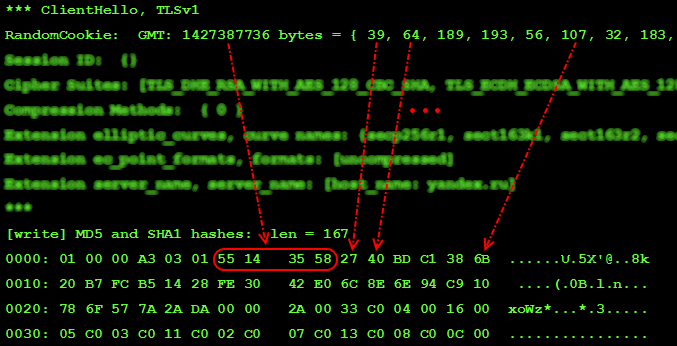
Here also the entry “: data” in the value of the JVM option javax.net.debug eliminates the need for manual conversion of number systems. In total, we need 64 bytes of a random number, then it is all in its entirety (and not just the beginning, as it was with RSA). It will also play the role of an index when Wireshark searches for a suitable entry in an NSS file.
The third element of the line - the MasterSecret main secret key - can also be extracted from the application logs:
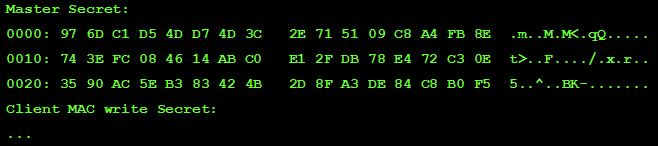
After extracting the main key from the logs, we supplement the generated line with it, “comb” and get something like:
# SSL/TLS secrets log file, generated by Toparvion
CLIENT_RANDOM 551435582740bdc1386b20b7fcb51428fe3042e06c8e6e94c910786f577a2ada 976dc1d54dd74d3c2e715109c8a4fb8e743efc084614abc0e12fdb78e472c30e3590ac5eb383424b2d8fa3de84c8b0f5
It should be noted that Wireshark is very sensitive to the format of the NSS file, so it’s better to carefully double-check now whether the number of bytes in each element of the string converges and whether there are any extra spaces somewhere; It may save time in the future.
Tasting
Now that all the “manual” steps have been completed, it’s time to give the floor to Wireshark - we present it with the created file exactly as described in the article mentioned at the beginning :
- Open the context menu in Wireshark on any SSL / TLS packet;
- Choose Protocol Preferences -> Secure Socket Layer Preferences ... ;
- In the window that opens, in the (Pre-) Master Secret log filnename column, specify the path to the NSS file that we created.
Click OK and look at the changes in the intercepted traffic:

If the decryption is successful, then packets that previously had the word Encrypted in their names will acquire specific names. This is exactly what happened with the Finished commands shown in the figure above.
In addition (and this is perhaps the most pleasant moment), you can now select any packet with SSL or TLS protocol and click on Follow SSL Stream in its context menu - the result should not require comments:

As you can see, despite the HTTP S call, we see the transmitted traffic and can export it for further analysis.
If it still doesn’t work out ...
Many mistakes can be made on this slippery slope. One of the most valuable sources of information is the wireshark’s log itself - it is maintained if the path to the log file is specified in the SSL column of the debug file, all in the same SSL settings window.
It is important to note that no filtering is provided for the log, and Wireshark is very detailed, so if you keep the log constantly on, it, firstly, will grow very quickly, and secondly, it can lead to inhibitions of Wireshark itself (since apparently written synchronously). In this regard, it is best to specify the log file just before the NSS file is used, and at the end of the analysis, clean it (but not delete it).
Conclusion
The article examined another approach to decrypting SSL / TLS traffic of Java applications with the goal of debugging them.
In this form, the approach is hardly applicable in practice, since it requires a significant investment of time and the presence of certain knowledge and skills of the performer. However, the presented description will allow us to formalize, and therefore, automate (program) this approach and, thus, put it at the service of people. Such work has already been started by the author. If this idea is interesting to you too, we welcome you! Do not forget to tell about it on Habré.
Thank you for reading!
Update
Dear friars, for those who are interested in the approach described in the article, but are really
The syntax for running it is simple, you only need to specify the source JVM log file:
java -jar nssjavamaker.jar some/directory/java-ssl-debug.log
The output in the current directory will create the NSS file session-keys.nss , ready for import into Wireshark. To change this path and other parameters, refer to the Readme file or run the utility with no parameters at all.
Ready to run JAR can be downloaded on the page with the latest version.
Suggestions / suggestions / comments / comments on the utility are welcomed in the application section on the project page , as well as at [email protected] . Good luck in job!









