Reviving Portable Sega Clones: Power, Battery, and Cartridge Fixes
Restoring and modifying old electronics, especially game consoles, is a popular pursuit among technical enthusiasts. Often, such projects involve a number of specific difficulties that require deep knowledge of hardware and the ability to solve non-standard problems. In this article, we will examine the process of diagnosing and repairing two portable 16-bit Sega clones, acquired from the secondary market, focusing on battery replacement and resolving game cartridge compatibility issues. The goal is not just to bring these devices back to life, but also to understand their internal mechanisms.
Diagnosis and First Steps: Encountering "New" Hardware
Acquiring devices advertised as "new, but long-stored in a warehouse" always carries an element of unpredictability. In this case, we're talking about two portable 16-bit consoles, externally resembling the Sega Genesis/Mega Drive, capable of using full-sized cartridges. The initial listings warned of non-functional batteries, a typical problem for electronics stored for extended periods. However, upon receipt and initial inspection, other, less obvious complications emerged that required detailed investigation. Beyond the expected need for battery replacement, a critical issue with the cartridge slot was discovered: some cartridges were inserted with great difficulty, while others refused to work at all, even when fully seated.
A preliminary inspection showed that the consoles were produced without any markings, making it difficult to find documentation or schematics. This is typical for many Chinese clones. For the first console, which arrived earlier, a visual inspection and testing with an external power supply were performed. This confirmed the functionality of the device's main logic but also revealed that Flash cartridges (e.g., Everdrive MD), while launching, were extremely difficult to remove, and Japanese-format cartridges did not function at all. A stuck Everdrive MD cartridge became the first serious challenge, requiring careful extraction without damaging the slot or the cartridge itself. Such incidents underscore the importance of thorough preliminary diagnostics and caution when working with unfamiliar equipment.
Solving the Power Problem: Li-Po Battery Replacement
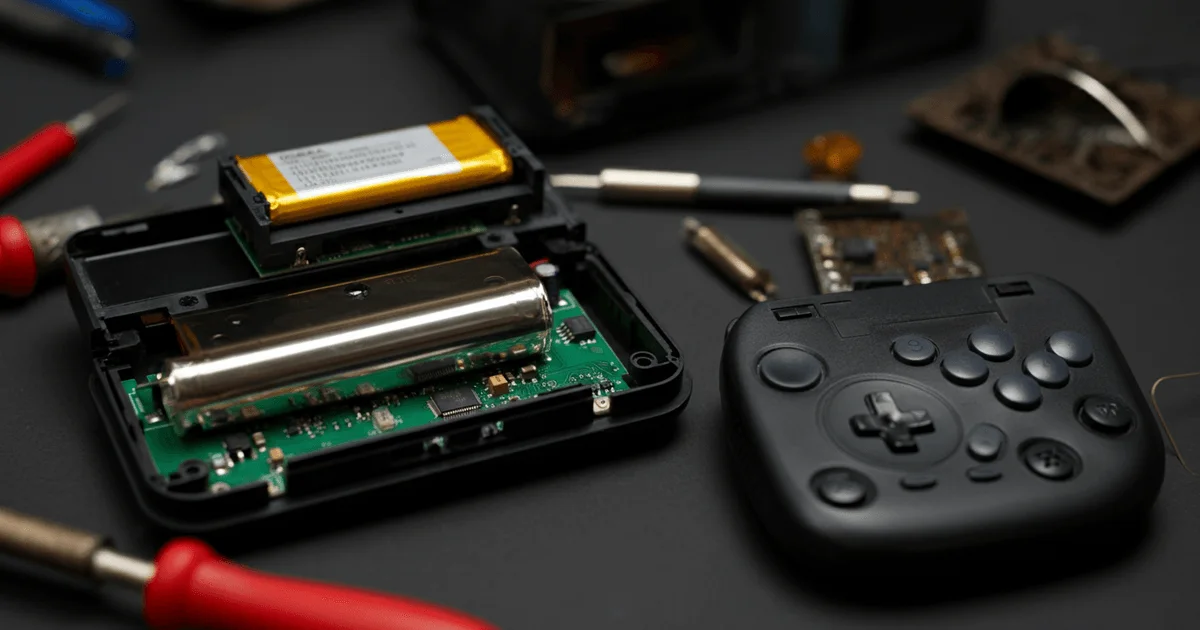
As expected, the main problem was a faulty battery. Opening the case of the first console revealed a standard form-factor Li-Po battery, albeit with signs of deformation. One unexpected difficulty was that the battery was glued with double-sided tape directly to the back of the TFT display. This created a risk of damaging the display during removal, as heating to loosen the adhesive was undesirable due to the battery's proximity and the screen's sensitivity. A plastic spudger was used for safe separation, allowing the adhesive layer to be carefully cut.
After removal, it turned out that part of the battery's marking remained on the display, making it difficult to precisely determine its parameters. However, by matching the remaining inscriptions and measuring physical dimensions, the original size was determined: 503048 (5.0 mm thick, 30 mm wide, 48 mm long) with a stated capacity of 750 mAh. Finding an exact replacement proved to be a non-trivial task, as identical batteries in all parameters are often not readily available, and space inside the console is limited.
The process of selecting and installing a new battery included the following steps:
- Measurement: Precisely determining the dimensions of the old battery (5.2 x 30 x 48 mm).
- Identification: Deciphering partial markings (503048 750 mAh).
- Searching for alternatives: Analyzing available Li-Po batteries, considering size constraints. Options found were: 6x30x48 mm (900 mAh) and 4x35x50 mm (750 mAh). The first option was chosen, as an extra millimeter of thickness was acceptable, given the old battery's deformation to 6 mm.
- Ordering: Purchasing two batteries with a stated capacity of 900-1000 mAh, despite the fact that actual dimensions might vary. Ultimately, the new batteries turned out to be slightly smaller, simplifying installation.
- Installation: Securing the new cells in place with double-sided tape, mimicking the original manufacturer's technique. In the second console, where the battery had simply swollen, the process was similar.
Cartridge Compatibility Nuances and Slot Mechanics
After successfully replacing the batteries, attention shifted to the cartridge problem. Initially, it was assumed that the tight slot was simply "not broken in" and would improve over time. Repeated insertion and removal of cartridges did indeed slightly ease the process, but it didn't solve all issues. It was noted that an internal plastic trim piece around the slot prevented full cartridge insertion, and its temporary removal improved the situation.
However, even after these manipulations, many modern multi-game cartridges with menus still refused to work. Meanwhile, Flash cartridges, old two-game cartridges, and some modern single-game cartridges launched without problems. This suggested problems not so much with physical contact, but with logical compatibility. Disassembling a non-working "Desert Strike" cartridge and testing it as a bare PCB showed that the game launched. This confirmed that the problem was not with game incompatibility per se, but with contact quality or the slot's specific interaction with the cartridge casing. The thickness of the cartridge PCBs (1.6 mm) was also checked and was not the cause.
Apparently, many modern multi-game cartridges use more complex "mappers" (memory bank switching schemes) that may not be fully compatible with the hardware of a specific Sega clone. Older two-game cartridges are likely implemented as a single address space without complex switching schemes, which explains their functionality. This aspect is a common problem when working with retro clones, where emulation or hardware implementation does not always precisely match the original or cover all cartridge variations.
Mechanical Aspects of the Slot: "Tight Slot" and Potential Solutions
A detailed inspection of the disassembled console confirmed that the main problem with tight cartridge insertion lies in the connector itself, not in the cartridge casing or external elements. The density of the contacts in the slot was excessive, leading to difficult insertion and removal, and potentially poor contact with some cartridges.
To address this mechanical problem, several approaches are commonly used in such situations:
- Breaking in the slot: The simplest, but long-term method — repeatedly and carefully inserting and removing known working cartridges. This can "break in" the contacts and reduce their resistance.
- Cleaning contacts: Using isopropyl alcohol and a soft brush to clean contacts on both the cartridges and inside the slot. Contamination can increase friction and degrade electrical contact.
- Careful contact bending: In cases of extreme tightness or poor contact, the contacts inside the slot can be gently bent. This requires extreme care and experience to avoid damaging the connector. Thin plastic or wooden tools are often used for this to prevent short circuits and mechanical damage.
The choice of method depends on the severity of the problem and the technician's comfort level with such manipulations. In this case, the problem was complex: both mechanical resistance and compatibility issues with various cartridge types. Successful restoration of the consoles' functionality required a combination of patience, diagnostic skills, and careful hardware intervention.
Key Takeaways
- Diagnosis is key to success: Before starting any repair work, thorough diagnosis of all identified and potential problems, from power to peripheral compatibility, is essential.
- Li-Po battery issues: Long-term storage of Li-Po batteries almost guarantees their failure (swelling, loss of capacity). Replacement requires care, especially if the cell is glued to sensitive components.
- Component sourcing challenges: Finding exact replacements for outdated or unmarked components often leads to the need to select close alternatives, which requires evaluating acceptable deviations.
- Clone compatibility: Hardware clones may have limited compatibility with various cartridge variations, especially those using non-standard mappers or specific timings.
- Mechanical connector problems: Tight or worn cartridge slots are a common problem, requiring a delicate approach to "breaking in" or adjusting contacts.
— Editorial Team


No comments yet.