Apple forensic. Extract data from iOS devices using open source tools
 As of July last year, Apple has sold more than 800 million devices running iOS. More than half of them are various iPhone models. With so many devices in circulation, it is not at all surprising that they often become objects of computer-technical expertise (forensics). Various solutions are presented on the market to automate such examinations, but the price tag on them often makes them inaccessible. Therefore, today we will talk about how to conduct such an examination with minimal cost or, more simply, using free and / or open source tools.
Bit of theory
During the examination, in most cases, physical access to the device is implied, and the expert has two tasks: to extract as much data and information from the device as possible and to leave as few traces (artifacts) as possible. The second task is especially important if the results of the examination are presented in court: too many artifacts can interfere with the re-examination, which, in turn, can cast doubt on the results of the initial examination. In many cases, it is impossible to avoid the appearance of artifacts; They are trying to solve this problem by documenting in detail the artifacts created at various stages of the study.
Data stored on iOS devices is relatively well protected, and in order to extract it, you usually need to overcome the following obstacles:
- Passcode. It protects the device from unauthorized access (including from examination) and cryptographically protects part of the data. This means that even if the passcode is somehow bypassed, some Keychain files and records will not be available, because the device will not be able to obtain the corresponding encryption keys without knowing the passcode.
- Keychain This is a centralized repository of passwords, tokens, encryption keys and other secrets in which Apple recommends that application developers keep valuable data. Physically, it is a SQLite3-database, the entries in which are encrypted and access to which is carried out indirectly, through requests to the `securityd` service.
- File encryption. Unlike full disk encryption (FDE) systems, iOS encrypts each file with a separate key (something like Windows EFS). Some files are protected with a key that is derived from a unique device key and can be decrypted without knowledge of the passcode, some are protected in such a way that it is impossible to decrypt them without knowledge of the passcode.
Together, these three mechanisms form the Data Protection subsystem, which appeared in iOS 4 and, with its appearance, significantly complicated the conduct of examinations. After the release of iOS 4, Data Protection did not change very much, with one exception - the advent of Secure Enclave in iPhone 5s and newer models. Secure Enclave is used as part of Data Protection for operations with fingerprints, passcodes, encryption keys and the like, but we will not consider it in this article.
Data extraction
In order to extract data from iOS devices, in practice, several methods are traditionally used:
- "Physical extraction" allows you to get a bitwise image of the disk, all the encryption keys of the device and, in most cases, also allows you to sort through the passcode (if installed). Physical extraction generally requires the execution of code on the device in the context of a user with full rights (root) and outside the sandbox (sandbox). This method was popular several years ago, since a vulnerability in the bootloaders of old devices (such as iPhone 4 or the first iPad's) allowed arbitrary code to be executed on the device. On newer devices, physical extraction is possible (and even with reservations) only if there is a jailbreak, so today we will not consider it.
- Logical Extraction uses interfaces and services that are already on the device and which are used by programs like iTunes or Xcode to retrieve data. A classic example here is creating a iTunes backup: to create it, you do not need to install any additional programs on the device, and at the same time it contains a lot of valuable information about the device (including contact and call lists, chat history, location history, photos / videos). But the matter is not limited to backup only - there are other services on iOS devices that allow access to data.
- Retrieving from iCloud allows you to download a backup of your device from the cloud. To do this, you need to know the authentication data configured on the Apple ID device: Apple ID and password or authentication token. The iCloud backup also contains tons of valuable information.
Pairing
When it comes to “logical” extraction, one of the key concepts is pairing the device and the host. In most cases, the device will only respond to requests from the host with which it was paired (there may be more than one such host). A pairing record consists of two parts - one is stored on the device and one on the host - and is created the first time the device is connected to the new host. To create such a record, it is necessary for the device to be unlocked (that is, for pairing in general it is necessary to enter a passcode) and for the user to confirm the creation of a pairing record on the device (starting with iOS 7; in earlier versions, the record was created automatically).
The pairing record contains encryption keys for all content stored on the device and, therefore, can be used to connect to the device and unlock it. In other words, from the point of view of access to encrypted data, the pairing record is equivalent to knowing the passcode: the presence of any of these two factors allows you to unlock the device and gain access to all data (in a cryptographic sense).
From a practical point of view, the above means that for logical extraction in the general case, an existing pairing record from one of the trusted computers or a passcode (in order to create this record) is necessary. Without this, most iOS services will refuse to work and return data.
Practice
For our experiments, we will need a virtual or physical machine running Linux. Linux, in principle, can be anything, it is important that `libusb` and` libimobiledevice` are normally working and working under it. I will use Santoku Linux , a distribution kit created for researching devices running Android and iOS. Unfortunately, Santoku Linux doesn’t contain everything you need, so you’ll still have to finish something.

Logical extraction
To logically extract data from a device, we need libimobiledevice , a cross-platform library for communicating with various iOS services. Unfortunately, Santoku Linux 0.5 comes with an outdated version of `libimobiledevice` (1.1.5), which does not fully support iOS 8, so first of all, install the latest version (1.1.7) and all its dependencies (download the archives at the specified links, unpack , go to the resulting folder and run `./autogen.sh && make && sudo make install`):
- libplist-1.12 ;
- libusbmuxd-1.0.10 ;
- libimobiledevice-1.1.7 - here pay attention to the `--enable-dev-tools` key, it includes the assembly of additional utilities, which we will use in future for communication with some iOS services:` ./autogen.sh --enable- dev-tools`;
- usbmuxd-1.1.0 - it seems that the `--without-systemd` key is needed on Santoku 0.5, since without it usbmuxd will not start:` ./autogen.sh --without-systemd`;
- ideviceinstaller-1.1.0 ;
- ifuse-1.1.3 .
If everything went well, then now is the time to connect some iOS device to the computer (or to the virtual machine) and check that the host sees it:
    santoku@santoku-vm:~$ idevice_id -l
    23f88587e12c30376f8ab0b05236798fdfa4e853
    santoku@santoku-vm:~$
This command should display the identifiers (UUIDs) of the connected devices.
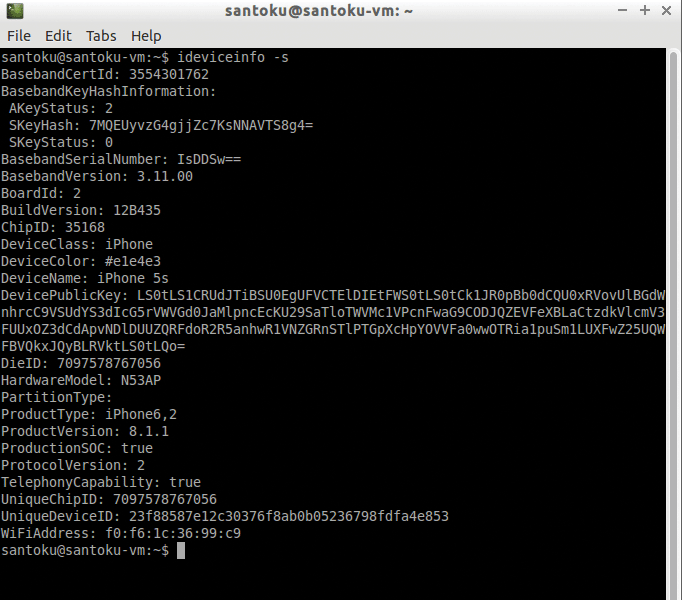
Device info
The next step is to obtain more detailed information about the device. The `ideviceinfo` utility is used for this. It can be used in two versions:
- `ideviceinfo –s` displays public information about the device without trying to create a new one or use the existing pairing between the host and device;
- `ideviceinfo [-q <domain>] [-x]` displays substantially more detailed information, but requires pairing between the device and the host. The utility requests information from the `lockdownd` service running on the device. Information is a key-value pair and the keys are grouped into domains. Using the `-q` parameter, you can specify the specific domain from which you want to obtain data.
The `-x` parameter allows you to format the output of the program in the form of XML (or rather, in the form of a property list), so that the output can be redirected to a file and further processed by other programs or scripts.
Applications
As part of logical extraction, you can access application data. To do this, you first need to get a list of installed applications using the `ideviceinstaller` utility:
santoku@santoku-vm:~$ ideviceinstaller -l
Total: 4 apps
com.viaforensics.viaprotect-app - NowSecure 1
com.facebook.Facebook - Facebook 6017145
ph.telegra.Telegraph - Telegram 39280
com.getdropbox.Dropbox - Dropbox 3.6.2
santoku@santoku-vm:~$
As a result, for each application we get its identifier (the so-called bundle ID), name and version. Knowing the application identifier, we can access its data. For this, two iOS services are involved - `house_arrest` and` afc`. AFC (Apple File Conduit) is a file access service; with its help, in particular, iTunes provides access to music and other media files on the device. `house_arrest` is a less well-known service that allows you to start the AFC server in the sandbox of a specific application; in particular, it is used to implement the File Sharing function in iTunes.
But this is all a theory. In practice, to gain access to the application files, it is enough to use the ifuse utility:
santoku@santoku-vm:~$ ifuse --container com.getdropbox.Dropbox ~/Desktop/Applications/
santoku@santoku-vm:~$
As a result of this command, the directory with the application data will be mounted in the ~ / Desktop / Applications directory:
santoku@santoku-vm:~$ ls ~/Desktop/Applications/
Documents Library StoreKit tmp
santoku@santoku-vm:~$
You can unmount application data with the command `fusermount –u ~ / Desktop / Applications`.
ITunes backup
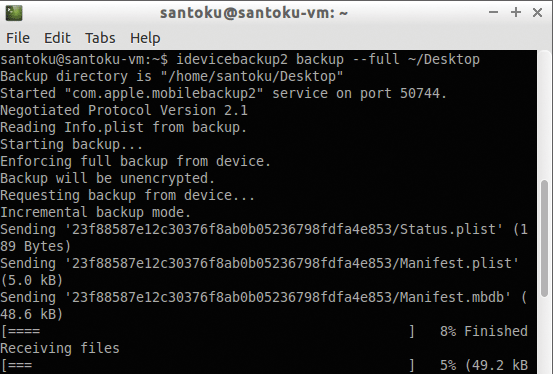
A device’s backup has traditionally been one of the most popular data extraction vectors, which is not surprising given that, by definition, a backup should contain a lot of valuable information about the device and its owner. To create a backup, you can use the `idevicebackup2` utility:
santoku@santoku-vm:~$ idevicebackup2 backup --full ~/Desktop
Backup directory is "/home/santoku/Desktop"
Started "com.apple.mobilebackup2" service on port 50066.
Negotiated Protocol Version 2.1
Starting backup...
Enforcing full backup from device.
Backup will be unencrypted.
Requesting backup from device...
Full backup mode.
[=                                                 ]   1% Finished
Receiving files
....
Received 237 files from device.
Backup Successful.
santoku@santoku-vm:~$
Depending on the amount of content on the device, creating a backup may take a long time (up to half an hour).
Another potential problem with backups is that they can be encrypted. Encryption of backups in iOS is carried out on the device side, so if the user has protected the backup with a password, then all data transmitted by the device during the backup will be encrypted. You can try to find a password - there are both commercial and free tools for this. Without a password, access to the contents of backup files is not possible.
By default, `idevicebackup2` saves the backup in the internal iOS format, which is not quite suitable for manual exploration, because, for example, instead of the file name, it uses the value of the SHA-1 hash function from the file path. The advantage of this internal iOS format is that many programs know how to work with it, so to analyze the contents of a backup, just open it in one of these programs (for example, iOS Backup Analyzer , iBackupBot , or iExplorer ).
If for some reason you want to get a backup in a more “readable” format, you can use the `unback` command:
santoku@santoku-vm:~$ idevicebackup2 unback ~/Desktop
This command will create the `_unback_` directory on the desktop, in which the backup copy of the device will be saved as a traditional file tree, and not as a list of files with pseudorandom names, as before.
File system
The ifuse utility can also be used to access the file system of an iOS device. Immediately, I note that the standard AFC service allows you to access only the contents of the `/ var / mobile / Media` directory, which stores photo and video files, movies, music and other media content. This directory can be mounted using the command `ifuse ~ / Desktop / Media /`.
If a jailbreak was made to the device and the AFC2 service was installed, then the possibilities of access to the file system are significantly expanded. AFC2 is the same AFC, only having access to the entire file system, and not just to the `/ var / mobile / Media` directory. The root file system of the device can be mounted as follows: `ifuse --root ~ / Desktop / Media /`. Unmounting the device is carried out, as in the case with access to application data, with the command `fusermount –u ~ / Desktop / Media`.
FILE_RELAY
File_relay is one of the lesser-known iOS services that allows in some cases to receive data that is not available through other interfaces. The service is present in all versions of iOS, starting with 2.0 (then the OS was also called iPhone OS), but the list of available data varies from version to version.
To retrieve data through the file_relay service, you can use the `filerelaytest` utility (it will be compiled only if the` --enable-dev-tools` parameter is specified during the `libimobiledevice` configuration):
santoku@santoku-vm:~$ filerelaytest
Connecting...
Requesting AppleSupport, Network, VPN, WiFi, UserDatabases, CrashReporter, tmp, SystemConfiguration
Receiving .........................................................................................................
Total size received: 393414
santoku@santoku-vm:~$
Sources of `file_relay` in iOS 8
AppleTV Baseband Bluetooth Caches CoreLocation CrashReporter CLTM demod Keyboard Lockdown MobileBackup MobileInstallation MobileMusicPlayer Network Photos SafeHarbor SystemConfiguration Ubiquity UserDatabases AppSuppor t Voicemail VPN WiFi WirelessAutomation MapsLogs NANDDebugInfo IORegUSBDevice VARFS HFSMeta tmp MobileAsset GameKitLogs Device-O-Matic MobileDelete itunesstored Accounts AddressBook FindMyiPhone DataAccess DataMigrator EmbeddedSocial MobileCal MobileNotes
This command will connect to the file_relay service and request a fixed set of sources: AppleSupport, Network, VPN, WiFi, UserDatabases, CrashReporter, tmp, SystemConfiguration. Each such source is one file or more from the device. For a complete list of sources for iOS 8, see the sidebar. To request a specific source, just use its name as a parameter for `filerelaytest`:
santoku@santoku-vm:~$ filerelaytest Accounts
Connecting...
Requesting Accounts
Receiving ..........
Total size received: 31217
santoku@santoku-vm:~$
The result (i.e., the extracted data) will be written to dump.cpio.gz in the current directory. It can be unpacked using the standard gunzip and cpio utilities:
santoku@santoku-vm:~$ gunzip dump.cpio.gz
santoku@santoku-vm:~$ cpio -idmv < dump.cpio
.
./var
./var/mobile
./var/mobile/Library
./var/mobile/Library/Accounts
./var/mobile/Library/Accounts/Accounts3.sqlite
./var/mobile/Library/Accounts/Accounts3.sqlite-shm
./var/mobile/Library/Accounts/Accounts3.sqlite-wal
./var/mobile/Library/Preferences
./var/mobile/Library/Preferences/com.apple.accountsd.plist
6297 blocks
santoku@santoku-vm:~$
Prior to iOS 8, this service was extremely useful and allowed you to get data that is not accessible through other interfaces (for example, if the backup is encrypted). But, starting with iOS 8, Apple introduced an additional check: in order for the file_relay service to work, a special configuration profile signed by Apple must be installed on the device.
When installing such a profile in the `/ Library / Managed Preferences / mobile /` directory, the file `com.apple.mobile_file_relay.plist` will be created with the following contents:
<?xml version="1.0" encoding="UTF-8"?><!DOCTYPE plist PUBLIC "-//Apple//DTD PLIST 1.0//EN" "http://www.apple.com/DTDs/PropertyList-1.0.dtd"><plistversion="1.0"><dict><key>Enabled</key><true /></dict></plist>`file_relay` at run time checks for the presence of this file and the value of the` Enabled` key in it and returns data only if it is set to `true`.
Automation
One of the great aspects of `libimobiledevice` is that this library, in addition to ready-made utilities for communicating with the device, also provides an API for creating its own tools. It contains, for example, bindings for Python that provide the same level of access to various device services. Using this API, you can quickly create exactly the tools you need.
iCloud
Starting with iOS 5, devices can create their own backup in the iCloud cloud, as well as recover from such a copy during initial setup. Access to data requires knowledge of Apple ID and password. One open source solution for this is iLoot . The utility is quite simple to use, so giving any explanation is unnecessary: an Apple ID and password are input, and the output is downloaded from iCloud. At the time of writing, iLoot does not work with accounts for which two-step authentication is enabled.
Conclusion
In the article, I tried to talk about the available methods of extracting data from iOS devices - methods that do not require financial costs. An important aspect of the research, such as analysis of the extracted data, was left behind the scenes - this topic is much more extensive and significantly depends on the version of iOS and installed programs, so it seems difficult to uncover the topic of analysis “in general”. Nevertheless, I hope that the material presented was interesting and you learned something new from it. Happy hacking!

First published in the Hacker magazine from 02/2015.
Posted by Andrey Belenko ( @abelenko )
Subscribe to Hacker