How to configure Android and RAD Studio XE7 (Delphi, C ++ Builder)
Let's talk about how to “make friends” or configure Android and RAD Studio XE7 (or Delphi, or C ++ Builder, or AppMethod).
In fact, the question is not very complicated, but often the questions coming up on this topic prompted me to write this post.
Action Plan:
- Configure RAD Studio XE7 (SDK + NDK);
- setting up an Android device;
- launch your application on an Android device.
So, let's begin!
Actors:
- RAD Studio XE7 (the latest version at the time of writing);

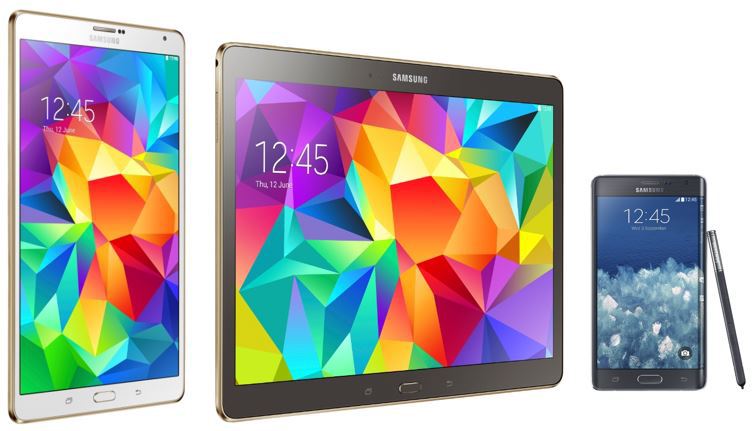
- Three wonderful devices:
Samsung Galaxy Tab S 8.4 (SM-T700);
Samsung Galaxy Tab S 10.5 (SM-T800);
Samsung Galaxy Note Edge (SM-N915F).
- You will also need regular USB cables. You can use one and connect devices in turn, or use three USB cables, but this is optional.

Let's get started! :)
I will use my laptop with Windows 8 64x.
During the installation of RAD Studio XE7, I do not touch the checkboxes of Android SDK and Android NDK. By default, the checkboxes are checked, after installation these two libraries will be installed and configured automatically.
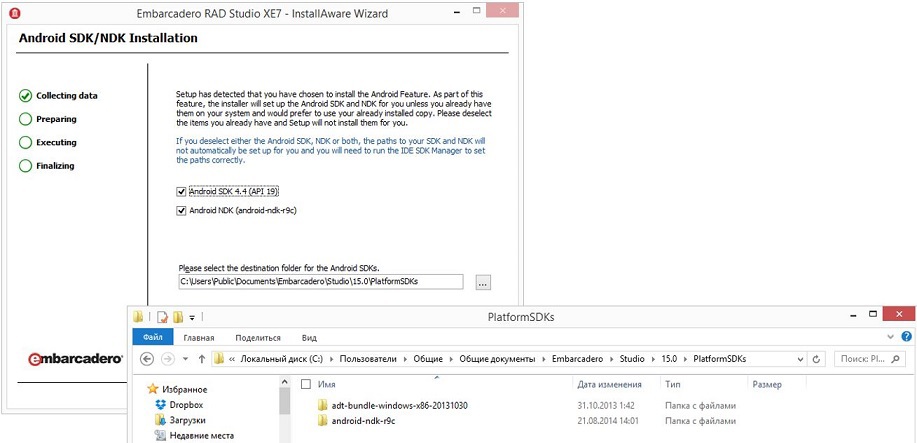
1.1. Configure paths to the SDK and NDK (this item is optional).
If for some reason you did not install the SDK and NDK during the installation of RAD Studio, then we configure them ourselves.
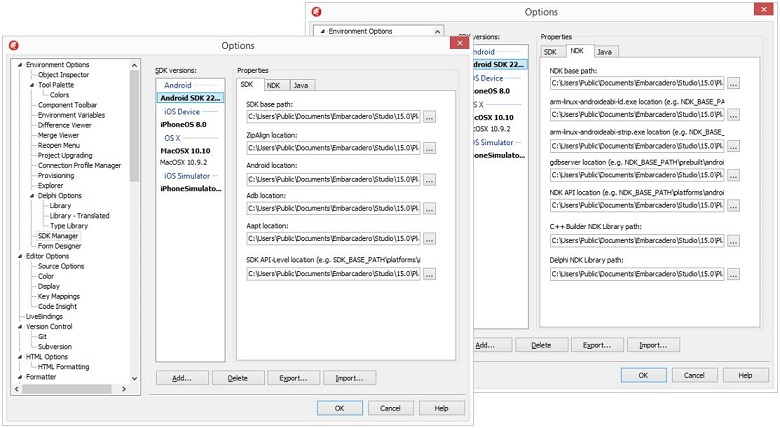
In RAD Studio we go to the Tools -> Options menu, there we find the “SDK Manager” tab, then we independently check and configure the paths to the libraries.
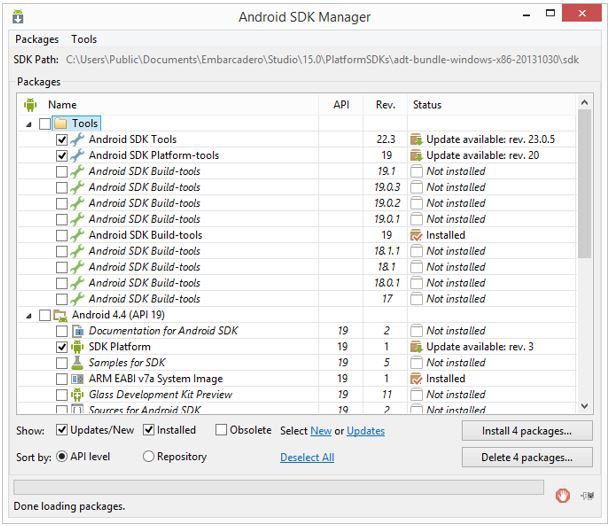
1.2. SDK library update (optional).
In rare cases, you may need to update the SDK library. To do this, launch the "Android SDK Manager" and click on the "Install N packages ..." button. Next, the
latest updates are downloaded and installed from the Internet .
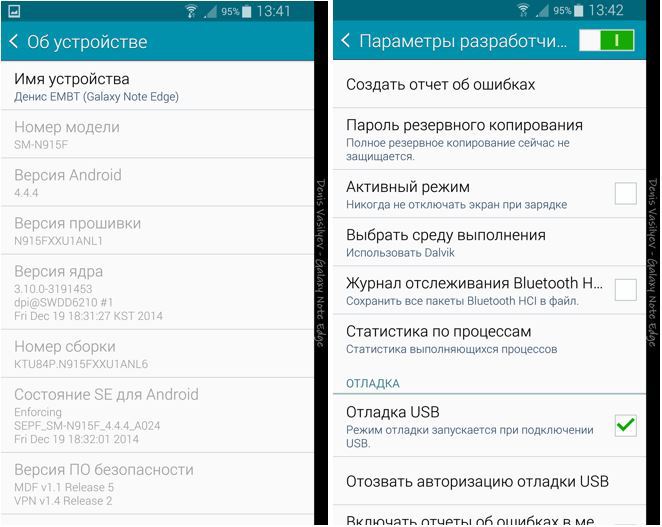
I take the tablet in my hands and go into its settings, there I find the item “About the device”.
Next, I find the "build number" and click on it 7 times in a row. After that, the hidden item “Developer options” is activated, I go into it and put a check mark next to the item “USB debugging”.
I repeat the same for the rest of my devices.
To do this, I alternately connect each tablet via a USB cable to my laptop.
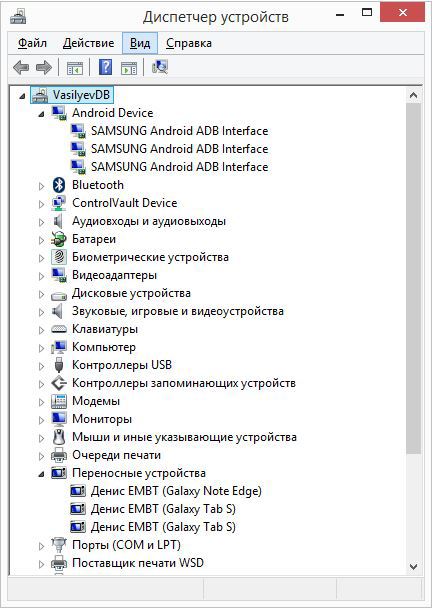
Then I go to the "Device Manager" and make sure that all the drivers are installed. In my case, they were installed automatically. If the drivers did not install automatically, then you need to go to the website of the manufacturer of your tablet, download and install them yourself. Make sure that in the “Device Manager” all devices have been defined.
I repeat the same for the rest of my devices.
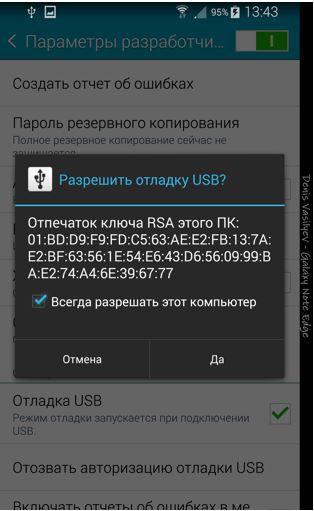
After installing the drivers, you must completely disconnect the Android device from the PC by pulling the USB cable out of it and reconnecting it. Wait until the prompt “Allow USB debugging” appears on the Android device itself, check the box “Always allow this computer” and click “Yes”.
Only at this point I start RAD Studio.
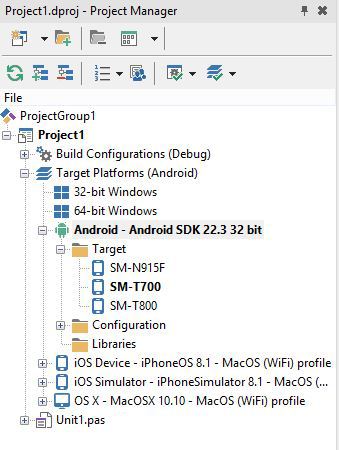
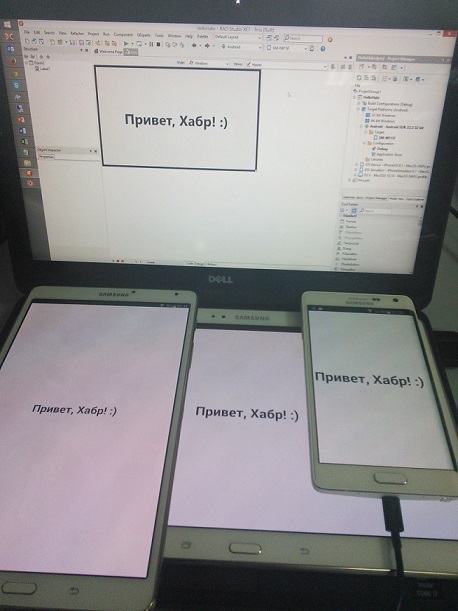
I create a new project Multi-Device Application and in the “Project Manager” double-click to activate the Android platform (it is highlighted in bold). Next, I open the Target list with a plus, if the device does not appear, then right-click on Target and from the drop-down list on Refresh. All three devices I decided on the first try.
I launch my application on an Android device. That's so simple :)
And finally.
It must be remembered that it is not necessary to debug every launch of your application on the device. Delphi allows you to do this quickly and comfortably. All the logic can be debugged in a Windows environment, and then check how the application starts on the device itself.
It is important to remember that we immediately create a cross-platform application, so all platform-dependent classes or constructs should be taken out separately from the main code.
And some related links:
Enabling USB Debugging on an Android Device
docwiki.embarcadero.com/RADStudio/XE7/en/Enabling_USB_Debugging_on_an_Android_Device
Installing the USB Driver for Your Android Device
docwiki.embarcadero.com/RADStudio/XE7/en/Installing_the_USB_Driver_for_Your_Android_Device
Running Your All Android the Application on the Device an All Android
docwiki.embarcadero.com/RADStudio/XE7/en/Running_Your_Android_Application_on_an_Android_Device
Good luck!
In fact, the question is not very complicated, but often the questions coming up on this topic prompted me to write this post.
Action Plan:
- Configure RAD Studio XE7 (SDK + NDK);
- setting up an Android device;
- launch your application on an Android device.
So, let's begin!
Actors:
- RAD Studio XE7 (the latest version at the time of writing);
- Three wonderful devices:
Samsung Galaxy Tab S 8.4 (SM-T700);
Samsung Galaxy Tab S 10.5 (SM-T800);
Samsung Galaxy Note Edge (SM-N915F).
- You will also need regular USB cables. You can use one and connect devices in turn, or use three USB cables, but this is optional.
Let's get started! :)
1. Install RAD Studio XE7 + SDK and NDK.
I will use my laptop with Windows 8 64x.
During the installation of RAD Studio XE7, I do not touch the checkboxes of Android SDK and Android NDK. By default, the checkboxes are checked, after installation these two libraries will be installed and configured automatically.
1.1. Configure paths to the SDK and NDK (this item is optional).
If for some reason you did not install the SDK and NDK during the installation of RAD Studio, then we configure them ourselves.
In RAD Studio we go to the Tools -> Options menu, there we find the “SDK Manager” tab, then we independently check and configure the paths to the libraries.
1.2. SDK library update (optional).
In rare cases, you may need to update the SDK library. To do this, launch the "Android SDK Manager" and click on the "Install N packages ..." button. Next, the
latest updates are downloaded and installed from the Internet .
2. Activation of the developer mode on the Android device.
I take the tablet in my hands and go into its settings, there I find the item “About the device”.
Next, I find the "build number" and click on it 7 times in a row. After that, the hidden item “Developer options” is activated, I go into it and put a check mark next to the item “USB debugging”.
I repeat the same for the rest of my devices.
3. Installing drivers on an Android device.
To do this, I alternately connect each tablet via a USB cable to my laptop.
Then I go to the "Device Manager" and make sure that all the drivers are installed. In my case, they were installed automatically. If the drivers did not install automatically, then you need to go to the website of the manufacturer of your tablet, download and install them yourself. Make sure that in the “Device Manager” all devices have been defined.
I repeat the same for the rest of my devices.
4. USB debugging resolution.
After installing the drivers, you must completely disconnect the Android device from the PC by pulling the USB cable out of it and reconnecting it. Wait until the prompt “Allow USB debugging” appears on the Android device itself, check the box “Always allow this computer” and click “Yes”.
5. Launch RAD Studio.
Only at this point I start RAD Studio.
I create a new project Multi-Device Application and in the “Project Manager” double-click to activate the Android platform (it is highlighted in bold). Next, I open the Target list with a plus, if the device does not appear, then right-click on Target and from the drop-down list on Refresh. All three devices I decided on the first try.
6. Launch the application.
I launch my application on an Android device. That's so simple :)
And finally.
It must be remembered that it is not necessary to debug every launch of your application on the device. Delphi allows you to do this quickly and comfortably. All the logic can be debugged in a Windows environment, and then check how the application starts on the device itself.
It is important to remember that we immediately create a cross-platform application, so all platform-dependent classes or constructs should be taken out separately from the main code.
And some related links:
Enabling USB Debugging on an Android Device
docwiki.embarcadero.com/RADStudio/XE7/en/Enabling_USB_Debugging_on_an_Android_Device
Installing the USB Driver for Your Android Device
docwiki.embarcadero.com/RADStudio/XE7/en/Installing_the_USB_Driver_for_Your_Android_Device
Running Your All Android the Application on the Device an All Android
docwiki.embarcadero.com/RADStudio/XE7/en/Running_Your_Android_Application_on_an_Android_Device
Good luck!