We play sapper in Photoshop

By the nature of my activity, I periodically have to automate my work in Photoshop. More precisely, I could not do this, but natural laziness leaves no chance in the fight against routine, as the saying goes, "it is better to lose an hour, but then fly in 5 minutes." Everything probably would have remained at the level of separate disparate scripts if not for the post from enotus . Thanks to him, I learned that for Photoshop (as well as other products from Adobe) you can write extensions in HTML + JS. And off we go.
Somehow it so happened that I usually start learning everything new by writing a simple toy on this newest one. For Photoshop, I chose Minesweeper. In this example, I would like to talk about creating an extension interface, interacting with Photoshop and handling events. So who is still interested, please tackle.
As already described in an article by my predecessor, we need Brackets with the extension installed and, in fact, Photoshop itself.
I also recommend immediately stock up on the documentation from the Adobe page.Most likely, you will need the Photoshop CC JavaScript Reference and, possibly, the Photoshop CC Scripting Guide. They are not directly related to writing extensions, but they will be required to interact with Photoshop.
Getting down. Let's create a project in Brackets using the extension:
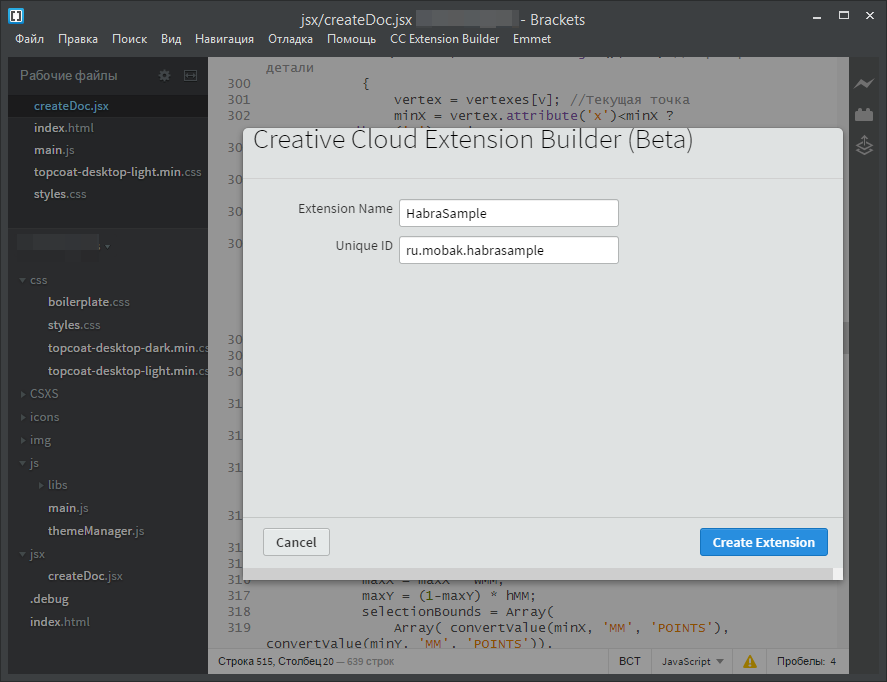
We will have a folder with a full set of files for the extension to work:
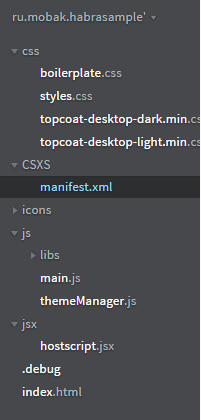
I added an additional file to the CSS folder for the topcoat light theme as I prefer to work with a light interface, but this is not necessary. Speaking of Topcoat: download and read the documentation here .
You don’t have to touch Manifest, everything is configured for the latest version of Photoshop. If you need to change the extension icon or allow the work in Photoshop of an earlier version, clarify these points in the documentation from the manufacturer .
In the js folder, we are interested in main.js, in fact, the main file of our project. But before moving on to it, we need to create an interface for our extension. This is done using HTML in the index.html file.
There is one more important file that I did not mention: hostscript.jsx. JSX script is just what they used for quite some time to automate various processes in Photoshop and other projects from Adobe. They even have a special ExtendScript Toolkit utility, it can also be useful, for example, for debugging jsx scripts.
index.html
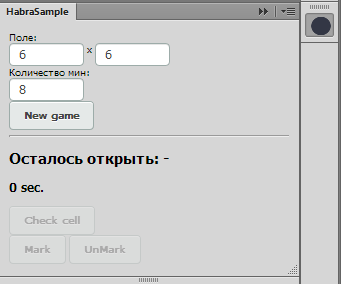
Everything has already been prepared in this file, the dark theme topcoat is connected, all the necessary scripts are added. Actually, all that is required is to fill out the div # content:
Поле:
x
Количество мин:
Осталось открыть: -
0 sec.
As a result, we get the following picture:
You can go to JS.
main.js
In fact, there is already an example of the simplest use:
/*jslint vars: true, plusplus: true, devel: true, nomen: true, regexp: true, indent: 4, maxerr: 50 */
/*global $, window, location, CSInterface, SystemPath, themeManager*/
(function () {
    'use strict';
    var csInterface = new CSInterface();
    function init() {
        themeManager.init();
        $("#btn_test").click(function () {
            csInterface.evalScript('sayHello()');
        });
    }
    init();
}());
The most important thing here is the line csInterface.evalScript ('sayHello ()'); , this is how the interaction with the application occurs. The fact is that the extension mechanism is universal and does not depend on the application in which it is running, but for the same reason it doesn’t know anything from the functional - it doesn’t matter if Photoshop is an illustrator. This is exactly what JSX scripts are used for. And sayHello () is just one of the methods implemented in hostscript.jsx.
But, we need not only to transfer data to jsx, but also to receive results. Therefore, you can use the callBack function, including an anonymous one:
csInterface.evalScript('checkCell()', function(result){
                if(result<=0)
                {
                    stopGame();
                }
                else
                {
                    $("#res").html(result); //вывод количества закрытых клеток без мин
                }
            });
That's about how I check the cells for mines: result contains the number of cells that still need to be opened to win. Mina corresponds to -1. If you noticed, jQuery is immediately connected among the scripts. So it's easy to interact with the interface.
The only point requiring a separate mention in main.js is the reaction to events occurring in the application outside of our extension. On the one hand, everything is simple, on the other, worse than we would like. First of all, I tried to catch a mouse click in a document - it wasn’t there, there simply is no such event. As it turned out later, events relate more likely to the entire application, and not to the document and have the nature of “used filter”, “last action has been canceled” and the like. In addition, all events have a 4-letter identifier and a long digital one, and in our case we need exactly a long digital one, and only short codes are indicated in the documentation. Fortunately, each application has a method for converting one identifier to another, but it works as part of a jsx script.
In general, I will not load you with details now, we will use an example from the documentation:
    function registerPhotoshopEvent(in_eventId) {
        var event = new CSEvent("com.adobe.PhotoshopRegisterEvent", "APPLICATION");
        event.extensionId = csInterface.getExtensionID();
        event.appId = csInterface.getApplicationID();
        event.data = in_eventId
        csInterface.dispatchEvent(event);
    }
    csInterface.addEventListener("PhotoshopCallback" , function(event) {
        csInterface.evalScript("return (app.documents.length > 0)", stopGame)
    });
    var closeEventid = "1131180832"; //идентификатор события закрытия документа
    registerPhotoshopEvent(closeEventid);
hostscript.jsx
As I wrote earlier, this is the main way to interact with the application, in this case, Photoshop CC. This is where the Photoshop CC JavaScript Reference downloaded at the very beginning comes in handy. It contains a description of the properties and methods of various Photoshop objects.
I will give here just a couple of examples. Let's start by creating a document:
var startRulerUnits = app.preferences.rulerUnits; // сохраняем текущие единицы измерения
preferences.rulerUnits = Units.PIXELS; //Заменяем единицы измерения на пикселы
//создаем документ
mainDoc = app.documents.add(width,  height, dpi, "Game", NewDocumentMode.RGB);
You know very well that the sizes in Photoshop can be set in different measurement systems. Accordingly, you will receive the measurement result in the same units. Therefore, this should be closely monitored. In order not to get an unpleasant surprise, it is better to play it safe and convert the units of measure to the desired value.
Please note that there are exceptions. For example, a selection is always set and measured only in PIXELS. For example, all vector objects are measured exclusively in POINTS.
To convert the units of measurement, I used a small method spied somewhere on the Internet:
function convertValue(value, from, to)
{
    output = new UnitValue(value, from);
    return output.as(to);
}
But here you will find a surprise. Conversion from mm and inches to pixels always takes place at the rate of 72 dots per inch, and if you have a different image resolution, you should recalculate yourself.
Well, perhaps the last example. So many things that we are used to doing in Photoshop as one action need to be implemented in software by a lot of teams. For example, to glue layers in different ways (to glue everything, only visible, connected) you need to implement it yourself. Of the available, there is only the option to glue it with the previous layer, and then it's up to you (check visibility, connectivity, swap layers). A similar situation with the selection of the area. You cannot select a circle or column in one pixel. All that you are offered to stick an array of coordinates of points, and what shape it will only depend on you:
function DrawBomb(layer, x, y, colorHEX)
{
    var startRulerUnits = app.preferences.rulerUnits; // сохраняем единицы измерения
    preferences.rulerUnits = Units.PIXELS; //Заменяем единицы измерения на пикселы
    mainDoc.activeLayer = layer;
    mainDoc.selection.select([
        [(x+0.2)*cellSize+padding, (y+0.2)*cellSize+padding],
        [(x+0.8)*cellSize+padding, (y+0.2)*cellSize+padding],
        [(x+0.8)*cellSize+padding, (y+0.8)*cellSize+padding],
        [(x+0.2)*cellSize+padding, (y+0.8)*cellSize+padding],
        [(x+0.2)*cellSize+padding, (y+0.2)*cellSize+padding]
    ]);
    var color = new SolidColor;
    color.rgb.hexValue = colorHEX;
    mainDoc.selection.fill(color);
    mainDoc.selection.deselect();
    preferences.rulerUnits = startRulerUnits; //восстанавливаем единицы измерения
}
You can play
Well, the interface is drawn, the handlers in js are written, the logic in jsx is implemented, you can play.
Do not forget to enable Debug Mode so that we see our unsigned extension in Photoshop.

Now you can run Photoshop and activate our extension:

Well, now you can play. True, due to the fact that clicks on the picture are not caught, you need to move the red rectangle and click the action buttons on the extension panel.
Well, the process video:
In the end, I’ll say a few words about signing your extensions.
Remember to delete all hidden files before signing.
On Windows, the path to the folder with the extension needs to start from a point, something like this:
ZXPSignCmd.exe -sign ./ru.mobak.habrasample ru.mobak.habrasample.zxp cert.p12 pass
And please, do not judge strictly my code, all the same I not a programmer.
Files
Extension sources can be downloaded here .
The finished extension that can be installed through the Adobe Extension Manager is here . Signed with a self-made certificate, so it fumbles a little.
PS I remembered that I forgot to write about one excellent resource, though in English, but with a bunch of examples: http://www.davidebarranca.com/
PPS Another point I wanted to say. Previously, to update the extension, you had to close and restart Photoshop. But progress does not stand still, now just collapse and expand the expansion panel. Thus, you can watch the result literally even after each change.