Stamping Windows: Automated Deployment of Windows Virtual Machines on Hyper-V with Vagrant (Part 2)
In the previous partWe examined what the deployment of Windows VMs is for and how to prepare the host system. Today I would like to focus on the technical implementation of the most massive part of the process, namely, the preparation of the base box for Vagrant. After all the necessary software is installed, it's time to prepare a model box - a template from which the machines will be deployed. Boxing is from a regular tar-archive containing a VHD disk file and metadata: virtualka settings and service information. Thus, it is necessary to begin preparing the image by creating a new VM, updating it, configuring and compressing it in order to save space and accelerate deployment. I will not dwell on how to create a new virtual machine in Hyper-V Manager, how to install the system and roll updates.
and the command line, which we prefer and also allows you to specify additional parameters:
Now, for Vagrant to copy it to itself and see it - you need to add it using the add command directly from our directory with the file:
In the next part, I will show how to lift a VM from boxing and automatically configure it using provisioning.
- Build a first-generation machine (Gen1). This is due to the fact that the current version of Vagrant (1.7.2) incorrectly sets the parameters of the hard disk (Gen2 does not have the “IDE” option, it is replaced by “VHD”), so I advise you not to get involved with Gen2 for now. However, if you really need to, you can fix the file plugins / providers / hyperv / scripts / import_vm.ps1.
- Use only one hard disk file, otherwise the box will not be able to rise (see below).
- Do not install unnecessary software (including Windows components) in the box. This makes it heavier and increases the chance that after a while there will be an outdated version. It is more correct to do this later, at the stage of provisioning.
- For Boxstarter to work correctly, you must disable Powershell restrictions:
Set-ExecutionPolicy -ExecutionPolicy Unrestricted
- By default, Vagrant accesses the machine through SSH (which required installing the latter on the machine), but in recent versions it has learned to work using the Windows-native WinRM protocol. All you need to do is configure WinRM:
winrm set winrm / config / client / auth '@ {Basic = "true"}'
winrm set winrm / config / service / auth '@ {Basic = "true"}'
winrm set winrm / config / service '@ {AllowUnencrypted = "True"} - I usually disable (set the startup mode to manual) unnecessary services (Print Spooler is the same), and also remove disk indexing and automatic weekly defragmentation: we optimize Storage Tier by the hypervisor itself.
- Reduce the size of the swap file, make this size fixed;
- Clear all logs:
wevtutil el | Foreach-Object {wevtutil cl "$ _"}
- Remove unnecessary Windows Update components:
Dism.exe / online / Cleanup-Image / StartComponentCleanup / ResetBase
Dism.exe / online / Cleanup-Image / SPSuperseded - Remove installers of Windows components. By running the Get-WindowsFeature command, you can see that some of the components have Install State = Available. Usually this means that these components can be installed, and for this there is enough cache that is stored directly on the local disk. Therefore, it makes sense to delete this cache by running the commands:
Get-WindowsFeature |
? {$ _. InstallState -eq 'Available'} |
Uninstall-WindowsFeature -Remove - If any of the components may come in handy later, it makes sense to leave it, otherwise during the subsequent installation you will have to specify the path to the wim-file (-Source parameter). However, there is nothing to worry about: this file is in the ISO file from which the system was installed, and it can be used both locally and from a network resource. In addition, some of the components are safely installed from the Internet - Powershell will download the necessary files itself.
- If desired, you can install Disk Cleanup - a program that automatically cleans the system from temporary files. However, for this you need to add the Desktop-Experience role, which uninstall causes problems with sysprep. So there are two options: either leave this feature, which itself eats up the place and makes the registry heavier (because it pulls a bunch of mandatory, but extra junk like Ink and Handwriting), or refuse sysprep, which puts an end to using the raised machines in the domain.
- After all these operations, the size of the dynamic VHD file will remain the same. To compress it, you must first defragment it to move all the files to the beginning of the disk:
Optimize-Volume -DriveLetter C -Defrag
- After defragmentation, it is desirable to reset all free space using the sdelete command, which is part of SysInternals:
sdelete -zc:
This will allow you to more efficiently compress it later.
Sysprep Walking
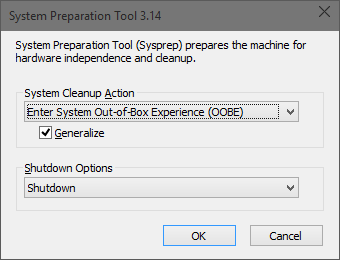
In the most general case, preparing a virtual machine for cloning using sysprep is a fairly common procedure. You can use it as a GUI.C: \ Windows \ System32 \ Sysprep \ sysprep
and the command line, which we prefer and also allows you to specify additional parameters:
C: \ Windows \ System32 \ Sysprep \ sysprep / generalize / oobe / mode: vm / shutdownAfter that, the program will perform all necessary operations and put out the car. The next time you turn on the system, it will be in the aforementioned OOBE (Out-of-Box Experience) - the state in which the freshly purchased laptop is located at the first start-up: an hardware inventory will be carried out, a local administrator password, a license key, a computer name and so on will be requested. All would be nothing, but you have to enter all this manually, from the keyboard. Fortunately, all this is easily automated. To do this, prepare the answer file, unattend.xml and put it next to the sysprep.exe file that is being launched (in the C: \ Windows \ System32 \ Sysprep folder), or by specifying the path to it as a command line parameter - this will allow you to place the file on an external drive, so that it does not appear on the final box. I will not dwell on this in detail, I just want to say that for this you need a Windows installation image (more precisely, the install.wim file from it) and the Windows Assessment and Deployment Kit (ADK) (you only need to install the Deployment Tools item, which includes Windows System Image Manager). Links to the distribution, instructions and examples of use will be in the appropriate section in the next, final part of the article.
Important nuances:
- If you installed and then uninstalled the Desktop-Experience component, then Sysprep will fall out with an error. As I mentioned above, there are two options: either leave this component installed, or do without it. For details, see Matt Rock (Boxstarter author) on the blog .
- When preparing a box, it is often necessary to modify something, for this the box rises in the OOBE state, all settings are passed in accordance with the answer file, then the necessary changes are made and the system is run again by Sysprep. I want to draw your attention to the fact that this will happen only two times (i.e. three sysprep runs). This is due to Microsoft licensing features. In principle, this can be done by cunning editing of the registry , but this can only be done for temporary or test machines, and not in production, so I advise you to just keep the image for further work separately, if necessary, make copies of it and prepare the new version independently. Thus, each virtual machine for the entire period of its life will be “detached” all once.
- It is better not to set the computer name - then it will be randomly generated, which will avoid confusion and conflict when several machines are being raised at the same time. In addition, it can be easily installed by the vagrant himself at the stage of provisioning when lifting.
- Set a complex and secure password for the local administrator. In the future, of course, it is better to change it (or even block it). This account will be needed when raising the machine at the provisioning stage: it is under it that Vagrant will install software, update the system and make all the necessary settings.
- It is better to change the name of the machine in the hypervisor itself (as it is called in Hyper-V Manager) to something short and simple - that is what the machine from the expanded box will be called. There was an awkward situation when my colleagues picked up my trial box and as a result they got a machine of the type “Winda 2k12 r2 x64 syspreped with bloody winrm settings version 111 test 222 yo”.
Box packing
After Sysprep put out the car, it's time to pack the virtual machine into a boxing file. In general, Vagrant has built-in functionality for this (the provision command), however, as of now, it does not work in Hyper-V. So we will pack boxing with our hands - there is nothing to be afraid of, this is done quite simply:- The machine’s hardware configuration is checked: the number of processor cores, memory size, boot priority. These parameters will be on newly deployed machines (although nothing prevents changing them later, of course).
- All images (snapshots) of the hard disk are deleted.
- Ready off machine is exported to a separate folder on the disk. This is necessary to place next to the hard disk file and all meta-information.
- The folder for snapshot files is deleted in the folder with the virtual machine - the Wagrant provider Hyper-V does not use it anyway.
- The text file metadata.json is also created there. At a minimum, at least one provider must be defined there (Hyper-V in our case). An example file for our case:
{
"Name": "Windows2012R2",
"description": "Windows 2012 R2 box sysprepped with ununtended provisioning",
"provider": "hyperv"
} - Now it remains only to make a .box file from the contents of the directory. For this, tar is used (you can use the free 7-Zip or bsdtar from the repository: the version that comes with Vagrant 1.7.2 will not work). Attention: the archive should only contain the contents of the folder where the machine was exported, without a parent folder, otherwise the box will not be recognized. Those. inside, directly in the root there should be the “Virtual Hard drives” and “Virtual Machines” directories, as well as the metadata.json file. The resulting file can then be compressed using gzip (again you can use 7-Zip, the main thing is to do it in a separate iteration, already on the .tar file) or LZMA (which gives better compression, but the time saved on copying will then be spent on a longer time than gzip, unzip) and change its extension to box. TA-dah! Boxing is ready!
Now, for Vagrant to copy it to itself and see it - you need to add it using the add command directly from our directory with the file:
vagrant box add --provider hyperv --name Win2012R2x64 Win2012R2.boxIf everything went fine, the box will become available (the vagrant will copy it to itself in% VAGRANT_HOME% and unpack it) and it can be seen in the output of the vagrant box list command. To make it available to colleagues, you can put it on a shared network drive (then the command to add a box will be of the form vagrant box add --name Win2012R2x64 D: \ Path \ To \ Win2012R2x64 \\ fileserver.domain.local \ boxes \ win2012r2. box) or a web server: local (vagrant box add --name Win2012R2x64 http: //devops.local/boxes/win2012r2.box) or external. For example, at http://www.vagrantbox.es/ or Hashicorp Atlas .
In the next part, I will show how to lift a VM from boxing and automatically configure it using provisioning.