How to set up a LibGDX project with Gradle, Google Play Services
Good day.
My friend and I have been developing Android for several years. Created toys on pure Android, OpenGL, as well as Unity3d. The main problem of the first two technologies is intolerance to different mobile platforms. Actually, that's why we started using Unity3d.
This is a pretty interesting thing. It combines the huge possibilities of programming with the mouse, as well as programming in a scripting language that looks like C #. Since we are Java developers, I wanted to write something cross-platform in Java. The choice fell on LibGDX. Having opened the manual and downloaded a couple of special skeleton collectors for the project on LibGDX, they started working.
As a result, most of the time we spent not on programming, but on setting up a project, setting up gradle, and adding Google Play Services. As a result, having filled the bumps, we decided to write this article.
First you need to download JDK 1.7 . In our project, we used Intellij Idea 14+ Community Edition . Well, for the mobile development of the Android SDK . It should also be noted that it is recommended to use the Android 4.4W.2 SDK (API 20). Next, you need to download the libGDX gdx-setup.jar project builder .
In order to create a project, libGDX developers provided a very convenient utility in which you can choose the set of libraries that you will use in your project. In general, run gdx-setup.jar and fill in all the fields:

After clicking generate, a ready-made test project on libGDX will be created. Through Intellij Idea, we call the import and select gradle.build in our project directory. Further, through gradle tasks, you can launch Android, Desktop, as well as web applications. But only for the further development of this project is it not entirely suitable. For some unknown reason, the Android module in Idea was left without dependences and, accordingly, writing some code in this module is not entirely convenient. Firstly, if you write something on Android, then Idea does not see the dependencies and does not suggest anything, and secondly, if you compile it not through gradle, then errors will appear that the dependencies themselves are missing. We dug for a long time and eventually found the right sequence of actions to assemble the project as it should.
First, create the project as described earlier. Then in the project directory we run the command
This command will create the correct project files. Then open the * .ipr project and look at the list of project modules. An indicator that all the dependencies are applied will be a bold selection of each module:

In principle, you can already work with the project. In order to start the Android application, you need to add the Debug / Run Configuration Andoid application with the following settings:

Similarly, create the configuration for the Desktop application:

To start the web application, run the command
Everything would be fine if we did not want to add new modules to the gradle project. I didn’t want to add dependencies to the project settings with my hands, because gradle should do it myself. In general, we also fiddled with this issue for a long time, because gradle for a long time refused to see the Google Play Services libraries.
First of all, we started following the Setting Up Google Play Services instruction , which says the following:
Add the Android module to the build.gradle configuration:
And also in AndroidManifest.xml the following:
As a result, after Gradle synchronization, we see this error:
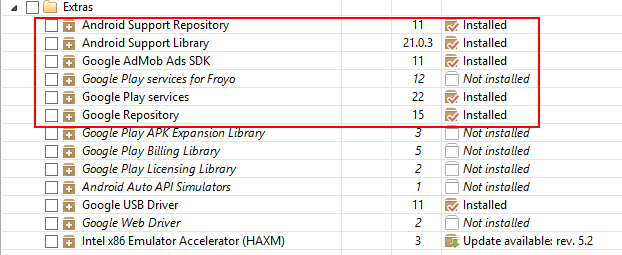
It turns out that this library was not found either in the maven repository or in others. In order to fix the situation, you need to install additional libraries from the extras package in the Android SDK Manager:
After installing all the libraries, the project was assembled.
Further, the installation instructions provided links to the BaseGameUtils project , which implements Helper classes for working with Google Play Services. Everything is pretty simple here. We add the whole package to the Android module, and in the AndroidLauncher.java class we add the initialization of the GameHelper and inherit it from the GameHelperListener interface.
Another problem appears here. We installed GameHelper in the Android module, and all development on libGDX takes place in the Core module. Accordingly, you need to come up with a mechanism by which you could call GameHelper methods in Core. For this, the IServices interface was invented, which describes all the work with Google Play Service calls.
We will inherit our AndroidLauncher class from this interface, implement all methods, and also save a link to it in a static manager, access to which is available throughout the project.
The next step is to create Google Play Services for your project in the Google Developer Console. All we need to do is create a service project, create leaderboards and achievments in it, and then add their id to the project constants. Id of the services themselves need to be added to AndroidManifest:
Next, do not forget to sign the project with the key and put the alpha release in the Developer Console.
After that, the services still did not work. The reason for this was the lack of API permissions in the console . Moreover, Google Play Game Management, Play Game Services and Google+ API were included, but they were not enough. I had to add another Drive API, Drive SDK and Google Cloud Storage JSON API.
As a result, we were able to get the project skeleton on LibGDX with Google Play Services embedded in it. In the next article I would like to talk about the project itself and how to build the application architecture using libGDX libraries
My friend and I have been developing Android for several years. Created toys on pure Android, OpenGL, as well as Unity3d. The main problem of the first two technologies is intolerance to different mobile platforms. Actually, that's why we started using Unity3d.
This is a pretty interesting thing. It combines the huge possibilities of programming with the mouse, as well as programming in a scripting language that looks like C #. Since we are Java developers, I wanted to write something cross-platform in Java. The choice fell on LibGDX. Having opened the manual and downloaded a couple of special skeleton collectors for the project on LibGDX, they started working.
As a result, most of the time we spent not on programming, but on setting up a project, setting up gradle, and adding Google Play Services. As a result, having filled the bumps, we decided to write this article.
Preparing a development environment
First you need to download JDK 1.7 . In our project, we used Intellij Idea 14+ Community Edition . Well, for the mobile development of the Android SDK . It should also be noted that it is recommended to use the Android 4.4W.2 SDK (API 20). Next, you need to download the libGDX gdx-setup.jar project builder .
Project deployment
In order to create a project, libGDX developers provided a very convenient utility in which you can choose the set of libraries that you will use in your project. In general, run gdx-setup.jar and fill in all the fields:
After clicking generate, a ready-made test project on libGDX will be created. Through Intellij Idea, we call the import and select gradle.build in our project directory. Further, through gradle tasks, you can launch Android, Desktop, as well as web applications. But only for the further development of this project is it not entirely suitable. For some unknown reason, the Android module in Idea was left without dependences and, accordingly, writing some code in this module is not entirely convenient. Firstly, if you write something on Android, then Idea does not see the dependencies and does not suggest anything, and secondly, if you compile it not through gradle, then errors will appear that the dependencies themselves are missing. We dug for a long time and eventually found the right sequence of actions to assemble the project as it should.
Project assembly
First, create the project as described earlier. Then in the project directory we run the command
gradlew idea
This command will create the correct project files. Then open the * .ipr project and look at the list of project modules. An indicator that all the dependencies are applied will be a bold selection of each module:
In principle, you can already work with the project. In order to start the Android application, you need to add the Debug / Run Configuration Andoid application with the following settings:
Similarly, create the configuration for the Desktop application:
To start the web application, run the command
gradlew html:superDev
Everything would be fine if we did not want to add new modules to the gradle project. I didn’t want to add dependencies to the project settings with my hands, because gradle should do it myself. In general, we also fiddled with this issue for a long time, because gradle for a long time refused to see the Google Play Services libraries.
Install and configure Google Play Services
First of all, we started following the Setting Up Google Play Services instruction , which says the following:
Add the Android module to the build.gradle configuration:
dependencies {
    compile 'com.android.support:appcompat-v7:21.0.3'
    compile 'com.google.android.gms:play-services:6.5.87'
}
And also in AndroidManifest.xml the following:
As a result, after Gradle synchronization, we see this error:
 Could not find any version that matches com.google.android.gms:play-services:6+.
     Searched in the following locations:
         https://repo1.maven.org/maven2/com/google/android/gms/play-services/maven-metadata.xml
         https://repo1.maven.org/maven2/com/google/android/gms/play-services/
         https://oss.sonatype.org/content/repositories/snapshots/com/google/android/gms/play-services/maven-metadata.xml
         https://oss.sonatype.org/content/repositories/snapshots/com/google/android/gms/play-services/
         https://oss.sonatype.org/content/repositories/releases/com/google/android/gms/play-services/maven-metadata.xml
         https://oss.sonatype.org/content/repositories/releases/com/google/android/gms/play-services/
It turns out that this library was not found either in the maven repository or in others. In order to fix the situation, you need to install additional libraries from the extras package in the Android SDK Manager:
After installing all the libraries, the project was assembled.
Further, the installation instructions provided links to the BaseGameUtils project , which implements Helper classes for working with Google Play Services. Everything is pretty simple here. We add the whole package to the Android module, and in the AndroidLauncher.java class we add the initialization of the GameHelper and inherit it from the GameHelperListener interface.
public class AndroidLauncher extends AndroidApplication implements GameHelper.GameHelperListener {
    private GameHelper gameHelper;
	@Override
	protected void onCreate (Bundle savedInstanceState) {
		super.onCreate(savedInstanceState);
        gameHelper = new GameHelper(this, GameHelper.CLIENT_ALL);
        gameHelper.setup(this);
    }
...
Another problem appears here. We installed GameHelper in the Android module, and all development on libGDX takes place in the Core module. Accordingly, you need to come up with a mechanism by which you could call GameHelper methods in Core. For this, the IServices interface was invented, which describes all the work with Google Play Service calls.
public interface IServices {
    public void signIn();
    public void showAchievements();
    public void showLeaderboard();
    public void addScore(final String scoreName, final Integer value);
    public Integer getScore(final String scoreName);
    public void unlockAchievement(final String achievementID);
    public boolean isAchievementUnlocked(final String achievementID);
}
We will inherit our AndroidLauncher class from this interface, implement all methods, and also save a link to it in a static manager, access to which is available throughout the project.
public class AndroidLauncher extends AndroidApplication implements IServices, GameHelper.GameHelperListener {
    private GameHelper gameHelper;
	@Override
	protected void onCreate (Bundle savedInstanceState) {
		super.onCreate(savedInstanceState);
        gameHelper = new GameHelper(this, GameHelper.CLIENT_ALL);
		AchievementsManager.setPlayService(this);
        gameHelper.setup(this);
    }
    @Override
    public final void signIn() {
        try {
            runOnUiThread(new Runnable() {
                public final void run() {
                    gameHelper.beginUserInitiatedSignIn();
                }
            });
        } catch (final Exception ignored) {}
    }
    @Override
    public final void showAchievements() {
        try {
            runOnUiThread(new Runnable() {
                public final void run() {
                    startActivityForResult(Games.Achievements.getAchievementsIntent(gameHelper.mGoogleApiClient), REQUEST_ACHIEVEMENTS);
                }
            });
        } catch (final Exception ignored) {}
    }
    @Override
    public final void showLeaderboard() {
        try {
            runOnUiThread(new Runnable() {
                public final void run() {
                    startActivityForResult(Games.Leaderboards.getLeaderboardIntent(gameHelper.mGoogleApiClient, AchievementsManager.c_ScoreID), REQUEST_ACHIEVEMENTS);
                }
            });
        } catch (final Exception ignored) {}
    }
    @Override
    public final void addScore(final String scoreName, final Integer value) {
        try {
            Games.Leaderboards.submitScore(gameHelper.getApiClient(), scoreName, value);
        } catch (final Exception e) {
            e.printStackTrace();
        }
    }
    @Override
    public final void unlockAchievement(final String achievementID) {
        try {
            Games.Achievements.unlock(gameHelper.getApiClient(), achievementID);
        } catch (final Exception e) {
            e.printStackTrace();
        }
    }
    @Override
    protected final void onActivityResult(final int requestCode, final int resultCode, final Intent intent) {
        super.onActivityResult(requestCode, resultCode, intent);
        gameHelper.onActivityResult(requestCode, resultCode, intent);
    }
}
The next step is to create Google Play Services for your project in the Google Developer Console. All we need to do is create a service project, create leaderboards and achievments in it, and then add their id to the project constants. Id of the services themselves need to be added to AndroidManifest:
Next, do not forget to sign the project with the key and put the alpha release in the Developer Console.
After that, the services still did not work. The reason for this was the lack of API permissions in the console . Moreover, Google Play Game Management, Play Game Services and Google+ API were included, but they were not enough. I had to add another Drive API, Drive SDK and Google Cloud Storage JSON API.
As a result, we were able to get the project skeleton on LibGDX with Google Play Services embedded in it. In the next article I would like to talk about the project itself and how to build the application architecture using libGDX libraries