Continuous Integration with Unity
- Tutorial
With the transition to a new project on Unity with a relatively large team of developers, the need for automatic assembly and delivery of applications to devices for testing sharply arose. This is how the situation was when I came to the project (for iOS):
Everything described above is automated using the so-called continuous integration (Eng. Continuous Integration , CI ). In my previous projects, TeamCity from JetBrains (creators of the convenient Resharper code refactoring tool) was used for these purposes. TeamCity (TC) is a very powerful software product that fulfills the goals set for the continuous integration system by 100%. He can do even more. But the article will focus not on him (there are already articles on him ), but on the new Unity Cloud Build service , especially for developers on the Unity engine.
UPD . Unity released Unity Cloud Build, and I updated the article :) Read about the changes and innovations below.
First, I want to warn you that some of the links below require access to Unity Cloud Build, its forum and documentation.
We have a large project, and the whole procedure described above took half an hour or more . The Mac on which the assemblies were made was slow. Programmers rarely installed the application on the device (everything was checked, mainly in the editor). And therefore, one approach was usually not enough, because after downloading to the device, an application suddenly (according to the law of meanness) detected errors. In addition, there was no normal QA. In addition, all this was done on Friday evening - i.e. we get all the unfavorable conditions for such an important matter :)
It is clear that this could not continue anymore. The solution had to be, of course, complex, and as one of its parts I set the task: to introduce CI into the development. The task was set as follows:
The last time in TeamCity I killed just about a day to set up the first build, but then I tuned and maintained these builds for a long time. In addition, it requires hosting on its server, its configuration and support. And this time I decided to try Unity Cloud Build. Recently, I heard a lot about him and, first of all, it bought me that you do not need to have your own server and mac as a build machine, everything is done on their side.
Unity acquired the Tsugi platform and built Unity Cloud Build on its basis. Now the service is already in the public domain, any Unity developer, even the owner of the free version, can register and use the system on a free plan by default. I registered with UCB on their page and set up the first build.
It took me about 15 minutes to set up. It is interactive and goes through several stages.
After that, the system will automatically start building the project. At the end of the process, a compact and detailed build log, the application itself + the packed dSYM (for iOS) will be available .
UPD . As it turned out, in the case of Android, UCB cannot split apk into expansion files. So in this case, you can use UCB only for testing, and build the release build manually.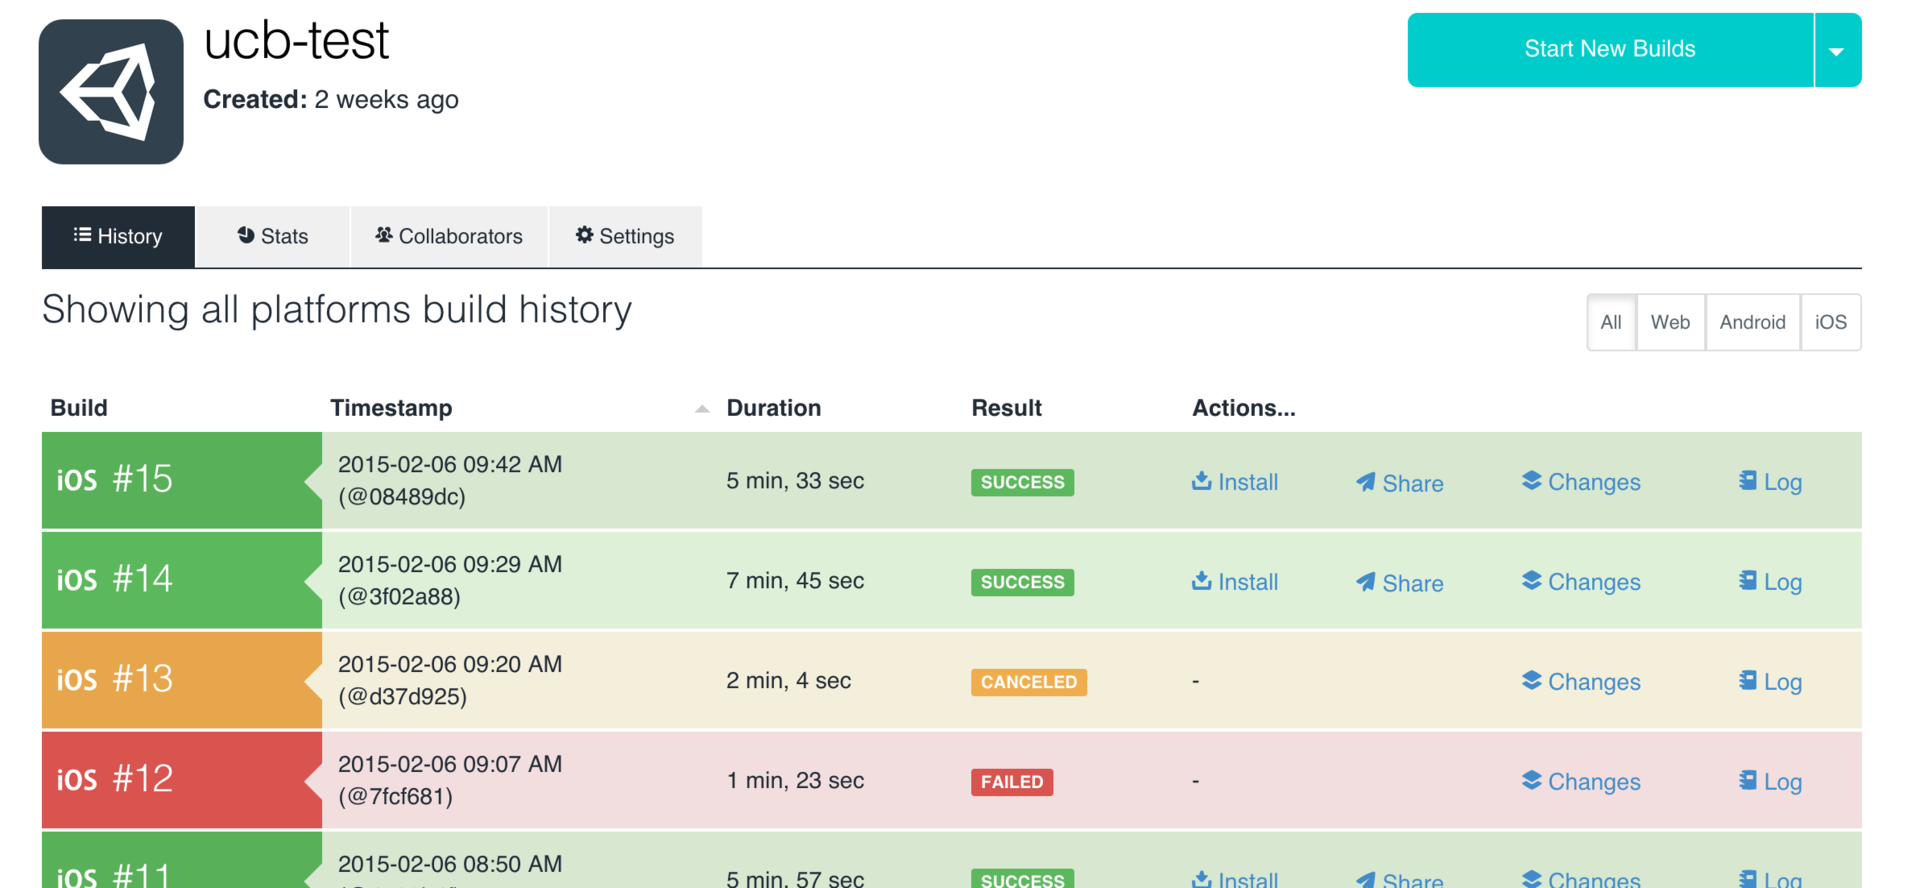
There are several ways to “share” an assembly in UCB:
In the settings there is an Advanced Settings section . More recently, it was available only on request, in test mode. Now available for holders of paid subscriptions.
With the release of Unity Cloud Build, subscriptions have been introduced . There are 4 types of subscriptions, each new one includes the previous one:
1. Free .
2. Pro .
3. Studio .
4. Enterprise .
So, I liked Unity Cloud Build. The project is developing, the forum is asking about the current requests of developers and gradually realizing them, technical support responds pretty quickly. If you are developing projects on Unity and thinking about CI, I recommend trying Unity Cloud Build. Save time and money.
Pros:
Minuses:
Waiting for questions, suggestions, clarifications in the comments!
It might be interesting for someone to read my previous articles:
Good luck with your development!
- On a separate mac-machine, the project was manually pumped out of the repository (Asset Sever).
- Manually ( File-> Build Settings-> Build & Run ), the assembly was launched into an xCode project.
- Further, an archive ( Archive ) was made in xCode .
- The archive was exported to an ipa file, which was manually uploaded to TestFlight.
- Further, already in TestFlight access was provided to the necessary testers.
Everything described above is automated using the so-called continuous integration (Eng. Continuous Integration , CI ). In my previous projects, TeamCity from JetBrains (creators of the convenient Resharper code refactoring tool) was used for these purposes. TeamCity (TC) is a very powerful software product that fulfills the goals set for the continuous integration system by 100%. He can do even more. But the article will focus not on him (there are already articles on him ), but on the new Unity Cloud Build service , especially for developers on the Unity engine.
UPD . Unity released Unity Cloud Build, and I updated the article :) Read about the changes and innovations below.
First, I want to warn you that some of the links below require access to Unity Cloud Build, its forum and documentation.
Problem
We have a large project, and the whole procedure described above took half an hour or more . The Mac on which the assemblies were made was slow. Programmers rarely installed the application on the device (everything was checked, mainly in the editor). And therefore, one approach was usually not enough, because after downloading to the device, an application suddenly (according to the law of meanness) detected errors. In addition, there was no normal QA. In addition, all this was done on Friday evening - i.e. we get all the unfavorable conditions for such an important matter :)
It is clear that this could not continue anymore. The solution had to be, of course, complex, and as one of its parts I set the task: to introduce CI into the development. The task was set as follows:
- CI system should be free if possible;
- must support the assembly of Unity projects;
- its setup should be very simple;
- for everything about everything - no more than one working day.
The last time in TeamCity I killed just about a day to set up the first build, but then I tuned and maintained these builds for a long time. In addition, it requires hosting on its server, its configuration and support. And this time I decided to try Unity Cloud Build. Recently, I heard a lot about him and, first of all, it bought me that you do not need to have your own server and mac as a build machine, everything is done on their side.
Unity acquired the Tsugi platform and built Unity Cloud Build on its basis. Now the service is already in the public domain, any Unity developer, even the owner of the free version, can register and use the system on a free plan by default. I registered with UCB on their page and set up the first build.
Customization
It took me about 15 minutes to set up. It is interactive and goes through several stages.
- Enter a link to the project in the repository . Supported by svn , perforce and git . The type of repository is determined automatically by reference. It turned out that UCB does not support Asset Server , which is strange - not to support its own version control system. When I came to work on the project, it was just at AS. When I first met AS, the first thing that killed me was that there was no support for branches (which is important for a large project), and their merger is based on time-based changes, not changes. The lack of AS support for UCB was another reason for moving the project to a git repository.
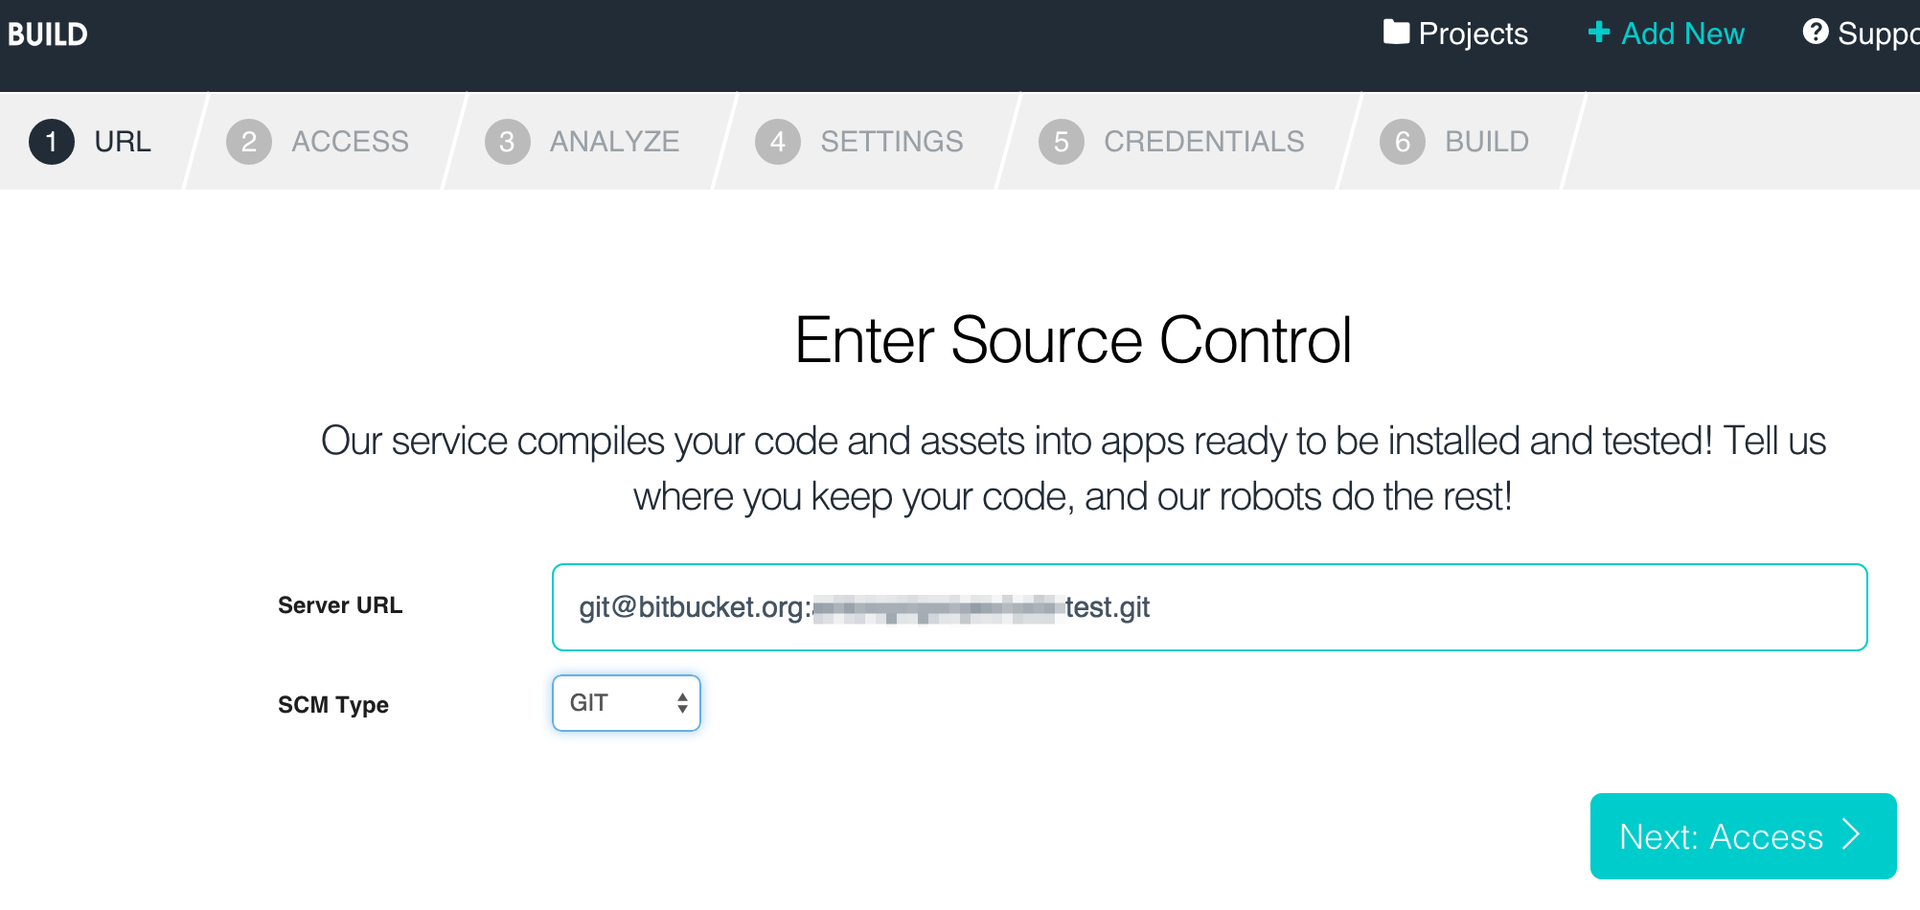
- Configuring access to the repository . In the case of git, UCB generates an SSH key that needs to be registered, for example, in the admin panel of a project on bitbucket or github . After gaining access, UCB allows you to select the branch from which the project will be assembled.
- Project setup . At this stage, it is possible to choose the version of Unity with which the project will be assembled. UCB now has all versions up to andincludingUnity 5
beta. At the moment, UCB supports the Web , iOS, and Android platforms , while accessing them does not require Pro licenses for the iOS and Android platforms, at least for now;) In the future, they plan to add Standalone platforms and Windows Phone . You can also specify a specific folder in the repository, as the folder of the Unity project.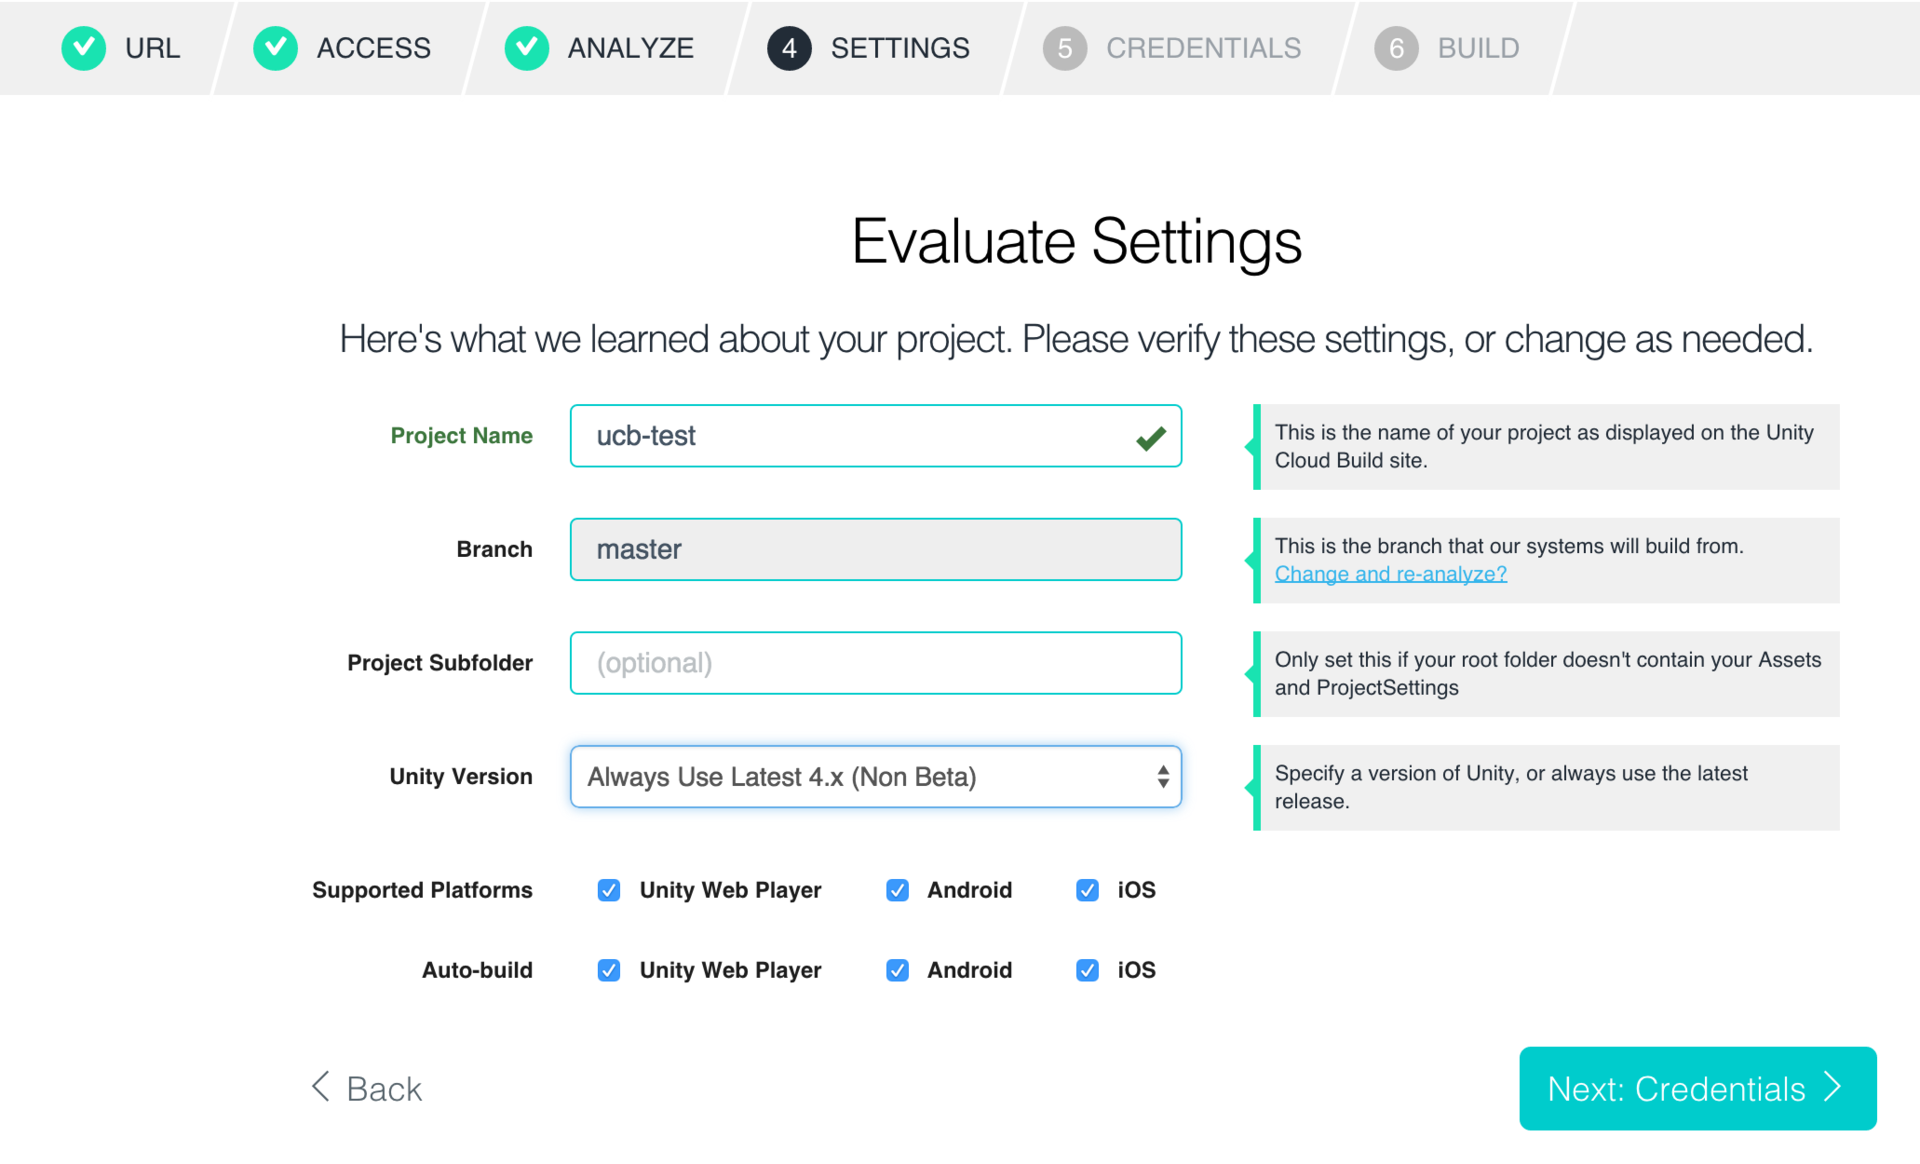
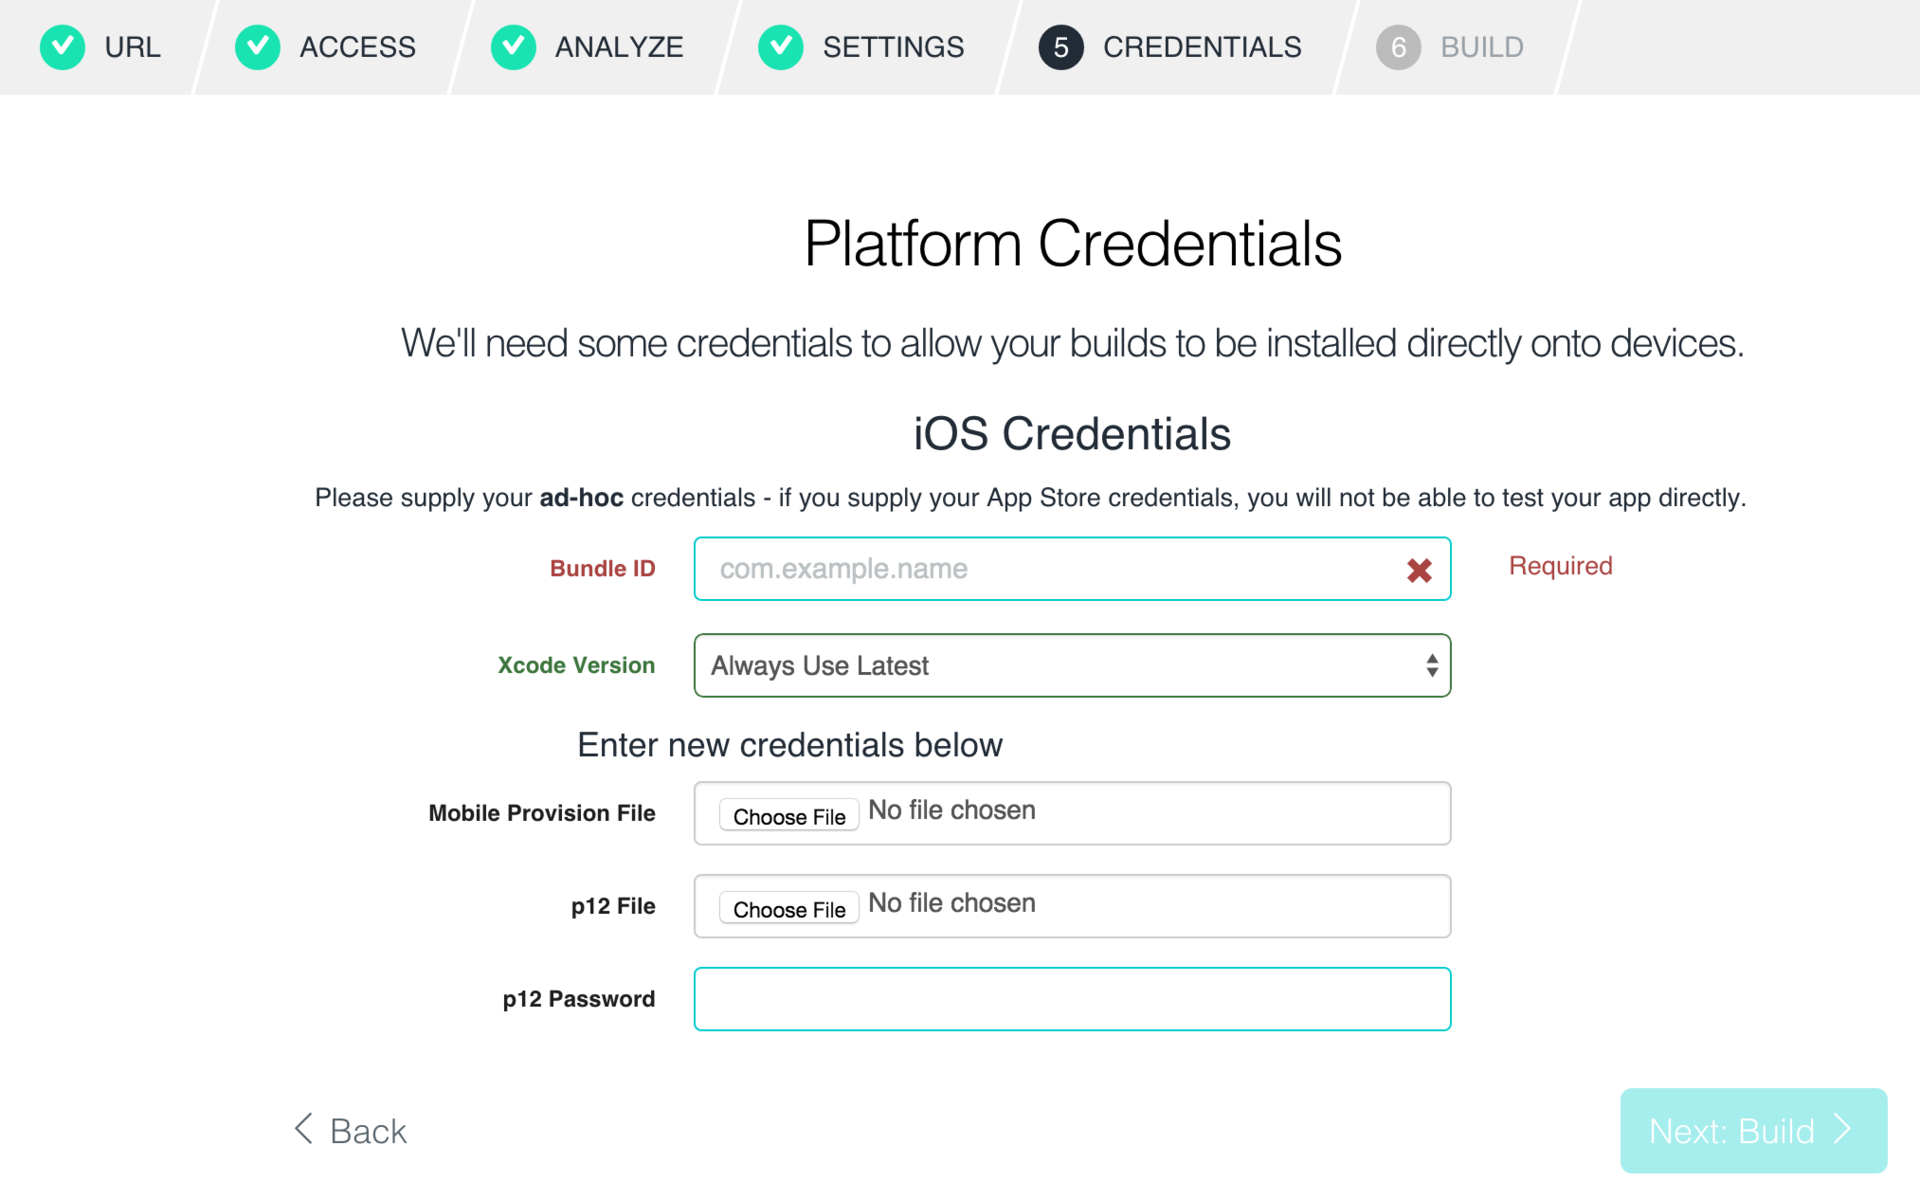
- Configure the build and subscription of the application . At this stage, the certificate for subscribing the application in p12 format is indicated. In the case of iOS, a provision profile is also indicatedand you can choose the xCode version - 5 or 6 (now using 6.0.1).
After that, the system will automatically start building the project. At the end of the process, a compact and detailed build log, the application itself + the packed dSYM (for iOS) will be available .
UPD . As it turned out, in the case of Android, UCB cannot split apk into expansion files. So in this case, you can use UCB only for testing, and build the release build manually.
Distribute the compiled application
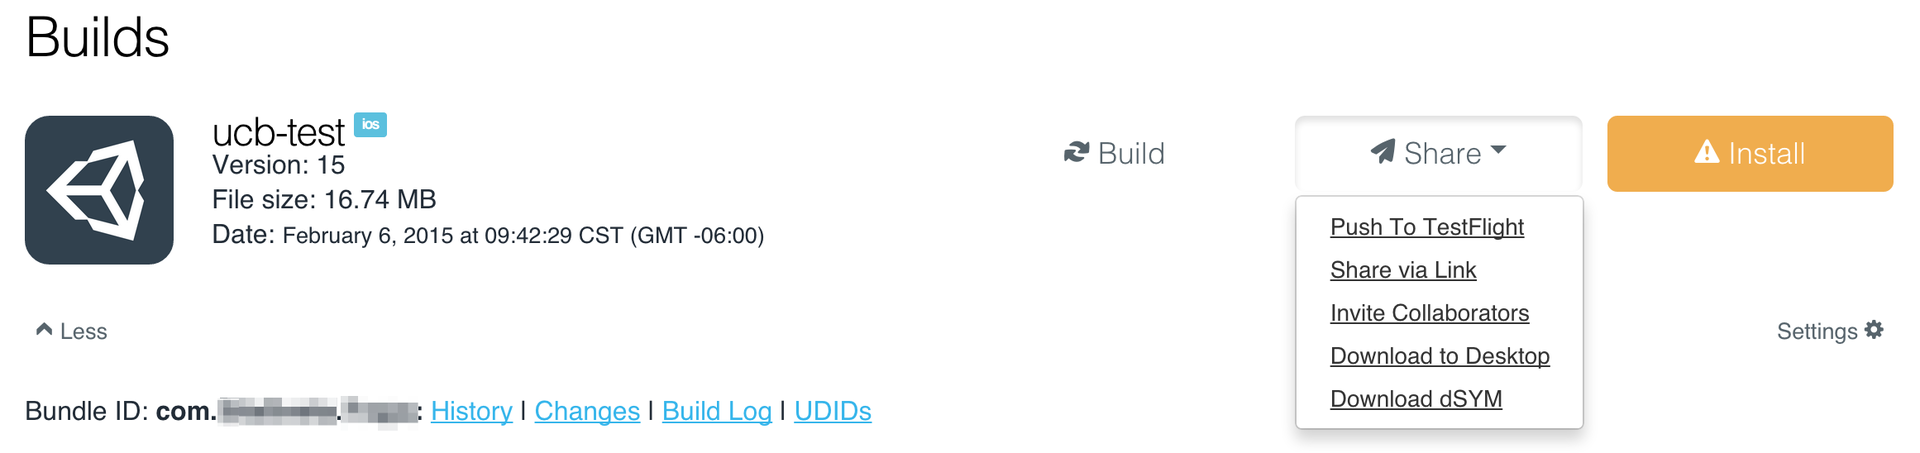
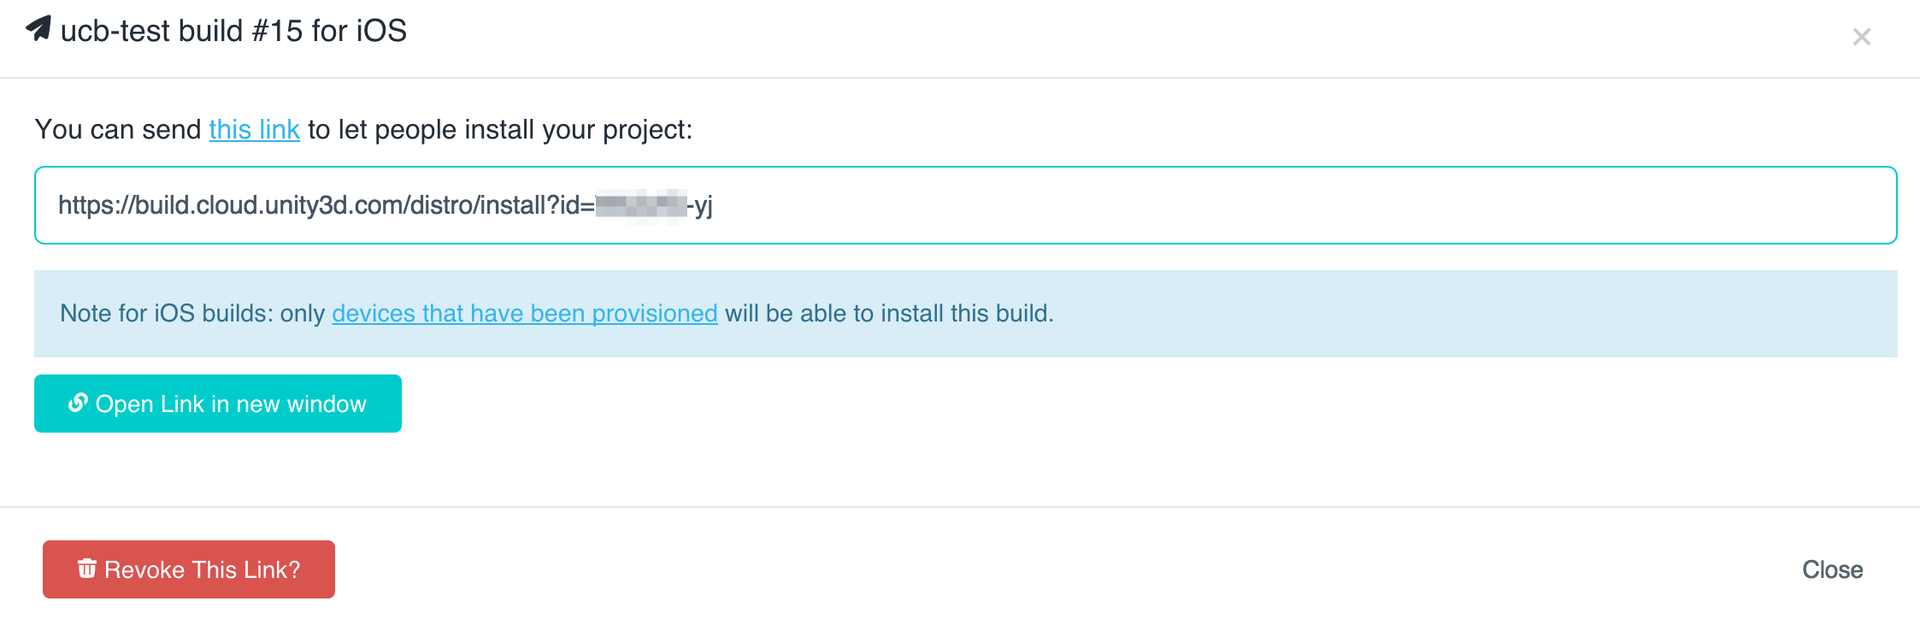
There are several ways to “share” an assembly in UCB:
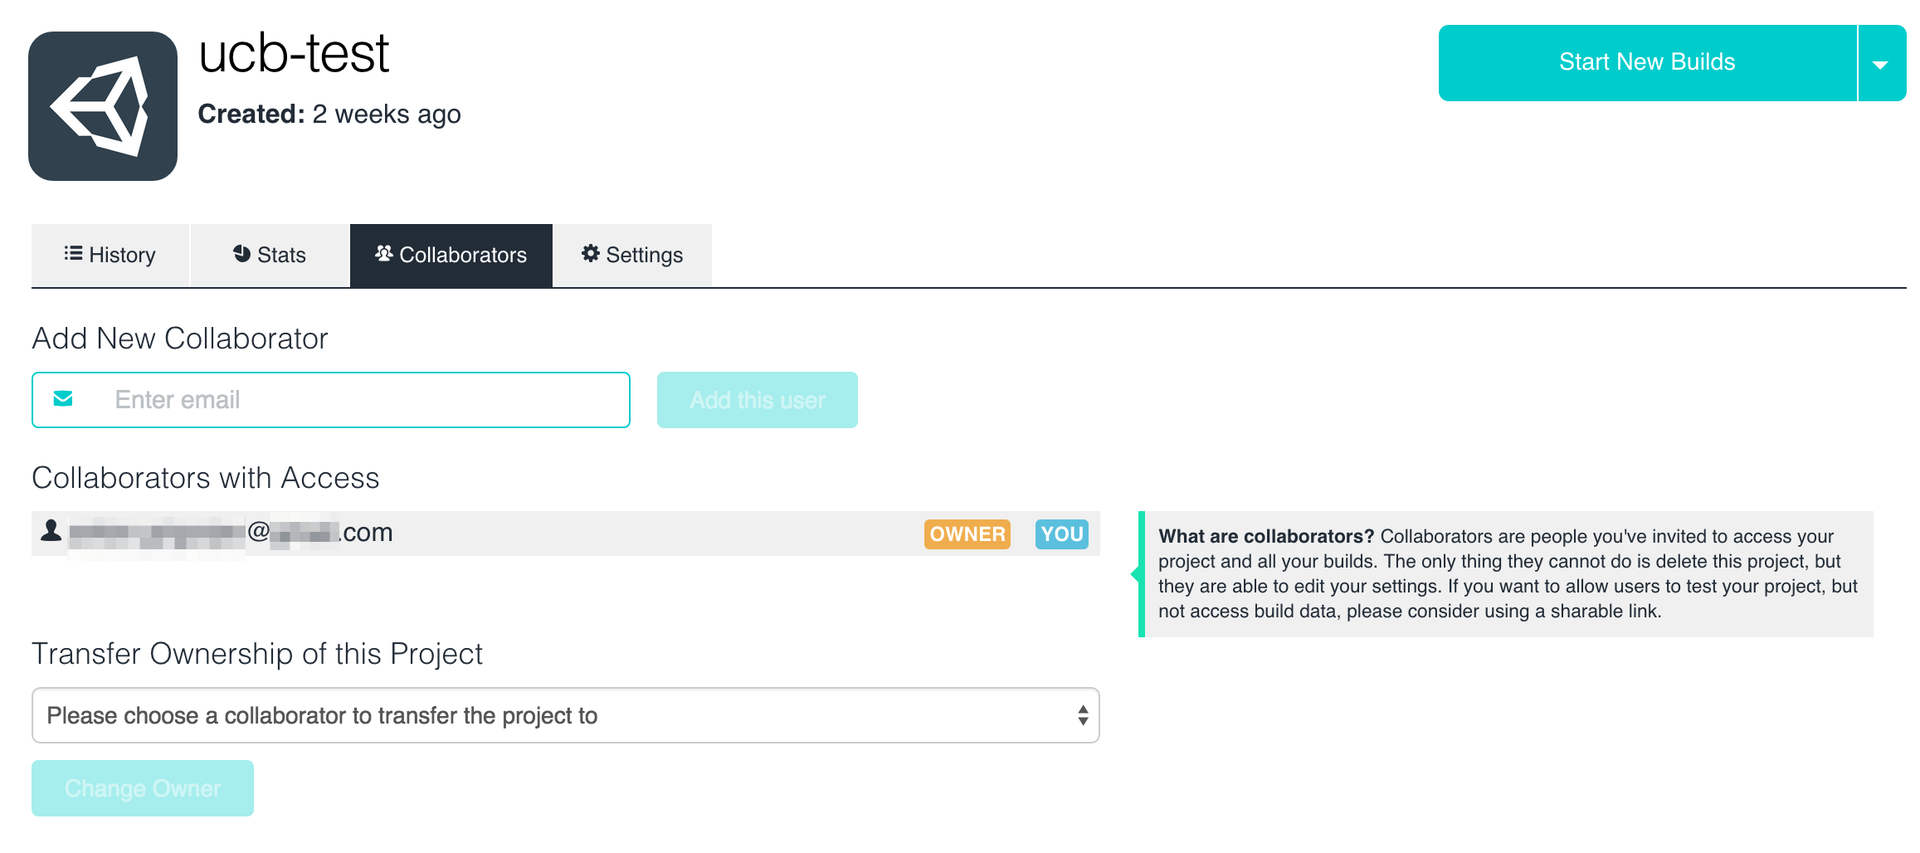
- Collaborators . This is a list of everyone who has access to the project. At the end of the assembly, each of this list will receive a message in the mail with a link to install. You can go through it on the device and install the application with one touch. And you can go to the admin panel from the browser on the computer and download the ipa- file and then do whatever you like with it. This method has one drawback - all from this list get access to the build settings and all assembled applications.
- Share via Link . A link is generated where you can download a specific assembly. At this link, anyone can download / install the application. It is permanent, i.e. does not change over time for a specific assembly.
- UPD . The Push to TestFlight options are gone. Apple closed Testflight in its old form (before banning the download of Android applications for testing) and proposed on its basis its distribution version of tested applications via iTunes Connect. The perversity of Apple’s new method is that in order to submit an application for an external test ( External Testers , up to 1000 testers), it must pass an internal test - Beta App Review . I don’t know how long it lasts, I haven’t tried it yet, but the application must meet all the same criteria as before sending it to the AppStore. For internal tests ( Internal Testers, no more than 25) testers should have access to iTunes Connect in the role of Technical or Admin, and this is not always possible.
Other features
- The number of assemblies is unlimited . For example, in the free TC, there are restrictions on the number of agents (as they call machines for assembly) and the number of assemblies. For additional you need to buy additional licenses.
- Unity Cloud Build manifest . I learned about the assembly manifest when I tried to build in the debug assembly the ability to display information about the commit from which the application was built in the application. This is very convenient when testing. It turned out that the guys from UCB embed a “manifest” in the JSON format in the project, from which you can get a lot of useful information for tests: commit, branch name, build number, etc. But, if you need to build an application for the store, this manifest will go away along with it for sale :(
Additional settings
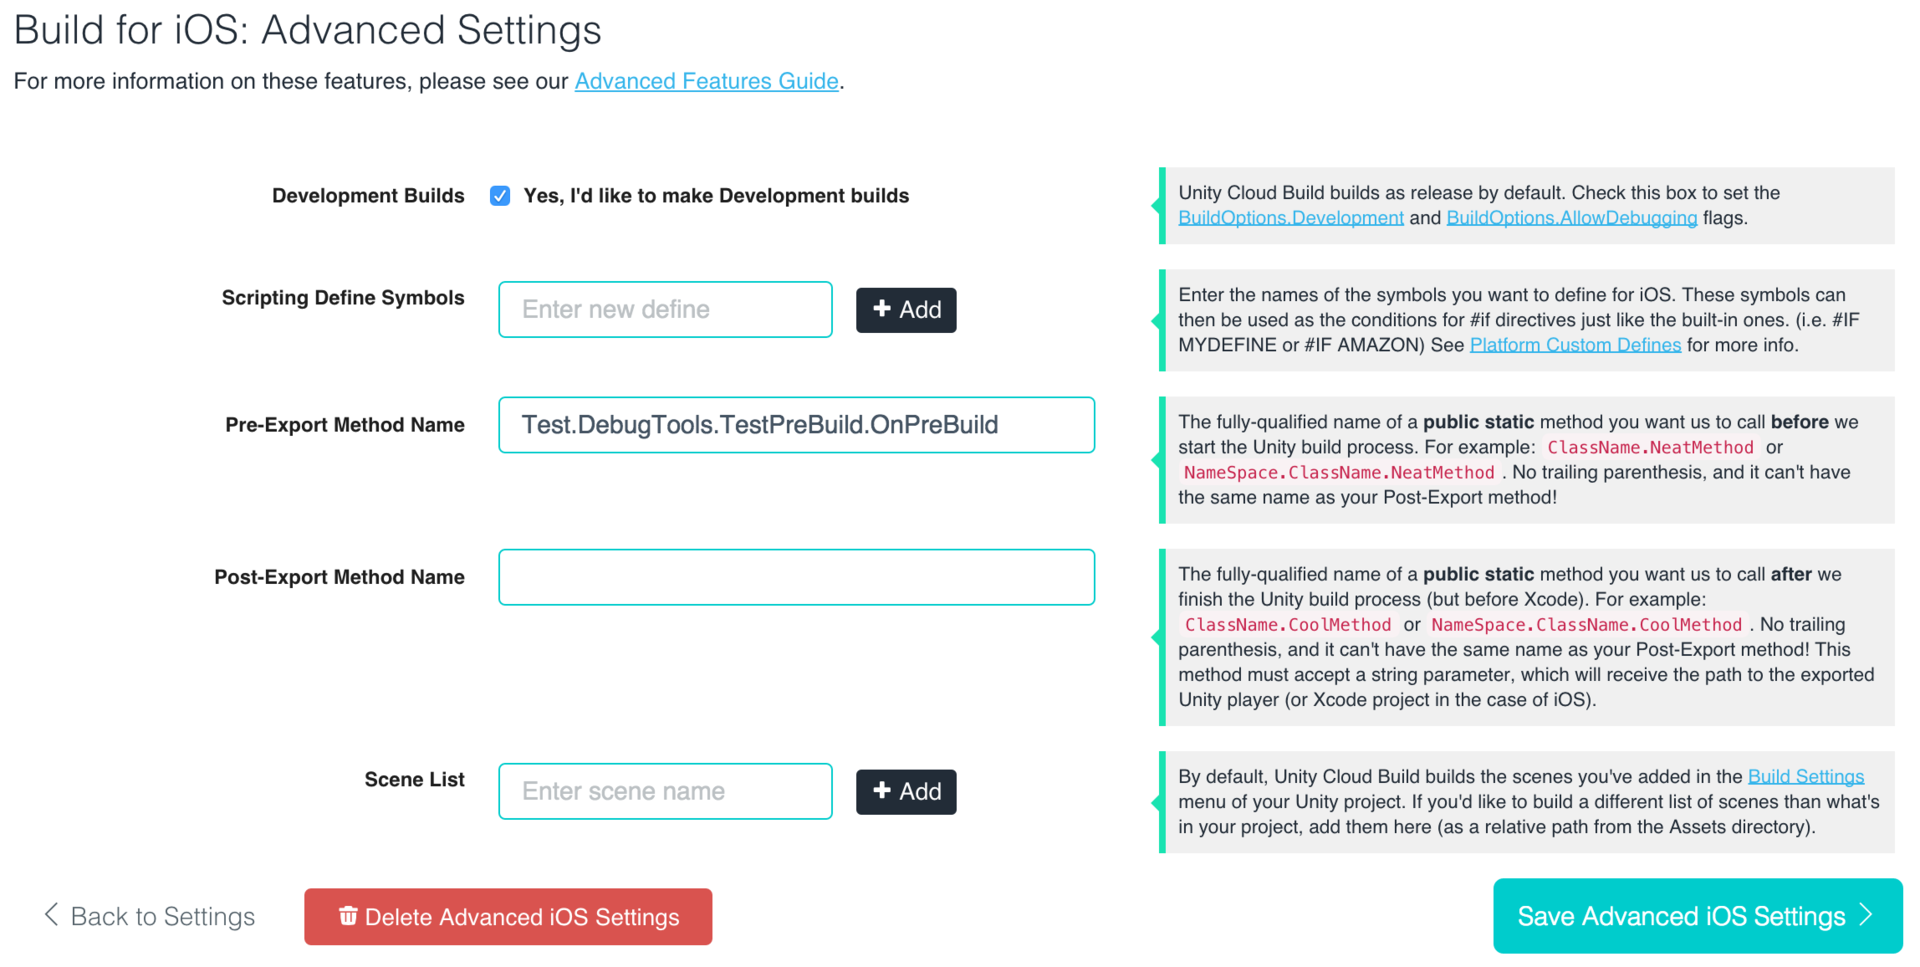
In the settings there is an Advanced Settings section . More recently, it was available only on request, in test mode. Now available for holders of paid subscriptions.
- Development Builds . Corresponds to BuildOptions.Development + BuildOptions.AllowDebugging build options, and the corresponding settings in File-> Build Settings , so that you can debug the assembled application. By default, Release is going to.
- Pre / Post-Export Method Name . These methods are called before building the project and after creating the xCode project, respectively. Here they are just letting you do miracles! It should be noted that the class file for these methods must be in the Editor folder(not necessarily in the root of the project). This is not indicated in the help and took my time until I achieved a working assembly.
- Scripting Define Symbols is a very convenient thing. You can not set them in the project settings, but set them separately for each assembly. For example, use preprocessor characters like DEBUG , RELEASE , STORE , and so onin the code.
- Scene List - you can separately specify a list of scenes for the assembly. It may be useful, for example, if there are special test scenes for tests.
Subscriptions and price
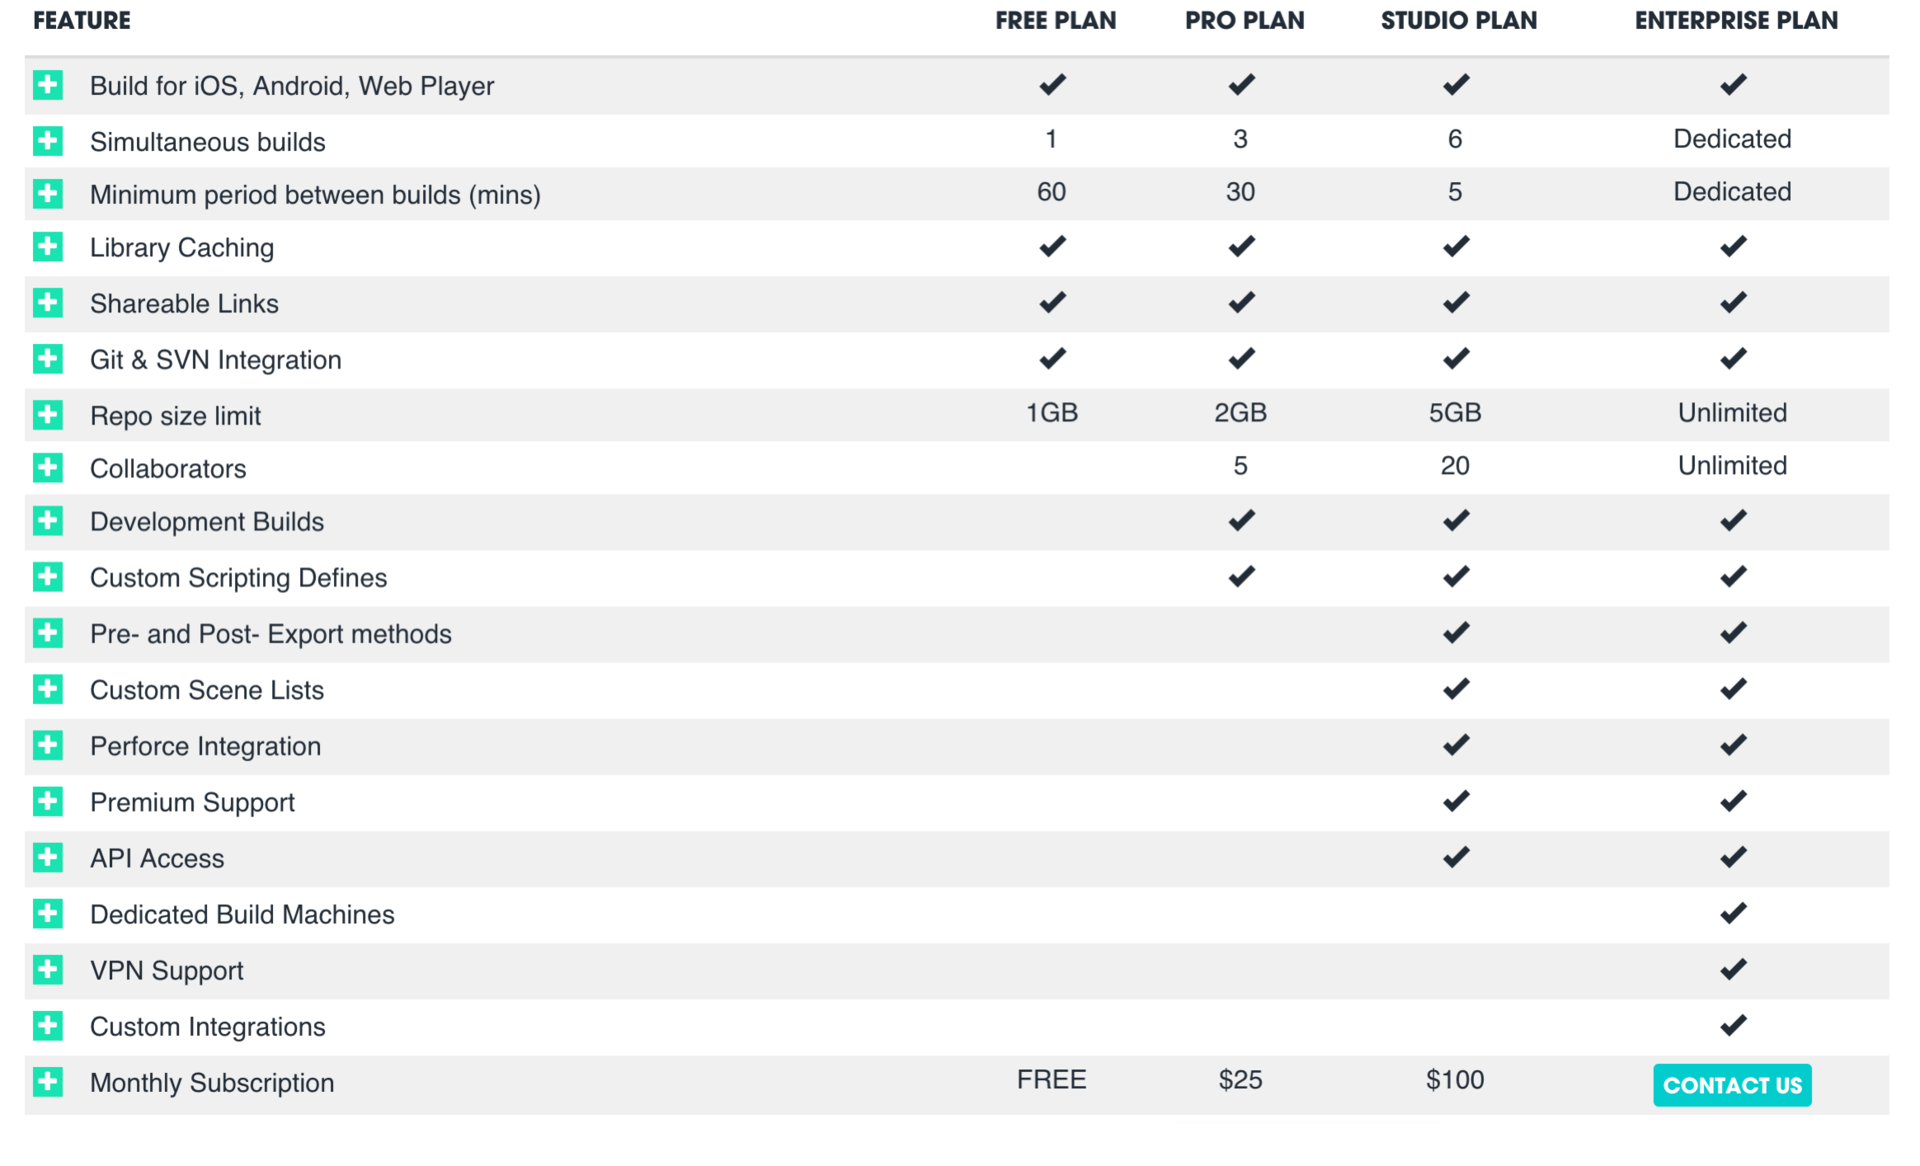
With the release of Unity Cloud Build, subscriptions have been introduced . There are 4 types of subscriptions, each new one includes the previous one:
1. Free .
- As the name implies, this is a free plan.
- 1Gb is allocated for the project, while all the space occupied by the project folder during assembly is considered.
- At least 60 minutes between builds, i.e. before the next assembly (automatic or manual start) will have to wait at least an hour. But Library Caching is enabled by default.
- The ability to collect only 1 project at a time.
- You cannot add other people to the project ( Collaborators ). But you can share the assemblies using the links generated by them ( Share via Link ).
- Not available advanced settings ( the Advanced the Settings ).
2. Pro .
- 25 $ per month.
- 2Gb per project.
- At least 30 minutes between builds.
- You can collect up to 3 projects at a time.
- You can add up to 5 people to the project.
- Optional options are Development Builds and Custom Scripting Defines .
3. Studio .
- $ 100 per month.
- 5Gb per project.
- Minimum 5 minutes between builds.
- You can collect up to 6 projects at a time.
- You can add up to 20 people to the project.
- The options Pre- / Post-Export methods and Custom Scene Lists are available .
- Perforce Support.
4. Enterprise .
- Separate plan. You need to negotiate a price.
- Separate machines for assembling your projects stand out.
- Theoretically - the fastest time to build projects.
- All restrictions above are removed.
Flaws or what else do you want
- The project is going on for a relatively long time . This means a free subscription. It also has a 1 hour limit between builds. Now the project, which is locally assembled in 5-10 minutes, is going to UCB in 15-50 minutes. The reason is that UCB does not allow it to be stored at home, and each time it is reloaded from the repository. The only optimization that exists is the Cache Library Directory option- it allows you to cache the Library folder for the project, so that when you build again, you don’t have to export everything again. In general, this time is not so critical for development, if programmers have the opportunity to build the project locally for their tests. Paid plans reduced assembly time, and on the most expensive one there are so-called “dedicated assembly machines” ( Dedicated Build Machines ), in which they promise a very fast assembly by allocating individual machines for the company and caching the entire project on these machines. Please unsubscribe in the comments if this is so if someone managed to try.
- There is no way to configure an assembly from a branch family , such as feature / * . There is such a possibility in TC, and UCB always collects from a strictly specified branch. If anyone is familiar with the git-flow paradigm, it can be very useful for development when programmers start different branches for tasks and can (they or testers) immediately test it on the assembled application. As a result, we managed with several projects in UCB configured on different branches, for example, master (Release-assembly separately for tests and uploading to the store), develop , the release branchfor continuous testing of the current release and specific branches of current features ( feature ). Naturally, these projects have different settings, such asDevelopment Build , Scripting Define Symbols . Accordingly, the Release assembly for tests and the AppStore is automatically collected as soon as the release light merges into the master (in accordance with git-flow ).
- While there is no way to include automatic testing in the process , although Dmytro Mindra at the last DevGamm in Minsk swore that there was such an opportunity) Naturally, this can be done manually, through Unity Test Tools and the Pre-Export Method option, but I want more serious native support, with a table of test results and graphs)
- Not always the project assembled on the local machine corresponds to what will be assembled on UCB , and such an application will not always work on the device. For example, we used the plugin for in-game purchases from Soomla. An application built locally worked fine, while an application built on UCB hung on theplugin's Initialize function. As a result, Soomla adds the `-ObjC` flagin Build Settings> Other Linker Flags and it is misused by UCB . The problem has already been fixed, but because of it, for some time we could not test assemblies from UCB, we had to assemble the project locally, in the old way).
- UPD . No support for Split Application Binary. If the Split Application Binary is turned on in the project settings to receive the add-on file for Google Play, if the application takes up more than 50Mb, you will have to disable it, otherwise in UCB the output will be inoperative apk without the add-on file. While support for add-ons is not implemented.
Summary
So, I liked Unity Cloud Build. The project is developing, the forum is asking about the current requests of developers and gradually realizing them, technical support responds pretty quickly. If you are developing projects on Unity and thinking about CI, I recommend trying Unity Cloud Build. Save time and money.
Pros:
- Quick setup. With ready-made certificates, profiles and a link to the repository, it will only take 2 minutes .
- The ability to “free” build for Android and iOS, their licenses do not require, and even mac will not be required.
- For those who do not care about the build time, this is a great opportunity to automatically build and store all the builds of the application.
- Additional features for customizing the assembly.
- The number of projects and assemblies is unlimited.
Minuses:
- Relatively long build time on the free plan. With the most expensive plan they promise a quick assembly, but I have not tried it myself, I can not guarantee it.
- There is no support for Hg, TFS, Asset Server (although I would not recommend using the last two).
- There is no built-in support for automatic tests.
Waiting for questions, suggestions, clarifications in the comments!
It might be interesting for someone to read my previous articles:
Good luck with your development!