MyTOTP - completely own * two-factor authorization by rfc6238
- Tutorial
 So, you decided to implement two-factor authorization for your project, and decided not to follow the example of Yandex and invent your new standard, but rather use the existing one, namely TOTP according to rfc6238.
Algorithms for generating and validating one-time codes are described in sufficient detail both in the RFC itself and in numerous implementations for all languages and platforms .
There are examples of implementation both for the server part and for the client part (in case if TOTP uses not a hardware key, but a mobile application). Unfortunately, very often the team may not have the resources to create its own mobile application for generating one-time passwords (I mean the lack of mobile developers to do it yourself or finance for outsource).
In this case, the most common way out is to use a “foreign” application (for example, the same Google Authenticator), but in this case the solution will not be completely its own (this is what the asterisk in the title hints at).
Do you want two-factor authorization completely yours and for a minimum of investments? Then to you under Kat.
Here are detailed instructions for creating a cross-platform mobile application for generating one-time TOTP codes by rfc6238. The cost estimates are described in detail in our previous article - a total of approximately 125 USD. Please note that these costs are solely for publication in the app, and not for the development itself.
The instructions are for Windows, but for other systems the differences are minimal.
What will we use
- MyTOTP HTML5 Template Designed Specifically for This Article
- Adobe account (to use the build.phonegap service)
- The plugin for phonegap is Barcodescanner (in fact, we will simply refer to it in the configs for build.phonegap, the plugin itself does not need to be downloaded). This plugin is necessary for reading QR images when creating a TOTP profile
- Developer accounts for Apple Appstore and Google Play if you publish the application
- Node.js on the local computer - used to connect to the build.phonegap service
Step 1. Install PhoneGap and create an empty application
a) Download and install NodeJS
b) From the command line, run the command
npm install -g phonegapc) Create a folder for the application and navigate to it (“cd C: \ MyApp \”)
d) Run the command
phonegap create my-appAn empty mobile application will be created in the sub-folder my-app (“C: \ MyApp \ my-app”). Remember to go to this folder when you run the build command
Step 2. Copy the HTML5 application template to the phonegap project
Download the zip file from GitHub. Replace the www folder in your project ("C: \ MyApp \ my-app \ www") with the www folder from the archive
Step 3. Connect the Barcodescanner plugin
Add the following line to config.xml:
Attention! For build.phonegap, the config.xml file must be copied to the www folder
Step 4. Build the application
a) Enter phonegap from the command line using the command
phonegap remote loginb) From the command line, go to the project folder ("C: \ MyApp \ my-app", not www ) and run the command
phonegap remote build androidc) Go to build.phonegap.com and download the finished APK file
By default, build.phonegap only creates debug APKs, for release apk and build for iOS you need to add certificates.
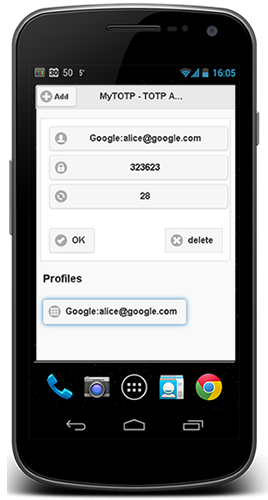
On the video demo application on Android:
Also, as an example, you can familiarize yourself with our Token2 Mobile OTP application . True, unlike MyOTP, the Token2 Mobile OTP application supports, in addition to TOTP, the Mobile-OTP standard and the proprietary Token2 algorithm. If you want and have JavaScript programming skills, you can also add additional algorithms to myTOTP