Apple Metal Graphics Programming Basics: Getting Started
- Tutorial
 Hello, Habr! My post today is a beginner's guide to programming graphics on the Apple Metal API. When I started to deal with this topic, it turned out that in addition to the documentation from Apple and examples from them, there’s nothing special to watch. Today I’ll talk about how to create a simple Metal application that displays a three-dimensional cube with lighting. Then we will draw some cubes using one of the main features of Metal - rendering in multiple threads. Interested, I ask for cat.
Demo application
In order to run the demo , we need a poppy, Xcode 6, as well as a device with an A7 processor (starting with iPad Air 2013 and iPhone 5S). Unfortunately, starting the application for Metal is not possible on the emulator. The last limitation implies the need to have a valid subscription to the developer program for iOS. I understand that these are not small requirements for a simple curious person, and, of course, I do not urge you to buy any of the above. However, if the stars are formed so that you have everything you need, I will be glad to know about the forks from my repository and your own experiments with Metal.
In addition, when reading this manual, I strongly recommend that you look at the demo code in parallel, this will greatly improve understanding of what is happening.
Introduction
I am not a supporter of adding official documentation to translation posts , so let's talk about the nature of Metal in simple words. Apple talked a lot about why Metal is cooler than OpenGL ES (there was a bit about it on the hub ). From all this, I would single out only 2 key advantages:
- Metal significantly reduced the amount of runtime-validation of commands for the GPU, transferring the validation at the time of loading the application or even at the time of compilation. So cached state objects appeared. The idea, frankly, is not new, we saw state objects in Direct3D 10. Thus, in the Metal API, you can pre-prepare and cache almost any state of the graphics pipeline.
- Possibility of parallel calculation and filling of command buffers. The idea here is to shift the process of filling the queue of commands for the GPU to the application developer, since no one knows better than the developer how his scene is rendered, what can be done in parallel and what cannot. At the same time, when working with the Metal API in multiple threads, you should not be afraid to get bogged down in the synchronization processes of threads; the API is designed to simplify the life of the developer as much as possible (or at least not cause an instant panic attack).
In order to start working with Metal, you can create a new project of the “Game” type in Xcode 6, then select Metal as a rendering method in the project creation wizard and ... that’s it. Xcode will generate a template project that will draw a cube. This is exactly how I started creating my demo, since the standard template project did not suit me.
Step 1. Draw a cube with lighting.
The result of this step will be an application in which a single-color cube is displayed, illuminated using the Pancake model. The application will also have an arcball camera that allows us to rotate around an object using the Swipe gesture and zoom in / out with the Zoom gesture .
In Apple’s standard template, all application logic is concentrated in a custom ViewController. I have allocated 2 classes: RenderView and RenderViewContoller . The first class is an inheritor from UIViewand is responsible for initializing Metal and its relationship with Core Animation. The second class contains the graphical demo itself and a certain amount of infrastructure code for handling situations of folding / unfolding applications and user input. It would be more correct to create the RenderModel class and put the logic of the graphic demo there. Perhaps we will do so when the complexity of the program increases.
It will be appropriate here to mention in which language we will create the application. I chose Objective-C ++, which allowed me to include in classes written in pure C ++ in the project. There is also the opportunity to use Swift (a good article in English about this can be read here ).
RenderView implementation
It is unlikely that anyone will be surprised to learn that Metal is closely connected with Core Animation, the system for managing graphics and animation in iOS. To embed Metal in iOS apps, Apple has prepared a special layer called CAMetalLayer . It is this layer that our RenderView will use . RenderView will be initialized as follows:
+ (Class)layerClass
{
    return [CAMetalLayer class];
}
- (void)initCommon
{
    self.opaque = YES;
    self.backgroundColor = nil;
    _metalLayer = (CAMetalLayer *)self.layer;
    _device = MTLCreateSystemDefaultDevice();
    _metalLayer.device = _device;
    _metalLayer.pixelFormat = MTLPixelFormatBGRA8Unorm;
    _metalLayer.framebufferOnly = YES;
    _sampleCount = 1;
    _depthPixelFormat = MTLPixelFormatDepth32Float;
    _stencilPixelFormat = MTLPixelFormatInvalid;
}
In this code, it is easy to find common with other graphical APIs: create the root API class ( MTLDevice in this case), select the formats of the back buffer and depth buffer, select the number of samples for multisampling. Direct texture creation of the back buffer and depth buffer is carried out on demand. This is due to the peculiarity of the combination of Metal and Core Animation. When Core Animation allows drawing on the device’s screen, it returns a non-zero CAMetalDrawable , which is connected to the device’s screen. If the user minimizes the application, then we must take care to stop any rendering, since in this case the CAMetalDrawable for this application will be zero (hello, Direct3D 9 and D3DERR_DEVICELOST) In addition, when switching the device from Portrait to Landscape and vice versa, it is necessary to reinitialize the textures for the back buffer, depth buffer and stencil.
On each frame, the MTLRenderPassDescriptor object is reorganized . This object associates the texture of the back buffer obtained from the current CAMetalDrawable with the desired rendering options. Also, actions that can be additionally performed before and after rendering are set in this object. For example, MTLStoreActionMultisampleResolve says that after rendering to a texture with multisampling, it is necessary to convert this texture to normal. MTLLoadActionClearallows you to clear the back / depth buffer / stencil buffer before drawing a new frame.
The code for creating and reinitializing the texture of the back buffer, depth buffer, and stencil buffer can be found under the cat.
Code for creating and reinitializing textures
- (void)setupRenderPassDescriptorForTexture:(id )texture
{
    if (_renderPassDescriptor == nil)
        _renderPassDescriptor = [MTLRenderPassDescriptor renderPassDescriptor];
    // init/update default render target
    MTLRenderPassColorAttachmentDescriptor* colorAttachment = _renderPassDescriptor.colorAttachments[0];
    colorAttachment.texture = texture;
    colorAttachment.loadAction = MTLLoadActionClear;
    colorAttachment.clearColor = MTLClearColorMake(0.0f, 0.0f, 0.0f, 1.0f);
    if(_sampleCount > 1)
    {
        BOOL doUpdate = (_msaaTexture.width != texture.width) || ( _msaaTexture.height != texture.height) || ( _msaaTexture.sampleCount != _sampleCount);
        if(!_msaaTexture || (_msaaTexture && doUpdate))
        {
            MTLTextureDescriptor* desc = [MTLTextureDescriptor texture2DDescriptorWithPixelFormat: MTLPixelFormatBGRA8Unorm
                                                           width: texture.width
                                                           height: texture.height
                                                           mipmapped: NO];
            desc.textureType = MTLTextureType2DMultisample;
            desc.sampleCount = _sampleCount;
            _msaaTexture = [_device newTextureWithDescriptor: desc];
            _msaaTexture.label = @"Default MSAA render target";
        }
        colorAttachment.texture = _msaaTexture;
        colorAttachment.resolveTexture = texture;
        colorAttachment.storeAction = MTLStoreActionMultisampleResolve;
    }
    else
    {
        colorAttachment.storeAction = MTLStoreActionStore;
    }
    // init/update default depth buffer
    if(_depthPixelFormat != MTLPixelFormatInvalid)
    {
        BOOL doUpdate = (_depthTexture.width != texture.width) || (_depthTexture.height != texture.height) || (_depthTexture.sampleCount != _sampleCount);
        if(!_depthTexture || doUpdate)
        {
            MTLTextureDescriptor* desc = [MTLTextureDescriptor texture2DDescriptorWithPixelFormat: _depthPixelFormat
                                                             width: texture.width
                                                             height: texture.height
                                                             mipmapped: NO];
            desc.textureType = (_sampleCount > 1) ? MTLTextureType2DMultisample : MTLTextureType2D;
            desc.sampleCount = _sampleCount;
            _depthTexture = [_device newTextureWithDescriptor: desc];
            _depthTexture.label = @"Default depth buffer";
            MTLRenderPassDepthAttachmentDescriptor* depthAttachment = _renderPassDescriptor.depthAttachment;
            depthAttachment.texture = _depthTexture;
            depthAttachment.loadAction = MTLLoadActionClear;
            depthAttachment.storeAction = MTLStoreActionDontCare;
            depthAttachment.clearDepth = 1.0;
        }
    }
    // init/update default stencil buffer
    if(_stencilPixelFormat != MTLPixelFormatInvalid)
    {
        BOOL doUpdate = (_stencilTexture.width != texture.width) || (_stencilTexture.height != texture.height) || (_stencilTexture.sampleCount != _sampleCount);
        if (!_stencilTexture || doUpdate)
        {
            MTLTextureDescriptor* desc = [MTLTextureDescriptor texture2DDescriptorWithPixelFormat: _stencilPixelFormat
                                                               width: texture.width
                                                               height: texture.height
                                                               mipmapped: NO];
            desc.textureType = (_sampleCount > 1) ? MTLTextureType2DMultisample : MTLTextureType2D;
            desc.sampleCount = _sampleCount;
            _stencilTexture = [_device newTextureWithDescriptor: desc];
            _stencilTexture.label = @"Default stencil buffer";
            MTLRenderPassStencilAttachmentDescriptor* stencilAttachment = _renderPassDescriptor.stencilAttachment;
            stencilAttachment.texture = _stencilTexture;
            stencilAttachment.loadAction = MTLLoadActionClear;
            stencilAttachment.storeAction = MTLStoreActionDontCare;
            stencilAttachment.clearStencil = 0;
        }
    }
}
The render method of the RenderView class will be called on every frame from the RenderViewController .
RenderViewController implementation
The description of the implementation of this class will begin with the infrastructure part. In order to call the method for rendering a frame from RenderView , we need a timer, an object of the CADisplayLink class , which we initialize as follows:
- (void)startTimer
{
    _timer = [CADisplayLink displayLinkWithTarget:self selector:@selector(_renderloop)];
    [_timer addToRunLoop:[NSRunLoop mainRunLoop] forMode:NSDefaultRunLoopMode];
}
It is important to note that we will stop the timer when minimizing the application and resume when expanding. To do this, I forwarded calls to applicationDidEnterBackground and applicationWillEnterForeground from AppDelegate to RenderViewContoller . This ensures that our application does not try to render anything when minimized and does not crash for this reason.
In addition, we initialize a special semaphore ( dispatch_semaphore_t _inflightSemaphore) This will allow us to avoid the so-called GPU Bound, that is, a situation where the central processor is waiting for the GPU to form the next frame. We will allow our CPU to prepare several frames in advance (up to 3 frames in our case) in order to minimize its idle time while waiting for the GPU. The technique of using semaphore will be discussed later.
We will intercept user input using the implementation of the touchesBegan , touchesMoved and touchesEnded methods . The movements of one or more fingers on the screen will be passed to the ArcballCamera class , which will transform these movements into turns and camera movements.
The response code for user input under the cat.
User Input Response
- (void)touchesBegan:(NSSet *)touches withEvent:(UIEvent *)event
{
    NSArray* touchesArray = [touches allObjects];
    if (touches.count == 1)
    {
        if (!camera.isRotatingNow())
        {
            CGPoint pos = [touchesArray[0] locationInView: self.view];
            camera.startRotation(pos.x, pos.y);
        }
        else
        {
            // here we put second finger
            simd::float2 lastPos = camera.getLastFingerPosition();
            camera.stopRotation();
            CGPoint pos = [touchesArray[0] locationInView: self.view];
            float d = vector_distance(simd::float2 { (float)pos.x, (float)pos.y }, lastPos);
            camera.startZooming(d);
        }
    }
    else if (touches.count == 2)
    {
        CGPoint pos1 = [touchesArray[0] locationInView: self.view];
        CGPoint pos2 = [touchesArray[1] locationInView: self.view];
        float d = vector_distance(simd::float2 { (float)pos1.x, (float)pos1.y },
                                  simd::float2 { (float)pos2.x, (float)pos2.y });
        camera.startZooming(d);
    }
}
- (void)touchesMoved:(NSSet *)touches withEvent:(UIEvent *)event
{
    NSArray* touchesArray = [touches allObjects];
    if (touches.count != 0 && camera.isRotatingNow())
    {
        CGPoint pos = [touchesArray[0] locationInView: self.view];
        camera.updateRotation(pos.x, pos.y);
    }
    else if (touches.count == 2 && camera.isZoomingNow())
    {
        CGPoint pos1 = [touchesArray[0] locationInView: self.view];
        CGPoint pos2 = [touchesArray[1] locationInView: self.view];
        float d = vector_distance(simd::float2 { (float)pos1.x, (float)pos1.y },
                                  simd::float2 { (float)pos2.x, (float)pos2.y });
        camera.updateZooming(d);
    }
}
- (void)touchesEnded:(NSSet *)touches withEvent:(UIEvent *)event
{
    camera.stopRotation();
    camera.stopZooming();
}
You can read about the theory of arcball camera implementation here .
Finally, let's move on to the logic of the graphical application itself, which is contained in 5 main methods:
- (void)configure:(RenderView*)renderView
Here we configure the view by setting, for example, the number of samples for multisampling, the formats of the back buffer, depth buffer and stencil.
- (void)setupMetal:(id)device
In this method, we create a command queue, initialize resources, load shaders, and prepare state objects.
- (void)update
Here, the frame is updated, the matrices and other parameters for the shaders are calculated.
- (void)render:(RenderView*)renderView
Here, obviously, the frame itself is being rendered.
- (void)resize:(RenderView*)renderView
This method is called when the screen is resized, for example, when the device is rotated, when the length and width are interchanged. Here it is convenient to calculate, for example, the projection matrix.
What are the features when initializing resources and state objects in Metal? For me, accustomed to the Direct3D 11 API, there was only one serious one. Since the CPU can manage to send up to 3 frames for rendering before synchronization with the GPU, the buffer size for the constants should be three times larger than usual. Each of the three frames works with its own piece of constant buffer, to exclude the possibility of data grinding. In practice, it looks like this:
// Заполнение
uint8_t* bufferPointer = (uint8_t*)[_dynamicUniformBuffer contents] +
                                      (sizeof(uniforms_t) * _currentUniformBufferIndex);
memcpy(bufferPointer, &_uniform_buffer, sizeof(uniforms_t));
// Использование
[renderEncoder setVertexBuffer:_dynamicUniformBuffer
                          offset:(sizeof(uniforms_t) * _currentUniformBufferIndex) atIndex:1 ];
Still, perhaps, it is worth mentioning the classes MTLRenderPipelineDescriptor and MTLRenderPipelineState , which defines the state handle of the graphics pipeline and the state object itself. This object includes links to vertex and pixel shaders, the number of multisample samples, the format of the back buffer and the depth buffer. Stop, it seems we have already asked this somewhere. Everything is exactly as it seems. This state is imprisoned for very specific rendering parameters, and cannot be used under other circumstances. By creating such an object in advance (and after validation), we eliminate the need for the graphics pipeline to check for parameter compatibility errors during rendering; the pipeline either accepts the entire state or rejects it entirely.
Metal initialization code is given below.
- (void)setupMetal:(id)device
{
    _commandQueue = [device newCommandQueue];
    _defaultLibrary = [device newDefaultLibrary];
    [self loadAssets: device];
}
- (void)loadAssets:(id)device
{
    _dynamicUniformBuffer = [device newBufferWithLength:MAX_UNIFORM_BUFFER_SIZE options:0];
    _dynamicUniformBuffer.label = @"Uniform buffer";
    id  fragmentProgram = [_defaultLibrary newFunctionWithName:@"psLighting"];
    id  vertexProgram = [_defaultLibrary newFunctionWithName:@"vsLighting"];
    _vertexBuffer = [device newBufferWithBytes:(Primitives::cube())
                                        length:(Primitives::cubeSizeInBytes())
                                       options:MTLResourceOptionCPUCacheModeDefault];
    _vertexBuffer.label = @"Cube vertex buffer";
    // pipeline state
    MTLRenderPipelineDescriptor *pipelineStateDescriptor = [[MTLRenderPipelineDescriptor alloc] init];
    pipelineStateDescriptor.label = @"Simple pipeline";
    [pipelineStateDescriptor setSampleCount: ((RenderView*)self.view).sampleCount];
    [pipelineStateDescriptor setVertexFunction:vertexProgram];
    [pipelineStateDescriptor setFragmentFunction:fragmentProgram];
    pipelineStateDescriptor.colorAttachments[0].pixelFormat = MTLPixelFormatBGRA8Unorm;
    pipelineStateDescriptor.depthAttachmentPixelFormat = MTLPixelFormatDepth32Float;
    NSError* error = NULL;
    _pipelineState = [device newRenderPipelineStateWithDescriptor:pipelineStateDescriptor error:&error];
    if (!_pipelineState) {
        NSLog(@"Failed to created pipeline state, error %@", error);
    }
    MTLDepthStencilDescriptor *depthStateDesc = [[MTLDepthStencilDescriptor alloc] init];
    depthStateDesc.depthCompareFunction = MTLCompareFunctionLess;
    depthStateDesc.depthWriteEnabled = YES;
    _depthState = [device newDepthStencilStateWithDescriptor:depthStateDesc];
}
Finally, consider the most intriguing piece of code, rendering a frame.
- (void)render:(RenderView*)renderView
{
    dispatch_semaphore_wait(_inflightSemaphore, DISPATCH_TIME_FOREVER);
    [self update];
    MTLRenderPassDescriptor* renderPassDescriptor = renderView.renderPassDescriptor;
    id  drawable = renderView.currentDrawable;
    // new command buffer
    id  commandBuffer = [_commandQueue commandBuffer];
    commandBuffer.label = @"Simple command buffer";
    // simple render encoder
    id  renderEncoder = [commandBuffer renderCommandEncoderWithDescriptor: renderPassDescriptor];
    renderEncoder.label = @"Simple render encoder";
    [renderEncoder setDepthStencilState:_depthState];
    [renderEncoder pushDebugGroup:@"Draw cube"];
    [renderEncoder setRenderPipelineState:_pipelineState];
    [renderEncoder setVertexBuffer:_vertexBuffer offset:0 atIndex:0 ];
    [renderEncoder setVertexBuffer:_dynamicUniformBuffer offset:(sizeof(uniforms_t) * _currentUniformBufferIndex) atIndex:1 ];
    [renderEncoder drawPrimitives:MTLPrimitiveTypeTriangle vertexStart:0 vertexCount:36 instanceCount:1];
    [renderEncoder popDebugGroup];
    [renderEncoder endEncoding];
    __block dispatch_semaphore_t block_sema = _inflightSemaphore;
    [commandBuffer addCompletedHandler:^(id buffer) {
        dispatch_semaphore_signal(block_sema);
    }];
    _currentUniformBufferIndex = (_currentUniformBufferIndex + 1) % MAX_INFLIGHT_BUFFERS;
    [commandBuffer presentDrawable:drawable];
    [commandBuffer commit];
}
At the beginning of the method, dispatch_semaphore_wait is called , which stops the frame calculation on the CPU until the GPU finishes with one of the current frames. As I said, in our demo the CPU is allowed to calculate up to 3 frames while the GPU is busy. The semaphore is released in the addCompletedHandler method of the commandBuffer command buffer . The command buffer is designed as a transient object, that is, it must be created every frame and cannot be reused.
Each frame for a particular buffer creates a so-called encoder of rendering commands (in this case, an object of the MTLRenderCommandEncoder class ). When creating it, an object of class MTLRenderPassDescriptor is used.which we discussed above. This object allows filling the buffer with various kinds of commands (setting states, vertex buffers, calling primitive drawing methods, that is, everything that is familiar from other graphical APIs). When filling is complete , the commit method is called for the command buffer , which sends this buffer to the queue.
There is nothing unusual in the shader code, an elementary implementation of lighting according to Blinn. For Metal, Apple engineers came up with their own shader language, which is not very different from HLSL, GLSL, and Cg. Those who at least once wrote shaders in one of these languages will easily start using this language, for the rest I recommend Apple’s language guide .
Shader code
#include
#include
using namespace metal;
constant float3 lightDirection = float3(0.5, -0.7, -1.0);
constant float3 ambientColor = float3(0.18, 0.24, 0.8);
constant float3 diffuseColor = float3(0.4, 0.4, 1.0);
constant float3 specularColor = float3(0.3, 0.3, 0.3);
constant float specularPower = 30.0;
typedef struct
{
    float4x4 modelViewProjection;
    float4x4 model;
    float3 viewPosition;
} uniforms_t;
typedef struct
{
    packed_float3 position;
    packed_float3 normal;
    packed_float3 tangent;
} vertex_t;
typedef struct
{
    float4 position [[position]];
    float3 tangent;
    float3 normal;
    float3 viewDirection;
} ColorInOut;
// Vertex shader function
vertex ColorInOut vsLighting(device vertex_t* vertex_array [[ buffer(0) ]],
                             constant uniforms_t& uniforms [[ buffer(1) ]],
                             unsigned int vid [[ vertex_id ]])
{
    ColorInOut out;
    float4 in_position = float4(float3(vertex_array[vid].position), 1.0);
    out.position = uniforms.modelViewProjection * in_position;
    float4x4 m = uniforms.model;
    m[3][0] = m[3][1] = m[3][2] = 0.0f; // suppress translation component
    out.normal = (m * float4(normalize(vertex_array[vid].normal), 1.0)).xyz;
    out.tangent = (m * float4(normalize(vertex_array[vid].tangent), 1.0)).xyz;
    float3 worldPos = (uniforms.model * in_position).xyz;
    out.viewDirection = normalize(worldPos - uniforms.viewPosition);
    return out;
}
// Fragment shader function
fragment half4 psLighting(ColorInOut in [[stage_in]])
{
    float3 normalTS = float3(0, 0, 1);
    float3 lightDir = normalize(lightDirection);
    float3x3 ts = float3x3(in.tangent, cross(in.normal, in.tangent), in.normal);
    float3 normal = -normalize(ts * normalTS);
    float ndotl = fmax(0.0, dot(lightDir, normal));
    float3 diffuse = diffuseColor * ndotl;
    float3 h = normalize(in.viewDirection + lightDir);
    float3 specular = specularColor * pow (fmax(dot(normal, h), 0.0), specularPower);
    float3 finalColor = saturate(ambientColor + diffuse + specular);
    return half4(float4(finalColor, 1.0));
}
As a result, on the screen of our device you can see the following.

This concludes the first step of the guide. The code for this step is available in the git repository under the tag tutorial_1_1 .
Step 2. Draw some cubes.
In order to draw several cubes, you need to change our constant buffer. Previously, the parameters (world-view-projection matrix, world matrix and camera position) were stored in it for only one object, now this data must be set for all objects. Obviously, it is enough to transfer the camera position once, for this you will need an additional constant buffer for parameters that are calculated 1 time per frame. However, I have not yet started creating a separate buffer for one vector, we will do it the next time when the number of parameters increases. You can try to do it yourself now. Thus, for 5 cubes, we will have 5 sets of parameters for each of the 3 frames that the CPU can manage to calculate until it is synchronized with the GPU.
We will change the rendering method as follows:
    id  renderEncoder = [commandBuffer renderCommandEncoderWithDescriptor: renderPassDescriptor];
    renderEncoder.label = @"Simple render encoder";
    [renderEncoder setDepthStencilState:_depthState];
    [renderEncoder pushDebugGroup:@"Draw cubes"];
    [renderEncoder setRenderPipelineState:_pipelineState];
    [renderEncoder setVertexBuffer:_vertexBuffer offset:0 atIndex:0 ];
    for (int i = 0; i < CUBE_COUNTS; i++)
    {
        [renderEncoder setVertexBuffer:_dynamicUniformBuffer
                                offset:(sizeof(_uniform_buffer) * _currentUniformBufferIndex + i * sizeof(uniforms_t))
                               atIndex:1 ];
        [renderEncoder drawPrimitives:MTLPrimitiveTypeTriangle vertexStart:0 vertexCount:36 instanceCount:1];
    }
    [renderEncoder popDebugGroup];
    [renderEncoder endEncoding];
I want to draw your attention to the calculation of the offset in the constant buffer ( sizeof (_uniform_buffer) * _currentUniformBufferIndex + i * sizeof (uniforms_t) ). The variable _currentUniformBufferIndex defines the block corresponding to the current frame, and counter i determines where the data for a particular cube is located.
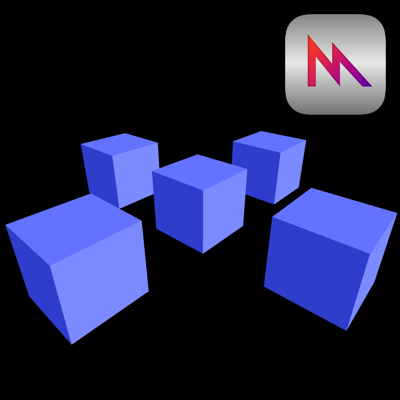
As a result, we get about such a picture.

The code for this step is available in the git repository under the tag tutorial_1_2 .
Step 3. We draw some cubes in several flows.
We can draw cubes in one stream also on OpenGL ES, now we will add the filling of the command buffer in several threads to the demo. Let half the cubes be rendered in one stream and the other half in the other. The example, of course, is purely educational, in this case we will not get any performance gain from this.
For multi-threaded filling of the command buffer in the Metal API there is a special class MTLParallelRenderCommandEncoder . This class allows you to create arbitrarily many objects of the MTLRenderCommandEncoder class , which we already know from the previous steps. Each of these objects allows you to execute code to fill the buffer with commands in a separate thread.
Using dispatch_async, we will start rendering half of the cubes in a separate stream, the second half will be rendered in the main stream. As a result, we get the following code:
- (void)render:(RenderView*)renderView
{
    dispatch_semaphore_wait(_inflightSemaphore, DISPATCH_TIME_FOREVER);
    [self update];
    MTLRenderPassDescriptor* renderPassDescriptor = renderView.renderPassDescriptor;
    id  drawable = renderView.currentDrawable;
    // new command buffer
    id  commandBuffer = [_commandQueue commandBuffer];
    commandBuffer.label = @"Simple command buffer";
    // parallel render encoder
    id  parallelRCE = [commandBuffer parallelRenderCommandEncoderWithDescriptor:renderPassDescriptor];
    parallelRCE.label = @"Parallel render encoder";
    id  rCE1 = [parallelRCE renderCommandEncoder];
    id  rCE2 = [parallelRCE renderCommandEncoder];
    dispatch_async(dispatch_get_global_queue(DISPATCH_QUEUE_PRIORITY_DEFAULT, 0), ^
    {
        @autoreleasepool
        {
            [self encodeRenderCommands: rCE2
                               Comment: @"Draw cubes in additional thread"
                            StartIndex: CUBE_COUNTS / 2
                              EndIndex: CUBE_COUNTS];
        }
        dispatch_semaphore_signal(_renderThreadSemaphore);
    });
    [self encodeRenderCommands: rCE1
                       Comment: @"Draw cubes"
                    StartIndex: 0
                      EndIndex: CUBE_COUNTS / 2];
    // wait additional thread and finish encoding
    dispatch_semaphore_wait(_renderThreadSemaphore, DISPATCH_TIME_FOREVER);
    [parallelRCE endEncoding];
    __block dispatch_semaphore_t block_sema = _inflightSemaphore;
    [commandBuffer addCompletedHandler:^(id buffer) {
        dispatch_semaphore_signal(block_sema);
    }];
    _currentUniformBufferIndex = (_currentUniformBufferIndex + 1) % MAX_INFLIGHT_BUFFERS;
    [commandBuffer presentDrawable:drawable];
    [commandBuffer commit];
}
- (void)encodeRenderCommands:(id )renderEncoder
                     Comment:(NSString*)comment
                  StartIndex:(int)startIndex
                    EndIndex:(int)endIndex
{
    [renderEncoder setDepthStencilState:_depthState];
    [renderEncoder pushDebugGroup:comment];
    [renderEncoder setRenderPipelineState:_pipelineState];
    [renderEncoder setVertexBuffer:_vertexBuffer offset:0 atIndex:0 ];
    for (int i = startIndex; i < endIndex; i++)
    {
        [renderEncoder setVertexBuffer:_dynamicUniformBuffer
                                offset:(sizeof(_uniform_buffer) * _currentUniformBufferIndex + i * sizeof(uniforms_t))
                               atIndex:1 ];
        [renderEncoder drawPrimitives:MTLPrimitiveTypeTriangle vertexStart:0 vertexCount:36 instanceCount:1];
    }
    [renderEncoder popDebugGroup];
    [renderEncoder endEncoding];
}
To synchronize the main and additional threads, I used the _renderThreadSemaphore semaphore , which synchronizes these two threads immediately before calling endEncoding on an object of the MTLParallelRenderCommandEncoder class . MTLParallelRenderCommandEncoder requires that the endEncoding method is guaranteed to be called after endEncoding calls on the objects it generates from the MTLRenderCommandEncoder class .
If everything was done correctly, then the result on the device screen will be the same as in the previous step.
The code for this step is available in the git repository under the tag tutorial_1_3 .
Conclusion
Today we looked at the very initial steps in programming graphics using the Apple Metal API. If this topic and this format will be interesting to the community, then we will continue. In the next series, I plan to draw a more interesting model, we use the index buffer and texture it. As a "chip" of the lesson will be something like instansing. Waiting for your feedback, thank you for your attention.