How did we connect DigitalOcean before Christmas
The Christmas period turned out to be full and interesting for us. In a month with a little, we were able to prepare the second release of Deploy4Me and enter the New Year with new plans. The Deploy4Me release brought significant replenishment to the service. We added support for DigitalOcean, got hold of beautiful pictures and slightly changed the visual accompaniment. Now it’s even easier to try the service and get your server in the cloud.
Integration with DigitalOcean was not as elegant as we expected and not as simple as the creators of this cloud platform stated. As it turned out, not all tested APIs are tested the same way. I would like to share this knowledge - all of a sudden, someone will help when choosing a site.
Let me remind you that Deploy4Me is a service for deploying business software to the clouds. The knowledge of cloud providers and integration with them is our bread and urgent need. Among the tasks that the service solves are the tasks of creating virtual machines, network and security settings. That is why the experience of integration with DigitalOcean is associated with these three tasks. But first things first.
It all started with the publication of a previous articlewhen kind people asked for more clouds. Choosing one of the popular providers, we decided to connect DigitalOcean. The company is young, ambitious, as it seemed to us, and rapidly growing. They declare attention to developers and provide an API for almost all programming languages. Documentation is available, and OAuth support strongly attracted from experience integrating with Amazon, finding user credentials can be a very repulsive moment. So, the work began to boil.
About OAuth
For developers, DigitalOcean offers, in addition to connecting via a login / password pair, OAuth tokens for working with the API. In the control panel, you can register the URL of your application and get a unique pair of Client ID / Client Secret and a link for the user. Through the link, the user will allow the connection, and the application will receive an authorization code. This code and a pair of Client ID / Client Secret will allow you to get an OAuth token. The token provides an opportunity for 30 days to connect on behalf of the user to the site and create virtual machines. Refresh Token is given along with the token to extend the token's validity. So, the connection to DigitalOcean can be kept active and renewed indefinitely, until the user revokes the rights.
The OAuth token, by the way, is passed when the API is called in plain text as an HTTP header. We did not notice any restrictions on its use. So, all hope for HTTPS.
For ourselves, we registered three applications, one for each of the test environments. They downloaded the client, developed the integration, and ... communication with support began.
About API
DigitalOcean is actively developing. There is much to develop, since the API is a dozen REST methods for the main tasks of the cloud. In general, it is surprising how scanty the API will turn out if you remove the mention of security from the hosting site. In comparison, 80% of our code for Amazon is about security, network, firewall, and DNS.
The development of the API leads to annoying errors in the official DigitalOcean client. So the release of API version 2 affected the stability of client libraries. Fortunately, the code is open, and after three hours of extensive study of the documentation, we forked and fixed the client under .NET and wrote one scary crutch for Ruby.
It is worth saying that support turned out to be at its best even in Catholic Christmas - there is help from the community, and this is the most important thing.
About CloudFlare
For three days we tested without surprises. On the fourth, all Wednesdays collapsed. Stable OAuth and the young API also stopped working. Denial of service and authorization errors went. Support stubbornly asked for details and pointed a finger at us. We understood - here it is, a turning point. Then either victory or a complete rejection of integration.
After a meaningless wandering around the provider's site, an unexpected window popped up. CloudFlare notified that the page was about to load and offered to check if you were a robot. Puzzled looking at this message, we climbed to read about this newfangled service. It turned out that a few days before the new year DO decided to connect CloudFlare. I don’t know if they had DDOS or just wanted a CDN. But this had a detrimental effect on the APIs.
Having found the reason for all the evils, with victorious cries, we began to encourage support staff from the country of Kaa and Sherkhan to turn off our art and quickly. They didn’t believe it. They called for help from the country of bald eagles. Those two calls did turn off CloudFlare for the API and we breathed a sigh of relief.
In the course of communication, a strange fact was revealed. The guys from DO are somehow close to Rackspace. Someone worked there, someone wrote comments to them, someone committed the code. Adding almost identical error messages to this, we hit conspiracy thesis. There was a feeling that DO is a beautiful rebranding of Rackspace for the American market. There is no evidence for this, therefore nothing can be proved.
About security
Cloud Security DO is from the field of activity. That is, it is at your discretion. The provider does not provide a firewall, does not provide network gateways, and does not close the server from the Internet. Of the solutions proposed in the documentation, the only sound grain: configure iptables on each server and start all requests through a separate machine with a proxy server.
But their hosting is cheap ...
And lastly:
How to connect DigitalOcean to a project on Deploy4Me?
To put the server in DO, go to Deploy4Me , log in, click Start New Deployment . Having invented the sonorous name of the project, we connect the cloud:

OAuth is a great thing, it greatly simplifies life. Scrolling through three screens is easier than looking for keys in the bowels of the provider. But there is a price to everything: simpler - not always safer.
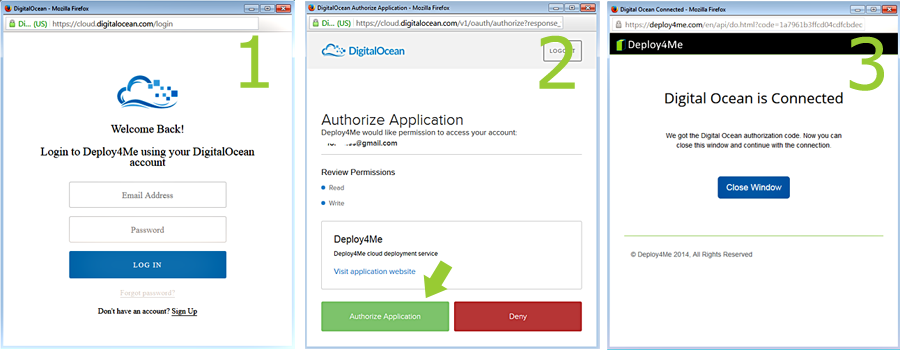
After closing the window for connecting to DO, an authorization code is immediately added, which can be seen on the screen below. This is the code we use to get the OAuth token.

The last action required is to click the Contune button. It will save and verify the connection is correct. Then you can continue the installation of the project.

What's next?
As always, the rest is more software and cloud providers. We have updated the system proposals and suggestions, so we are pleased to voting for the software and offers a feature there , or here in the comments.
Thanks for reading
And we also have free loans at registration and for the community. Write articles, send a link to the community and get free credits on the server.