Pebble: working with static graphics using the example of creating a 7-segment watchface
- Tutorial
 All applications for Pebble watches are divided into two watchapp categories - just applications, and watchface - watch applications, which, based on the name, are the face of the device. The difference between the “faces” is the lack of reaction to the hardware buttons, as “UP” and “DOWN” are used to cycle through the installed watchface .
 But, probably, due to the low resolution of the screen 144x168 px, it’s rather difficult to find a watchface that fits in with the watch’s design, which at the same time fulfills its main function - counting the time.
It seems to me that numbers in the style of seven-segment indicators look best on such a screen.
Below, more on how to add to your watchfaceelegant minimalism, personality and unique features.
So, a few pictures, snippets of code and, as a result, a link to the finished project.
The creation of a watchface, the structure and construction of a project are described in detail in the corresponding section of the Build Your Own Watchface documentation [1] . I won’t repeat myself, but I’ll go straight to
Features
What will distinguish our application from a dozen and a half from Examples and hundreds from mypebblefaces :
- font close to 7-segment indicators;
- two screens :
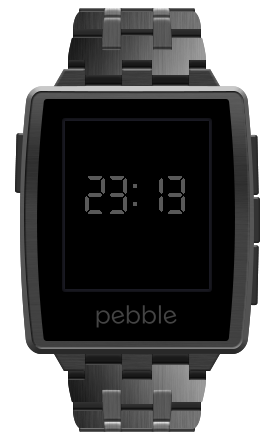
- the main "standby" screen, economical and minimalistic, updated once a minute, shows the current time;
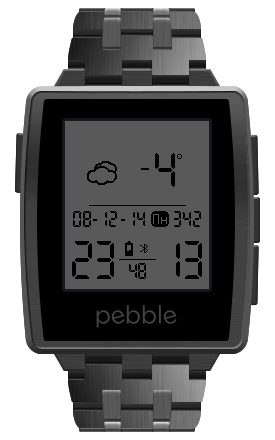
- additional “info” screen, extended information: current time with seconds, date, day of the week, weather forecast (where would it be without it).
- switching between screens with a gesture (shaking with a brush) ;
- automatic transition to "standby" ;
- Display battery status and bluetooth connection .
First things first:
7-segment font
To display the numbers you will need two sets, the main large (20x38px digit), for the time:

and an extra small one (digit 8x16px), for date and seconds:

Both sets are rendered in a graphical editor as a two-color png file.
We connect them as resources in appinfo.json :
  "resources": {
    "media": [
      {
        "type": "png",
        "name": "DIGITS",
        "file": "images/digits.png"
      },
      {
        "type": "png",
        "name": "DIGITS_MIDI",
        "file": "images/digits_midi.png"
      }
    ]
The graphical framework is described in the documentation [2] . We are interested in the section on working with raster images [3] .
The preparatory steps for working with the raster, the creation of the resource we take out in a separate function:
/*...*/
static GBitmap *bmp_digits;
static GBitmap *bmp_digits_midi;
/*..*/
static void load_resources() {
    bmp_digits = gbitmap_create_with_resource(RESOURCE_ID_DIGITS);
    bmp_digits_midi = gbitmap_create_with_resource(RESOURCE_ID_DIGITS_MIDI);
}
/*..*/
static void window_load(Window *window) {
    load_resources();
}
do not forget to free resources:
static void destroy_resources() {
    gbitmap_destroy(bmp_digits);
    gbitmap_destroy(bmp_digits_midi);
}
/*..*/
static void window_unload(Window *window) {
    destroy_resources();
}
The sets of numbers are read from the resources and created in the form of a raster in memory, now we need the function of drawing a separate figure, when calling the function, we specify the graphic context on which we will draw, the initial set from which we must “tear out” the image and the serial number of the image in the set:
/*
ctx - графический контекст;
sources - исходное изображение;
bounces - координаты и размер изображения для отрисовки;
number - порядковый номер изображения в наборе.
*/
static void draw_picture(GContext* ctx, GBitmap **sources, GRect bounces,
                         int number) {
    GPoint origin = bounces.origin;
    bounces.origin = GPoint(bounces.size.w*number, 0);
    GBitmap* temp = gbitmap_create_as_sub_bitmap(*sources, bounces);
    bounces.origin = origin;
    graphics_draw_bitmap_in_rect(ctx, temp, bounces);
    gbitmap_destroy(temp);
}
and for example, to draw a triple at the coordinates (10, 0) in context:
draw_picture(ctx, &bmp_digits, GRect(10, 0, 20, 38), 3);
to content
Two screens
Since we will have two independent screens, each with its own content, we implement them in the form of separate layers, the size of a watch’s screen:
/*..*/
static Layer *standby_layer;
static Layer *info_layer;
/*..*/
static void window_load(Window *window) {
    Layer *window_layer = window_get_root_layer(window);
    GRect bounds = layer_get_bounds(window_layer);
    load_resources();
    standby_layer = layer_create(bounds);
    layer_add_child(window_layer, standby_layer);
    info_layer = layer_create(bounds);
    layer_add_child(window_layer, info_layer);
}
We switch the screens between the “Tick Timer” service handler:
/*..*/
int current_screen = 0;
/*..*/
static void tick_handler(struct tm *tick_time, TimeUnits units_changed) {
    // Каждую минуту помечаем "standby" для отрисовки
    if (units_changed & MINUTE_UNIT) {
        layer_mark_dirty(standby_layer);
    };
    switch (current_screen) {
        case 0:
            // Если слой "standby" скрыт, делаем его видимым и убираем "info"
            if (layer_get_hidden(standby_layer)) {
                layer_set_hidden(info_layer, true);
                layer_set_hidden(standby_layer, false);
            };
            break;
        case 1:
            layer_mark_dirty(info_layer);
            // Если слой "info" скрыт, делаем его видимым и убираем "standby"
            if (layer_get_hidden(info_layer)) {
                layer_set_hidden(standby_layer, true);
                layer_set_hidden(info_layer, false);
                // В зависимости от настройки запускаем таймер возврата на "standby"
                if (settings.s_auto) {
                    standby_timer = app_timer_register(30000, timer_callback, NULL);
                };
            };
            break;
    };
}
static void init(void) {
    /*..*/
    tick_timer_service_subscribe(SECOND_UNIT, tick_handler);
}
So we came to the point that we already need to draw content on the screens. For example, the code for displaying content on the standby screen is a digital dial.
First, let's set the rendering function for the “standby_layer” layer, which is automatically called when necessary:
static void window_load(Window *window) {
    standby_layer = layer_create(bounds);
    layer_add_child(window_layer, standby_layer);
    layer_set_update_proc(standby_layer, update_standby);
}
and implement content rendering:
update_standby
static void update_standby(Layer *layer, GContext* ctx) {
    GRect bounds = layer_get_bounds(layer);
    // Цвет фона - черный
    graphics_context_set_fill_color(ctx, GColorBlack);
    // Режим композитинга - инвернтный
    graphics_context_set_compositing_mode(ctx, GCompOpAssignInverted);
    // Заливаем слой
    graphics_fill_rect(ctx, bounds, 0, GCornerNone);
    time_t temp = time(NULL);
    struct tm *tick_time = localtime(&temp);
    int hour_dicker = tick_time->tm_hour/10;
    int hour_unit = tick_time->tm_hour%10;
    int min_dicker = tick_time->tm_min/10;
    int min_unit = tick_time->tm_min%10;
    // Рисуем цифры
    draw_picture(ctx, &bmp_digits, GRect(20, 55, 20, 38), hour_dicker);
    draw_picture(ctx, &bmp_digits, GRect(42, 55, 20, 38), hour_unit);
    draw_picture(ctx, &bmp_digits, GRect(78, 55, 20, 38), min_dicker);
    draw_picture(ctx, &bmp_digits, GRect(100, 55, 20, 38), min_unit);
    // Рисуем разделитель
    graphics_context_set_fill_color(ctx, GColorWhite);
    GRect frame = (GRect) {
        .origin = GPoint(bounds.size.w/2-4, 63),
        .size = GSize(4, 4)
    };
    graphics_fill_rect(ctx, frame, 0, GCornerNone);
    frame = (GRect) {
        .origin = GPoint(bounds.size.w/2-4, 81),
        .size = GSize(4, 4)
    };
    graphics_fill_rect(ctx, frame, 0, GCornerNone);
}
Result:
similarly, using draw_picture we draw an information screen, more in the source .
Result: go
to content
Switch between screens
To switch the screens we use the built-in accelerometer [4] . To do this, subscribe to the “Tap Event Service”:
static void tap_handler(AccelAxisType axis, int32_t direction) {
    current_screen = !current_screen;
}
static void init(void) {
   /*...*/
  tick_timer_service_subscribe(SECOND_UNIT, tick_handler);
  accel_tap_service_subscribe(tap_handler);
}
to content
Going to standby
To automatically switch to the standby screen, use the timer [4] .
/*..*/
AppTimer *standby_timer = NULL;
/*..*/
static void timer_callback() {
  current_screen = 0;
}
static void tick_handler(struct tm *tick_time, TimeUnits units_changed) {
    /*..*/
        case 1:
            layer_mark_dirty(info_layer);
            // Если слой "info" скрыт, делаем его видимым и убираем "standby"
            if (layer_get_hidden(info_layer)) {
                layer_set_hidden(standby_layer, true);
                layer_set_hidden(info_layer, false);
                // В зависимости от настройки запускаем таймер возврата на "standby"
                if (settings.s_auto) {
                    standby_timer = app_timer_register(30000, timer_callback, NULL);
                };
            };
            break;
    /*..*/
}
to content
Battery and bluetooth status
To display the state of the battery [6], create a resource with images corresponding to tens of percent (with such accuracy, the API gives the amount of charge):

"resources": {
    "media": [
    /*..*/
      {
        "type": "png",
        "name": "BATTERY",
        "file": "images/battery.png"
      },
    /*..*/
    ]
  }
And draw on the appropriate screen:
    /*..*/
    BatteryChargeState charge_state = battery_state_service_peek();
    int bat_percent = charge_state.charge_percent/10;
    if (charge_state.is_charging) {
        bat_percent = 110/10;
    };
    draw_picture(ctx, &bmp_battery, GRect(0, 0, 8, 15), bat_percent);
    /*..*/
The status of bluetooth [7] is displayed by the corresponding icon:
"resources": {
    "media": [
    /*..*/
      {
        "type": "png",
        "name": "BT",
        "file": "images/bluetooth.png"
      },
    /*..*/
    ]
  }
    if (bluetooth_connection_service_peek()) {
        draw_picture(ctx, &bmp_bt, GRect(0, 0, 8, 15), 0);
    };
to contents
Summary: watchface, which most of the time does not annoy with excessive information, is readable and fairly watchable, if desired, shares extended information.
For those interested:
Bitbucket
App Code on the Pebble App Store
1. Pebble Developers // Build Your Own Watchface
2. Pebble Developers // Graphics
3. Pebble Developers // Graphics Types
4. Pebble Developers // Detecting Acceleration
5. Pebble Developers // Timer
6. Pebble Developers // Measuring Battery Level
7. Pebble Developers // Managing Bluetooth Events