2D shadows at Signed Distance Fields
- Transfer
Now that we know the basics of combining signed distance functions, you can use them to create cool things. In this tutorial, we will apply them for rendering soft two-dimensional shadows. If you have not read my previous tutorials about distance fields with a sign (signed distance fields, SDF), then I highly recommend you study them, starting with the tutorial on creating simple shapes .

[Additional artifacts appeared in GIF during recompression.]
I created a simple configuration with a room, it uses the techniques described in previous tutorials. Earlier, I did not mention that I used the function for vector2
We will copy the 2D_SDF.cginc file from the previous tutorial into one folder with the shader, which we will write in this tutorial.
If we still used the visualization technique from the previous tutorial, the figure would look like this:
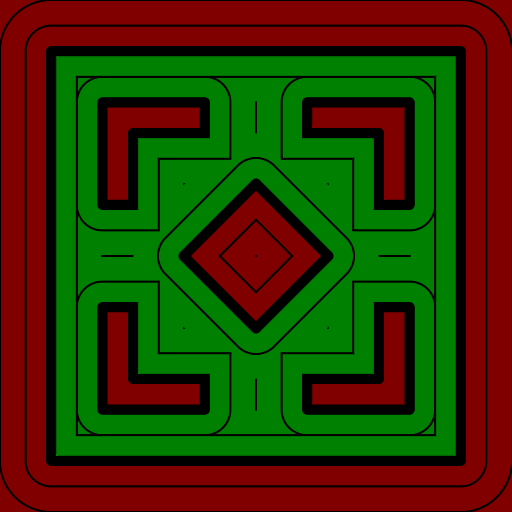
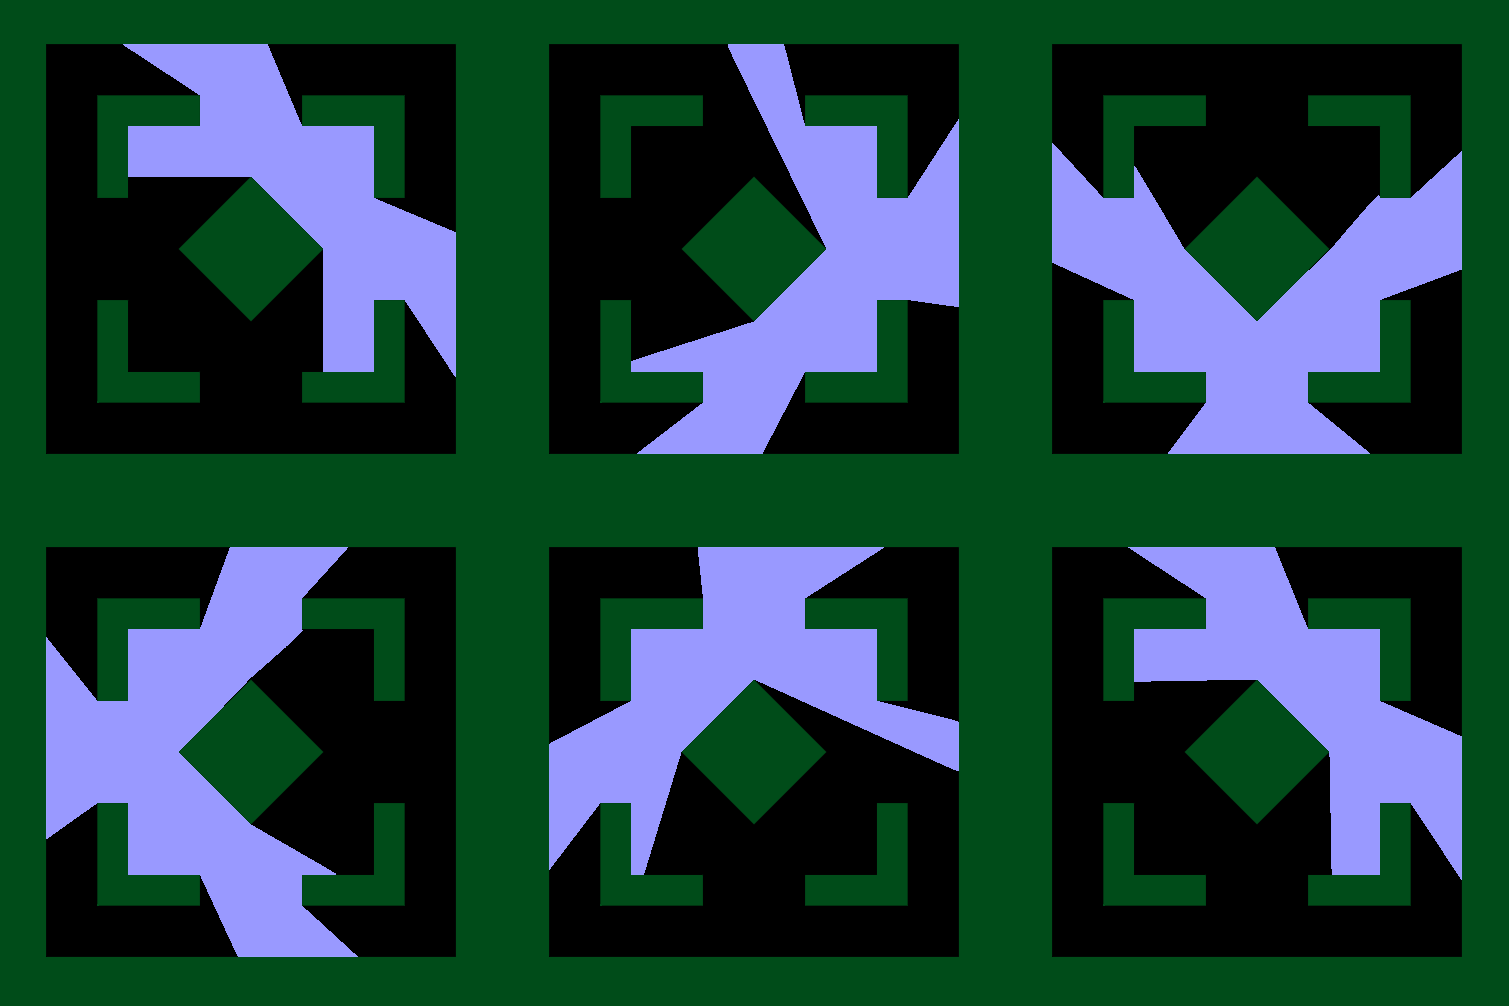
To create sharp shadows, we go around the space from the position of the sample to the position of the light source. If we find an object on the way, then we decide that the pixel should be shaded, and if we get to the source without hindrance, then we say that it is not shaded.
We start by calculating the basic parameters of the beam. We already have the starting point (the pixel position we are rendering) and the target point (the light source position) for the beam. We need length and normalized direction. The direction can be obtained by subtracting the beginning from the end and normalizing the result. The length can be obtained by subtracting the position and passing the value to the method
Then we iteratively traverse the ray in the loop. We will set the loop iterations in the define declaration, and this will allow us to later configure the maximum number of iterations, and also allow the compiler to optimize the shader a bit by expanding the loop.
In the cycle we need the position we are in now, so we declare it outside the cycle with an initial value of 0. In the cycle we can calculate the position of the sample, adding the beam advance multiplied by the beam direction to the base position. Then we sample the distance function with the sign in the newly calculated position.
Then we will check whether we are already at the point where we can stop the cycle. If the distance of the scene of the distance function with a sign close to 1, then we can assume that the beam is blocked by the figure, and return 0. If the beam has spread further than the distance to the light source, then we can assume that we have reached the source without collisions, and return the value 1.
If the return is not performed, then you need to calculate the next position of the sample. This is done by adding the distance in the beam advance scene. The reason for this is that the distance in the scene gives us the distance to the nearest figure, so if we add this value to the beam, then we probably won't be able to emit the beam further than the nearest figure, or even beyond it, which will cause the shadows to flow.
In case we did not encounter anything and did not reach the light source by the time the sample stock was completed (the cycle ended), we also need to return the value. Since this basically happens next to the shapes, shortly before the pixel is still considered shaded, here we use the return value of 0.
To use this function, we call it in a fragment function with a pixel position and a light source position. Then multiply the result by any color to blend it with the color of the light sources.
Also for visualization of geometry I used the technique described in the first tutorial on distance fields with a sign . Then I just added folded and geometry. Here we can simply use the addition operation, and not perform linear interpolation or similar actions, because the shape is black wherever there is no figure, and the shadow appears black wherever there is a shape.
Going from these harsh shadows to softer and more realistic is easy enough. At the same time, the shader does not become much more computationally expensive.
First, we simply get the distance to the nearest object of the scene for each sample that we go around, and choose the nearest one. Then, where we used to return 1, it will be possible to return the distance to the nearest figure. So that the brightness of the shadow is not too high and does not lead to the creation of strange colors, we will pass it through a method
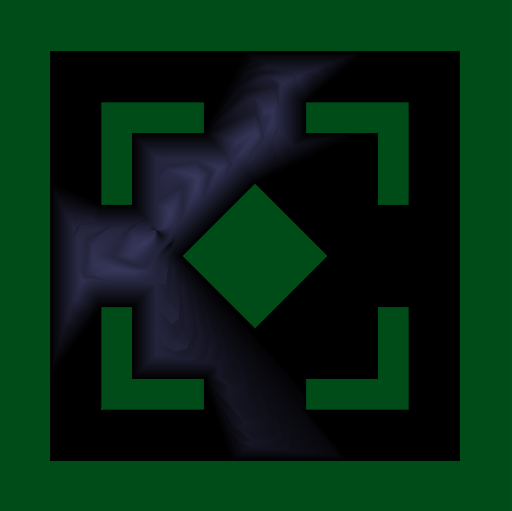
The first thing that we will notice after this is strange "teeth" in the shadows. They arise because the distance from the scene to the light source is less than 1. I tried to counteract this in various ways, but I could not find a solution. Instead, we can realize the sharpness of the shadow. Sharpness will be another parameter in the shadow function. In the cycle, we multiply the distance in the scene by sharpness, and then with sharpness 2 the soft, gray part of the shadow will be half the size. When using sharpness, the light source may be located at a distance of at least 1 divided by the sharpness, otherwise artifacts will appear. Therefore, if you use the sharpness of 20, then the distance should be no less than 0.05 units.
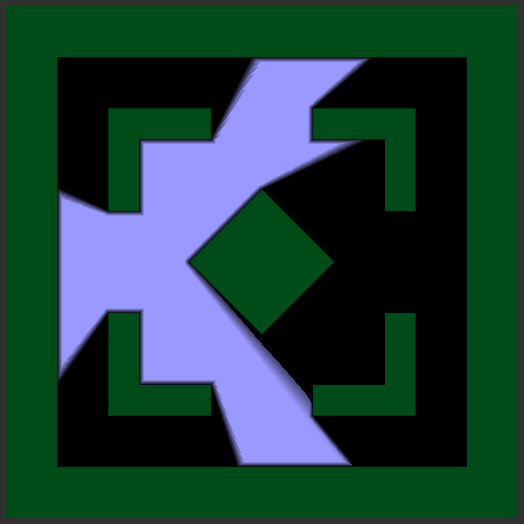
Minimizing this problem, we notice the following: even in areas that should not be shaded, there is still a weakening next to the walls. In addition, the softness of the shadow appears to be the same for the entire shadow, rather than being sharp next to the figure and softer when away from the object emitting the shadow.
We will fix this by dividing the distance in the scene by the beam spread. Due to this, we divide the distance into very small numbers in the place where the beam starts, that is, we still get high values and a beautiful clear shadow. When we find the point closest to the beam at subsequent points of the beam, the nearest point is divided by a larger number, which makes the shadow softer. Since this is not entirely related to the shortest distance, we will rename the variable to
We will also make another minor change: since we divide by rayProgress, you should not start from 0 (divide by zero is almost always a bad idea for dividing). As a start, you can choose any very small number.

In this simple one-step implementation, the easiest way to get multiple sources of illumination is to calculate them separately and add the results.
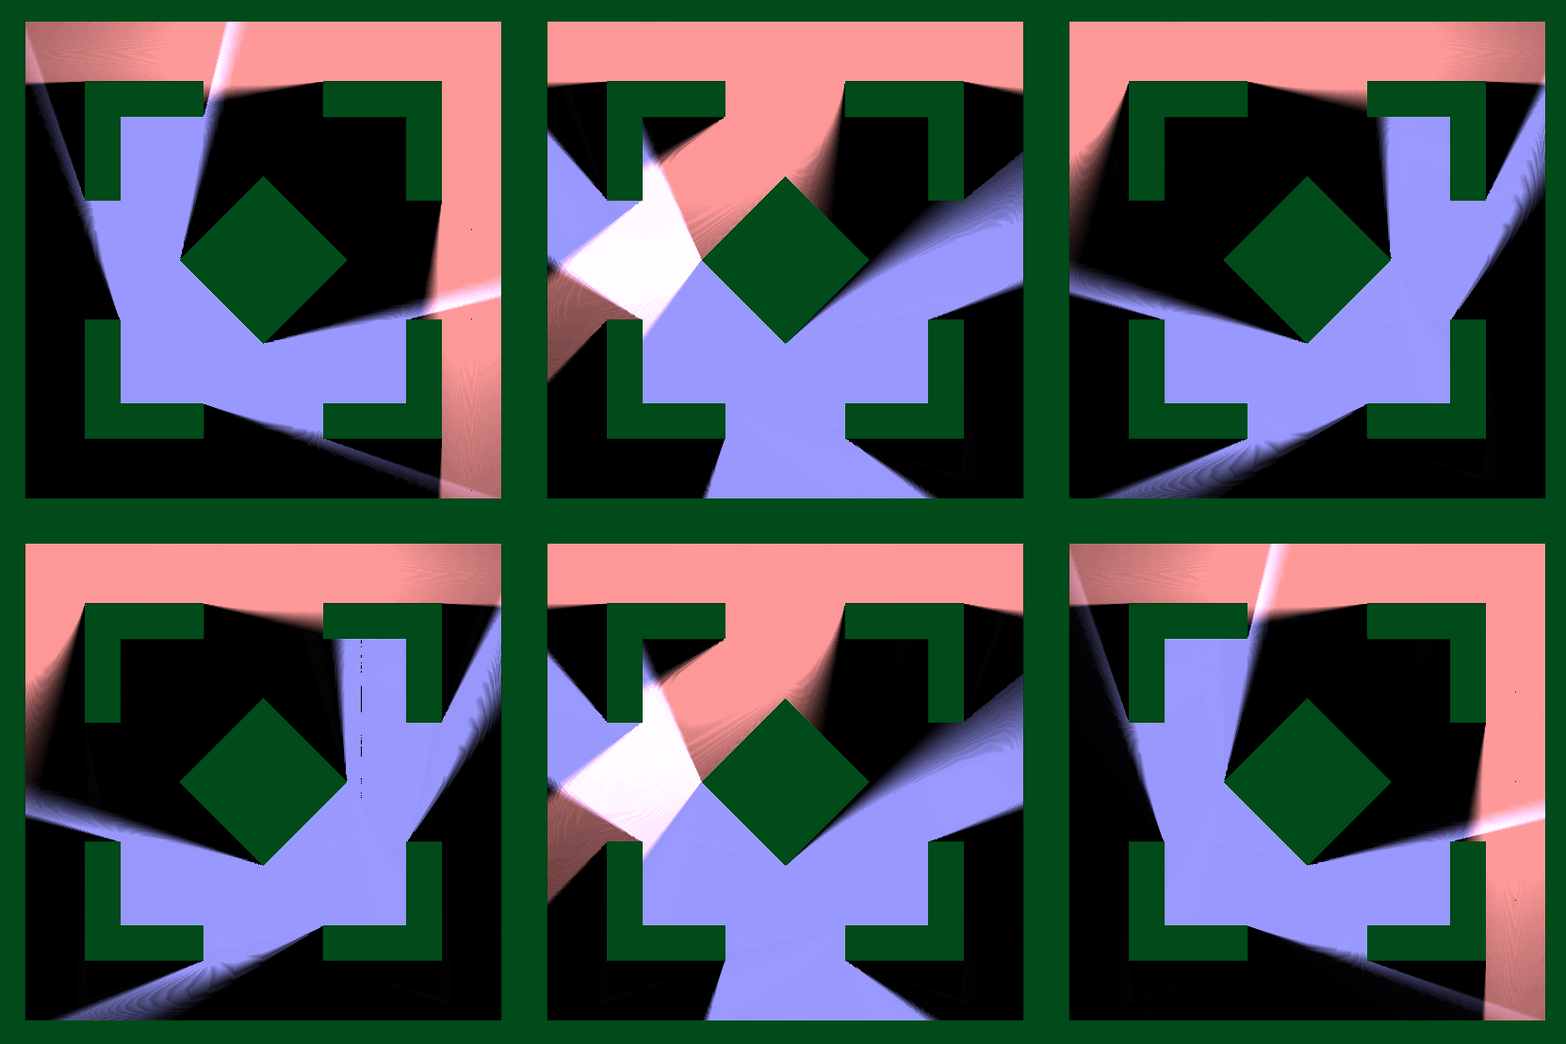
This is just one of many examples of the use of signed distance fields. While they are rather cumbersome, because all the figures must be written in the shader or passed through the properties of the shader, but I have some ideas on how to make them more convenient for future tutorials.

[Additional artifacts appeared in GIF during recompression.]
Basic configuration
I created a simple configuration with a room, it uses the techniques described in previous tutorials. Earlier, I did not mention that I used the function for vector2
absto mirror the position with respect to the x and y axes, as well as that I inverted the distance of the shape in order to swap the inner and outer parts. We will copy the 2D_SDF.cginc file from the previous tutorial into one folder with the shader, which we will write in this tutorial.
Shader "Tutorial/037_2D_SDF_Shadows"{
    Properties{
    }
    SubShader{
        //the material is completely non-transparent and is rendered at the same time as the other opaque geometry
        Tags{ "RenderType"="Opaque""Queue"="Geometry"}
        Pass{
            CGPROGRAM
            #include "UnityCG.cginc"
            #include "2D_SDF.cginc"
            #pragma vertex vert
            #pragma fragment frag
            struct appdata{
                float4 vertex : POSITION;
            };
            structv2f{
                float4 position : SV_POSITION;
                float4 worldPos : TEXCOORD0;
            };
            v2f vert(appdata v){
                v2f o;
                //calculate the position in clip space to render the object
                o.position = UnityObjectToClipPos(v.vertex);
                //calculate world position of vertex
                o.worldPos = mul(unity_ObjectToWorld, v.vertex);
                return o;
            }
            floatscene(float2 position){
                float bounds = -rectangle(position, 2);
                float2 quarterPos = abs(position);
                float corner = rectangle(translate(quarterPos, 1), 0.5);
                corner = subtract(corner, rectangle(position, 1.2));
                float diamond = rectangle(rotate(position, 0.125), .5);
                float world = merge(bounds, corner);
                world = merge(world, diamond);
                return world;
            }
            fixed4 frag(v2f i) : SV_TARGET{
                float dist = scene(i.worldPos.xz);
                return dist;
            }
            ENDCG
        }
    }
    FallBack "Standard"//fallback adds a shadow pass so we get shadows on other objects
}
If we still used the visualization technique from the previous tutorial, the figure would look like this:

Simple shadows
To create sharp shadows, we go around the space from the position of the sample to the position of the light source. If we find an object on the way, then we decide that the pixel should be shaded, and if we get to the source without hindrance, then we say that it is not shaded.
We start by calculating the basic parameters of the beam. We already have the starting point (the pixel position we are rendering) and the target point (the light source position) for the beam. We need length and normalized direction. The direction can be obtained by subtracting the beginning from the end and normalizing the result. The length can be obtained by subtracting the position and passing the value to the method
length.floattraceShadow(float2 position, float2 lightPosition){
float direction = normalise(lightPosition - position);
float distance = length(lightPosition - position);
}Then we iteratively traverse the ray in the loop. We will set the loop iterations in the define declaration, and this will allow us to later configure the maximum number of iterations, and also allow the compiler to optimize the shader a bit by expanding the loop.
In the cycle we need the position we are in now, so we declare it outside the cycle with an initial value of 0. In the cycle we can calculate the position of the sample, adding the beam advance multiplied by the beam direction to the base position. Then we sample the distance function with the sign in the newly calculated position.
// outside of function#define SAMPLES 32// in shadow functionfloat rayDistance = 0;
for(int i=0 ;i<SAMPLES; i++){
    float sceneDist = scene(pos + direction * rayDistance);
    //do other stuff and move the ray further
}
Then we will check whether we are already at the point where we can stop the cycle. If the distance of the scene of the distance function with a sign close to 1, then we can assume that the beam is blocked by the figure, and return 0. If the beam has spread further than the distance to the light source, then we can assume that we have reached the source without collisions, and return the value 1.
If the return is not performed, then you need to calculate the next position of the sample. This is done by adding the distance in the beam advance scene. The reason for this is that the distance in the scene gives us the distance to the nearest figure, so if we add this value to the beam, then we probably won't be able to emit the beam further than the nearest figure, or even beyond it, which will cause the shadows to flow.
In case we did not encounter anything and did not reach the light source by the time the sample stock was completed (the cycle ended), we also need to return the value. Since this basically happens next to the shapes, shortly before the pixel is still considered shaded, here we use the return value of 0.
#define SAMPLES 32floattraceShadows(float2 position, float2 lightPosition){
    float2 direction = normalize(lightPosition - position);
    float lightDistance = length(lightPosition - position);
    float rayProgress = 0;
    for(int i=0 ;i<SAMPLES; i++){
        float sceneDist = scene(position + direction * rayProgress);
        if(sceneDist <= 0){
            return0;
        }
        if(rayProgress > lightDistance){
            return1;
        }
        rayProgress = rayProgress + sceneDist;
    }
    return0;
}
To use this function, we call it in a fragment function with a pixel position and a light source position. Then multiply the result by any color to blend it with the color of the light sources.
Also for visualization of geometry I used the technique described in the first tutorial on distance fields with a sign . Then I just added folded and geometry. Here we can simply use the addition operation, and not perform linear interpolation or similar actions, because the shape is black wherever there is no figure, and the shadow appears black wherever there is a shape.
fixed4 frag(v2f i) : SV_TARGET{ float2 position = i.worldPos.xz;float2 lightPos;
sincos(_Time.y, lightPos.x /*sine of time*/, lightPos.y /*cosine of time*/);
float shadows = traceShadows(position, lightPos);
float3 light = shadows * float3(.6, .6, 1);
float sceneDistance = scene(position);
float distanceChange = fwidth(sceneDistance) * 0.5;
float binaryScene = smoothstep(distanceChange, -distanceChange, sceneDistance);
float3 geometry = binaryScene * float3(0, 0.3, 0.1);
float3 col = geometry + light;
return float4(col, 1); }
Soft shadows
Going from these harsh shadows to softer and more realistic is easy enough. At the same time, the shader does not become much more computationally expensive.
First, we simply get the distance to the nearest object of the scene for each sample that we go around, and choose the nearest one. Then, where we used to return 1, it will be possible to return the distance to the nearest figure. So that the brightness of the shadow is not too high and does not lead to the creation of strange colors, we will pass it through a method
saturatethat limits it to the interval from 0 to 1. We get a minimum between the current nearest figure and the next one after checking whether the beam has already reached the light source, otherwise, we can take samples that pass for the source of the light, and get strange artifacts.floattraceShadows(float2 position, float2 lightPosition){
float2 direction = normalize(lightPosition - position);
float lightDistance = length(lightPosition - position);
float rayProgress = 0;
float nearest = 9999;
for(int i=0 ;i<SAMPLES; i++){
float sceneDist = scene(position + direction * rayProgress);
if(sceneDist <= 0){
return0;
}
if(rayProgress > lightDistance){
return saturate(nearest);
}
nearest = min(nearest, sceneDist);
rayProgress = rayProgress + sceneDist;
}
return0;
}
The first thing that we will notice after this is strange "teeth" in the shadows. They arise because the distance from the scene to the light source is less than 1. I tried to counteract this in various ways, but I could not find a solution. Instead, we can realize the sharpness of the shadow. Sharpness will be another parameter in the shadow function. In the cycle, we multiply the distance in the scene by sharpness, and then with sharpness 2 the soft, gray part of the shadow will be half the size. When using sharpness, the light source may be located at a distance of at least 1 divided by the sharpness, otherwise artifacts will appear. Therefore, if you use the sharpness of 20, then the distance should be no less than 0.05 units.
floattraceShadows(float2 position, float2 lightPosition, float hardness){
    float2 direction = normalize(lightPosition - position);
    float lightDistance = length(lightPosition - position);
    float rayProgress = 0;
    float nearest = 9999;
    for(int i=0 ;i<SAMPLES; i++){
        float sceneDist = scene(position + direction * rayProgress);
        if(sceneDist <= 0){
            return0;
        }
        if(rayProgress > lightDistance){
            return saturate(nearest);
        }
        nearest = min(nearest, hardness * sceneDist);
        rayProgress = rayProgress + sceneDist;
    }
    return0;
}
//in fragment functionfloat shadows = traceShadows(position, lightPos, 20);
Minimizing this problem, we notice the following: even in areas that should not be shaded, there is still a weakening next to the walls. In addition, the softness of the shadow appears to be the same for the entire shadow, rather than being sharp next to the figure and softer when away from the object emitting the shadow.
We will fix this by dividing the distance in the scene by the beam spread. Due to this, we divide the distance into very small numbers in the place where the beam starts, that is, we still get high values and a beautiful clear shadow. When we find the point closest to the beam at subsequent points of the beam, the nearest point is divided by a larger number, which makes the shadow softer. Since this is not entirely related to the shortest distance, we will rename the variable to
shadow.We will also make another minor change: since we divide by rayProgress, you should not start from 0 (divide by zero is almost always a bad idea for dividing). As a start, you can choose any very small number.
floattraceShadows(float2 position, float2 lightPosition, float hardness){
    float2 direction = normalize(lightPosition - position);
    float lightDistance = length(lightPosition - position);
    float rayProgress = 0.0001;
    float shadow = 9999;
    for(int i=0 ;i<SAMPLES; i++){
        float sceneDist = scene(position + direction * rayProgress);
        if(sceneDist <= 0){
            return0;
        }
        if(rayProgress > lightDistance){
            return saturate(shadow);
        }
        shadow = min(shadow, hardness * sceneDist / rayProgress);
        rayProgress = rayProgress + sceneDist;
    }
    return0;
}
Multiple light sources
In this simple one-step implementation, the easiest way to get multiple sources of illumination is to calculate them separately and add the results.
fixed4 frag(v2f i) : SV_TARGET{
    float2 position = i.worldPos.xz;
    float2 lightPos1 = float2(sin(_Time.y), -1);
    float shadows1 = traceShadows(position, lightPos1, 20);
    float3 light1 = shadows1 * float3(.6, .6, 1);
    float2 lightPos2 = float2(-sin(_Time.y) * 1.75, 1.75);
    float shadows2 = traceShadows(position, lightPos2, 10);
    float3 light2 = shadows2 * float3(1, .6, .6);
    float sceneDistance = scene(position);
    float distanceChange = fwidth(sceneDistance) * 0.5;
    float binaryScene = smoothstep(distanceChange, -distanceChange, sceneDistance);
    float3 geometry = binaryScene * float3(0, 0.3, 0.1);
    float3 col = geometry + light1 + light2;
    return float4(col, 1);
}
Sources
2D SDF library (unchanged, but used here)
2D soft shadows
Shader "Tutorial/037_2D_SDF_Shadows"{
    Properties{
    }
    SubShader{
        //the material is completely non-transparent and is rendered at the same time as the other opaque geometry
        Tags{ "RenderType"="Opaque""Queue"="Geometry"}
        Pass{
            CGPROGRAM
            #include "UnityCG.cginc"
            #include "2D_SDF.cginc"
            #pragma vertex vert
            #pragma fragment frag
            struct appdata{
                float4 vertex : POSITION;
            };
            structv2f{
                float4 position : SV_POSITION;
                float4 worldPos : TEXCOORD0;
            };
            v2f vert(appdata v){
                v2f o;
                //calculate the position in clip space to render the object
                o.position = UnityObjectToClipPos(v.vertex);
                //calculate world position of vertex
                o.worldPos = mul(unity_ObjectToWorld, v.vertex);
                return o;
            }
            floatscene(float2 position){
                float bounds = -rectangle(position, 2);
                float2 quarterPos = abs(position);
                float corner = rectangle(translate(quarterPos, 1), 0.5);
                corner = subtract(corner, rectangle(position, 1.2));
                float diamond = rectangle(rotate(position, 0.125), .5);
                float world = merge(bounds, corner);
                world = merge(world, diamond);
                return world;
            }
            #define STARTDISTANCE 0.00001#define MINSTEPDIST 0.02#define SAMPLES 32floattraceShadows(float2 position, float2 lightPosition, float hardness){
                float2 direction = normalize(lightPosition - position);
                float lightDistance = length(lightPosition - position);
                float lightSceneDistance = scene(lightPosition) * 0.8;
                float rayProgress = 0.0001;
                float shadow = 9999;
                for(int i=0 ;i<SAMPLES; i++){
                    float sceneDist = scene(position + direction * rayProgress);
                    if(sceneDist <= 0){
                        return0;
                    }
                    if(rayProgress > lightDistance){
                        return saturate(shadow);
                    }
                    shadow = min(shadow, hardness * sceneDist / rayProgress);
                    rayProgress = rayProgress + max(sceneDist, 0.02);
                }
                return0;
            }
            fixed4 frag(v2f i) : SV_TARGET{
                float2 position = i.worldPos.xz;
                float2 lightPos1 = float2(sin(_Time.y), -1);
                float shadows1 = traceShadows(position, lightPos1, 20);
                float3 light1 = shadows1 * float3(.6, .6, 1);
                float2 lightPos2 = float2(-sin(_Time.y) * 1.75, 1.75);
                float shadows2 = traceShadows(position, lightPos2, 10);
                float3 light2 = shadows2 * float3(1, .6, .6);
                float sceneDistance = scene(position);
                float distanceChange = fwidth(sceneDistance) * 0.5;
                float binaryScene = smoothstep(distanceChange, -distanceChange, sceneDistance);
                float3 geometry = binaryScene * float3(0, 0.3, 0.1);
                float3 col = geometry + light1 + light2;
                return float4(col, 1);
            }
            ENDCG
        }
    }
    FallBack "Standard"
}
This is just one of many examples of the use of signed distance fields. While they are rather cumbersome, because all the figures must be written in the shader or passed through the properties of the shader, but I have some ideas on how to make them more convenient for future tutorials.
