Launching a terminal server for 1C applications on Synology NAS

Most recently, the DS412 + NAS from Synology came into our hands. If you believe the words from the manufacturer’s website, it is designed for small and medium-sized businesses that require high performance, ease of management and a full-featured network storage solution to centralize data backup, protect critical information and transfer files between different platforms . Our customer was interested in using it not only as a drive (for storing the 1C database), but also as a terminal server for working with the 1C platform. Under the cut you will find directly the process of adapting the DS412 +.
Let's start with a brief description of the characteristics of the device, full you can find here :
- CPU Clock - 2.13 GHz (Dual Core)
- RAM RAM - DDR3 1 GB
- HDD type and number - 4 3.5 ”SATA (II) drives or 4 2.5” SATA / SSD drives
- Type and number of network ports - 2 Gigabit ports
We were lucky that Atom CPU was at 412m and its architecture allowed using pre-compliled 1C packages for the i386 platform, although MARVELL Armada 370 is already on the same DS213j, which, unfortunately, has no ready-made solutions. To build packages, we used a virtual machine running on a working PC. So let's get started.
1. Install the minimum Debian distribution on the virtual machine;
2. Install debootstrap on this system (from the repository);
apt-get install debootstrap
3. Prepare debootstrap to run on another system. Because DS412 + under i686, specify the architecture. Put it in the ~ / deboo folder:
debootstrap --foreign --arch i386 wheezy deboo
Copy your repositories to the prepared image:
cp /etc/apt/sources.list ~/deboo/etc/apt/sources.list
And we pack it into a tarball file to make it more convenient to transfer:
tar xvzpf synodebian.tar.gz
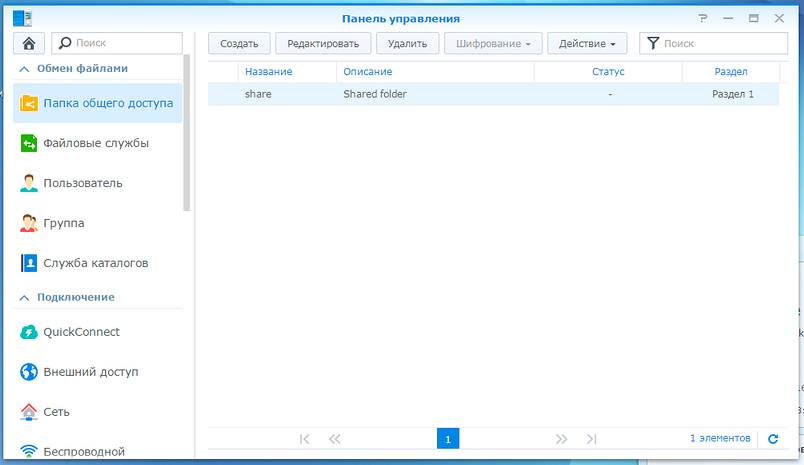
4. After initializing the DiskStation, turn on the ftp server, add the “share” shared folder through the web interface.


We transfer the tarball-file with the system (debootstrap) prepared in the third stage to this folder;
5. In order not to collect later on a weak DS, we immediately collect XRDP packets on a virtual machine:
apt-get install git
git clone https://github.com/scarygliders/X11RDP-o-Matic.git
cd X11RDP-o-Matic
./X11rdp-o-matic.sh –justdoit
It will be collected for a long time, at the end we take ready-made packages from ./X11RDP-o-Matic/packages, put it in the same shared share folder on DS. There we copy the service script from ./X11RDP-o-Matic/RDPsesconfig.sh. The virtual machine is no longer needed, it can be turned off.
6. Connect to DS via SSH. The system mounts the partition in the "/ volume1" folder, go to it, in the share subfolder (which is shared by ftp). Unpack the created tarball-file in / volume1 / deboo;
7. Transfer the DNS settings and server name:
hostname > /volume1/deboo/etc/hostname
cp /etc/resolv.conf /volume1/deboo/etc/
8. Unpack all the packages:
chroot /volume1/deboo /debootstrap/debootstrap --second-stage
9. We make scripts for mounting / unmounting system folders, we allow their launch:
~/deboo-mount.sh:
	/bin/mount -o bind /dev /volume1/deboo/dev
	/bin/mount -o bind /proc /volume1/deboo/proc
	/bin/mount -o bind /dev/pts /volume1/deboo/dev/pts
	/bin/mount -o bind /sys /volume1/deboo/sys
	/bin/mount -o bind /mnt/share /volume1/deboo/share
~/deboo-umount.sh:
	/bin/umount /volume1/deboo/proc
	/bin/umount /volume1/deboo/dev/pts
	/bin/umount /volume1/deboo/dev
	/bin/umount /volume1/deboo/sys
	/bin/umount /volume1/deboo/share
10. Mount the system folders, and run the already full debian:
sh ~/deboo-mount
chroot /volume1/deboo /bin/bash
11. That's it, now the full-fledged work with debian in the bash has begun. We prepare work with repositories and update packages:
apt-get update && apt-get upgrade
12. Install probably the lightest graphical shell (Xs are also set when resolving dependencies):
apt-get install --no-install-recommends lxde
13. Install the XRDP packages collected in the fifth stage:
cd /volume1/share/packages
dpkg -i *.deb && apt-get install -f
14. We add users to the system that will connect to the terminal server, run the RDPsesconfig.sh script obtained in step 5, which will generate the necessary configuration files for them;
15. Launch XRDP:
/etc/init.d/xrdp start
Now you can connect to the terminal server.
16. We download from this client and server packages for DEB-based systems. Unpack them into one folder and install:
dpkg -i *.deb && apt-get -f install
17. The platform needs additional font packages and imagemagick, put them:
apt-get install ttf-mscorefonts-installer imagemagick
It is done! Remained a routine. In the same shared folder we put the 1C file base (the already unpacked demo version of Trade Management). We connect via RDP to the server under our user, the shell starts, add a shortcut to launch 1C Enterprise on the desktop, start it. 1C suggests you to add base. Add the existing one, point to the shared folder in which the database was placed. We are connected in the enterprise mode, we select the user.
And a couple of words in the end, despite the fact that it was still possible to launch the terminal server, we consider the use of this configuration to solve the task inappropriate, due to the high cost and complexity of preparing the software component.
