Programming for beginners - an example of creating the Morse Code based on the visual system Snap!
- Tutorial
One of the goal of popularizing DIY-robotics, for me, is to draw attention to IT, to programming. And in this regard, I am interested in visual programming environments where you can create programs using simple drag & drop. For those who are just starting to learn a computer, this kind of programming can be of interest at the initial stage (due to its simplicity), and further contribute to independent study (of something more complex).
I think many people have heard about Scratch - this is a "classic of the genre" (created in MIT, the idea of 2003 and the release in release 1.0 in January 2006), but for it to work, it is necessary to install software on a computer (or Flash). Some time ago, the University of California at Berkeley developed the Snap!, whose interface is close to Scratch, but works in a browser based on classic html / js / css. That is, to work with it, you only need a browser (and besides, it is open-source ).
Here's the Snap Visual Web Programming System! I want to tell.
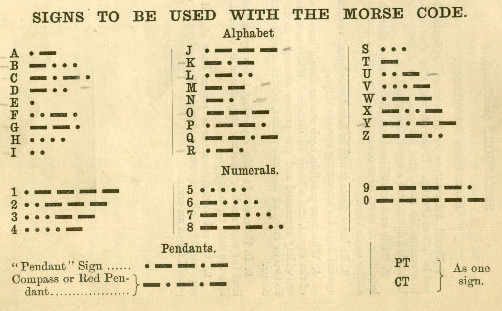
It’s always interesting to learn something new using an example from life, so I decided to try the task of drawing and voicing Morse code - the stages of solving this problem will be the content of this publication.
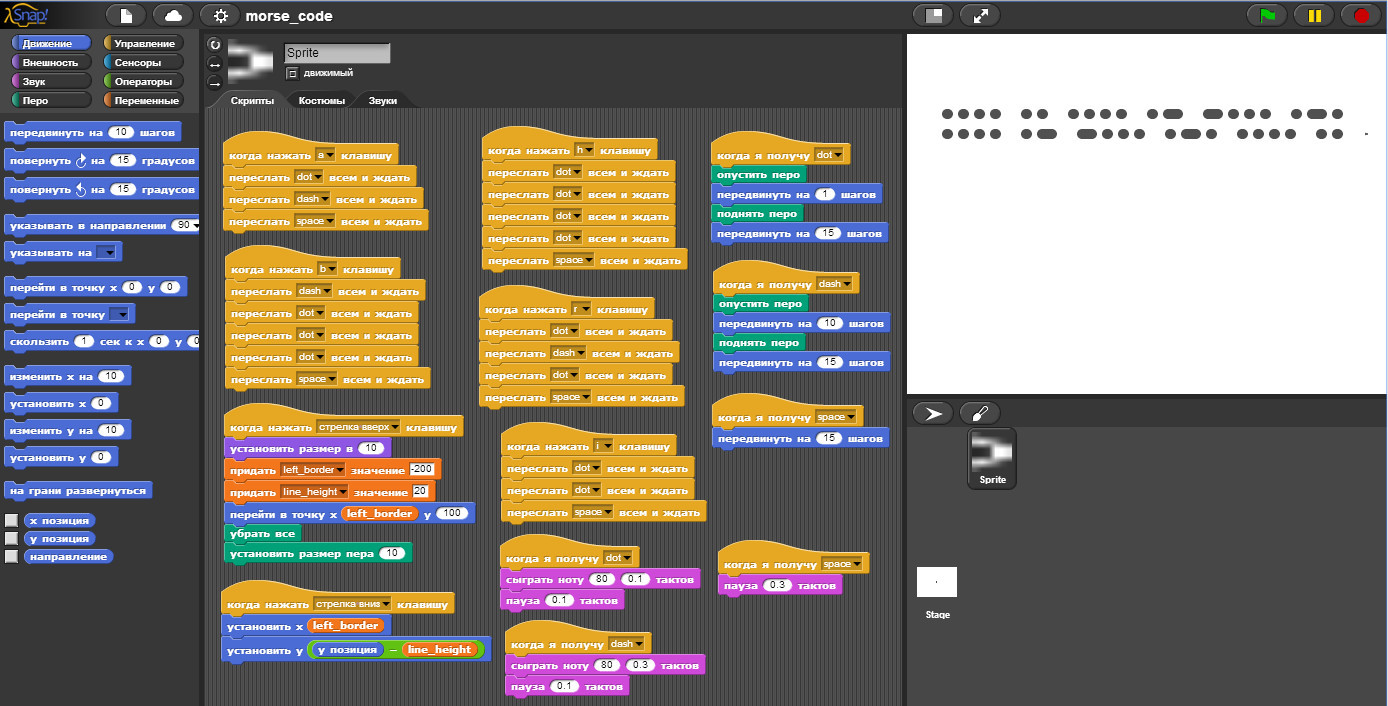
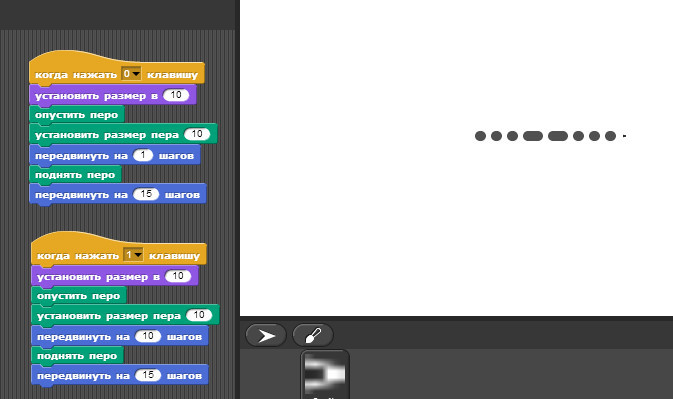
The program will, when you press the keys, draw the corresponding characters, and also “voice” them. The final program is given on the KDPV, and “HI HABR, HABR HI” is written on the right.
View demo
If someone wants to immediately see the result, then the demo is here .
Management:
" up key " - initialization of parameters and cleaning (it is better to press after loading - the width of the dots will be set)
" down key " - line feed
keys " h ", " i ", " a ", " b ", " r " - drawing and scoring acc. letters using morse code.
Management:
" up key " - initialization of parameters and cleaning (it is better to press after loading - the width of the dots will be set)
" down key " - line feed
keys " h ", " i ", " a ", " b ", " r " - drawing and scoring acc. letters using morse code.
Start
To start the Snap system! just open this page in a browser.
Here's what we will see after the start:
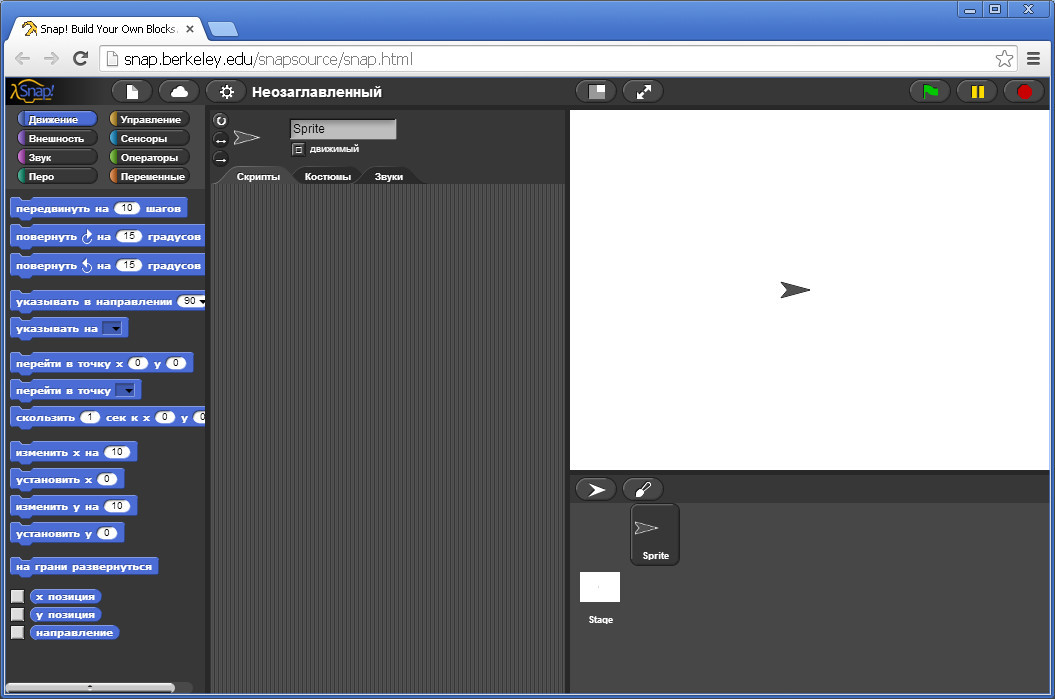
If you did not have experience with Scratch, then we explain the principle of working with such a system:
We see three areas (simplified):
- left
- central
- on right
On the left are the blocks that we can use the mouse to transfer to the central area and connect them together (this is the name of the program - “snap”). When you click on a block, it is executed, and all blocks connected together.
The execution of blocks in the central area - is displayed in the right area, where we see the "cursor".
Perhaps someone remembers the Logo programming system (Turtle), where by giving commands for moving and drawing, one could draw figures. We will begin with this example.
First meeting
For the first acquaintance with work in Snap! draw a square.
Above the blocks, the types of blocks are displayed (note that they are of different colors):
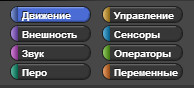
- Movement - here we control the movement and location of the "cursor"
- Appearance - here we control the appearance of the "cursor" - which is essentially a "sprite"
- Sound - here we can play sounds
- A pen is a function for drawing.
- Management - with the help of these blocks we can add logic
- Sensors - this is feedback from the "world" where the "cursor" lives - the definition of touches, etc.
- Operators are mathematical functions, conditions, cycles
- Variables - here you can define variables
To draw a square, we will write a free-style program:
10. lower the pen
20. repeat 4 times:
30. move forward by 50 pixels
40. turn right 90 degrees
Let's start:
1. select the “Pen” section, and drag the “ lower feather ” block to the central area.
2. select the “Movement” section, and drag the “ move 10 steps ” block , then change the value 10 to 50.
3. drag the “ rotate clockwise 15 degrees ” block - change 15 to 90.
4. connect the “ movement ”and“ turn ”- for this we grab the“ turn ”and move it to the bottom of the block“ move ”until the light bar appears - the indicator of the connection of the blocks - and release the block - after which the two blocks become connected.
If we click on these blocks now, then our cursor will begin to move and rotate, with each click. But he does not drawlower the pen "- after that the cursor will draw. And by pressing 4 times - draw a square.
Now we ’ll clear the drawing area, for this we ’ll select the“ Pen ”section and click on“ remove everything ”(you can’t transfer it to the work area).
5. select “Management” section, and move the “ repeat 10 ” block to the work area, and change 10 to 4.
6. transfer the “ lower pen ” blocks and “move / rotate” blocks, inside the “repeat” block - until they are automatically connected to block.
7. also from section "Office" - fast forward block " When you click on (green flag) " in Working area, and attach it to the upper part of the “repeat” block.
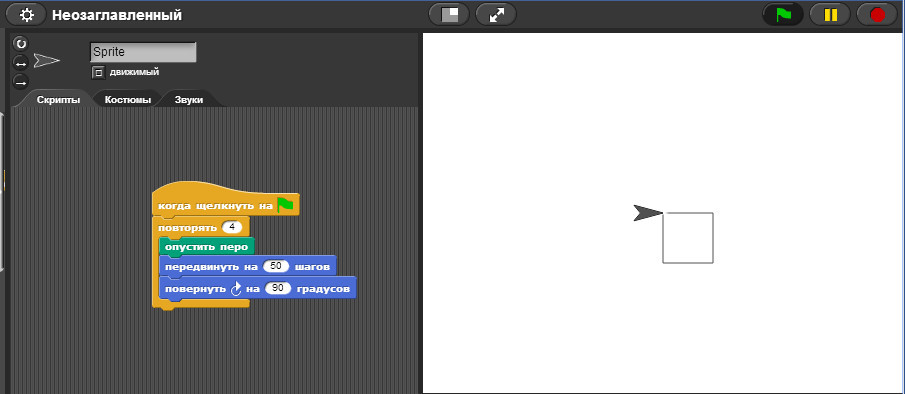
We all finished our program, now clicking on the "green flag", in the upper right (above the drawing area) - we will start our drawing program.
Here's what happened:
Creating Morse Code
The basic things are now clear, now let's start implementing our idea on Morse code. Recall that coding occurs with a dot and a dash. Therefore, we need to make two functions:
- one will draw dots
- and the second dash.
(for a new project, if we do not want to save the current changes, we can just refresh the page).
Point drawing
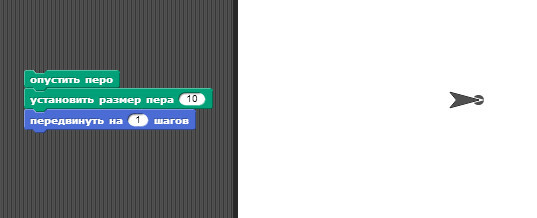
1. Go to the "Pen" section - move the " set pen size to 1 " block and set it to 10. So you can clearly see the point.
2. From the “Movement” section, move the “ move 10 steps ” block and set 1 step. So we draw a point (because the brush has a diameter of 10 pixels - it will draw a circle for us).
3. And do not forget to move the “ lower pen ” block from the “ Pen ” section - otherwise we won’t see anything :)
4. Connect all the blocks, and it turns out:
We see that our “cursor” closes the drawn point, to solve this problem we just reduce the size of the "cursor":
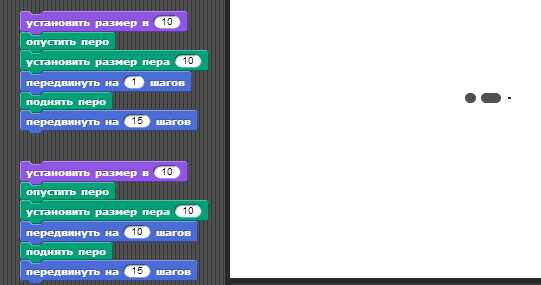
5. In the "Appearance" section, find and transfer the block " set the size to 100"and set it to 10. (and attach it to our blocks on top).
6. Also, make the cursor go further, but without drawing, to do this, move (and connect) the" raise feather " block from the" Pen "section
7. Add move the block “ 10 steps ” from the “Movement” section - and attach it to our blocks, and change 10 steps to 15.
As a result, we get (after clearing the “Pen” zone - “ remove all ”):
The point on the right is our reduced “cursor” - at this point the next drawing will begin.
Dash drawing
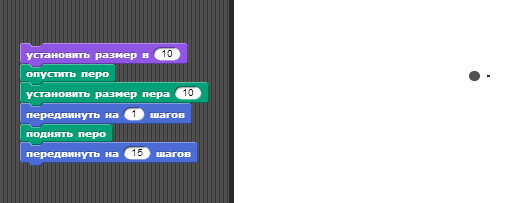
To draw a dash, we only need to increase the motion parameter from 1 to 10 steps, and leave the rest unchanged.
In Snap! it is possible to clone blocks, for this on our blocks we right-click, and select "duplicate" - a double will appear, and move it down. And we change the value in the “ move 1 step ” block , to 15.
Click on this assembly block, the result:
We see that we have drawn a “dash”!
Click Processing
Now we can try to tie the execution of our blocks, not to clicking on them, but to pressing keys on the keyboard.
For example, let's do it: press “0” - a point , press “1” - a dash (keys on the main keyboard).
1. To do this, go to the "Management" section and select the block " When to press the" space "key ", and attach it on top of our group of blocks (where the dot is drawn). And we select “0” in the drop-down list instead of “space”
2. We transfer the same block, and attach “dash” groups of blocks on top, and select “1” instead of “space”.
We get and check:
Let me remind you that you can clear the drawing area with the “Pen” - “remove everything”, and moving the cursor to the beginning: “Move” - “go to point x [0] y [0]”
Message engine
In the English version of the Morse code, the letter "A" is encoded using the "dot", "dash". Also, after the symbol there should be a slight delay - indent (space).
To accomplish this, we will use the messaging engine in Snap! - we will intercept the keystroke “A”, and (according to the encoding of this letter in Morse code) sequentially send messages “dot”, “dash” and “space” (dot, dash, space).
And in the current functions / blocks where drawing by pressing takes place, we will replace it with execution when the signal is received.
Thus, we will have three signals (events):
* dot
* dash
* space
Let's start:
1. we will transfer the block "from the" Management "sectionкогда я получу []"
2. открепим блоки что рисуют точку, от "когда нажать 0 клавишу" — для этого можно захватить первый блок снизу, у нас это "установить размер в 10", и перенести его в сторону — блоки отсоединятся от верхнего.
3. прикрепляем блок "когда я получу []" к нашим блокам рисующим точку — прикрепляем сверху.
4. удаляем единичный блок «когда нажать 0 клавишу» — для этого переносим его из рабочей зоны, на на левую область блоков.
5. выставляем получаемое сообщение в блоке "когда я получу " — в выпадающем списке выбираем «новый» и вводим "dot"
6. для генерации сообщения — переносим из раздела «Управление» блок — "forward [] to everyone and wait ", and in the drop-down list, select the message" dot ".
Here's what we should get:
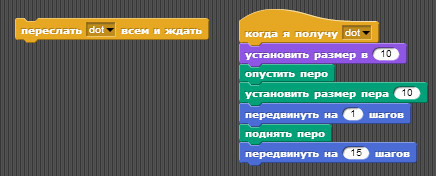
Now, when you click on the" forward [dot] to everyone and wait " block , the message will be sent, and activation / execution of all blocks who are "subscribed" to this message, in our example - a block that draws a point.
Initial parameters
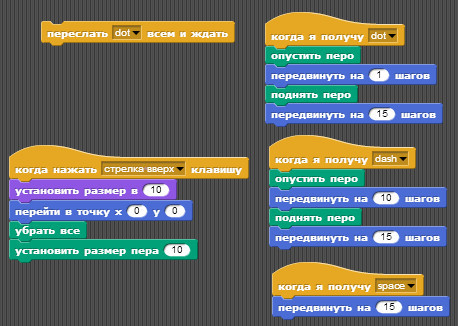
Let's make a little refactoring.
We have frequently repeated operations, and they can be taken out into a separate “function”, and called up by pressing the “up” key. There will be:
- placing the cursor to the beginning
- screen cleaning
- setting the cursor size
- setting the size of the drawing point.
Draw these blocks out of our dot and dash blocks.
We’ll also modify the dash block, instead of processing a keystroke, it will also respond to a dash message .
And add the processing of the “space” block - “space” - it will only move the cursor - to indent between the “letters” of the Morse code.
Here's what we got:
Character Encoding
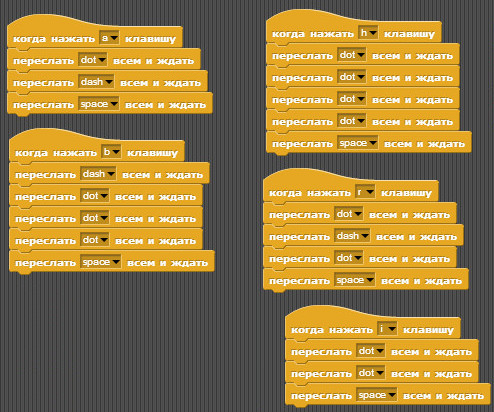
Well, finally, we have come to the most important thing - the encoding of the character A. So that when you click on "a" - drawing, respectively. the letter Morse code.
To do this, we use the block " when to press the [] key " from the Office, and the blocks " forward to everyone and wait " from there. Specifically, for the letter A , we must send a “dot”, “dash”, and then a “space” (respectively, signals: “dot”, “dash”, “space”).
Here is the result:

Variables and line breaks
In the process, I realized that without wrapping a line it would not be very convenient to draw morse code. Therefore, we will make the function "line break", and assign it to pressing the cursor down key.
To perform line wrapping, two tasks must be performed:
1. move the cursor to the beginning along the X axis
2. move the cursor to the next line (along the Y axis) to the height of the line.
To implement them, I decided to introduce two variables:
* the beginning of the text on the X axis ( left_border )
* the height of the line ( line_height )
The value of the left_border variable will be used when setting the initial position (we will change from 0 to -200 so that drawing starts on the left side of the screen) .
To add a variable, you need to click on the "Variables" section at the top left, and there on " Declare a variable ":
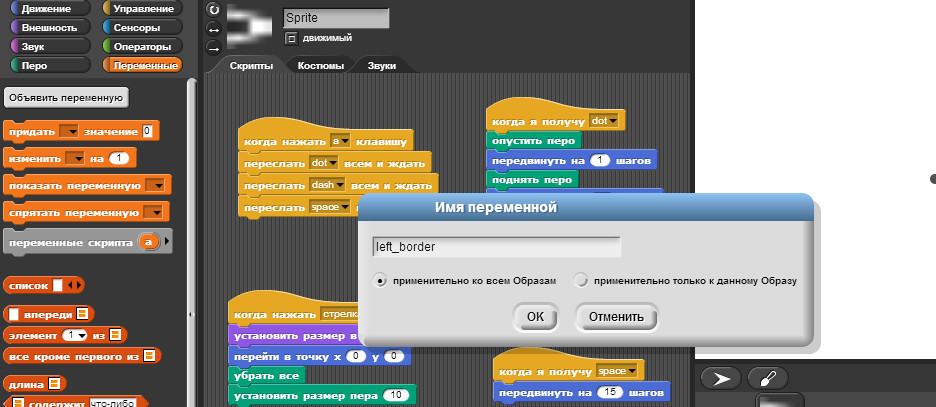
In the same way, declare the variable "line_height" .
After adding, the variables will be displayed on the left (so that they can be Drag & Drop and inserted into arithmetic operations, conditions, etc.), and also the value of the variable will be transmitted to the drawing screen - to turn off the display on the screen - just click to the left of the variable (in the Variables panel).
Now we can set the values for these variables, using the " give [] value [0] " block in the "Variables" section - we transfer these blocks to our "Initialization Function". And set for left_border = -200 , forline_height = 20 .
Here's what our initialization and line feed function looks like as a result: the
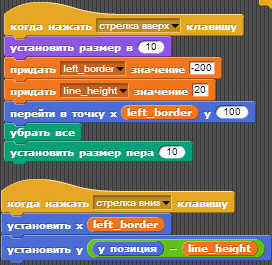
arithmetic commands are in the "Operators" section, and the variable itself, we are Drag & Drop from the "Variables" section, respectively. function field (pay attention to different forms).
Encoding the remaining letters
By analogy with the letter A, we encode the letters H, I, B, R:
Sound
If you are still interested in learning about sound
To get sound, we just need to use the unit that plays the sound in Snap! there is the possibility of obtaining sound indicating the frequency and duration.
These blocks will also listen to the dot, dash and space signals.
According to the description from Morse code :
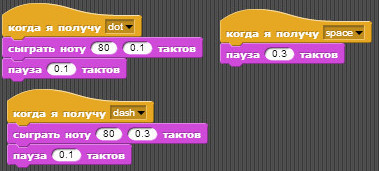
We open the “Sound” section, and we need two blocks: “ play a note [60] [0.5] measures ”, and “ pause [0.2] measures ”.
Choose a frequency of 80, and a measure of 0.1 as a “space” after the dot / dash, and 0.3 measure for a “space” between characters.
We will receive the following blocks:
Convenience of the event / subscriber system - that without changing the logic of the system itself, we simply supplemented the mechanism (for sound accompaniment) by creating new subscribers to the “point”, “dash” - and already their implementation
These blocks will also listen to the dot, dash and space signals.
According to the description from Morse code :
The duration of a dash is three times the duration of a dot. Each dot or dash is followed by a short silence, equal to the dot duration. The letters of a word are separated by a space equal to three dots (one dash)
We open the “Sound” section, and we need two blocks: “ play a note [60] [0.5] measures ”, and “ pause [0.2] measures ”.
Choose a frequency of 80, and a measure of 0.1 as a “space” after the dot / dash, and 0.3 measure for a “space” between characters.
We will receive the following blocks:
Convenience of the event / subscriber system - that without changing the logic of the system itself, we simply supplemented the mechanism (for sound accompaniment) by creating new subscribers to the “point”, “dash” - and already their implementation
Saving / Exporting a Project
If you are interested in learning about conservation
Сохранить проект можно с помощью меню (нажимаем на иконке «Листок» слева вверху:
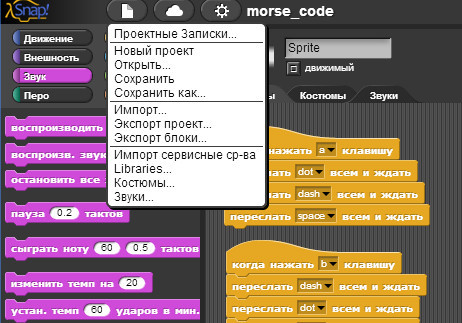
Сохранение происходит в локальный storage браузера, есть возможность сохранять в облако, после регистрации.
Так же можно экспортировать проект — "Экспорт проект..." — мы получим xml нашей программы. Вот так выглядит эта программа по азбуке Морзе.
Сохранение происходит в локальный storage браузера, есть возможность сохранять в облако, после регистрации.
Так же можно экспортировать проект — "Экспорт проект..." — мы получим xml нашей программы. Вот так выглядит эта программа по азбуке Морзе.
В заключении
Of course, this is only a small part of the capabilities of Snap !, and I think in the following publications we will try in practice other features of the system - in particular, interconnection with external systems, including Arduino .
In my opinion, the presence of such a visual system could add interest to informatics lessons, and if there were still robo-informatics lessons, then I think programming would be interesting and in demand at school :)
Resources:
- Official Snap page! systems (snap.berkeley.edu)
- Snap User Guide! v.4.0 (in English), 77 pp.
- Snap page! gihub project
If you want to help popularize the Russian-speaking Snap!
Some time ago, the translation of the Snap User Guide! into Russian. If you are ready to help to act as a proofreader, or to help financially (translating 77 pages is still not a simple matter). That can be noted in the questionnaire on Snap!
If you are interested in sharing experience, and staying in touch - the Russian-speaking VK group on Snap!