September 10, 2014 at 14:55
A pair of crutches for Notepad ++ Arduino IDE (for Dummies)

If you work with Arduino, sooner or later you will invariably be disappointed in the minimalistic functionality of the Arduino IDE as in a text editor. Neither human highlighting, nor auto-completion, nor tasty buns and plug-ins ... And you will naturally start digging information about Arduino bundles with Intellij Idea, Sublime Text, or at worst with Notepad ++, since even in the latter it is much more convenient to edit the code.
This is just about the last Arduino bundle with Notepad ++ and the tale of crutches will go, for those who have not yet forked out for an Intellij Idea or Sublime Text license.
And in general, working with a sketch in Notepad ++ you can minimize access to the Arduino IDE window (the first and well-known crutch) or even completely eliminate the launch of the Arduino IDE and compile and even upload the sketch to the board directly from Notepad ++ (second crutch).
First crutch
This is not even a crutch, but such a build-in cane, regularly available in the Arduino IDE. But judging by the forums, practically nobody uses it. Although, if you look, you can live with it for a while ...
- So, the sequence of actions is as follows:
- Launch Arduino IDE
- open your sketch;
- go to the IDE settings and enable the checkbox "Use an external editor";
Now the IDE window has changed color and the ability to edit the sketch in the IDE itself has disappeared. - open Notepad ++ (or any other code editor or other favorite IDE);
- open your sketch, connected modules, libraries, etc .;
- edit the code;
- save;
- go to the Arduino IDE;
- click Verify or Upload (compile or upload the sketch);
What's going on? When the "Use an external editor" checkbox is enabled, the Arduino IDE will automatically reopen the current sketch you saved in another editor with each Verify or Upload operation. Well, in general it’s not manna from heaven, but you can already live with it, and not suffer from the inferiority of the Arduino IDE editor.
What is wrong? What you need to switch between windows ... it quickly tires. I want to like in childhood, to like people! - edited the code, pressed Alt + F9 for Compile, then Ctrl + F9 for Run. There is such a solution.
Crutch second
And this is a full-fledged walker, with rubber caps and foam handles. But, the design is still soviet, without candelabra ...
Starting from version 1.5 (this is the one with Arduino Due support ), the Arduino IDE began to support work from the command line. A complete list of commands can be found here . We will be interested in two commands, "--verify" and "--upload" to compile and upload the sketch, respectively.
To use them you need to install the NppExec plugin in Notepad ++. You can do this from the plugins menu. More details about installing and using the plugin are written in the corresponding article on Habr. We will be particularly interested in the file-level environment variable $ (FULL_CURRENT_PATH), which substitutes the command line with the entire file opened in the current Notepad ++ tab.
Now in NppExec we need to create two macros for the verify and upload commands. But before that, you need to add the path where the arduino.exe file is located in the PATH system variable (the path to the Arduino IDE installation folder). This is so that our macros start with a short “arduino -”, and not with the full path to the executable file. How to change PATH for different OS is described here .
Now create two macros:
- arduino --verify "$ (FULL_CURRENT_PATH)"
- arduino --upload "$ (FULL_CURRENT_PATH)"
Please note that the variable "$ (FULL_CURRENT_PATH)" must be indicated in quotation marks, this is in case the path to the sketch file contains spaces.
And if you do not specify in the macros any parameters for the board, chip, port, etc., then all of these parameters for uploading to the board (macro --upload) will be taken from those that were configured in the Arduino IDE at the last start.
There is an option in the NppExec settings menu that places the macros you create on the Macros tab in the Notepad ++ menu bar.
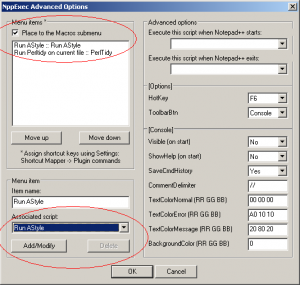
Unfortunately, the NppExec developer did not take care of the option of creating new buttons in the Notepad ++ panel and binding new macros to them, so our macros will have to be launched from the Macros menu:
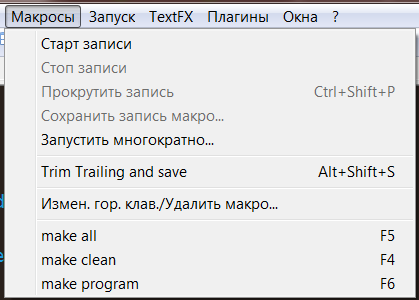
New macros will be located at the very bottom of the menu, under the separator.
Now you can open the console ("Show Console Dialog")

and check the macros.
All Arduino IDE messages will now be displayed in the console of Notepad ++ itself when compiling and unloading.
But there is a pitfall. If you are sitting on Russian Windows, then instead of Russian system messages of the C compiler and Russian letters in the file path (for example, if you keep your sketches in the Google Drive folder), you will see an abracadabra in the NppExec console. While this is not being treated systemically (I have not contacted the NppExec developer yet), but you can try replacing the current NppExec library with one of the two offered in the latest release, ANSI or Unicode . It hasn’t helped me yet ...
As you can see, this crutch has a couple of unpleasant shortcomings
Firstly, arduino.exe is launched every time the macro is launched and is closed upon its execution. Thus, you lose 3-4 seconds for each compilation of code. In this regard, the Arduino IDE runs a little faster. But, if you write code carefully and rarely compile, then this should not bother you.
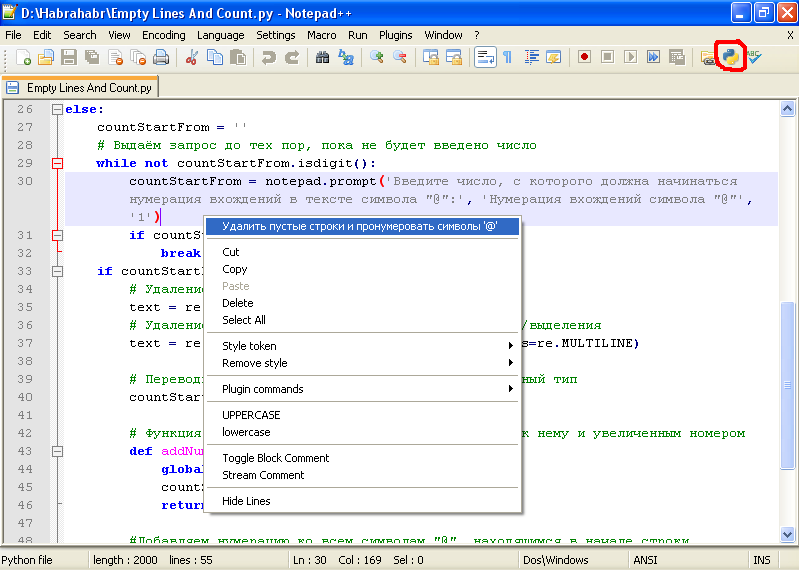
Secondly, as I wrote above, the NppExec developer did not take care of the option of creating new buttons on the Notepad ++ panel with binding new macros to them, as was done, for example, in the Python Script plugin: (the picture is clickable) Therefore, the macros will have to be run in two clicks with the mouse, for example, from the Macros menu.
Thirdly, you do not have a COM port monitor in Notepad ++. But here no one will help you, reconcile ... the monitor is only in the Arduino IDE. But I, for example, didn’t always need it for debugging a new library for WiFly, only when controlling the work of an already included and spilled board with a module. And I have done almost all the work (and even now I am) in Notepad ++.
In general, I put up with it. And even some intrigue remained - to finish the buttons and the monitor itself.
Well, now it remains only to assign the hotkeys Alt + F9 and Ctrl + F9 to the new macros

and ...

Welcome home, old people! ;)
And no Arduino IDE.
PS Not all pictures are taken from my Notepad ++, litter. I am not at my computer right now, but I was very asked to share crutches. Then I will replace the pictures with real ones.
The topic a la turbo pascal can be viewed here .