Download Sketches to Arduino via Bluetooth
When programming an Arduino, it is sometimes advisable to dispense with a physical connection via USB to a computer, for example:
On the Internet you can find several publications on this topic, but they are all fragmentary and there is no complete solution. Also, despite the simplicity and obviousness of the design, there are several small difficulties that are ready to disrupt the whole event. About how to overcome them, I want to tell in this article.
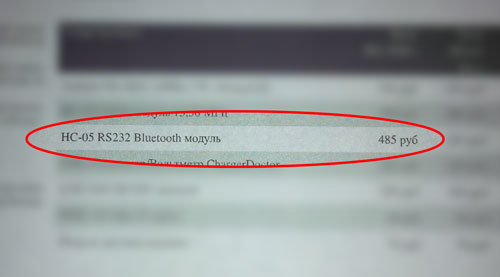
I used the cheapest Bluetooth modules with the straightforward name "Bluetooth module HC-05 (HC-06)." On ebay they can be found from 200 rubles. apiece, in domestic stores - from 500 rubles. I advise you to take the module already soldered on the adapter "for Arduino", the difference in money is minimal, and saves time on assembly of the interface circuit.
We need HC-05, but since visually distinguishing them is extremely difficult, there is a great chance that HC-06 will be in your hands, even if the package says “HC-05”, as happened with me:
Fortunately, HC-06 can be flashed into HC-05, but you will have to find a computer with an LPT port and spend several hours. You can read the flashing instructions here . I want to add on my own that under Windows7 the firmware did not take place, I had to install Windows XP, as well as change the LPT port mode to EPP 1.7 in the BIOS.
So, we have the HC-05 module on hand. Now you need to set him the parameters of work. To transfer to the parameter setting mode, you need to solder the last, 34th leg to the 3.3v power supply.

Then we connect to the computer via any USB-UART-TTL adapter and in the terminal give the following sequence of commands:
AT
AT + RESET
AT + ORGL
AT + ROLE = 0
AT + POLAR = 1.0
AT + UART = 57600.0.0
AT + INIT
AT + INQ
If there is a desire to change the standard pairing password, then additionally:
AT + PSWD = 5678
If there is a desire to change the device name, then additionally:
AT + NAME = RemoteArduino
After that, we disconnect the module, remove the jumper with 34 legs and proceed to the final development of the module. This can be done directly on the HC-05 board, but it seemed to me more convenient to do this in the form of an adapter board for direct connection to the Mini Pro.
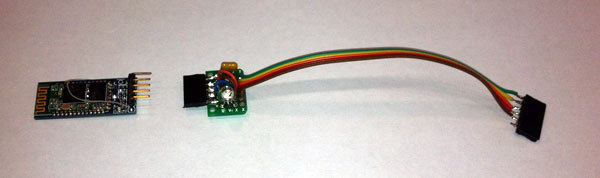
To automatically reset Arduino when establishing a connection, it is necessary to bring the 32nd leg to the connector, for this I cut off the “WAKE-UP” output that I did not need and designated it as “RESET”. The adapter circuit turned out as follows:
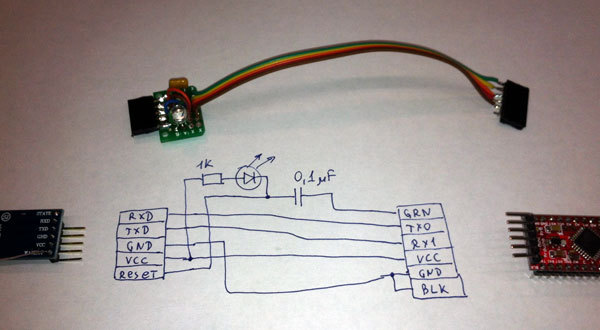
Ignition of the LED will indicate the established connection.
That's all with soldering, but the fill still does not work. The fact is that every time you try to fill the sketch, the Arduino IDE cleans up the COM port buffers, which leads to the BlueTooth connection being closed and the download canceled.
To avoid this, you need to correct the configuration of the Arduino IDE, which is located in the file C: \ arduino \ hardware \ arduino \ boards.txt . We open this file in a text editor, look for the section corresponding to the board we are working with (I have Pro Mini 5V) and add the following line:
pro5v328.upload.disable_flushing = true
Do not forget to change the first word in the line, for example, for Arduino Uno this will be:
uno.upload.disable_flushing = true
Now the fill should work. There remains a small annoying detail - when we go to the Arduino IDE menu and select the “Tools” item, the program “freezes” for a few seconds. The fact is that each time you access this menu item, the program enumerates all the COM ports available in the system, but in an non-optimal way, which leads to large delays. To remove this delay, you need to replace the rxtxSerial.dll library with a modified version, which can be taken here . Anyone interested in the details of the problem can check out the thread on the Arduino forum .
Here is another option with the Arduino power off and TX output button:
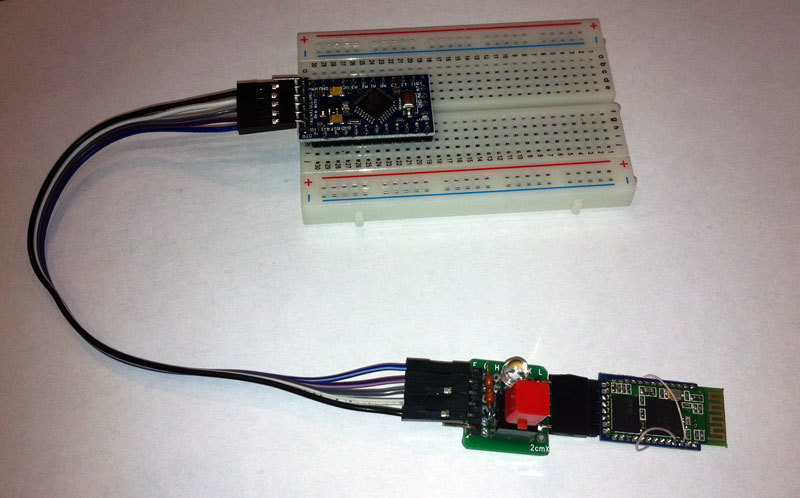
The scheme of the second option (the Bluetooth module is different, so the pins are located differently and the Pro Mini is not original, but “Deek-Robot”, the pinout is mirror-like):
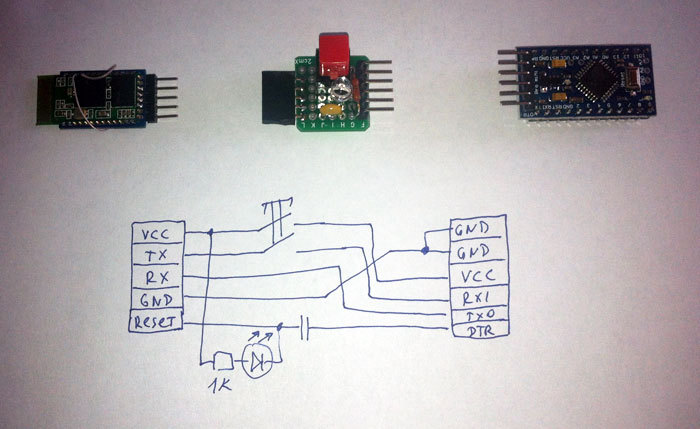
The scheme takes up minimal space, connects quickly, does not require settings. Also, the ability to turn on the Serial Monitor in the Arduino IDE and receive data from the device remains as if it were connected via USB.
PS
It turned out that there are already ready such converted modules , and perhaps someday we will see them for sale in our country.
- Power circuits - switching 220V. One error in the connection and goodbye to the USB controller of your favorite system unit.
- Radio frequency circuits - a lot of tips on nutrition.
- Assembled and somewhere fixed devices that are desirable to reflash, but it is inconvenient to crawl to them.
On the Internet you can find several publications on this topic, but they are all fragmentary and there is no complete solution. Also, despite the simplicity and obviousness of the design, there are several small difficulties that are ready to disrupt the whole event. About how to overcome them, I want to tell in this article.
I used the cheapest Bluetooth modules with the straightforward name "Bluetooth module HC-05 (HC-06)." On ebay they can be found from 200 rubles. apiece, in domestic stores - from 500 rubles. I advise you to take the module already soldered on the adapter "for Arduino", the difference in money is minimal, and saves time on assembly of the interface circuit.
And if you got a module without an adapter card?
In this case, you have to assemble the adapter circuit yourself. The instruction is here
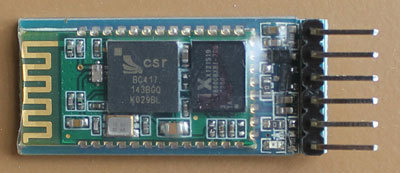
We need HC-05, but since visually distinguishing them is extremely difficult, there is a great chance that HC-06 will be in your hands, even if the package says “HC-05”, as happened with me:
Is it possible to distinguish HC-05 from HC-06?
You can try to distinguish in appearance if not all the legs of the Bluetooth module are soldered or there is a multimeter at hand. The HC-05 leads to the LED, wired on the module itself, from the leg 31, and the HC-06 leads from the leg 24.
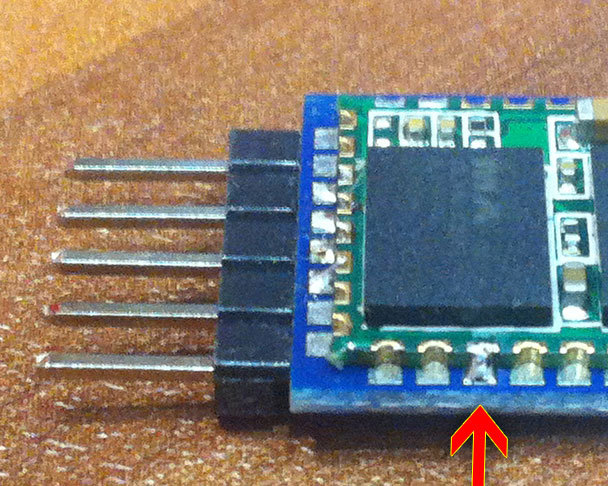
The photo shows that the only 24th leg is soldered on the entire row, this is the absolute HC-06 module.
The photo shows that the only 24th leg is soldered on the entire row, this is the absolute HC-06 module.
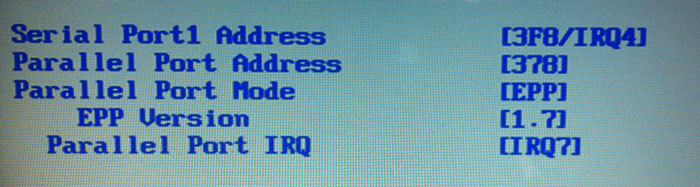
Fortunately, HC-06 can be flashed into HC-05, but you will have to find a computer with an LPT port and spend several hours. You can read the flashing instructions here . I want to add on my own that under Windows7 the firmware did not take place, I had to install Windows XP, as well as change the LPT port mode to EPP 1.7 in the BIOS.
Detailed LPT port settings
Especially tired of switching the LPT port modes and settings in the device manager, so right away I will give the correct screenshots. BIOS:
In the manager:
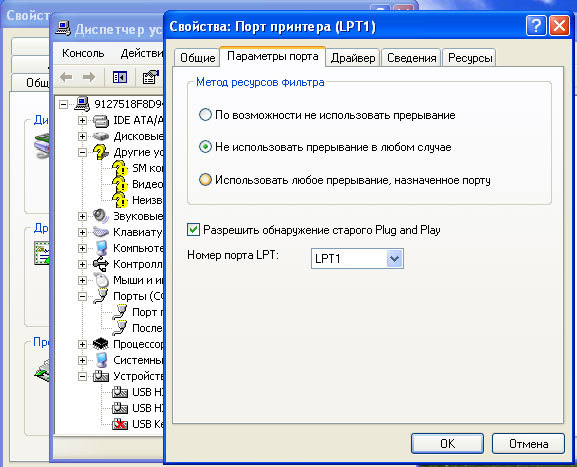
In the manager:
Why reflash?
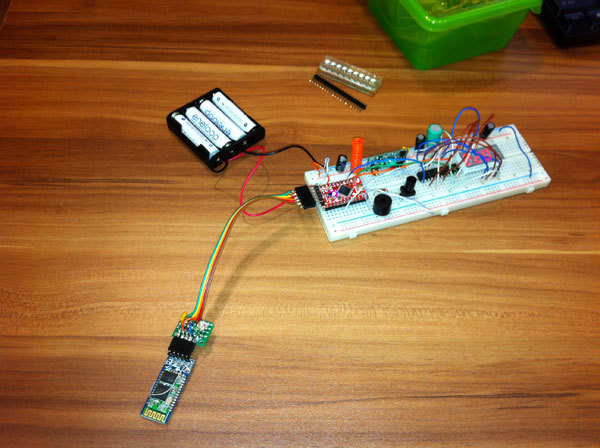
The HC-05 firmware, unlike the HC-06, when the connection is established, changes the signal on the 32th pin - this is necessary to hard reset the programmable Arduino and start the filling process. You can not reflash, but press the RESET button on the board every time before filling, and you need to catch the right moment, which is extremely inconvenient. It looks something like this
So, we have the HC-05 module on hand. Now you need to set him the parameters of work. To transfer to the parameter setting mode, you need to solder the last, 34th leg to the 3.3v power supply.
Then we connect to the computer via any USB-UART-TTL adapter and in the terminal give the following sequence of commands:
AT
AT + RESET
AT + ORGL
AT + ROLE = 0
AT + POLAR = 1.0
AT + UART = 57600.0.0
AT + INIT
AT + INQ
If there is a desire to change the standard pairing password, then additionally:
AT + PSWD = 5678
If there is a desire to change the device name, then additionally:
AT + NAME = RemoteArduino
After that, we disconnect the module, remove the jumper with 34 legs and proceed to the final development of the module. This can be done directly on the HC-05 board, but it seemed to me more convenient to do this in the form of an adapter board for direct connection to the Mini Pro.
To automatically reset Arduino when establishing a connection, it is necessary to bring the 32nd leg to the connector, for this I cut off the “WAKE-UP” output that I did not need and designated it as “RESET”. The adapter circuit turned out as follows:
Ignition of the LED will indicate the established connection.
That's all with soldering, but the fill still does not work. The fact is that every time you try to fill the sketch, the Arduino IDE cleans up the COM port buffers, which leads to the BlueTooth connection being closed and the download canceled.
To avoid this, you need to correct the configuration of the Arduino IDE, which is located in the file C: \ arduino \ hardware \ arduino \ boards.txt . We open this file in a text editor, look for the section corresponding to the board we are working with (I have Pro Mini 5V) and add the following line:
pro5v328.upload.disable_flushing = true
Do not forget to change the first word in the line, for example, for Arduino Uno this will be:
uno.upload.disable_flushing = true
Now the fill should work. There remains a small annoying detail - when we go to the Arduino IDE menu and select the “Tools” item, the program “freezes” for a few seconds. The fact is that each time you access this menu item, the program enumerates all the COM ports available in the system, but in an non-optimal way, which leads to large delays. To remove this delay, you need to replace the rxtxSerial.dll library with a modified version, which can be taken here . Anyone interested in the details of the problem can check out the thread on the Arduino forum .
Here is another option with the Arduino power off and TX output button:
The scheme of the second option (the Bluetooth module is different, so the pins are located differently and the Pro Mini is not original, but “Deek-Robot”, the pinout is mirror-like):
The scheme takes up minimal space, connects quickly, does not require settings. Also, the ability to turn on the Serial Monitor in the Arduino IDE and receive data from the device remains as if it were connected via USB.
PS
It turned out that there are already ready such converted modules , and perhaps someday we will see them for sale in our country.