Like we did xvm. Part One: Starting and Gathering a Team

Welcome, dear habrasociety! On the occasion of the start of the Wargaming contest, we decided, firstly, to participate in it, and, secondly, to write a series of articles on how we got to creating one of the most popular modifications of World of Tanks and as a hobby with a couple of lines of shit for evening has grown into what we have. The articles describe all the rakes encountered (and tested on themselves). Another reason for writing this article was to bury the ax of war between XVM and Wargaming and take our relationship to the next level - we are glad that this article was published on the WG blog. We hope that the reading itself turned out to be interesting, and other contestants will be able to learn something useful for themselves.
When I just started playing World of Tanks in early 2011, I naturally didn’t bother about mods. I did not even know that they exist. But I have such a habit: if I like a game (that is, it is not deleted after the very first game session), then I try to learn as much as possible about this game, for which I climb to thematic forums. On this very forum I learned about the existence of mods and decided to try it. For a week I went over all these sights, skins, equipment icons, various voiceovers, and more and more I didn’t like it. It seems to be all right, but something is missing, I want to tighten it up. Almost all mods were deleted after the first test battle. But once I came across a mod called the simple OTM.
OTM
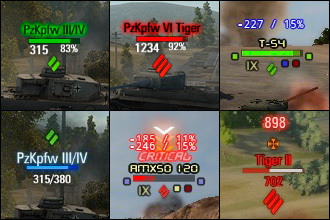
He is Over Target Markers. This thing replaced the standard tank markers with your own (markers are the same HP strips, equipment class and others located above all tanks).

The most important feature at that time was that OTM added these same strips of HP, which were not in the standard markers. When using standard markers, the only way to find out the number of HPs of enemy and allied vehicles was to move the mouse cursor over it and read the hint. Finding a “wounded animal” by which to focus fire was problematic: you had to drive the mouse along the battlefield, instead of focusing on shooting and maneuvering. With OTM, the situation on the battlefield was literally in the palm of your hand. But this is not all: the mod had a config in the form of the OTMData.xml file, which allowed to customize the appearance and behavior of markers! From version to version, the number of custom items has grown. You could share the config, what people were actively doing on thematic resources. The mod was in front of many tank YouTubes,
In general, this was the first mod that I did not delete after the first battle. Instead, I tuned it in exactly the way I wanted for a couple of nights, and played with pleasure until the next thing that interested me.
Olenemer
I was still a WoT super tester at that time. These guys are shown early versions of the client in order to get feedback. And one evening, behind friendly pokatushki I heard snatches of conversation in Teamspeak: “did you see THIS? ... But how to put it then? ... Sate! ... PAMAGITE !!!!! ". It turned out that we are talking about some kind of new fashion, which differed, among other things, somewhat, ahem, an extraordinary installation process.
So, remember (and better - write down!) What was needed for installation ( instructions similar to the original ):
- Download and unzip the archive.
- Copy the contents of one of the archive directories with the replacement to the game client folder. (It should be mentioned here that at that time it was a common thing for all mods, since there were no res_mods folders and, accordingly, mod support from the game developers.)
- Install some WAMP assembly. (Yes, yes, this is where Apache, MySQL and PHP are. Generally, MySQL was not needed here, but installing the assembly is clearly easier.)
- In the root of the web server, you had to put a script from another directory of the archive. The script was a WebDAV server with minor changes.
- Create a network drive in Windows and connect it to the server created in the previous step
> net use t: localhost/local_server/server.php
using the command or through the wizard. - Install a thing called Dokan (similar to FUSE for Windows).
- Using the mirror.exe utility from the Dokan kit, mirror the t: to r: drive. This led to the appearance of another disk in the system - an exact copy of the network from step 5, but which the system considered local.
- Create a symbolic link in the res \ gui \ flash directory of the WoT client with the name stat pointing to the r: \ user directory with the command
> mklink /D c:\games\World_of_Tanks\res\gui\flash\stat r:\user\ - At this point, it was finally possible to launch the client and enjoy the work of the mod.
This mod itself showed as much as the percentage of victories of teammates and opponents. And right in the battle and right in the ears (“ears” are the panels on the sides of the screen with a list of players), using the most real color differentiation. Honestly, the first reaction when I personally saw the work of the mod was a sagging jaw: does it really work at all ?! The jaw dropped even lower when I watched battle after battle, the number of those representatives of the fauna who gave the name of fashion.
Although stop. Do you imagine that a typical CA of “tanks” was able to complete the first eight installation points of the mod without errors? It is expected that the topic with this mod on the official forum was one of the fastest growing.
Having explained to several comrades how to set it all up, I realized that this was a dead end, and I had to somehow simplify everything. The first thought was to get rid of WAMP. Then I thought that from PHP, in fact, only a WebDAV server is required, which obviously can be done a lot.
As luck would have it, then (and now) I was fond of NodeJS and seriously wanted to write WebDAV on it. Well, type, then install Apache, and then Node. After all, this is a huge difference! As a result, he sat down on Google and found out about user mode file systems in general and Dokan in particular. Launched Visual Studio and, after midnight, gave birth to a .NET executable, which did the same as the construction from WAMP + the Dokan mirror - created a local disk in the system.
A few words about why this disk was needed. World of Tanks user interface is made on Action Script. The idea of the mod is to take the desired AS-file, decompile it, change what you want, compile and upload it back. The olenemer was made in the same way - it painted the lines of the ears in colors corresponding to the statistics of the player. The only question is how to get these statistics from the mod server? The most obvious answer: request via http! Yes, but there is one “but”: AS works in the sandbox (and there are several of these sandboxes for different parts of the interface), and this sandbox has blocked access to the network. But there is access to the file system in relative ways. And because of this, I had to fence a garden with disks, servers and links.
The work looked like this:
- AS script receives a list of players who need to be drawn in the ears.
- For each player, read the file stat \ <player nickname>.
- Since stat is a link, R: \ user \ <player nickname> is actually read.
- A .NET application receives a request to read a file, generates an http request to the mod server (about which in the next article).
- Having received the answer, it issues it in the form of “file content” to the AS script.
This simple improvement increased the number of users of the new mod by an order of magnitude. In the original topic, if asked about the installation, most often sent to my topic with a "simplified installation."
Team Building and XVM
Meanwhile, the number of users of the mod was growing, and in a hurry, a written server hosted on a cheap VPS began to cope with the load.
The result was:
Just at the same time, I rented the cheapest “dedicated” server at Hetzner for my own needs (EQ4: Intel Core i7-920, 8 GB DDR3, 2x 750 GB SATA II HDD). Seeing such a disgrace with the mod I liked, I contacted bkon comrade and offered all possible help with the hosting.
After a few days, the server was safely installed, and for some time users got a relatively buggy operation of the mod.
In February-May 2012, at the same time a forum was made on the same server for technical support and exchange of configs.
A small historical excursion. Initially, the idea and first implementations of OTM belong to Nicolas Siver . In November 2011, this business seemed to bother him, and sirmax and bkon comrades picked up the baton , releasing OTM for the tank client version 0.6.7. They also came up with the idea of a deer measurer. Sirmax ( sirmax2 ) is still the main developer of the client part of XVM.
In January 2012, I joined the team: first as a hoster, a little later as a developer of the server side, and then of auxiliary systems (for example, a statistics activation widget).
In mid 2012 , bkon somehow quietly left the team , but appeared: Mr 13( Wayfarer ) - CEO and PR, XlebniDizele4ku ( ilit ) - client side developer, Mr A - help in developing the client side and release builds , Mixaill ( Mixaill ) - organization of continuous integration (nightly assemblies), interaction with client side translators, q4x2 - * nix specialist and server-side developer.
And a few words about why, in fact, the topics with the description of modifications on the official forum were deleted. With the popularity of the mod, the number of precedents, so to speak, of unsportsmanlike use also increased: insults to players with low statistics, or, conversely, with too high. The offended players went to the same official forum and cried / demanded / threatened and in every possible way sought to ban this “offended” mod. After some time, "without declaring war" (that is, without any prior contact with the developers of the mod), all topics related to the olelenamer and XVM were deleted, and the forum rules would ban the publication of links to any mods that display statistics. The official reason for such prohibitions: mods create an additional load on WG servers.
We offered various compromise options: limit the frequency of requests to a given value. Enter a schedule when we send requests - everything rested against a blank wall. Having crashed into it for a couple of months, we abandoned these attempts, and simply divided XVM into XVM-full and XVM-light. In the light version, everything related to the display of statistics was cut out. Thus, we did not formally fall under the ban (with the light version, of course): the watchmen didn’t particularly touch us, and the channel for attracting new users through the official forum started working again.
Config and editor
As mentioned above, OTM and, accordingly, XVM had a config file. At first it was in XML format: OTMData.xml. There were few settings, and there were enough manual edits in any editor. Over time, the number of settings grew, as did popularity, and two things became apparent:
- XML is not very convenient for manual edits.
- Whatever format we choose, we need a WYSIWYG editor.
The story with the editors turned out like this: there was always not enough time for them (and even now is not enough), because they often do not keep up with the latest features in the mod itself. The very first editor was made on Adobe Air by the same Nikolas Siver . When the relay race passed to our team, we did not touch the editor for a long time, and, in fact, it ceased to be of serious value, since it did not contain a large number of relevant settings. At some point, I even tried to make an HTML / JS editor, but nothing interesting came of it.
In addition to some slowdown, he had one fatal flaw: to make it WYSIWYG, it was necessary to do a decent amount of work to repeat the AS + functional to keep it up to date. The applet variant allowed to take part of the code directly from the main branch and get a visualization of the twisted parameters “for free”. The current editor is located here .
Next, we had a migration from the XML config to JSON. The new config was named xvm.xvmconf. In truth, this is not exactly strict JSON: comments are allowed in it. Thanks to this, more advanced users can edit the config without an online editor - just by reading the comments.
We did not forget about backward compatibility. Firstly, the client, in the absence of a new format config, searched and downloaded the old OTMData.xml (moreover, this feature was sawn out recently, so there was more than enough time for migration). Secondly, until recently, in the online editor it was possible to open the config of the old format, and save it in the new one.
In the spring of 2013, another need was brewing: due to the increase in the number of custom features, the config grew and grew with each version. As a result, it became problematic to navigate in it, plus it became problematic to find errors such as missing commas or brackets. The separation of the config file into several separate files suggests itself, but the JSON format, unlike XML, does not allow links between files. The solution was to expand the JSON format, which we called JSONx.
Actually, there was only one change - as a value, you can specify a link to an arbitrary object in this or in another file. There are two recording options: short and extended:
short -
“name”: ${“file”:”path”}
extended -
“name”: { “$ref”: { “file”: “”, “path”: “” }, [overrides] }
Short format is a special case of extended. The extended format adds the ability to override values inherited from substitution. The “file” parameter is optional: if it is not specified, the value will be searched in the current file. The “path” parameter indicates the path to the value in the document hierarchy, separated by dots.
You can consider this with an example:
root.xc:
{
  "configVersion": "5.1.0",
  "colors": ${"colors.xc":"colors"},
  "colors2": {
    "$ref": { "path": "colors" },
    "ally_dead": "0x009900",
    "enemy_dead": "0x840500"
  }
}
colors.xc:
{
  "def": {
    "al": "0x96FF00", // союзник
    "en": "0xF50800" // противник
  },
  "colors": {
    "ally_alive": ${"def.al"},
    "ally_dead": ${"def.al"},
    "enemy_alive": ${"def.en"},
    "enemy_dead": ${"def.en"}
  }
}
Here we get the following:
- Root.xc. starts to boot.
- The “colors” parameter of the root.xc file refers to the colors.xc file and substitutes the “colors” object from it.
- The parameters in the “colors” section of the colors.xc file refer to the “def.al” and “def.en” values of the same file.
- The colors2 parameter of the root.xc file refers to the colors object, copies its value and overrides the ally_dead and enemy_dead values with others.
The result is valid JSON, which is parsed according to standard rules:
{
  "configVersion": "5.1.0",
  "colors": {
    "ally_alive": "0x96FF00",
    "ally_dead": "0x96FF00",
    "enemy_alive": "0xF50800",
    "enemy_dead": "0xF50800"
  },
  "colors2": {
    "ally_alive": "0x96FF00",
    "ally_dead": "0x009900",
    "enemy_alive": "0xF50800",
    "enemy_dead": "0x840500"
  }
}
The config file extension was changed to .xc (from “xvm config”), and the boot config file was called xvm.xc. Separate files and folders with speaking names are responsible for individual interface elements. It also makes it quite easy to assemble your own config using the individual elements you like.
User support
We initially understood that XVM is a bit more difficult to install than the bulk of mods (this even spawned the meme “The Olenemer begins to work already in the installation process”), and that without the support of a lot of audience we won’t gather.
To reduce the load on the support, we even divided XVM into XVM-full and XVM-light. In the light version, everything related to the display of statistics was cut out. Accordingly, these players did not need to install either a Dokan or a .NET application, which greatly simplified the installation.
The very first support was provided at the official World of Tanks forum. It was not very convenient - at least, we did not have the possibility of moderation and fixing topics, the themes were mixed with others that have nothing to do with us. Therefore, almost simultaneously with the move to the first dedicated server (January 2012), the first technical support forum was installed on it. The most common phpBB out of the box. Nevertheless, he performed his function to one state of emergency.
The state of emergency was that we needed to resize partitions in the file system. Why - no one already remembers, but it was necessary. We did not have specialists then, we decided to do it on our own. The result of this action was a ruined raid with (surprise!) The absence of actual backup.

A positive aspect of this incident was the appearance in our teamMr 13 (he makes backups!), Who is also the owner of the Korean Random forum , on the basis of which the main XVM support resource is now located.
In autumn 2012, the mod appeared face in the form of its own website http://www.modxvm.com/. The site contains a gentleman's set of any resource: description, links, news, FAQ. The online configuration editor moved there too. Over time, the site was translated into English, German, French and Ukrainian. The site also helped reduce the cost of personal funds for the development of XVM, since donations from volunteers could not recoup even a small part of the costs of maintaining and developing the project. But there was some discrepancy. We saw from our metrics that the number of unique XVM users is increasing every month, at some point it has exceeded one million, and the number of unique users per month on the site was less than 100K.
The reason we already knew - modpacks. Modpacks are modded self-promoted mods. XVM itself was willingly included in these assemblies, but not links to it. It even got to the point that the inscription on the battle loading screen with a link to our website was replaced with your own. This parasitism did not tire of us, and we made a voluntary-forced activation of the statistics module on our website.
It happens like this:
- A user visits the XVM website.
- Login using Wargaming.net ID (OpenID).
- Thanks to this, we recognize the game nickname and user ID and put down the sign “requested token” for it.
- After that, the user launches the game client with XVM installed. The mod at startup sends a request to the method
/checkToken. In response to the user with the status “requested token”, the token itself (GUID) is sent, otherwise only the status is “active” or “inactive” - depending on whether this client has active tokens or not. Received tokens are stored by the client in\res_mods\xvm\db\tokens.xdb. - Then, with each request to our API, the client also sends this token.
- If the token is missing or expired (and its validity period is two weeks) - the data is not returned, and the client displays an error message with a proposal to go to the mod’s website and activate statistics.
- A client can receive up to five tokens if he plays with his account on several PCs.
Activation gave us at least two effects:
- Website traffic was equal to the number of users of the mod.
- Approximately 30% decreased the load on the statistics server.
On the second point, we have the following opinion: some users of the same modpacks did not need statistics, but they used it only because it was turned on by default in most of these same packs.
This concludes the first part of our article. Ahead you will find a detailed story about the difficult path of our long-suffering server (in the second part), and the development of the client part itself (in the third, final part).