Freeing up hard disk space: WIMBoot
Today's desktop computers are slowly fading into the background. Laptops take their place, and then tablet computers go. The combination of mobility, high performance and high speed of obtaining information - all this is an undoubted advantage of tablets. However, tablets have their own fly in the ointment: it is a small size of hard drives. If the disk is 16, 32, or even 64 GB, you don’t feel like throwing valuable space on installation files. With the release of Windows 8.1 Update, a solution to this problem appeared - WIMBoot - a new way to install the OS, providing more free space for the user.

So what exactly is WIMBoot (Windows Image Boot)? This is a technology designed for devices with a small amount of hard drives, with which it provides more space for user data and applications after installing the operating system. I will immediately list the limitations when using WIMBoot:
How is WIMBoot different from a typical Windows installation? In a typical Windows installation, each installation file is written to disk twice: in compressed form in case of recovery and in unzipped format for use. Thus, the size of the space available to the user is reduced.

When installing Windows using WIMBoot, files are written to the hard drive only once and in a compressed format. Next, Pointer files, which refer to compressed files in the image section, are applied to the Windows partition.

What are the benefits of WIMBoot? From a technical point of view, the user will not notice the difference in the operation of the system. All user files will be visible and accessible without any conversion. At the same time, there will be much more space on the device. For example, with a typical installation of Windows 8.1 on a 16 GB hard drive, approximately 7 GB will be available to the user. If you install the system from a WIMBoot image, the free space will increase, and about 12 GB will be available to the user.
Now let's try to create a WIMBoot image ourselves and deploy it. To do this, you need the Windows 8.1 Update image, the Windows Assessment and Deployment Kit for Windows 8.1, and the Windows PE 5.1 boot disk. To check the version of Windows PE in wpeinit, you must run the registry editor ( regedit) and check the following registration key:
If the version of WinPE is 5.1, Windows PE can not be updated.
We start by installing the Windows ADK. First, install the following components from the Windows ADK for Windows 8.1: these are Deployment Image and Management and PE Environment ( download ). You can create a WIMBoot image both on a computer running Windows 8 and Windows 8.1, and on Windows Server 2012.
After the Windows ADK is installed, you must run the Deployment Image and Management program with administrator rights. It is with her that we have to work. Also, for convenience, we will use the following directory system:
In the C: \ Images directory, copy the install.wim file from the Windows 8.1 installation image.
Before describing in detail the process of creating a WIMBoot image, I will list the main steps that need to be done.
Next, we consider each of these steps in detail. At the end of the article, as additional materials, detailed descriptions of the processes for updating a Windows image, a WinPE image, as well as instructions for checking the final WIMBoot image are given.
Using the updated Windows files, create a WIMBoot image.
Copy the updated install.wim file to a new temporary file. This file will be used to install WIMBoot.
Create a directory and mount the image there.
Move the Windows RE image ( winre.wim ) from the mounted directory. Add a few words about Windows RE. Windows Recovery Environment is an extensible recovery platform based on Windows PE. When creating a WIMBoot image, it is recommended that you separate the Windows RE image from the main Windows image. Otherwise, the image will require approximately 200 MB of free hard disk space, which will not be used. I also want to note that the winre.wim file is usually hidden, so it must be made visible.
We optimize the WIMBoot image.
Unmount the image
Create a working copy of Windows PE files. Two versions of x86 or amd64 are available .
If necessary, upgrade WinPE 5.0 to WinPE 5.1. See the appendix for a detailed description of the update process.
The next step is to create a WinPE 5.1 boot disk. There are several possible options. In the simplest version, you can write files to a regular USB flash drive. The size of the flash card is better to choose 16 GB or more, because in the future, you will need to do some manipulations with the image, which will require additional space. You can create a bootable USB flash drive using the command:
In my case, WIMBoot was tested on a Hyper-V virtual machine. To simulate the standard process of installing WIMBoot on a tablet from a USB flash drive, I will use a virtual hard drive and describe the process of creating it. In order to burn a Windows PE image to VHD, use the diskpart tool and enter the following commands:
Next, write the WinPE files to the virtual disk we created
Run diskpart again and complete the disk creation.
After the WinPE 5.1 image is created and the WIMBoot image is prepared, the Deployment Image and Management program can be closed. We will continue to work without her. Now you need to add the WIMBoot image files to the WinPE 5.1 disk (copy the entire Images folder ). Also, I recommend adding several scripts for diskpart to the boot disk , which will save us time when creating and deploying a WIMBoot image. These scripts are optional, they can be added later or not added to the image at all.
You can add WIMBoot to the boot disk on absolutely any computer or virtual machine, the main thing is that they comply with the restrictions imposed by WIMBoot technology. I will continue to work with the virtual machine and create a second-generation virtual machine ( Generation 2 ) in Hyper-V that supports UEFI technology. As an image for installing the operating system, I will indicate the previously created WinPE.vhdx virtual disk. I created a WinPE image with WIMBoot in a virtual machine with a 32 GB hard drive. And installing the system using WIMBoot already on a virtual machine with a hard disk size for the created virtual machine will be 16 GB to simulate installation on a tablet with a small hard disk size. We load the virtual machine from the WinPE.vhdx disk and wait until wpeinit utilities start up (it may take several minutes).
Using the diskpart utility, create hard disk partitions. You can run the script below using the command
You can check the location of the script file by running the diskpart utility and the list volume command . You must specify the path to the WinPE disk .
A short comment about the team
Using the above script does not allow the user to see the recovery partitions through Explorer, however, through the Disk Management Tools, the user can delete these partitions. To prevent the removal of recovery partitions, you need to use the above command.
After executing this script, you should see something like the following.

As a result, we got such sections (MSR is the backup section of Microsoft and is not displayed in the output of this command):

Next, we will install the image. First, create a directory on drive R and copy the installation image there.
Apply the install.wim image to the Windows partition.
Copy the recovery tools to the Windows RE partition.
Copy the boot files from the Windows partition to the System partition. This step is necessary in order to load the expanded image.
Register the Windows partition and recovery partition
Reboot the computer. With a new boot, wait for the screen to start the setup.
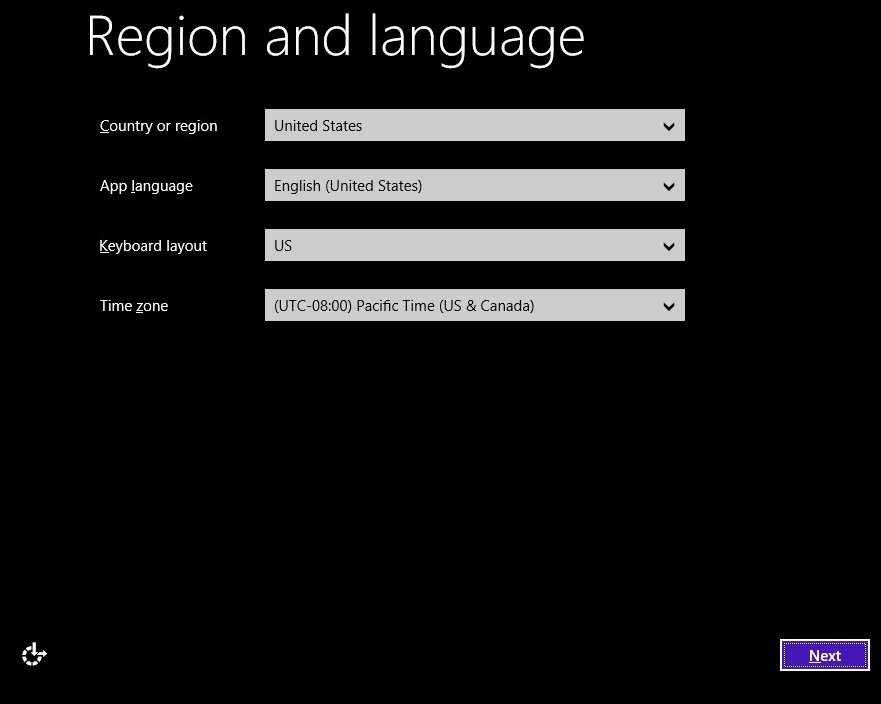
When it appears, you must press CTRL + SHIFT + F3 to restart the computer in audit mode. After that, the computer will start the system under the local administrator account. In Windows 8.1, you will need to run a command prompt with Administrator rights and clean the image. Clearing the image will free up additional disk space.
After that, using the Sysprep command, we prepare the computer for use and shut down.
Start the computer again in WinPE mode. I recommend running the diskpart utility and the list volume command . You must have letters assigned to the Windows disk and to the WinPE disk. All other sections are hidden.

Create a directory for temporary files C: \ Recycler \ Scratch and re-capture the image, but with the WIMBoot option.
After the command completes, we can turn off the computer. Now on our virtual disk or on a USB flash drive there is a WIMBoot installation image.
Now it remains only to test the WIMBoot image and make sure that the size of the files occupied by Windows is reduced. As already mentioned, the installation will use a second-generation virtual machine that supports UEFI technology with a 16 GB hard drive. As the installation disk, use the WinPE.vhdx virtual disk and start the virtual machine.
Wait for the wpeinit environment to start , run the diskpart utility and the list volume command . If the letter C is assigned to the WinPE partition, I recommend that you reassign it using the following commands.
Now, using the diskpart utility and the script below, we will create partitions for installation. Run the script with the command
As a result, you should get this result:

Create the “Windows Images” folder in the Images section. The name of the folder must be “Windows Images”.
Copy the Windows image from the WinPE disk to the Windows Images folder and rename it to install.wim , if necessary.
Apply the Windows image to the Windows partition using the / WIMBoot command . Before that, create a directory for temporary files in order to avoid problems associated with short file names.
Create the boot files and configure their work in the Windows partition.
Copy the image of the Windows recovery environment to the Images folder
Register the Windows Recovery Environment section.
It remains to protect the Windows image partitions and verify the results. To set the Read-Only attribute in wpeinit, execute the following commands
Now it remains only to start the computer and see a nice picture:
What happened? Now there is more free disk on the Windows partition. This happened due to the fact that in the Windows section there are now pointer files that reference Windows images. At the same time, the user does not feel the difference in work: all of his files work fine.
In conclusion, I want to additionally note that if there is a need to add any additional settings to the WIMBoot image, this can be done before the WIMBoot folders have been protected. Further information on WIMBoot can be found on TechNet .
I hope the information will be useful!
Technology Overview
So what exactly is WIMBoot (Windows Image Boot)? This is a technology designed for devices with a small amount of hard drives, with which it provides more space for user data and applications after installing the operating system. I will immediately list the limitations when using WIMBoot:
- WIMBoot can only be used on computers with UEFI running in UEFI mode. BIOS compatibility mode is not supported.
- WIMBoot is designed for devices with low SSD or eMMC hard drives.
- WIMBoot is available only with Windows 8.1 Update and is not supported for server operating systems. WIMBoot is available for all processor architectures (amd64, x86, and ARM).
How is WIMBoot different from a typical Windows installation? In a typical Windows installation, each installation file is written to disk twice: in compressed form in case of recovery and in unzipped format for use. Thus, the size of the space available to the user is reduced.
Standard Partition Scheme (without WIMBoot)
When installing Windows using WIMBoot, files are written to the hard drive only once and in a compressed format. Next, Pointer files, which refer to compressed files in the image section, are applied to the Windows partition.
Partition scheme when using WIMBoot
What are the benefits of WIMBoot? From a technical point of view, the user will not notice the difference in the operation of the system. All user files will be visible and accessible without any conversion. At the same time, there will be much more space on the device. For example, with a typical installation of Windows 8.1 on a 16 GB hard drive, approximately 7 GB will be available to the user. If you install the system from a WIMBoot image, the free space will increase, and about 12 GB will be available to the user.
Now let's try to create a WIMBoot image ourselves and deploy it. To do this, you need the Windows 8.1 Update image, the Windows Assessment and Deployment Kit for Windows 8.1, and the Windows PE 5.1 boot disk. To check the version of Windows PE in wpeinit, you must run the registry editor ( regedit) and check the following registration key:
HKEY_LOCAL_MACHINE\SOFTWARE\Microsoft\Windows NT\CurrentVersion\WinPE
If the version of WinPE is 5.1, Windows PE can not be updated.
We start by installing the Windows ADK. First, install the following components from the Windows ADK for Windows 8.1: these are Deployment Image and Management and PE Environment ( download ). You can create a WIMBoot image both on a computer running Windows 8 and Windows 8.1, and on Windows Server 2012.
After the Windows ADK is installed, you must run the Deployment Image and Management program with administrator rights. It is with her that we have to work. Also, for convenience, we will use the following directory system:
C:\Images – каталог, в котором хранятся образы
C:\mount – каталог, в который будем монтировать образы
C:\MSU – каталог, в котором сохраним архивы с обновлениями
In the C: \ Images directory, copy the install.wim file from the Windows 8.1 installation image.
Before describing in detail the process of creating a WIMBoot image, I will list the main steps that need to be done.
- Creating a WIMBoot Image
- Create a temporary copy of the image for installing Windows
- Separating a recovery image from a master Windows image
- Image Optimization for WIMBoot
- Creating a WinPE 5.1 Boot Disk
- Adding WIMBoot to the boot disk
- Deploy WIMBoot
- WIMBoot Partition Formatting a Hard Disk
- Adding Windows and Recovery Files
- WIMBoot Folder Protection
Next, we consider each of these steps in detail. At the end of the article, as additional materials, detailed descriptions of the processes for updating a Windows image, a WinPE image, as well as instructions for checking the final WIMBoot image are given.
1. Creating a WIMBoot Image
Using the updated Windows files, create a WIMBoot image.
1.1 Creating a temporary copy of the image for installing Windows
Copy the updated install.wim file to a new temporary file. This file will be used to install WIMBoot.
Copy C:\Images\install.wim C:\Images\install_temp.wim
Create a directory and mount the image there.
md C:\mount\Windows
Dism /Mount-Image /ImageFile:"C:\Images\install_temp.wim" /Index:1 /MountDir:C:\mount\Windows
1.2 Separating the recovery image from the main Windows image
Move the Windows RE image ( winre.wim ) from the mounted directory. Add a few words about Windows RE. Windows Recovery Environment is an extensible recovery platform based on Windows PE. When creating a WIMBoot image, it is recommended that you separate the Windows RE image from the main Windows image. Otherwise, the image will require approximately 200 MB of free hard disk space, which will not be used. I also want to note that the winre.wim file is usually hidden, so it must be made visible.
attrib –s -h C:\mount\Windows\Windows\System32\Recovery\winre.wim
move C:\mount\Windows\Windows\System32\Recovery\winre.wim C:\images\winre.wim
1.3 Image Optimization for WIMBoot
We optimize the WIMBoot image.
Dism /Optimize-Image /Image:C:\mount\Windows /WIMBoot
Unmount the image
Dism /Unmount-Image /MountDir:C:\mount\Windows /Commit
2. Creating a WinPE 5.1 boot disk
Create a working copy of Windows PE files. Two versions of x86 or amd64 are available .
copype amd64 C:\WinPE_amd64
If necessary, upgrade WinPE 5.0 to WinPE 5.1. See the appendix for a detailed description of the update process.
The next step is to create a WinPE 5.1 boot disk. There are several possible options. In the simplest version, you can write files to a regular USB flash drive. The size of the flash card is better to choose 16 GB or more, because in the future, you will need to do some manipulations with the image, which will require additional space. You can create a bootable USB flash drive using the command:
MakeWinPEMedia /UFD C:\WinPE_amd64 F:
In my case, WIMBoot was tested on a Hyper-V virtual machine. To simulate the standard process of installing WIMBoot on a tablet from a USB flash drive, I will use a virtual hard drive and describe the process of creating it. In order to burn a Windows PE image to VHD, use the diskpart tool and enter the following commands:
Diskpart
  create vdisk file=”C:\WinPE.vhdx” maximum=16000
  attach vdisk
  create partition primary
  assign letter=V
  format fs=ntfs quick
exit
Next, write the WinPE files to the virtual disk we created
MakeWinPEMedia /UFD C:\WinPE_amd64 V:
Run diskpart again and complete the disk creation.
Diskpart
  select vdisk file=”C:\WinPE.vhdx”
  detach vdisk
exit
3. Adding WIMBoot to the boot disk
After the WinPE 5.1 image is created and the WIMBoot image is prepared, the Deployment Image and Management program can be closed. We will continue to work without her. Now you need to add the WIMBoot image files to the WinPE 5.1 disk (copy the entire Images folder ). Also, I recommend adding several scripts for diskpart to the boot disk , which will save us time when creating and deploying a WIMBoot image. These scripts are optional, they can be added later or not added to the image at all.
You can add WIMBoot to the boot disk on absolutely any computer or virtual machine, the main thing is that they comply with the restrictions imposed by WIMBoot technology. I will continue to work with the virtual machine and create a second-generation virtual machine ( Generation 2 ) in Hyper-V that supports UEFI technology. As an image for installing the operating system, I will indicate the previously created WinPE.vhdx virtual disk. I created a WinPE image with WIMBoot in a virtual machine with a 32 GB hard drive. And installing the system using WIMBoot already on a virtual machine with a hard disk size for the created virtual machine will be 16 GB to simulate installation on a tablet with a small hard disk size. We load the virtual machine from the WinPE.vhdx disk and wait until wpeinit utilities start up (it may take several minutes).
Using the diskpart utility, create hard disk partitions. You can run the script below using the command
diskpart /s C:\Createpartition.txt
You can check the location of the script file by running the diskpart utility and the list volume command . You must specify the path to the WinPE disk .
rem == CreatePartitions.txt ==
select disk 0
clean
convert gpt
rem == Создание раздела под средства восстановления ==
create partition primary size=300
format quick fs=ntfs label=”Windows RE tools”
assign letter=”T”
set id=”de94bba4-06d1-4d40-a16a-bfd50179d6ac”
gpt attributes=0x8000000000000001
rem == Создание системного раздела ==
create partition efi size=100
format quick fs=fat32 label=”System”
assign letter=”S”
rem == Создание раздела MSR ==
create partition msr size=128
rem == Создание раздела Windows ==
create partition primary
shrink minimum=10000
format quick fs=ntfs label=”Windows”
assign letter=”W”
rem == Создание образа для восстановления ==
create partition primary
format quiсk fs=ntfs label=”Recovery image”
assign letter=”R”
set id=”de94bba4-06d1-4d40-a16a-bfd50179d6ac”
gpt attributes=0x8000000000000001
list volume
exit
A short comment about the team
set id=”de94bba4-06d1-4d40-a16a-bfd50179d6ac”
gpt attributes=0x8000000000000001
Using the above script does not allow the user to see the recovery partitions through Explorer, however, through the Disk Management Tools, the user can delete these partitions. To prevent the removal of recovery partitions, you need to use the above command.
After executing this script, you should see something like the following.
As a result, we got such sections (MSR is the backup section of Microsoft and is not displayed in the output of this command):
Next, we will install the image. First, create a directory on drive R and copy the installation image there.
md R:\RI
copy C:\Images\install.wim R:\RI\install.wim
Apply the install.wim image to the Windows partition.
dism /Apply-Image /ImageFile:R:\RI\install.wim /Index:1 /ApplyDir:W:\
Copy the recovery tools to the Windows RE partition.
md T:\Recovery\WindowsRE
attrib –s –h W:\windows\system32\recovery\winre.wim
copy W:\windows\system32\recovery\winre.wim T:\Recovery\WindowsRE\winre.wim
Copy the boot files from the Windows partition to the System partition. This step is necessary in order to load the expanded image.
bcdboot W:\Windows
Register the Windows partition and recovery partition
W:\Windows\System32\reagentc /setosimage /path R:\RI /target W:\Windows /index 1
W:\Windows\System32\reagentc /setreimage /path T:\Recovery\WindowsRE /target W:\Windows
Reboot the computer. With a new boot, wait for the screen to start the setup.
When it appears, you must press CTRL + SHIFT + F3 to restart the computer in audit mode. After that, the computer will start the system under the local administrator account. In Windows 8.1, you will need to run a command prompt with Administrator rights and clean the image. Clearing the image will free up additional disk space.
dism /Cleanup-Image /Online /StartComponentCleanup
After that, using the Sysprep command, we prepare the computer for use and shut down.
C:\Windows\System32\Sysprep\sysprep /generalize /shutdown /oobe
Start the computer again in WinPE mode. I recommend running the diskpart utility and the list volume command . You must have letters assigned to the Windows disk and to the WinPE disk. All other sections are hidden.
Create a directory for temporary files C: \ Recycler \ Scratch and re-capture the image, but with the WIMBoot option.
DISM /Capture-Image /WIMBoot /ImageFile:"D:\Images\install_wimboot.wim" /CaptureDir:C: /Name:"WIMBoot Enterprise_x64 with 8.1 Updates" /ScratchDir:C:\Recycler\Scratch
After the command completes, we can turn off the computer. Now on our virtual disk or on a USB flash drive there is a WIMBoot installation image.
4. Deploy WIMBoot
Now it remains only to test the WIMBoot image and make sure that the size of the files occupied by Windows is reduced. As already mentioned, the installation will use a second-generation virtual machine that supports UEFI technology with a 16 GB hard drive. As the installation disk, use the WinPE.vhdx virtual disk and start the virtual machine.
4.1 Formatting the hard disk according to the WIMBoot partition scheme
Wait for the wpeinit environment to start , run the diskpart utility and the list volume command . If the letter C is assigned to the WinPE partition, I recommend that you reassign it using the following commands.
select volume=0
assign letter=”D”
exit
Now, using the diskpart utility and the script below, we will create partitions for installation. Run the script with the command
diskpart /s D:\WimCreatePartition.txt
rem == WimCreatePartition.txt ==
select disk 0
clean
convert gpt
rem == Создание системного раздела ==
create partition efi size=100
format quick fs=fat32 label=”System”
rem == Создание раздела MSR ==
create partition msr size=128
rem == Создание раздела Windows ==
create partition primary
shrink minimum=5000
format quick fs=ntfs label=”Windows”
assign letter=”С”
rem == Создание раздела для образов ==
create partition primary
format quick fs=ntfs label=”Images”
assign letter=”M”
set id=”de94bba4-06d1-4d40-a16a-bfd50179d6ac”
gpt attributes=0x8000000000000001
list volume
exit
As a result, you should get this result:
4.2 Adding Windows and recovery files
Create the “Windows Images” folder in the Images section. The name of the folder must be “Windows Images”.
md "M:\ Windows Images \"
Copy the Windows image from the WinPE disk to the Windows Images folder and rename it to install.wim , if necessary.
copy D:\Images\install_update1.wim "M:\Windows Images\install.wim"
Apply the Windows image to the Windows partition using the / WIMBoot command . Before that, create a directory for temporary files in order to avoid problems associated with short file names.
md C:\Recycler\Scratch
DISM /Apply-Image /ImageFile:"M:\Windows Images\install.wim" /ApplyDir:C: /Index:1 /WIMBoot /ScratchDir:C:\Recycler\Scratch
Create the boot files and configure their work in the Windows partition.
C:\Windows\System32\bcdboot C:\Windows
Copy the image of the Windows recovery environment to the Images folder
md M:\Recovery\WindowsRE
echo f | xcopy D:\Images\winre.wim M:\Recovery\WindowsRE\winre.wim /h
Register the Windows Recovery Environment section.
C:\Windows\System32\Reagentc /SetREImage /Path M:\Recovery\WindowsRE /Target C:\Windows
4.3 Protecting the WIMBoot folder
It remains to protect the Windows image partitions and verify the results. To set the Read-Only attribute in wpeinit, execute the following commands
icacls "M:\Windows Images" /inheritance:r /T
icacls "M:\Windows Images" /grant:r SYSTEM:(R) /T
icacls "M:\Windows Images" /grant:r *S-1-5-32-544:(R) /T
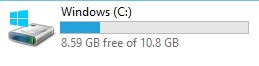
Now it remains only to start the computer and see a nice picture:
What happened? Now there is more free disk on the Windows partition. This happened due to the fact that in the Windows section there are now pointer files that reference Windows images. At the same time, the user does not feel the difference in work: all of his files work fine.
In conclusion, I want to additionally note that if there is a need to add any additional settings to the WIMBoot image, this can be done before the WIMBoot folders have been protected. Further information on WIMBoot can be found on TechNet .
I hope the information will be useful!
application
Installing the update: WinPE 5.0 -> WinPE 5.1
Перейдем к созданию WinPE и его обновления. В принципе, можете сначала просто создать WinPE, попробовать загрузить с его помощью целевой компьютер и проверить его версию. Однако здесь я приведу весь процесс создания образа.
Предварительно должна быть создана рабочая копия файлов Windows PE.
Смонтируем образ Windows PE
Добавляем пакеты обновлений к образу Windows PE. Набор пакетов обновлений тот же, что и был использован для обновления образа Windows 8.1 можно скачать здесь. Важно при загрузке пакета KB2919355 скачать также пакеты KB2919355, KB2932046, KB2934018, KB2937592, KB2938439, и KB2959977. Пакеты нужно устанавливать по порядку и по отдельности.
Оптимизируем образ
Размонтируем образ Windows PE
Экспортируем и конвертируем образ Windows PE в новый wim-файл
Заменяем файл boot.wim новым файлом boot2.wim
Предварительно должна быть создана рабочая копия файлов Windows PE.
Смонтируем образ Windows PE
Dism /Mount-Image /ImageFile:"C:\WinPE_amd64\media\sources\boot.wim" /index:1 /MountDir:"C:\WinPE_amd64\mount"
Добавляем пакеты обновлений к образу Windows PE. Набор пакетов обновлений тот же, что и был использован для обновления образа Windows 8.1 можно скачать здесь. Важно при загрузке пакета KB2919355 скачать также пакеты KB2919355, KB2932046, KB2934018, KB2937592, KB2938439, и KB2959977. Пакеты нужно устанавливать по порядку и по отдельности.
Dism /Add-Package /PackagePath:C:\MSU\Windows8.1--.msu /Image:C:\mount\Windows /LogPath:AddPackage.log
Оптимизируем образ
Dism /Image:С:\WinPE_amd64\mount /Cleanup-Image /StartComponentCleanup /ResetBase
Размонтируем образ Windows PE
Dism /Unmount-Image /MountDir:"C:\WinPE_amd64\mount" /commit
Экспортируем и конвертируем образ Windows PE в новый wim-файл
Dism /Export-Image /SourceImageFile:C:\WinPE_amd64\media\sources\boot.wim /SourceIndex:1 /DestinationImageFile:C:\WinPE_amd64\media\sources\boot2.wim
Заменяем файл boot.wim новым файлом boot2.wim
del C:\WinPE_amd64\media\sources\boot.wim
rename C:\WinPE_amd64\media\sources\boot2.wim boot.wim
Проверка образа WIMBoot
А теперь я приведу команды для проверки образа WIMBoot, которые необходимо выполнить в среде wpeinit.
Ожидаемый результат:

Ожидаемый результат:

Ожидаемый результат:

Ожидаемый результат:

- Проверяем наличие разделов System, MSR, Windows и Images
diskpart
  select disk 0
  select partition 3
  assign letter C
  select partition 4
  assign letter M
  list partition
exit
Ожидаемый результат:
- Проверка атрибутов раздела Images
diskpart
  select disk 0
  select partition 4
  detail partition
exit
Ожидаемый результат:
- Проверка файлов в разделе Images и файлов восстановления
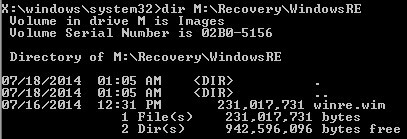
dir "M:\Windows Images"
dir M:\Recovery\WindowsRE
Ожидаемый результат:
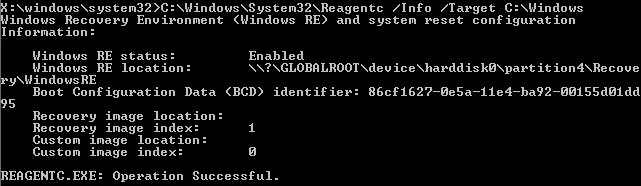
- В среде восстановления Windows должно быть правильно указано расположение допустимого образа восстановления.
C:\Windows\System32\Reagentc /Info /Target C:\Windows
Ожидаемый результат:
Установка обновлений на образ Windows 8.1
Смонтируем образ Windows
Устанавливаем обновления KB2919442 и KB2919355. Данные пакеты доступны для различных архитектур процессора: x86, x64 и arm. Скачать пакеты можно здесь. Пакеты обновлений должны быть установлены по порядку и по отдельности.
Здесь и далее — имя пакета, а — архитектура процессора.
Монтируем образ Windows RE
Updating a WinRE Image Using the Same Packages Used to Upgrade a Windows Image
Additionally, we will clean the image in order to remove some elements and reduce the final image size. This step is optional, but it can be performed only at this stage: after starting, it will be impossible to clear the image.
Now you can unmount the Windows RE image
In order to see changes in file size, the image must be exported.
After exporting, you need to replace winre.wim with the new version.
After the updates are installed, you can unmount the Windows image
md C:\mount\Windows
Dism /Mount-Image /ImageFile:"C:\Images\install.wim" /Index:1 /MountDir:C:\mount\Windows
Устанавливаем обновления KB2919442 и KB2919355. Данные пакеты доступны для различных архитектур процессора: x86, x64 и arm. Скачать пакеты можно здесь. Пакеты обновлений должны быть установлены по порядку и по отдельности.
Dism /Add-Package /PackagePath:C:\MSU\Windows8.1--.msu /Image:C:\mount\Windows /LogPath:AddPackage.log
Здесь и далее — имя пакета, а — архитектура процессора.
Монтируем образ Windows RE
md C:\mount\WinRE
Dism /Mount-Image /ImageFile:"C:\mount\Windows\Windows\System32\Recovery\winre.wim" /Index:1 /MountDir:C:\mount\WinRE
Updating a WinRE Image Using the Same Packages Used to Upgrade a Windows Image
Dism /Add-Package /PackagePath:C:\MSU\Windows8.1--.msu /Image:C:\mount\WinRE /LogPath:AddPackage.log
Additionally, we will clean the image in order to remove some elements and reduce the final image size. This step is optional, but it can be performed only at this stage: after starting, it will be impossible to clear the image.
Dism /Cleanup-Image /Image:C:\mount\WinRE /StartComponentCleanup /ResetBase
Now you can unmount the Windows RE image
Dism /Unmount-Image /MountDir:C:\mount\WinRE /Commit
In order to see changes in file size, the image must be exported.
Dism /Export-Image /SourceImageFile:C:\mount\Windows\Windows\System32\Recovery\winre.wim /SourceIndex:1 /DestinationImageFile:C:\Images\winre_updated.wim
After exporting, you need to replace winre.wim with the new version.
attrib –s -h C:\mount\Windows\Windows\System32\Recovery\winre.wim
Del C:\mount\Windows\Windows\System32\Recovery\winre.wim
copy C:\Images\winre_updated.wim C:\mount\Windows\Windows\System32\Recovery\winre.wim
After the updates are installed, you can unmount the Windows image
Dism /Unmount-Image /MountDir:C:\mount\Windows /Commit