Theory of Universal Links
Introduction
WWDC15 - Apple announces transition to Universal Links. Their meaning is prohibitive - send the user to the application if he goes to the page of the site that the application supports. This is most often used in letters that are sent after registration to confirm e-mail. Thus, Universal Links eliminates the need for users to return to the application on their own - and this is good for both user experience and statistics.

Many right now may think that this article is not being written very well, but you, dear reader, may not have seen what is happening on Stackoverflow on the topic of Universal Links.
Implementation
Now we will analyze four points that will allow you to implement Universal Links without the extra pain and blinding surprises that I had to face. In the end, we will easily touch on other literature and links, which may give you a deeper understanding of Universal Links.
Let's move on to the first point.
Associated Domains in App IDs
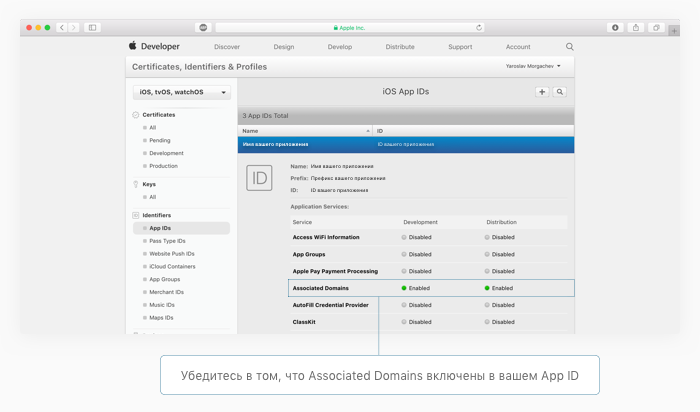
If you have not registered an App ID for your application, then do it now on the Apple Developer website . When registering, be sure to connect the Associated Domains. If the App ID is already registered, just go to the next step and enable Associated Domains directly from Xcode.
Associated Domains in Xcode
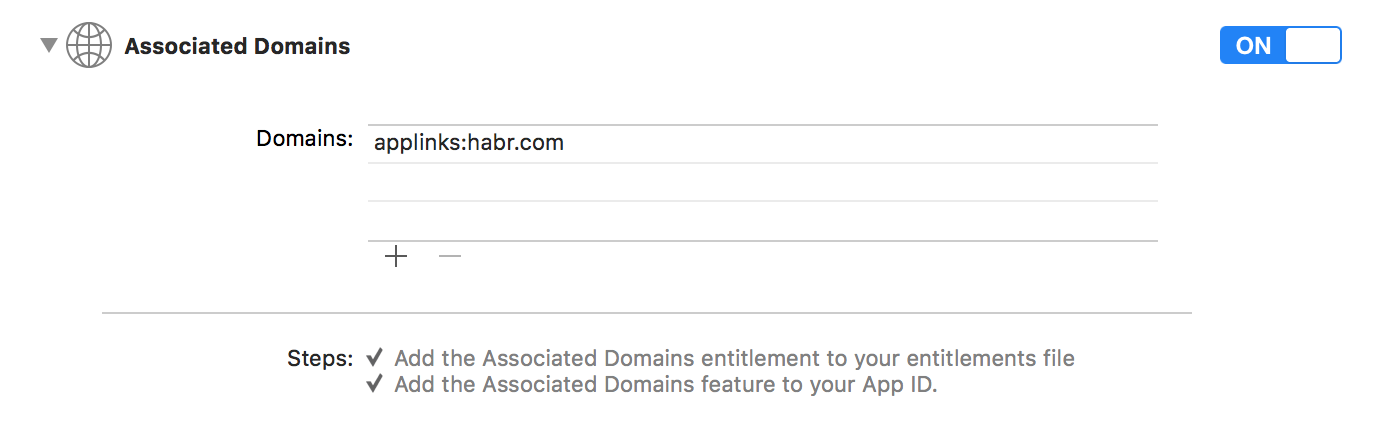
To be clear even to a novice, we won’t do it directly through the .entitlements file and go the clear way: Xcode → Project → Capabilities → Associated Domains.
Here we need to click on "+" and add the domains that interest us. Domains are necessarily added via applink signature, for example ...
applink:habr.comIn this case, we will pretend that we want to teach the Habr application to open when switching to one of the hubs, so I can safely tell habr.com. In fact, we will not be able to test the work of Universal Links on Habré, and if you immediately decided to switch from theory to practice, then I recommend creating a domain on Github Pages right now and pointing it out through applink.
AppDelegate.swift
Here it is enough for us to copy and paste this code, but then comes the explanation for the inquisitive.
func application(_ application: UIApplication, continue userActivity: NSUserActivity, restorationHandler: [Any?] -> Void) -> Bool {
     guard userActivity.activityType == NSUserActivityTypeBrowsingWeb, let url =           userActivity.webpageURL else { return false }
     print(url) // В зависимости от URL Вы можете открывать разные экраны приложения.
     return true
}
When you launch the application through Universal Link you will get an NSUserActivity object with an activityType value. The webpageURL property contains the URL that the user clicked on, it can be parsed into pieces using NSURLComponents.
NSURLComponents is a fairly simple topic that has been uncovered many times by small projects in the Playground. If you do not understand what it is about, then here is a good screenshot .
Apple-app-site-association file
It is a file without an extension, but it stores data in JSON format. It looks approximately as follows.
{
    "applinks": {
        "apps": [],
        "details": [{
            "appID": "teamId.com.bundleId.of.your.app",
            "paths": ["/path-for-redirectionl/*"]
        }]
    }
}
Also, I urge you to fix it in memory right now that this file should be stored in the root directory of the domain .
In the code, in fact, we are only interested in two fields. The appID in apple-app-site-association is a combination of your Team Identifier and Bundle Identifier. In the code above, I already substituted the data in such a way that it would be more convenient for you to copy them and change a couple of lines.
How to search for Team Identifier? To do this, go to developer.apple.com → Account → Sign In → Membership. The third field is your Team Identifier. For me it is 74D322Z5HV.
How to search for a bundle identifier? Xcode → Project → General. Your Bundle Identifier is written in the Identity section, second field. For me, this is com.habrahabr.ios.application.
Now let's make this appID for apple-app-site-association.
"appID": "74D322Z5HV.com.habrahabr.ios.application"
Done! You are gorgeous! Now let's talk about paths. This field says directly to the forehead which pages of the site the application supports, from which pages you should be sent to the application. You can add pages as many as you want. Further, a little help on how this works and to make it even more clear to you, I remind you that we are making an application for habr.com
"paths": [
    "/path-for-redirection/*" // Мы перенесемся в приложение при попадании на URL – habr.com/path-for-redirection/ или куда-угодно дальше (за это отвечает *), например при попадании на URL habr.com/path-for-redirection/ok/funny-video-with-dogs/ мы всё равно перейдем в приложение.
    "/path-for-redirection/" // Мы перенесемся в приложение при попадании на URL – habr.com/path-for-redirection/, но мы убрали звездочку, а значит не перенесемся в приложение при попадании на, например, habr.com/path-for-redirection/ok/.
    "*" // Только символ звездочки без указания какого-либо пути значит что мы перенесемся в приложение при попадании вообще на какую угодно страницу сайта.
    "NOT /path-for-redirection/*" // Если выше указана звездочка, а следующей строкой следует какой-угодно URL с приставкой NOT – мы перенесемся в приложение при попадании на любую страницу сайта, кроме той, что указана рядом с NOT.
]
And here it will look like apple-app-site-association if, for example, we have 2 applications: one for the Swift hub, and the other for the iOS development hub.
{
    "applinks": {
        "apps": [],
        "details": [{
            "appID": "74D322Z5HV.com.habrahabr.ios.application.iosdev",
            "paths": ["/hub/ios_dev/*"]
            },
            {
            "appID": "74D322Z5HV.com.habrahabr.ios.application.swift",
            "paths": ["/hub/swift/*"]
        }]
    }
}
Now you can save the apple-app-site-association file without the extension (format) and upload it to the server. Then send the required URL to your e-mail, assemble in Xcode a project with Associated Domains and code in AppDelegate.swift. You should check the work by going to the desired URL from the standard Mail application.
Noteworthy Facts and Tips
- Universal Links does not work from the browser, when you go to the required URL in Safari you will see a plate telling you that you can go to the application.
- Universal Links does not work in redirect chains. When you get to the desired URL, the site will simply show a plate at the top informing you that you can go to the application.
- Universal Links can be tested without its own dedicated or virtual server using GitHub Pages.
- The URL for the transition must necessarily begin with "https: //".
- You can check if everything is ok with the apple-app-site-association file through the App Search API Validation Tool .
- To cause a transition to the application from the desired URL, it is not necessary to have any content at this URL. That is, the transition will be carried out even if the browser at this URL gives 404.
- A long press on Universal Link in the mail application will prompt you to choose between opening the application and opening the browser.
References and references
In view of the fact that one of the goals of this publication is to give a maximum understanding of Universal Links, I want to end it with references to the literature that was used to write the article and / or just provides a deeper understanding of Universal Links.
- Apple Developer Documentation - Allowing Apps and Websites to Link to Your Content
- Medium Article - Universal Links in iOS
- Medium Article - The things I hate (and you should know) about Apple Universal Links
I hope this publication was the best that you found on the topic in Russian. In addition, I will be happy to further guide you here (in the comments). If I missed some points or was mistaken in something, I also beg you to inform me about this.
Thanks!