 April 29, 2014 at 08:45
Migrating from Windows XP to 8.1 using SCCM 2012 R2 and MDT 2013
- Tutorial

Good day, gentlemen. In connection with the recent demise of Windows XP, this topic is quite relevant, so let's get started.
The main problem is that USMT 6.3 does not support Windows XP, and USMT 5.0 does not support Windows 8.1. You will have to use both versions.
Top-level work breakdown:
1. Preparing SCCM for the OSD procedure
2. Creating the necessary packages
3. Creating the necessary Task Sequences (hereinafter TS)
4. Linking computers to SCCM
5. Data migration from Windows XP to the data migration point.
6. Installing Windows 8.1 on the computer with the restoration of pre-migrated data.
In addition, I assume you have a ready-made and working SCCM 2012 R2 infrastructure.
Limitations:
1. SCCM Client must be installed on all Windows XP machines
2. You can migrate folders and files, the settings will not move.
More details under the cut.
Preparing SCCM for the OSD procedure
1. Preparing PXE
Open the console, then go to Administration> Servers and Site System Roles> Distribution Point, open the properties, check the box "Enable PXE support for clients", "Enable unknown computer support" and "Allow this distribution point to respond to incoming PXE requests. " In addition, you need to configure DHCP for PXE to function correctly.
option 66 - NetBIOS PXE server name
option 67 - \ smsboot \ x64 \ wdsnbp.com
WDS settings do not need to be touched.
2. Installing the State Migration Point role
Open the console, then stomp in Administration> Sites, right-click on the necessary site "Add Site System Roles". If you have a Standalone Primary Site (and this is true for 99.99% of those reading this), click the “Next” button N times, do not forget to select the State Migration Point role, specify a folder for storing data and data retention period after successful migration .
Creating the necessary packages
1. Adding a Windows 8.1 image
I personally added just install.wim from the installation disk (as part of the test), if you have a corporate image, add it.
2. Adding the USMT package.
USMT 6.3 is created when SCCM is installed, we need USMT 5.0 (build 6.2.9200.16384), download the ADK from hereand put only USMT on some machine (preferably not on a machine with USMT 6.3 already installed) and “tear out” USMT files from it (the default folder is C: \ Program Files (x86) \ Windows Kits \ 8.0 \ Assessment and Deployment Kit \ User State Migration Tool)
Then we copy them to the server and create a package that includes the copied files, you do not need to create a program.
3. Creating MDT Boot Image
Open the console, then stomp in the Software Library> Operating Systems> Boot Images. “Create Boot Image using MDT”, enter the name, description, path to the package storage location, then select the bit size and size of “Scratch Space”, it is recommended to select a size of at least 128mb. You must create both x86 and x64 images. After creating, you need to go into the properties of the created images and check the box “Deploy this boot image from the PXE-enabled distribution point”
Creating the necessary TSs
1. Creating TS for data migration from Windows XP.
Open the console, then stomp in the Software Library> Operating Systems> Task Sequence. We create the usual “Custom Task Sequence” with three steps: Request State Store, Capture User State, Release State Store. In the Capture User State step, select the "Customize how user profiles are captured" item and add the MigDocs.xml and MigUser.xml files.
USMT 5.0
2 will be used in this TS . Creating TS for Windows 8.1 Installation
Open the console, then stomp in the Software Library> Operating Systems> Task Sequence. Create an MDT Task Sequence. We set the name and comments, enter information about the organization, enter it into the domain, etc., on the next screen, leave the tick “This task sequence will never be used to capture an image”. We select the boot image and the Windows 8.1 package created earlier. Create a new MDT Toolkit Package, fill in the information. Select the item "Zero Touch Installation". Select the SCCM client package. Select the USMT package (6.3!) Create a new MDT Settings Package, fill in the information. Click "next" to the end.
3. Modification of TS
It is necessary to modify our TS to make it work . This TS will use USMT 6.3.
Open the console, then stomp in the Software Library> Operating Systems> Task Sequence. Select our TS and click "Edit". Find the “Set Status 5” step and add the “Request State Store” step after it and select “Restore State from another computer”.
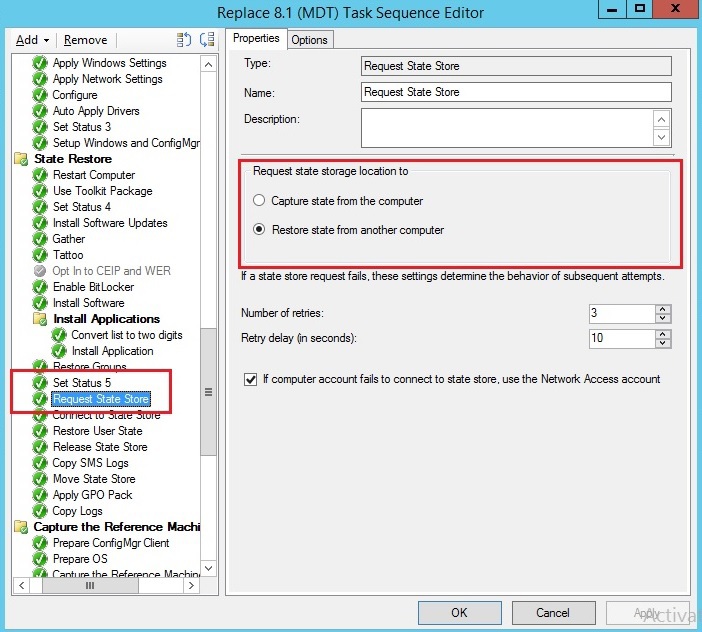
In the “Options” tab add the condition “Task Sequence Variable” “USMTLOCAL” “Not equals” “True”

Add under “Restore User State” item “Release State Store” and add the same condition for it.
Next, in the “Restore User State” item, select “Customize how user profiles are restored” and add the MigDocs.xml and MigUser.xml files.
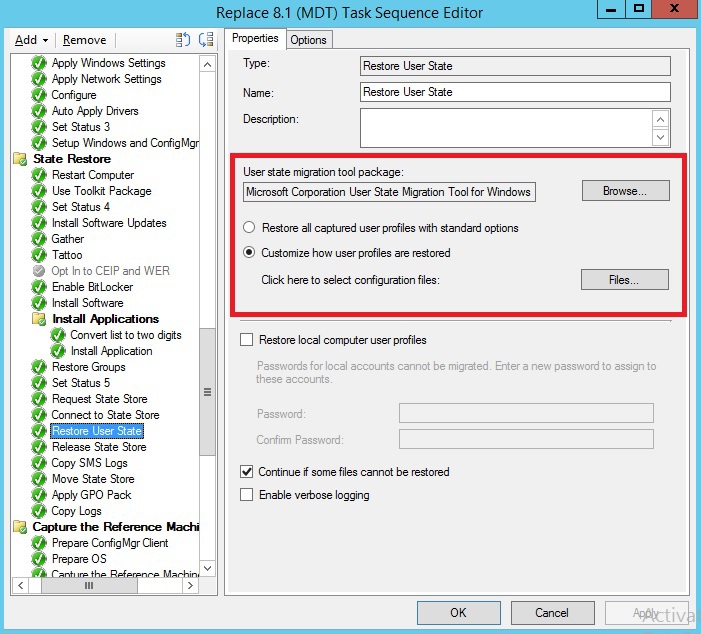
In the “Set Variable for Drive Letter” item in the “Install” group, change the value to “True”
4. Modification CustomSettings.ini
When creating the MDT Setting Package, the CustomSettings.ini file was created and needs to be modified. Add the following lines to it:
DeploymentType = NEWCOMPUTER
SLShare = \\ server_name \ xxx \ log - UNC path to the folder where TS will copy the logs, very convenient for troubleshooting.
ScanStateArgs = / v: 5 / o / c / ue:% computername% \ * - attention, this command will exclude all local users from the migration process.
LoadStateArgs = / v: 5 / c
5. Distributing packages You
must distribute all packages and both boot images to the content distribution point. (I personally always forget to do this)
Linking computers to SCCM
This step is necessary for a successful migration, you need to link computers for a successful migration between different computers.
Open the console, then stomp in Assets And Compliance> User State Migration. Select the Create Computer Association item and select the source computer (Windows XP) and the target computer (Windows 8.1). If the target computer does not already exist, it must be created in SCCM.
If you need to implement the “Refresh” script and not the “Replace” script, you do not need to link computers. You simply start the data collection, then reboot the machine into PXE and start the installation of Windows 8.1.
The following are points 5 and 6.
Naturally, for competent migration, you need to correctly create collections on which you "set" TS data.
Collection with all Windows XP computers:
select * from SMS_R_System inner join SMS_G_System_OPERATING_SYSTEM on SMS_G_System_OPERATING_SYSTEM.ResourceId = SMS_R_System.ResourceId where SMS_G_System_OPERATING_SYSTEM.Caption like "* Windows XP *" The
collection will need to be created for Windows 8.1 computers.
Thus, you can migrate settings from the old computer to the new one, as well as within the “limits” of one machine.
Of the pluses - a copy of the user's files on the server is as long as necessary, a single script for “Refresh” (this script is best implemented entirely through WinPE, but this requires a separate TS) and “Replace” scripts.
Of the minuses- 2 TS, one is not done in WinPE because the user can somehow influence it, a lot of space on the State Migration Point is needed to store user information.
This post is a set of pseudo-random data.
4c74356b41
ps. I will answer the main question in the comments “Why?”. If you have thousands of Windows XP machines, there is no question of manual migration, SCCM programs can be installed during the installation process, large companies always have some corporate standards, and the user usually does not need to ask what programs he needs.
Of course, everyone solves the problems that arose for him because he was more comfortable, I had no choice, they set a specific task for me, and I wrote this opus based on the results of a study of the problem.









