We write the REST API on Vert.x. Part 1: setting up the environment
- From the sandbox
- Tutorial
Hi, Harbauser. In this series of articles, we will write a REST API using Vert.x. Let's start with a simple one: installing vert.x itself and setting up the launch of a simple application in the IDE.
Vert.x is a kind of node.js from the Java world. It features a large list of supported languages (at the time of writing: Java, JavaScript, CoffeeScript, Groovy, Python, Ruby, Clojure, Scala), as well as the presence of a mechanism for starting blocking operations and the ability to use multiple threads, while maintaining the principle of a single workflow.
More information about the framework:
vertx.io/manual.html - The official manual
habrahabr.ru/post/181686 - The only post I found on the hub about the framework
First, install vert.x itself, for this we’ll go to the downloads section on the official website of the framework . Unpack the archive, add the bin directory to PATH. We verify the installation by running the following command in the terminal:
And that’s it. One of the main principles of the framework is simplicity of configuration.
Next, using apache maven, we will generate an example project. To do this, execute the following command in the terminal:
We select io.vertx: vertx-maven-archetype from the archetype found (at the time of writing, there are exactly no more than one) and select the latest version. We set the following parameters of the future application in the terminal: groupId, artifactId, version and basic package. For an example project, I set them accordingly: com.example, vertx-example, 1.0.0-SNAPSHOT, com.example. We’ll verify that the project is successfully built, to do this, run the following command in the terminal:
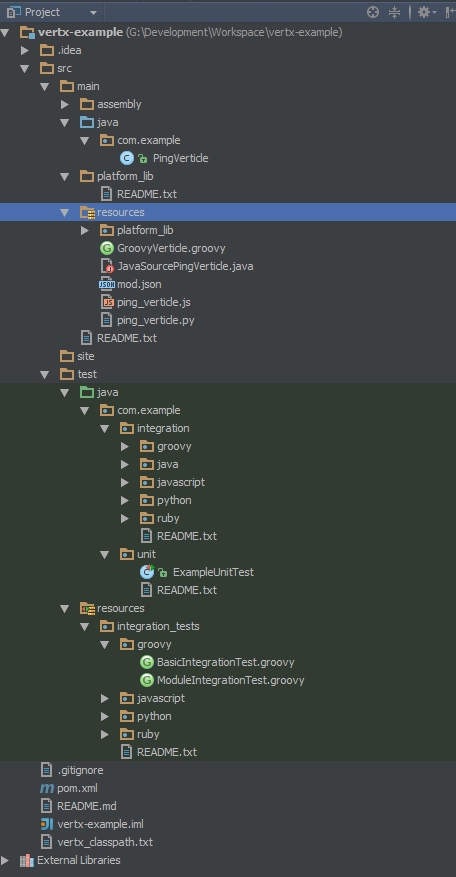
If you see the BUILD SUCCESS message, then everything is done correctly, while the structure of the project should look something like this:
Set up the launch of the project. I configured IntelliJ IDEA, but I assure you there should be no problems with other IDEs.
There is a slight problem with resolving dependencies from the vertx-core, vertx-platform, and vertx-hazelcast packages. In our project, scope is now set for them, which means that they will be provided by the environment. However, to run our application in the IDE, which does not provide these packages, therefore, we will create two maven profiles: one to run in the IDE, the other to build the application, which will run directly on vert.x, which carries the necessary dependencies. To do this, add the following text to our pom.xml:
And change the scope for vertx packages:
In order to start the project with one click, we create the following launch configuration:
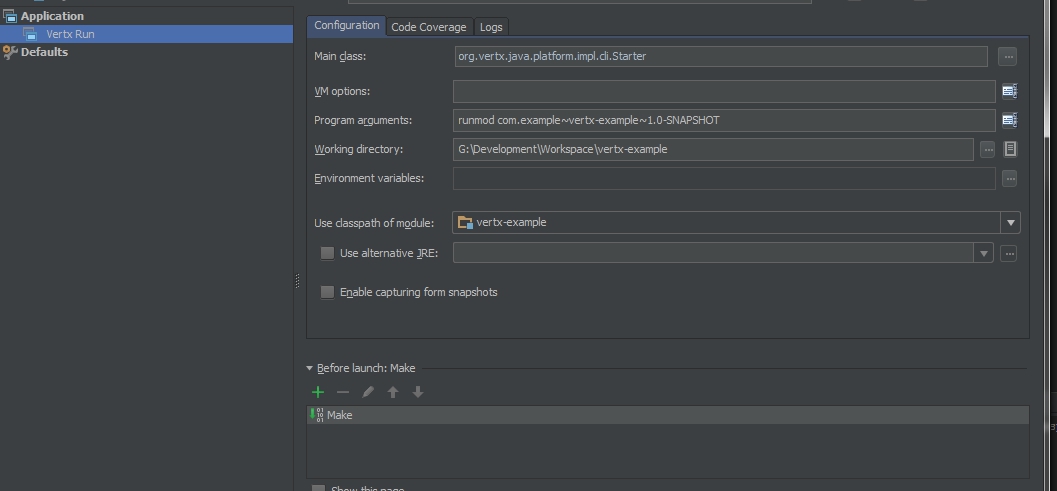
In fact, we run the program with
Now you can run our application, if at startup the output to the console is similar to the following, then everything is done correctly:
Thank you for attention. Next time, we’ll analyze what’s happening in this project and start writing our own application.
The source code for the resulting project is available on GitHub: github.com/X3H4/vertx-example
A bit of general information about the framework
Vert.x is a kind of node.js from the Java world. It features a large list of supported languages (at the time of writing: Java, JavaScript, CoffeeScript, Groovy, Python, Ruby, Clojure, Scala), as well as the presence of a mechanism for starting blocking operations and the ability to use multiple threads, while maintaining the principle of a single workflow.
More information about the framework:
vertx.io/manual.html - The official manual
habrahabr.ru/post/181686 - The only post I found on the hub about the framework
Install the framework, configure the IDE, and run the sample project
First, install vert.x itself, for this we’ll go to the downloads section on the official website of the framework . Unpack the archive, add the bin directory to PATH. We verify the installation by running the following command in the terminal:
vertx versionAnd that’s it. One of the main principles of the framework is simplicity of configuration.
Next, using apache maven, we will generate an example project. To do this, execute the following command in the terminal:
mvn archetype:generate -Dfilter=io.vertx:We select io.vertx: vertx-maven-archetype from the archetype found (at the time of writing, there are exactly no more than one) and select the latest version. We set the following parameters of the future application in the terminal: groupId, artifactId, version and basic package. For an example project, I set them accordingly: com.example, vertx-example, 1.0.0-SNAPSHOT, com.example. We’ll verify that the project is successfully built, to do this, run the following command in the terminal:
mvn installIf you see the BUILD SUCCESS message, then everything is done correctly, while the structure of the project should look something like this:
Set up the launch of the project. I configured IntelliJ IDEA, but I assure you there should be no problems with other IDEs.
There is a slight problem with resolving dependencies from the vertx-core, vertx-platform, and vertx-hazelcast packages. In our project, scope is now set for them, which means that they will be provided by the environment. However, to run our application in the IDE, which does not provide these packages, therefore, we will create two maven profiles: one to run in the IDE, the other to build the application, which will run directly on vert.x, which carries the necessary dependencies. To do this, add the following text to our pom.xml:
local compile deployment provided
And change the scope for vertx packages:
io.vertx vertx-core $ {vertx.version} $ {vertx-scope} io.vertx vertx-platform $ {vertx.version} $ {vertx-scope} io.vertx vertx-hazelcast $ {vertx.version} $ {vertx-scope}
In order to start the project with one click, we create the following launch configuration:
In fact, we run the program with
org.vertx.java.platform.impl.cli.Starteras an input point and arguments runmod com.example~vertx-example~1.0-SNAPSHOT. The argument indicates which module to run. The naming logic is as follows: groupId ~ artifactId ~ version. Now you can run our application, if at startup the output to the console is similar to the following, then everything is done correctly:
Apr 08, 2014 5:47:39 PM org.vertx.java.core.logging.impl.JULLogDelegate info
INFO: PingVerticle started
Apr 08, 2014 5:47:39 PM org.vertx.java.core.logging.impl.JULLogDelegate info
INFO: Succeeded in deploying module
Thank you for attention. Next time, we’ll analyze what’s happening in this project and start writing our own application.
The source code for the resulting project is available on GitHub: github.com/X3H4/vertx-example