Developers of RAW files for Mac OS X RPP and Aperture: Apple Exclusive in the hands of a amateur photographer

In the world of digital image processing, Macs have traditionally stood apart. Since ancient times, it has become the custom that Apple products are largely aligned with the interests of graphic designers, artists, photographers, and book publishers. In the old days, when Apple worked on PowerPC processors, the software park for them was special.
But soon, already ten years ago, the hardware uniqueness of apple products has been lost, and the interpenetration of various programs under the monopoly of Intel-compatible processors has accelerated significantly. As a result, a typical professional photographer or an "advanced" amateur uses now and on Apple, the traditional Windows bundle for processing graphic files: Adobe Lightroom (or even the Adobe Camera Raw plugin) plus Adobe Photoshop.
There is no doubt that this decision is not so bad; however, there are many complaints about the work of Lightroom and ACR, especially in the field of color rendition and preservation of micro-contrast on modern matrices. As an alternative, users prefer "native" developers (Canon DPP, Nikon Capture NX, Olympus Viewer, etc.), or use third-party commercial products (Capture One and SilkyPix most often come across in reviews). The almost omnipotent free developer of RAWtherapee, about which I wrote earlier, enjoys constant and growing popularity .
But the Mas world has its own alternatives to the established tradition. It will be primarily about two products. The first one, Aperture, is a paid product from Apple and serves as a kind of calling card for Mac OS X. The second, RAW Photo Processor (RPP) is a free Russian-made product that has suddenly gained such huge popularity that many amateur photographers only put it for it on their Hackintosh machines and virtual Mayverics.
I want to talk about these programs briefly in the following article.
Aperture
This thing is not free. Downloading it from the App Store, you will have to give 2690 r (at the time of writing, because Apple has been doing amazing things lately with the price of its products). By installing Aperture, you get a serious replacement for the useless, for my taste, iPhoto application, which includes all its functionality. However, iPhoto, unfortunately, does not disappear.
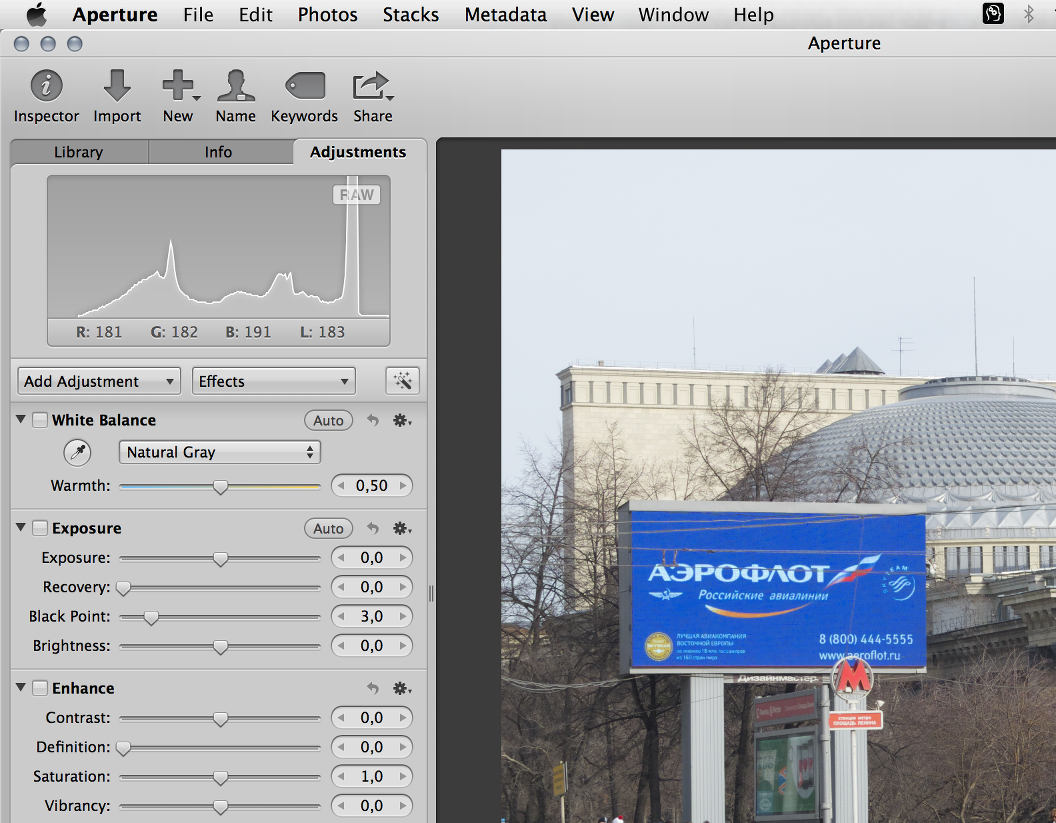
Aperture's interface is as simple as an oak plank. You can understand the basic functions in five minutes, if you do not get nervous and do not forbid yourself to poke buttons in any succession. Here is a fragment of the upper left corner of Aperture (one photo is open in the program window):
How to work with this thing? Not a single article is enough for this. But in short, the technology is simple.
Import
First you need to import the images into the Aperture library. We switch to the Library tab (it is clearly visible in the picture), select or create a library, select the device from which the files will go (note - the device is selected from the list in the upper left corner, but the files and folders are in the center from the bottom! you can tear off the file interface!), click “Import Checked” - the process has started!
Pay attention to the “Automatically split projects” checkbox - if it is enabled, the import will not go to one large folder, but to many small folders numbered sequentially so that you, more likely than not, get lost.
At the end of the import, you will be prompted to delete the imported files from the device where they were located. I do not use this function, because if possible I store all the pictures taken directly on the memory cards, but in general - it's up to you.
Job
In the bottom left, the Library tab will list available libraries. By clicking on one of them, you can select it for work.
The Info tab shows the EXIF of the selected file. Nothing special, but it can be useful. Here you can do cataloging, putting labels and asterisks for each file, as well as selecting and grouping files according to these criteria.
The last tab, Adjustments, is the tastiest. At the top left you see a histogram of the selected file. Under it is a panel for various settings and file adjustments, even a 100% beginner can understand the contents of which. True, initially there are few options on this panel; to add the ones you need, feel free to go to the Photos / Add adjustment menu and select what you need for happiness from the list.
Please note that some options are selected with a key combination of the form “^ (key)”, for example, “^ C”. Here, the “cap” means exactly the “Ctrl” key, familiar to Windows users, and not everyone’s favorite Apple Cmd. For some reason, this elementary fact causes regular problems to users.
Features
Aperture has no layers for editing, but there are brushes. A brush is a tool for drawing a mask from an image within which the declared editing properties are applied. Using a brush, you can, for example, remove chromatic aberrations and halos around a central object, or darken the sky without touching the details of the landscape. Many useful brushes are collected in the Photos / Add adjustment / Quick brushes menu.
Like any self-respecting developer, Aperture provides only non-destructive file editing; that is, instead of changing the source file, the program records and reproduces the list of operations performed on it. Any changes made to Aperture can be rolled back without any problems.
For my taste, Aperture is good for individual work with each file, fine-tuning and correction; however, this developer works very well in batch mode. The output formats are JPEG or TIFF, and you can set the color depth to 8 or 16 bits for TIFF, as well as the type of color space used.
And the last one. I really love the accurate and accurate shumodav RAWtherapee. Aperture also has noise reduction, but I have never had a chance to use it. The noises in Aperture disappear somewhere by themselves. For better or worse, I can’t judge, but I’ll say one thing for sure: it’s very convenient.
RAW Photo Processor (RPP)
If you came to the film during the film age, if the names “Unibrom” and “Iodocont” tell you something, if you remember how difficult it is to wash your fingers from the smell of hydroquinone and remember how the bluish tone of the picture when developing with amidol differs from deep black metolovy developer, RPP will inevitably subdue you.
This program is free, although on its website, I remember, asking for donations. At the first opening, it is unclear where, in fact, the developer; The program has a single-window interface and does not show space for the picture. Select “Open” - a file selection dialog will open, from which you can extract the desired picture. After opening the picture, the interface panel will be on the right.
The interface itself is pretty Spartan. All parameters for image correction are entered into the appropriate fields manually, using the scientific poke method. However, for 2-3 times you quickly navigate the settings. The “Apply” button at the top allows you to see what you got as a result, so that you still have time to quickly fix it.
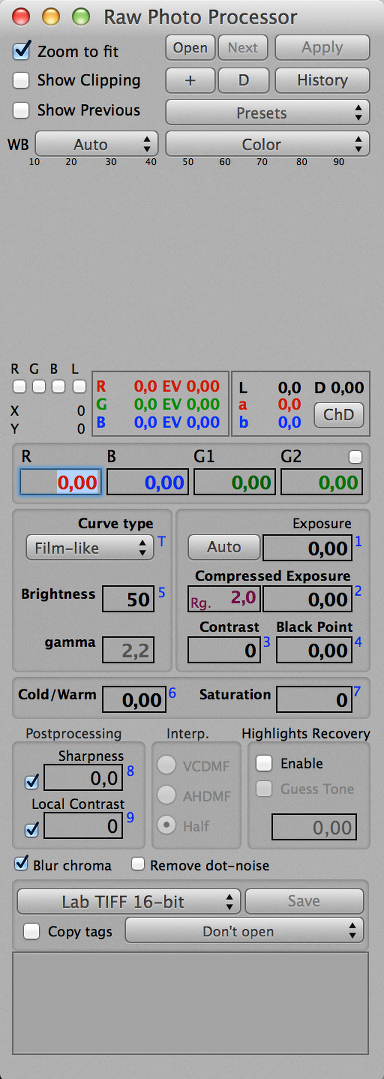 Of particular note is the “Interp.” Form, which is responsible, in fact, for the process of manifestation from RAW (debayerization or demosaics, that is, the conversion of a black and white image masked by a Bayer or transitive filter into a color one). The popular debayerization algorithm, AMaZE, which has shown traditionally the best result in comparison in recent years, is missing here. Instead, it presents a choice of modified VCD, AHD algorithms and another, which is called Half and which makes the picture half smaller on each side, for ease of preview. So, by default this particular Half is included. If you do not want to find out why your 24 megapixels turned into six after developing, be sure to pay attention to this point.
(I already wrote about debayerization algorithms in an article about RAWtherapee and provided a link to a good study of their comparative properties, which, for reference, I will
provide here.) The drop-down list for choosing a color model (next to the WB and Presets lists) includes several options for pre-installed color imitation, which include some dearly beloved by the authors varieties of Soviet photo paper and imported slide films. This imitation is not accurate, but very accurate, and fans of experiments and vintage retro shots may like it.
It should be noted that RPP is best used not as an editor for individual files (its interface is completely unsuitable for this purpose), but as a batch developer for a group of files previously cataloged in a separate folder and taken under more or less the same conditions and with more or less the same settings. I already wrote about the rules and methods of such cataloging in a separate article. A preliminary sorting of catalogs dramatically facilitates the use of RPP.
But all these difficulties and difficulties are lost against the background of the main advantage of this developer - RPP is able to work with color completely unique, preserving the most accurate color nuances of the image. It is this careful attitude to color that makes RPP the “weapon of choice” for many amateur photographers, especially those who for the sake of working with color refuse the traditional false confrontation “Canon vs. Nikon ”and selects cameras capable of reproducing color with maximum precision, like Leica, Fuji or Rikoh. In this segment of photography, RPP is considered by many to be the only acceptable solution for developing photos.
You can save data in JPEG, 8- or 16-bit TIFF and in a large selection of available color spaces. The choice of the type of saving is made by a long, uncomfortable drop-down list.
Briefly about the main thing
In the Windows world, as already mentioned, RPP and Aperture have no analogues. Their very existence is a good reason to overcome the old prejudices about "Apple is only for glamor, but you need to work seriously on Windows" and try Mas.
Aperture is as easy to set up and use as RPP is, perhaps. Aperture functionality is designed for “simple” users or for those professionals who are not ready to spend extra time getting a high-quality result; Aperture takes beautiful shots from the most unpretentious digital negatives with the ease of a circus magician. RPP - a weapon for a thoughtful, long, leisurely fight for the "right" color. This fight should be conducted according to the rules of mathematics of digital processing, with knowledge of realities, with taste and experience; with such skills and desire RPP guarantees victory.
The two programs are equally different in their capabilities. Aperture provides import and cataloging; for RPP, these features are completely redundant. In RPP, you can fine-tune the processing algorithms; in Aperture, these algorithms are hidden from the user. Aperture is paid, but RPP is not.
And really, these programs have only two things in common: a unique “Makovsky” platform and the highest quality of the results obtained at the output. The result, however, always depends primarily on the straightness of the user's hands, on his taste and experience.
So let me wish you good pictures and no less successful digital processing!