Raspbian and QEMU
Hello everybody! They gave me a raspberry pi recently, and I decided to use it. But, as it usually happens, there is very little time for this at home, but at work there is nothing to connect it to. Therefore, I decided to install raspbian on a virtual machine in order to use it at work. Who cares how I did this, please join in.
To achieve my goal, I used many articles and messages on forums in various parts of the Internet, links to those articles that I recall at the end of my story. Also, please do not kick for mistakes and narrative style, but indicate all the flaws in the comments, because This is my first publication on the Habr in particular, and somewhere in general.
So, let's begin! To get raspbian working on QEMU, we first need a Linux kernel for the arm platform. There are ready-made kernels, but for general development, I decided to try to assemble it myself.
To do this, you will need a machine with an operating system from the Linux family (in fact, I just don’t know if this can be done on other operating systems). I used one of the varieties of Debian, namely Kali Linux, because he was at that moment at hand.
1. From the beginning, download the packages that we need to build the kernel by running the following command:
sudo apt-get install git libncurses5-dev gcc-arm-linux-gnueabihf
If you are using a 32-bit system, then you will still need to install the x86 library:
sudo apt-get install ia32-libs
2. You also need to install the cross-compiler, for this you need to add the repository:
deb www.emdebian.org/debian unstable mainAnd execute the following commands:
apt-get update
apt-get install gcc-4.7-arm-linux-gnueabihf
And for compatibility, create a character label on the compiler:
ln -s 'which arm-linux-gnueabihf-gcc-4.7' /usr/local/bin/arm-linux/gnueabihf-gcc
3. The next step is to deflate the kernel sources and the patch to support the ARM11 architecture by the kernel and apply this patch to the sources. To do this, execute the following commands:
mkdir /git
cd /git
git clone https://github.com/raspberrypi/linux.git
wget http://xecdesign.com/downloads/linux-qemu/linux-arm.patch
patch -p1 -d linux/ < linux-arm.patch
4. Next, we will need to configure the kernel for the needs of Raspbian.
To do this, execute the following commands:
cd linux
make ARCH=arm versatile_defconfig
make ARCH=arm menuconfig
And in the menu that appears, select the following settings.
IMPORTANT!!! If you select an option, if you have an option next to it, press the spacebar again so that <*> appears.
a) We indicate the cross-compiler: IMPORTANT! Do not forget to indicate '-' at the end b) CPU settings: c) Enabling support for hard-float binaries: d) Enabling EABI for ARM: e) Enabling support for QEMU disks: e) Enabling devtmpfs: e) Enabling important file systems: w ) Enabling tmpfs: h) Enabling the message interface: i) (optional) Enabling /proc/config.gz k) (optional) Use larger fonts and enabling the logo:
General Setup -> Cross-compiler tool prefix

arm-linux-gnueabihf-
System Type->
[*] Support ARMV6 processor
[*] ARM errata: Invalidation of the Instruction Cache Operation fail
[*] ARM errata: Possible cache data corruption with hit-under-miss enabled
Floating point emulation ->

 [*] VFP-format floating point maths
Kernel Features ->

 [*] Use the ARM EABI to compile the kernel

 [*] Allow old ABI binaries to run with this kernel
Bus Support->

 [*] PCI Support

Device Drivers ->

 SCSI Device Support

 [*] SCSI Device Support

 [*] SCSI Disk Support

 [*] SCSI CDROM Support

 [*] SCSI low-level drivers ->

 [*] SYM53C8XX Version 2 SCSI support
Device Drivers ->
Generic Driver Options ->
[*] Maintain a devtmpfs filesystem to mount at /dev
[*] Automount devtmpfs at /dev, after the kernel mounted the rootFile Systems ->
<*> Ext3 journaling file system support
<*> The Extended 4 (ext4) filesystem
DOS/FAT/NT Filesystems ->
<*> VFAT (Windows-95) fs supportFile Systems ->
Pseudo filesystems->
[*] Tmpfs Virtual Memory file system support (former shm fs)Device Drivers ->
Input device support ->
[*] Event interfaceGeneral Setup ->
[*] Kernel .config support
[*] Enable access to .config through /proc/config.gzDevice Drivers ->
Graphics Support ->
[*] Bootup logo
Console display driver support ->
[*] Select compiled-in fonts
[*] VGA 8x16 fontSave and exit.
Next, go to the kernel compilation itself. To do this, execute the following commands:
make ARCH=arm
make arch=arm INSTALL_MOD_PATH=../modules modules_install
Well, I immediately copy it to the root, because then I will prescribe the parameters from the root.
cp arch/arm/boot/zImage /kernel-qemu
This completes the kernel build for QEMU. If you do not want to repeat all this, then in the end I will lay out links to all files.
The next step is to install QEMU.
For Windows users, everything is very simple. We go to QEMU ON WINDOWS and download the archive with the latest version of QEMU.
IMPORTANT!!! QEMU version must be at least 1.5.0, because it fixes a critical bug for emulating Raspbian.
For Windows users, I will not describe the process of starting Raspbian in detail, because it is very similar to the startup process on a Linux family of OS. If you have questions, we will meet in the comments.
So, for starters, copy the QEMU sources to ourselves:
cd /git
git clone git://git.qemu-project.org/qemu.git
Also install the dependencies:
apt-get install libsdl1.2-dev
We proceed to the setup and installation:
cd qemu
./configure -target-list="arm-softmmu arm-linux-user" -enable-sdl -static
make
sudo make install
If you receive the Error: DTC not present message , then run the following command:
git submodule update --init dtc
Now you have QEMU and the kernel, it remains to download the Raspbian image and carry out a “tuning” boot.
To start Raspbian for the first time, you need to run the following command:
qemu-system-arm -kernel /kernel-qemu -cpu arm1176 -m 256 -M versalitepb -append "root=/dev/sda2 panic=1 rootfstype=ext4 rw init=/bin/bash" -hda <путь_к_образу_Rapbian>
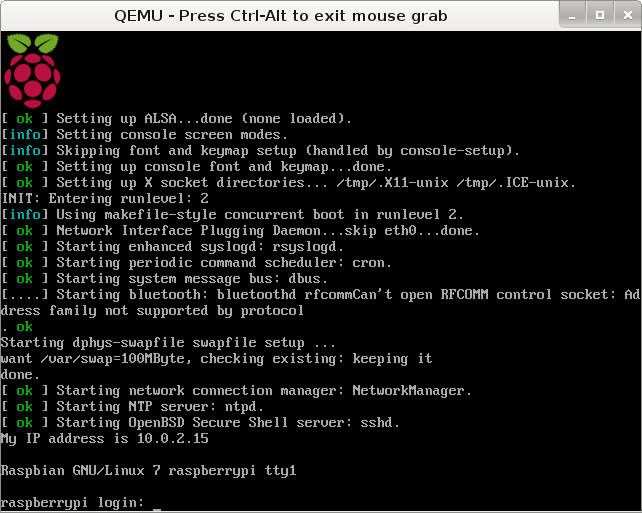
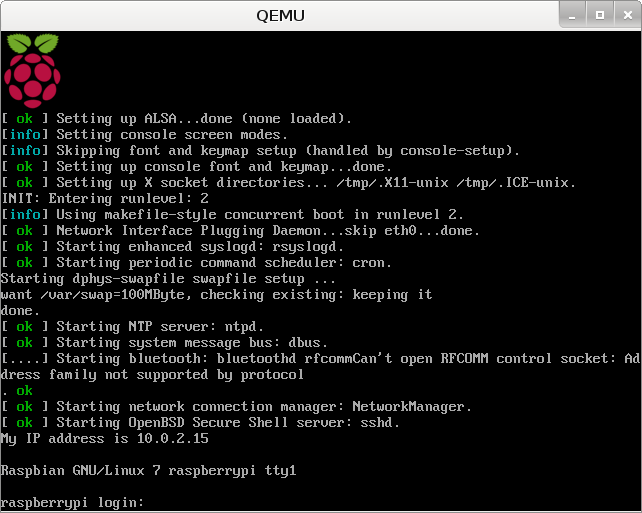
After loading, you will see a bash prompt:
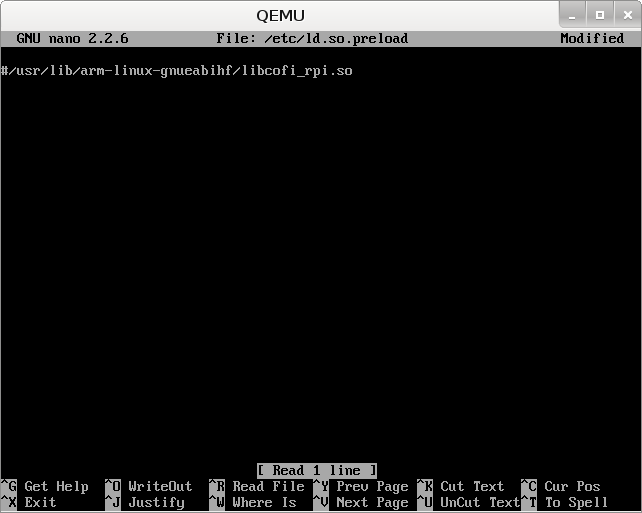
Enter:
nano /etc/ld.so.preload
Comment out the line, press [Ctrl] + [x], save and exit
. Also do:
nano /etc/udev/rules.d/90-qemu.rules
And enter: Save, close and turn off the virtual machine:
KERNEL=="sda",SYMLINK+="mmcblk0"

KERNEL=="sda?",SYMLINK+="mmcblk0p%n",
shutdown -h now
Now you are ready to run virtual Raspbian. Run the command:
qemu-system-arm -kernel /kernel-qemu -cpu arm1176 -m 256 -M versalitepb -append "root=/dev/sda2 panic=1 rootfstype=ext4 rw" -hda <путь_к_образу_Rapbian>
And if everything went well, then you will see the standard Raspbian prompt:
Changing the disk size can also be useful. To do this, on the host, do:
qemu-img resize <образ_диска_Raspbian> +6G
Then download Raspbian and do the following:
sudo fdisk /dev/sda
Press [p] and remember the Start value for sda2.
Then press [d] and delete 2 section.
Then press [n] - to create a new partition.
Press [p] to indicate that it will be primary.
Indicate that he will be second by pressing [2].
Set First sector to Start.
For Last Sector, just press [Enter] to use all the free space.
Press [w] to exit, saving the changes to the partition table.
Reboot by running the command:
sudo shutdown -r now
After rebooting, run the command:
sudo resize2fs /dev/sda2
That's all. Running the command
df -h
You will see the new size of your disk.
That's probably all I wanted to say on this. Please do not kick much for the style of presentation, but rather point out specific errors in the comments.
Links to materials:
1. Compiling the kernel - xecdesign.com/compiling-a-kernel
2. QEMU - wiki.qemu.org
3. My kernel