 March 13, 2014 at 13:49
Upload historical data to SAP using LSMW (Legacy System Migration Workbench)
- From the sandbox
- Tutorial
When implementing the SAP ERP system, one of the most important issues is the issue of loading the data of historical systems (those that operated at the enterprise before the introduction of SAP) into the new ERP. To do this, there is a powerful tool inside SAP - the Data Transfer System from Historical Systems (LSMW). Over 8 years of working with SAP, I have gained considerable experience working with this system, and since LSMW does not have easy-to-understand manuals (especially in Russian) and my colleagues from the workshop constantly turn to me for advice, finding me on the Russian SAP forum, I dare to believe that this article will be very informative for both interns and experienced consultants who so far do not have experience with LSWM.
We start the LSMW transaction and, lo and behold, we are already welcomed: Welcome to the Legacy System Migration Workbench!
On the initial screen, we see the following picture
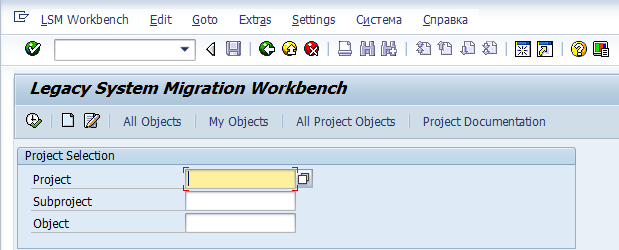
First things first, you need to create a project (Project). A project can be, for example, a top-level “project” (for example, with the name “PM” for working with the entire maintenance group (Maintenance and repair of equipment)), or a more localized one, for example, a project for loading Technical Objects into a system (we’ll call his "Tech Objects"). I recommend not to produce essence and, remembering the commandment of Uncle Okama, as a project to start just the same upper level. It is very convenient for all project teams - in LSMW to see their modules as a project.
Become the cursor in the Project field and click on the white sheet. We create a project. In the case of my example, this will be “PM”.
Then create a subproject. This is also just a structuring of your project, therefore, depending on the decision to choose a project, we accordingly create a subproject. In the case of my example, the subproject is just “Tech Objects”.
Well, the object (Object). Here we already detail what exactly we are going to load into the system / modify using LSMW. For example, I need to download Equipment Unit data. In this case, I create a “PoE Upload” object. We
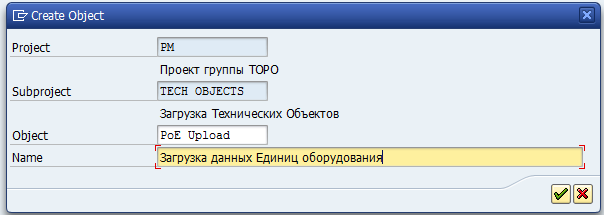
created a project, a subproject and an object, we start it.
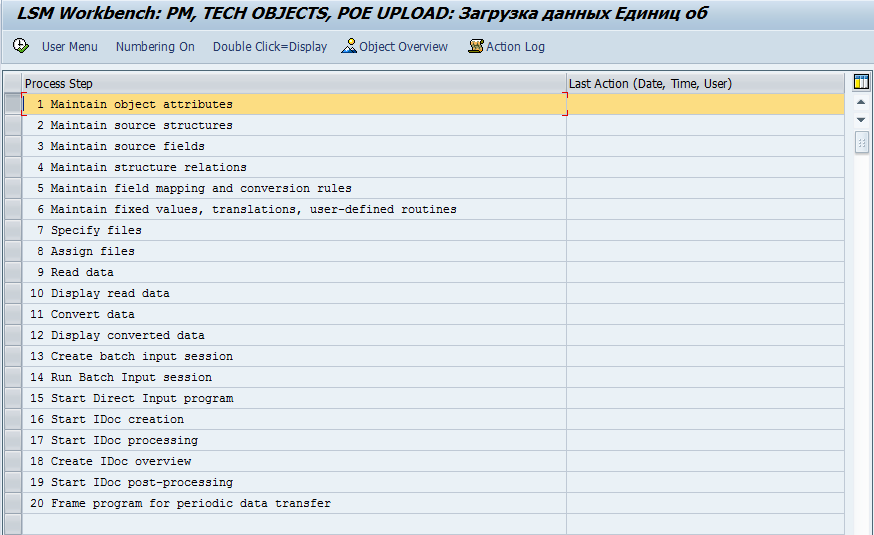
We see a screen with twenty steps
(in the Edit menu item, enable Numering On so that a serial number is displayed next to each step)
1) Step One - Maintain object attributes
At this step, we need to indicate how we will load the data. I will focus on the two most frequently used by me and popular in principle methods.
A) Standard Object (Standart Batch / Direct Input)
LSMW provides a list of predefined objects, among which you most likely have the one you need.
In my case, this is a Unit of equipment
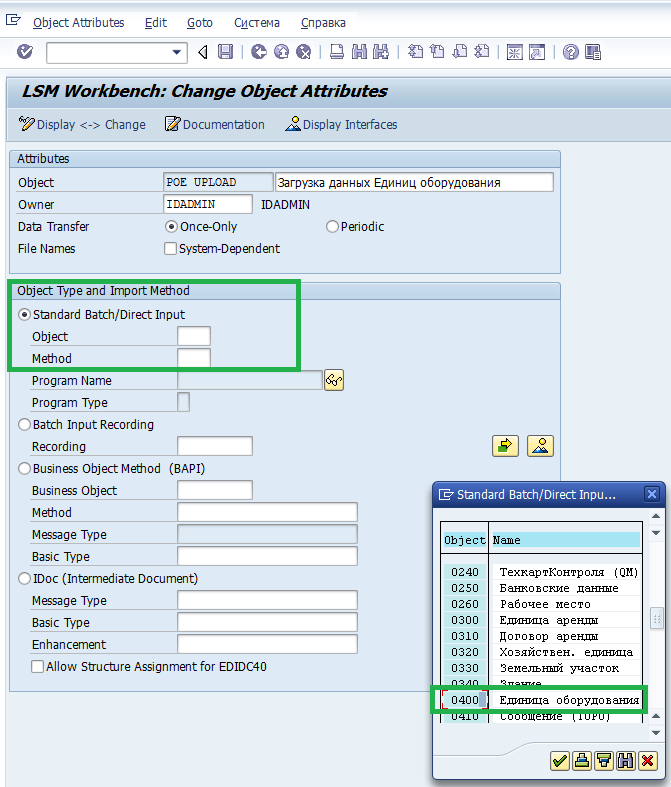
In the Method field, select 0001 - Create PackVv (that is, "batch input").
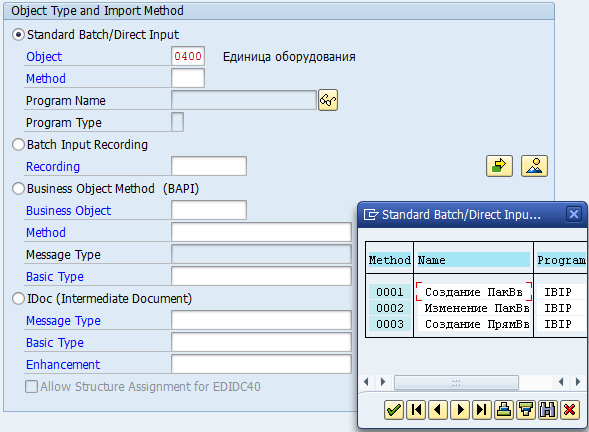
Save, exit.
B) Batch Input Recording
If you don’t have enough of a standard object, or if there isn’t a standard object for your needs, in principle, in this case you need to write a “macro” (as I call it). That is, you will call transcription, the data of which you need to download, and record the sequence of your actions, and then, in the next steps, match the recorded “macro”, you will create a structure for the download template file.
I will write the Batch Input Recording method if there is time in a separate topic (this is a big separate topic) if the topic finds its reader.
2) Step two - Maintain source structures
At this step, we need to determine the structure of our loaded data. In the case of Equipment Units, the structure will be single-level (“flat”), without subordinate substructures. The latter would be useful to us, say, in the case of loading Maintenance Orders, when for one order header there can be N operations, each of which can have M components. And a piece of equipment has a number and a data set, without nesting.
If the structure is flat, then this step is a formality. Create a structure, for example, “Main”. Save, exit.
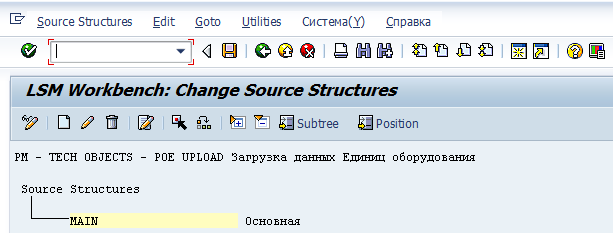
3) Step three - Maintain source fields
In step 3, we determine the fields that we plan to load. We position the cursor on our Main structure, click on the “white sheet” icon and create the fields.
Fields are those fields that you are going to load for your object. In my case, I want to say, for the Unit of Equipment, to load:
- EO number
- EO name
- type of object
This, of course, is an example. You can ship any fields. For the sake of brevity, I will confine myself to only these three.
So that in the future, at step No. 5, you don’t bother with comparing your own invented field names with system fields, and just for clarity, I propose to name the fields as they are called in the system. To find out what this or that field is called, what type they are and what bit depth, we become the cursor on this field and press "F1".
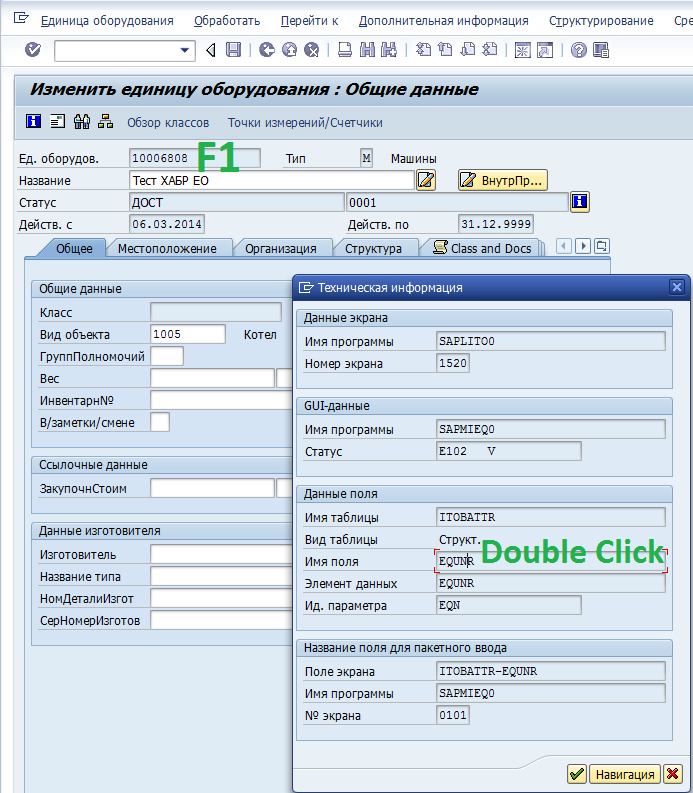
In the window that appears, we double-click (drill down) into the entry "Field Name"
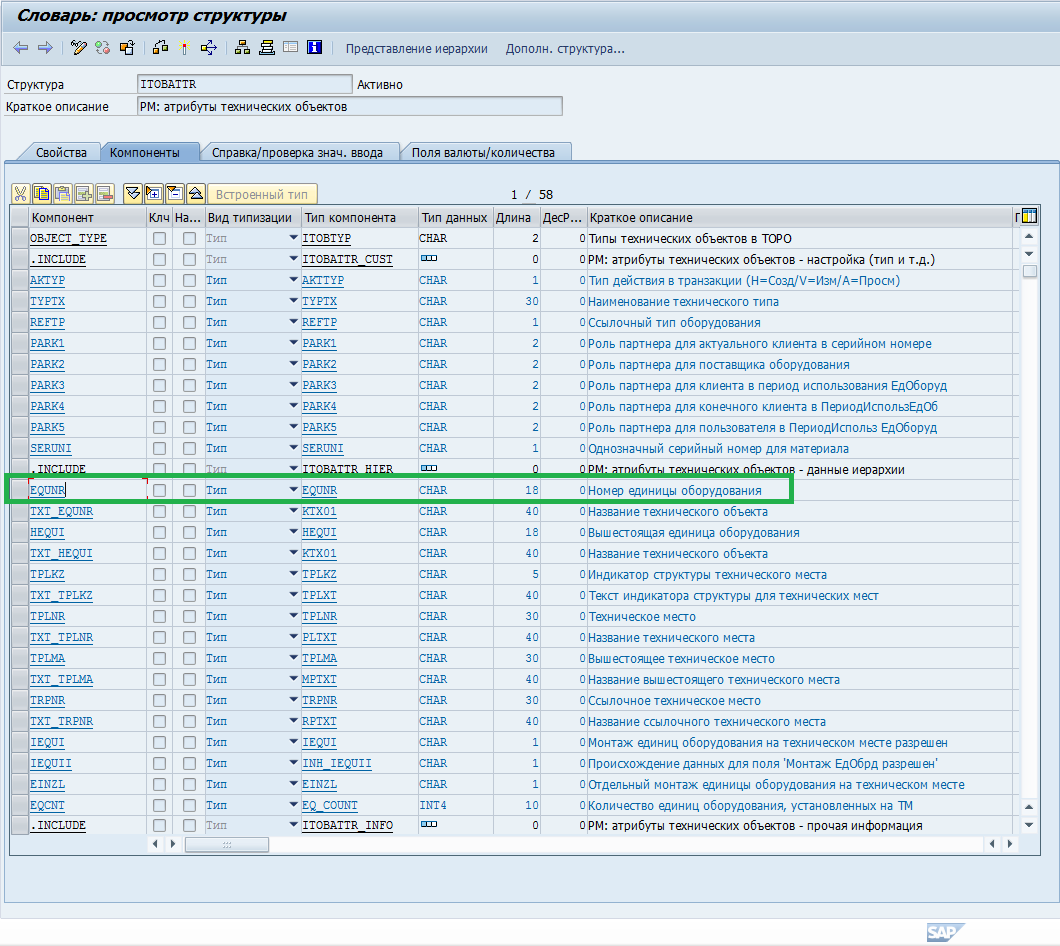
Among the fields we find the one of interest to us (in this case, “Unit Number” is the EQNR field), its type (CHAR) and length (18 characters). And, accordingly, we prescribe this data in the field created in the third step. We
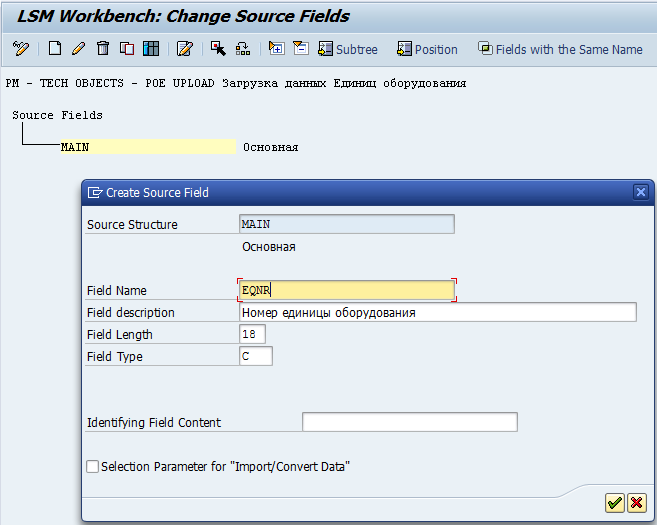
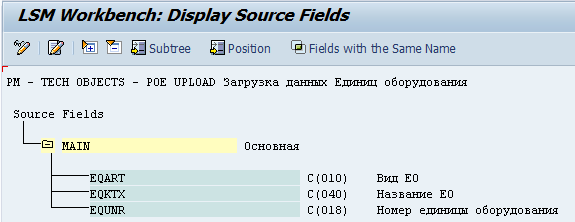
created a set of the fields of interest to us as loadable fields, save, exit.
4) Fourth step - Maintain structure relations
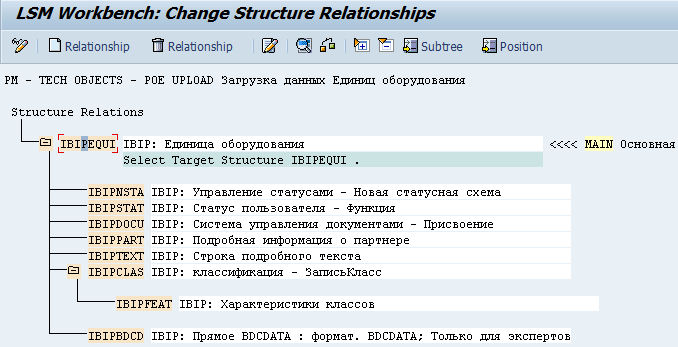
At this step we need to connect our structures with standard ones. In the case of my simple, flat structure, everything is very simple: we position the cursor on IBIP: the Unit of Equipment, press the white sheet. Our only Main structure is automatically tied to the standard EO structure. Save, exit.
5) Step Five - Maintain field mapping and conversion rules
Here we need to connect the created fields, which are supposed to be loaded, with the corresponding SW fields known to the system.
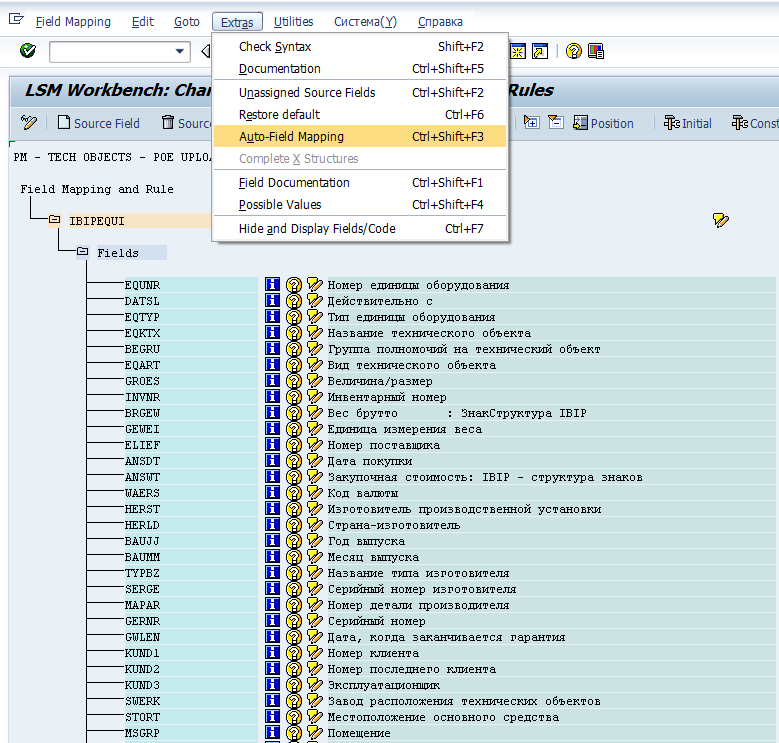
And here it is useful to us that at step 3 we called the fields the same way the system knows them. Now in the Extras menu item we click on Auto-Field Mapping, after which the system automatically maps the fields. In all further windows that appear, you must click "OK" and, if you do not have errors in the name of the fields you created, the system will automatically make everything.
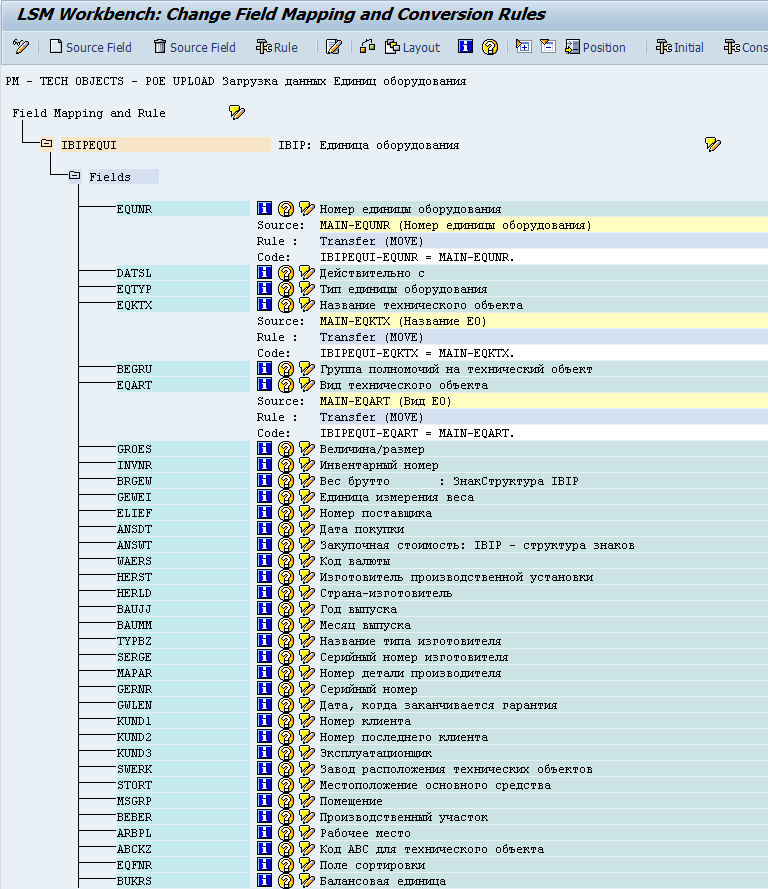
After all the fields are mapped, save and exit.
6) Step six - Maintain fixed values, translations, user-defined routines We
skip, we do not need it in this case.
7) Step Seven - Specify files
At this step, we need to specify a template file with data to be downloaded.
There are two options:
a) Legacy Data On the PC (Frontend)
b) Legacy Data On the R / 3 server (application server)
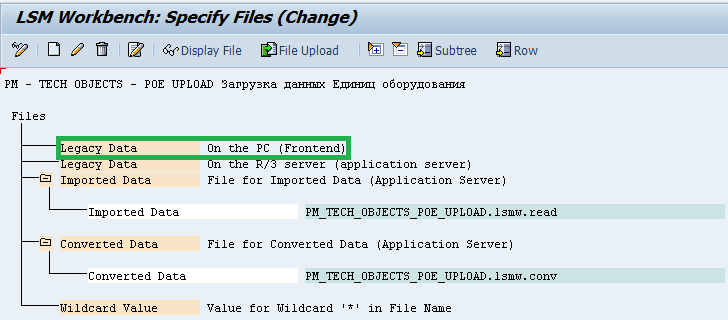
Option “a” is the choice of a template file located directly on your computer, and “b” - on the SAP server. Somehow I did not come across the second option. All the time for convenience I use a file located directly in my file system. We position ourselves on Legacy Data (on the red area, click on the “Create” leaflet)
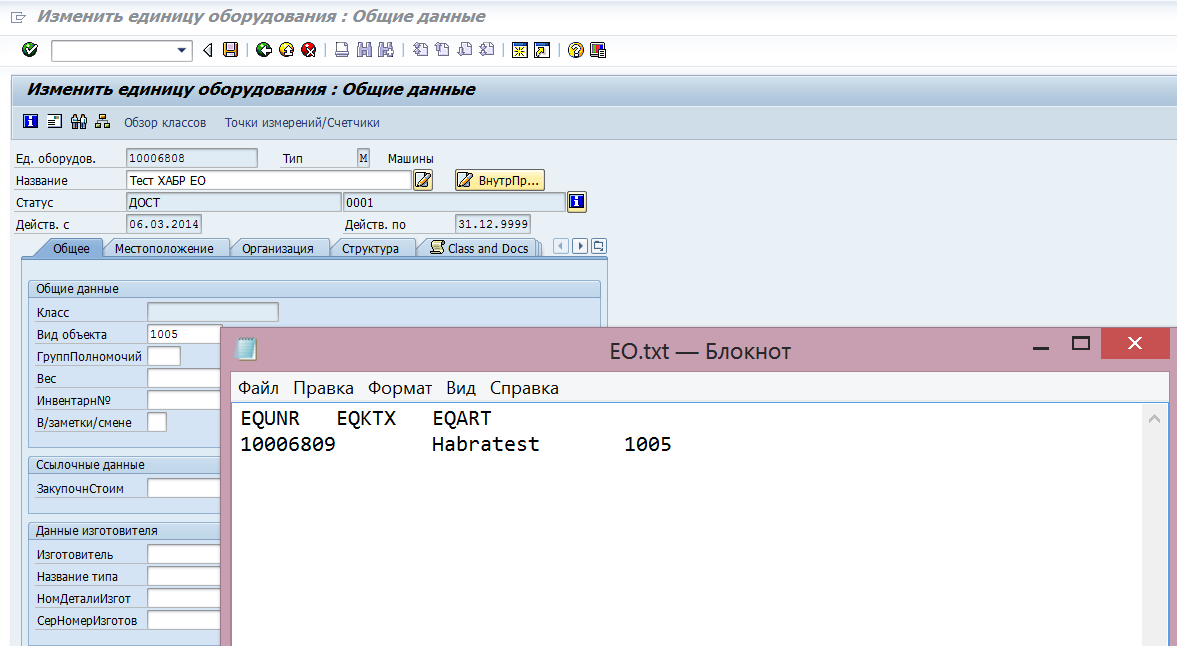
Actually, we create a text file on the hard drive. We remember that we gruim three fields:
Number of SW
Name SW
Type EO
is possible in a template file the first line through the TAB indicate systemic field names for clarity. In the second and subsequent lines, also through TAB, write the values to load
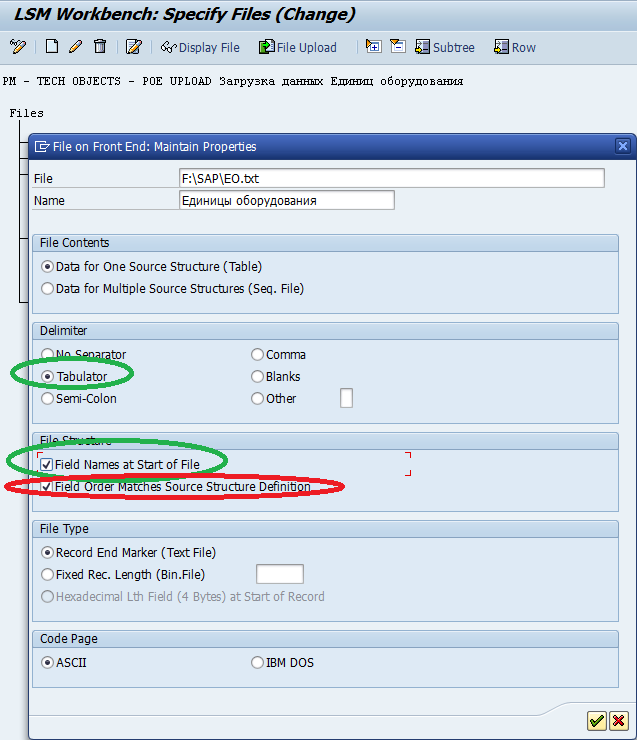
On the screen that appears, select the location of the template file on the drive of your computer, set the “Tabulator” radio button on the Delimiter sub-screen (separator), check the box “Field Names at Start of File” (indicate that the first line of the file is the technical name of the field) .
If your sequence of fields in the template file does not correspond to the corresponding sequence of step three - Maintain source fields, then you need to uncheck “Fields Order Matches Source Structure Definition”. We do not touch the rest on the screen, close and exit.
8) Step Eight - Assign files
Since we have a flat structure with one incoming template file, open this item for editing, save and exit. Our only file is attached to a single structure. Formality.
9) Step Nine - Read Data
In this step, we read our file. We carry out.
10) Step ten - Display read data
Here, we look at the reading results in step 10. If everything is fine, then the correct data falls into the correct fields
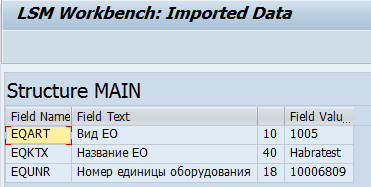
11) Step eleven - Convert data
Convert the data to the internal format of the system
12) Step twelve - Display converted data
Actually , see the conversion results

13) Step thirteen - Create batch input session
Run, check the boxes as shown on the print screen below and allow the SAP GUI to create an error file on the local train
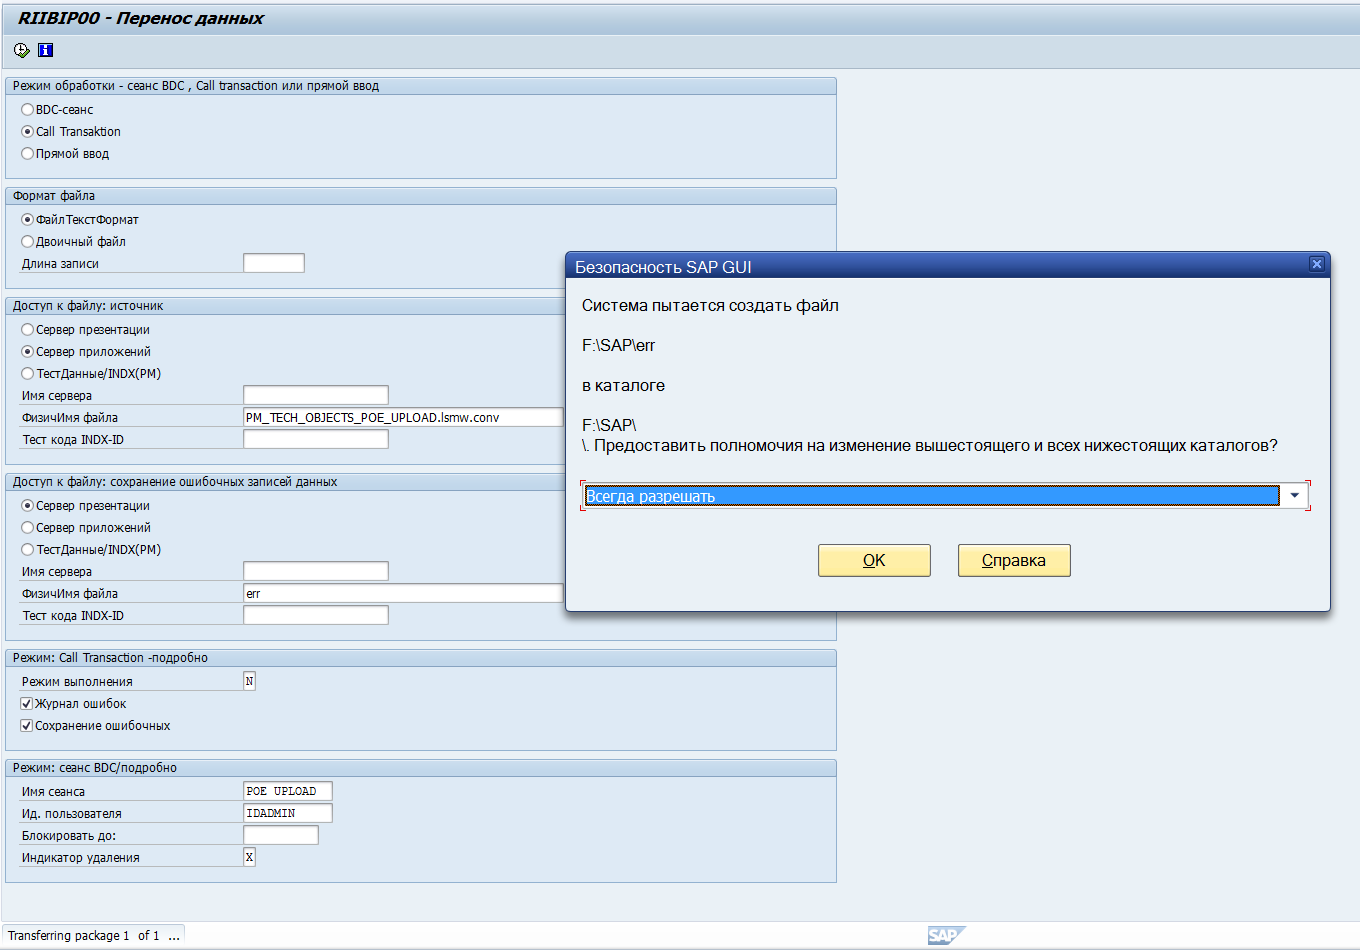
14) Step fourteen - Run Batch Input session
We start, we see ours in the list of tasks. Select the line, click "execute", the window opens. In it, you can select “Run Visibly” (then each field to be filled for each of the N lines from the template file will be filled apparently for you and require Enter to confirm each entry; this is usually used to test a package written by us on one line), or "Background mode". In the background, the execution of the batch will be invisible, and any errors that occur or their absence can be consulted in the log file.
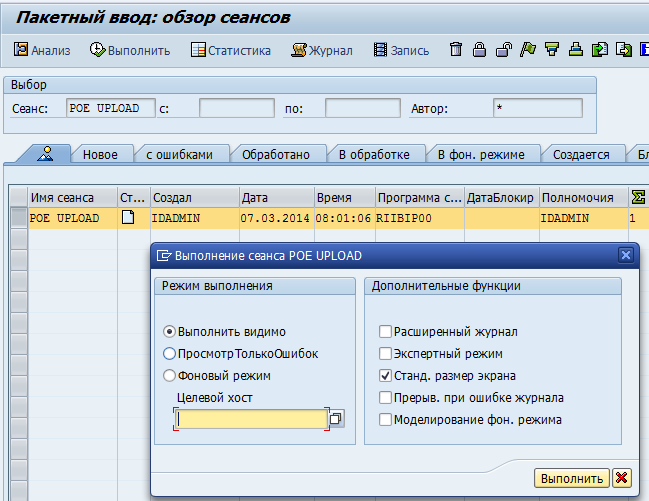
I created this example without preliminary rehearsal. In particular, on the visible run, I realized that I did not indicate in the third step the field "Type of SW", which is mandatory when creating the SW, and also, since the numbering for the SW is acc. type - internal (that is, a rising counter), it was not necessary to specify the EQUNR field as the loaded field. After correcting these two mistakes, the packetizer successfully worked out and automatically created a SW. In this way, the bulk loading of historical data into SAP takes place. At least this is one of the most convenient and easiest ways. Good luck learning LSMW!
We start the LSMW transaction and, lo and behold, we are already welcomed: Welcome to the Legacy System Migration Workbench!
On the initial screen, we see the following picture
First things first, you need to create a project (Project). A project can be, for example, a top-level “project” (for example, with the name “PM” for working with the entire maintenance group (Maintenance and repair of equipment)), or a more localized one, for example, a project for loading Technical Objects into a system (we’ll call his "Tech Objects"). I recommend not to produce essence and, remembering the commandment of Uncle Okama, as a project to start just the same upper level. It is very convenient for all project teams - in LSMW to see their modules as a project.
Become the cursor in the Project field and click on the white sheet. We create a project. In the case of my example, this will be “PM”.
Then create a subproject. This is also just a structuring of your project, therefore, depending on the decision to choose a project, we accordingly create a subproject. In the case of my example, the subproject is just “Tech Objects”.
Well, the object (Object). Here we already detail what exactly we are going to load into the system / modify using LSMW. For example, I need to download Equipment Unit data. In this case, I create a “PoE Upload” object. We
created a project, a subproject and an object, we start it.
We see a screen with twenty steps
(in the Edit menu item, enable Numering On so that a serial number is displayed next to each step)
1) Step One - Maintain object attributes
At this step, we need to indicate how we will load the data. I will focus on the two most frequently used by me and popular in principle methods.
A) Standard Object (Standart Batch / Direct Input)
LSMW provides a list of predefined objects, among which you most likely have the one you need.
In my case, this is a Unit of equipment
In the Method field, select 0001 - Create PackVv (that is, "batch input").
Save, exit.
B) Batch Input Recording
If you don’t have enough of a standard object, or if there isn’t a standard object for your needs, in principle, in this case you need to write a “macro” (as I call it). That is, you will call transcription, the data of which you need to download, and record the sequence of your actions, and then, in the next steps, match the recorded “macro”, you will create a structure for the download template file.
I will write the Batch Input Recording method if there is time in a separate topic (this is a big separate topic) if the topic finds its reader.
2) Step two - Maintain source structures
At this step, we need to determine the structure of our loaded data. In the case of Equipment Units, the structure will be single-level (“flat”), without subordinate substructures. The latter would be useful to us, say, in the case of loading Maintenance Orders, when for one order header there can be N operations, each of which can have M components. And a piece of equipment has a number and a data set, without nesting.
If the structure is flat, then this step is a formality. Create a structure, for example, “Main”. Save, exit.
3) Step three - Maintain source fields
In step 3, we determine the fields that we plan to load. We position the cursor on our Main structure, click on the “white sheet” icon and create the fields.
Fields are those fields that you are going to load for your object. In my case, I want to say, for the Unit of Equipment, to load:
- EO number
- EO name
- type of object
This, of course, is an example. You can ship any fields. For the sake of brevity, I will confine myself to only these three.
So that in the future, at step No. 5, you don’t bother with comparing your own invented field names with system fields, and just for clarity, I propose to name the fields as they are called in the system. To find out what this or that field is called, what type they are and what bit depth, we become the cursor on this field and press "F1".
In the window that appears, we double-click (drill down) into the entry "Field Name"
Among the fields we find the one of interest to us (in this case, “Unit Number” is the EQNR field), its type (CHAR) and length (18 characters). And, accordingly, we prescribe this data in the field created in the third step. We
created a set of the fields of interest to us as loadable fields, save, exit.
4) Fourth step - Maintain structure relations
At this step we need to connect our structures with standard ones. In the case of my simple, flat structure, everything is very simple: we position the cursor on IBIP: the Unit of Equipment, press the white sheet. Our only Main structure is automatically tied to the standard EO structure. Save, exit.
5) Step Five - Maintain field mapping and conversion rules
Here we need to connect the created fields, which are supposed to be loaded, with the corresponding SW fields known to the system.
And here it is useful to us that at step 3 we called the fields the same way the system knows them. Now in the Extras menu item we click on Auto-Field Mapping, after which the system automatically maps the fields. In all further windows that appear, you must click "OK" and, if you do not have errors in the name of the fields you created, the system will automatically make everything.
After all the fields are mapped, save and exit.
6) Step six - Maintain fixed values, translations, user-defined routines We
skip, we do not need it in this case.
7) Step Seven - Specify files
At this step, we need to specify a template file with data to be downloaded.
There are two options:
a) Legacy Data On the PC (Frontend)
b) Legacy Data On the R / 3 server (application server)
Option “a” is the choice of a template file located directly on your computer, and “b” - on the SAP server. Somehow I did not come across the second option. All the time for convenience I use a file located directly in my file system. We position ourselves on Legacy Data (on the red area, click on the “Create” leaflet)
Actually, we create a text file on the hard drive. We remember that we gruim three fields:
Number of SW
Name SW
Type EO
is possible in a template file the first line through the TAB indicate systemic field names for clarity. In the second and subsequent lines, also through TAB, write the values to load
On the screen that appears, select the location of the template file on the drive of your computer, set the “Tabulator” radio button on the Delimiter sub-screen (separator), check the box “Field Names at Start of File” (indicate that the first line of the file is the technical name of the field) .
If your sequence of fields in the template file does not correspond to the corresponding sequence of step three - Maintain source fields, then you need to uncheck “Fields Order Matches Source Structure Definition”. We do not touch the rest on the screen, close and exit.
8) Step Eight - Assign files
Since we have a flat structure with one incoming template file, open this item for editing, save and exit. Our only file is attached to a single structure. Formality.
9) Step Nine - Read Data
In this step, we read our file. We carry out.
10) Step ten - Display read data
Here, we look at the reading results in step 10. If everything is fine, then the correct data falls into the correct fields
11) Step eleven - Convert data
Convert the data to the internal format of the system
12) Step twelve - Display converted data
Actually , see the conversion results
13) Step thirteen - Create batch input session
Run, check the boxes as shown on the print screen below and allow the SAP GUI to create an error file on the local train
14) Step fourteen - Run Batch Input session
We start, we see ours in the list of tasks. Select the line, click "execute", the window opens. In it, you can select “Run Visibly” (then each field to be filled for each of the N lines from the template file will be filled apparently for you and require Enter to confirm each entry; this is usually used to test a package written by us on one line), or "Background mode". In the background, the execution of the batch will be invisible, and any errors that occur or their absence can be consulted in the log file.
I created this example without preliminary rehearsal. In particular, on the visible run, I realized that I did not indicate in the third step the field "Type of SW", which is mandatory when creating the SW, and also, since the numbering for the SW is acc. type - internal (that is, a rising counter), it was not necessary to specify the EQUNR field as the loaded field. After correcting these two mistakes, the packetizer successfully worked out and automatically created a SW. In this way, the bulk loading of historical data into SAP takes place. At least this is one of the most convenient and easiest ways. Good luck learning LSMW!









