February 21, 2014 at 13:32
Configuring pgpool-II + PostgreSQL + Streaming replication + Hot standby in AWS
Hello!
I decided to describe the main points of setting up a failover (HA) PostgreSQL database cluster in Amazon - AWS IaaS environment.
A lot of articles have already been written about setting up this bundle since the publication of the 9th version with native replication, so I won’t dwell on setting up PostgreSQL and pgpool in detail, everything is relatively standard here. The given pieces of configs are unsuitable for thoughtless copy-paste; in any case, you will have to open your configs and edit the necessary parameters. I do not want to encourage the copy-paste configuration process.
Streaming replication - means that postgres nodes will pull updates from the wizard themselves. No additional archive functionality is needed.
Hot standby - allows slave nodes to serve READ requests for load balancing, unlike warm standby, in which the slave server does not serve client requests, but only constantly updates the current base from the wizard. In turn, replication can be synchronous and asynchronous (sync or async).
In my example, the usual bunch of master-slave database servers is used; synchronous replication cannot be used in it, because during synchronous replication, the master, having failed to send the replica to the slave, simply does not fulfill the request and hangs waiting for the slave and all the meaning in such a scheme is lost .
The configuration created must be devoid of a single point of failure. At the pgpool level, we will use its native watchdog functionality to be able to track the fall of one of the nodes and drag the IP through which the client application connects. At the postgresql level, we use streaming replication + hot standby. In the case of the fall of the master, slave will quickly take on its role, the slave will turn pgpool into master by creating a trigger file in $ PGDATA. In the event of a slave crash, we will bring it back to life manually, because any automatic manipulations with the databases are not done well, and the contingency situation of the node drop in any case requires attention. In all the described cases of a crash, the client application should continue to function with minimal downtime.
Four virtual machines were created in the AWS cloud (Amazon Web Services): pgpool-1 (IP: 10.0.3.11), pgpool-2 (IP: 10.0.3.12), db-1 (IP: 10.0.3.21), db-2 ( IP: 10.0.3.22). Machines are created immediately in VPC to be able to assign private addresses and they would be saved between reboot instances. When creating the instances, I used the ami-8e987ef9 image from Ubuntu. But if you have the opportunity to choose any image - take Amazon Linux, why I think you will learn from the text.
1. db-1 - the master at the stage of launching the bundle
According to your needs, we adjust the values for
checkpoint_segments, max_wal_senders, wal_keep_segments.
To start replication, you can leave them by default and then tighten them after reading wiki.postgresql.org/wiki/Tuning_Your_PostgreSQL_Server.
In pg_hba.conf we configure access to replication, because everything in the VPC cloud is spinning and I don’t have direct access from outside, I just registered trust:
2. db-2 - a slave at the start of the bunch
The behavior of standby for the slave is controlled by the recovery.conf file, which should be in $ PGDATA.
In my case, it was the directory /var/lib/postgresql/9.3/main
recovery.conf:
Do not forget about the settings for access to pg_hba.conf
3. pgpool-1
4. pgpool-2 The
config is identical to pgpool-1, the descriptions of the neighboring node are changed from pgpool-2 to pgpool-1
In / etc / hosts on both nodes we set the name binding to ip:
5. Integration of pgpool for working with our databases.
On the part of pgpool-1 and pgpool-2, we create a script from the failover_command parameter that runs when the node falls (I have an automatic action, only when the master node falls). Everything that he does is actually checked by the master, if the node is fallen or not, and if the master creates a trigger file on the slave, which automatically puts the slave into READ-WRITE mode, i.e. makes him a master:
From the db-1 and db-2 side, we install the pgpool scheme for work:
Create a script in $ PGDATA pgpool_remote_start, which will start postgresql on the neighboring node [depending on the version of postgresql you use, you may need a second parameter passed by pgpool'om pointing to the $ PGDATA directory for the node]:
And also a script from the recovery_1st_stage_command parameter that will synchronize with the current master of new slaves (also lies in $ PGDATA next to pgpool_remote_start):
5. To be able to execute commands related to restarting services and copying data on remote hosts, it is necessary to configure passwordless access:
After setting up access, you need to check it on behalf of the user who will run the scripts during pgpool work, I have this postgres:
From the pgpool-1 host, execute:
And so for all the necessary hosts, we check access and update the known_hosts file for ssh.
At this stage, a bunch of 4 nodes could already be started for normal work not in the AWS environment.
After starting up, the first pgpool to start pulls the virtual address from the delegate_IP parameter onto itself by executing the command from the if_up_cmd parameter (by default it is just ifconfig).
Log entry:
All these commands, as well as the status of the nodes in the pool are very well described in the documentation for pgpool - www.pgpool.net/docs/pgpool-II-3.3.2/doc/pgpool-en.html
When you disconnect the first pgpool, the second one would pull delegate_ip command from the if_up_cmd parameter.
When the db-1 or db-2 backend crashes, the command from the failover_command parameter is executed.
The pcp_attach_node and pcp_recovery_node commands are used to return the backend to the pool.
So what happens in an AWS environment? All the same except that the IP address must be pre-assigned to the network interface through the “Assign a secondary private address” setting in the Network Intefaces menu. For Amazon Linux, which I wrote earlier, it is possible to automatically assign this address to a working instance and then crawl it between pgpool-1 and pgpool-2 if necessary (I personally did not test amazon linux, it would be very interesting to find out how smooth it all works there ) In the case of an image not adapted for AWS, I need to use additional scripts from the ec2-api-tools set .
The latest version of api-tools is best downloaded from amazon .
For ec2-api-tools to work, we need Java, put it - apt-get install default-jre
In the unpacked api-tools archive in aws / bin scripts will be placed to control aws through the console.
But to work with amazon api you need an authorization key.
The process of obtaining authentication data is described in detail on amazon here - docs.aws.amazon.com/IAM/latest/UserGuide/ManagingCredentials.html and here docs.aws.amazon.com/IAM/latest/UserGuide/ManagingUserCerts.html
On the first link we we learn how to create a user with keys and assign him the necessary group through the IAM menu ( console.aws.amazon.com/iam/home?#userswhen creating the key in the clear, it is shown to the owner once, if you do not have time to write it down, you will have to generate another one). When you first try to create a key, Amazon will strongly recommend creating a separate user in the IAM menu for these purposes, instead of creating a key under the AWS administrative account.
On the second link, we will learn how to create our certificate and register it all in the same AWS IAM menu:
The contents of certificate.pem are poured onto AWS in IAM. Certificate management can be done through the IAM Security Credentials menu:
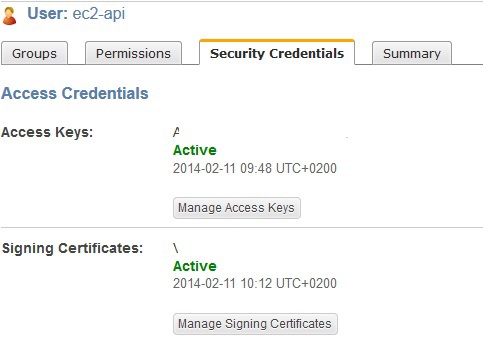
After all these manipulations, we have:
certificate.pem for the parameter EC2_CERT
private-key-in-PCKS8-format.pem for EC2_PRIVATE_KEY, AWS_ACCESS_KEY and AWS_SECRET_KEY.
You can start using ec2-api-tools.
To do this, I created an if.sh script that will drag delegate_IP for pgpools between instances. The script as parameters receives the action that must be performed with the interface (up / down) and the desired ip address for the interface. Next, the script calculates the subnet for the entered IP (I use / 24 and I just cut off the last octet, so whoever has the mask not / 24 will have to finish the script). I consider the subnet as two interfaces are used on instances - primary and management, in order to understand which of them you need to hang secondary ip on.
You can use ec2-associate-address and ec2-unassign-private-ip-addresses to manage real elastic IP.
Actually, such motions had to be performed in order to make friends pgpool, which does not work on an Amazon Linux instance, with AWS.
I decided to describe the main points of setting up a failover (HA) PostgreSQL database cluster in Amazon - AWS IaaS environment.
A lot of articles have already been written about setting up this bundle since the publication of the 9th version with native replication, so I won’t dwell on setting up PostgreSQL and pgpool in detail, everything is relatively standard here. The given pieces of configs are unsuitable for thoughtless copy-paste; in any case, you will have to open your configs and edit the necessary parameters. I do not want to encourage the copy-paste configuration process.
Terminology:
Streaming replication - means that postgres nodes will pull updates from the wizard themselves. No additional archive functionality is needed.
Hot standby - allows slave nodes to serve READ requests for load balancing, unlike warm standby, in which the slave server does not serve client requests, but only constantly updates the current base from the wizard. In turn, replication can be synchronous and asynchronous (sync or async).
In my example, the usual bunch of master-slave database servers is used; synchronous replication cannot be used in it, because during synchronous replication, the master, having failed to send the replica to the slave, simply does not fulfill the request and hangs waiting for the slave and all the meaning in such a scheme is lost .
Input data:
The configuration created must be devoid of a single point of failure. At the pgpool level, we will use its native watchdog functionality to be able to track the fall of one of the nodes and drag the IP through which the client application connects. At the postgresql level, we use streaming replication + hot standby. In the case of the fall of the master, slave will quickly take on its role, the slave will turn pgpool into master by creating a trigger file in $ PGDATA. In the event of a slave crash, we will bring it back to life manually, because any automatic manipulations with the databases are not done well, and the contingency situation of the node drop in any case requires attention. In all the described cases of a crash, the client application should continue to function with minimal downtime.
Four virtual machines were created in the AWS cloud (Amazon Web Services): pgpool-1 (IP: 10.0.3.11), pgpool-2 (IP: 10.0.3.12), db-1 (IP: 10.0.3.21), db-2 ( IP: 10.0.3.22). Machines are created immediately in VPC to be able to assign private addresses and they would be saved between reboot instances. When creating the instances, I used the ami-8e987ef9 image from Ubuntu. But if you have the opportunity to choose any image - take Amazon Linux, why I think you will learn from the text.
Configuration:
1. db-1 - the master at the stage of launching the bundle
...
wal_level = hot_standby
# The next parameter is ignored on the master server, but due to the fact that master and slave can change places, we include it in the master'a config
hot_standby = on
...
According to your needs, we adjust the values for
checkpoint_segments, max_wal_senders, wal_keep_segments.
To start replication, you can leave them by default and then tighten them after reading wiki.postgresql.org/wiki/Tuning_Your_PostgreSQL_Server.
In pg_hba.conf we configure access to replication, because everything in the VPC cloud is spinning and I don’t have direct access from outside, I just registered trust:
host replication postgres 10.0.3.0/24 trust
2. db-2 - a slave at the start of the bunch
...
wal_level = hot_standby
hot_standby = on
...
The behavior of standby for the slave is controlled by the recovery.conf file, which should be in $ PGDATA.
In my case, it was the directory /var/lib/postgresql/9.3/main
recovery.conf:
standby_mode = 'on'
primary_conninfo = 'host = 10.0.3.21 port = 5432 user = postgres'
trigger_file = '/var/lib/postgresql/9.3/main/postgresql.trigger'
Do not forget about the settings for access to pg_hba.conf
3. pgpool-1
pgpool.conf:
...
backend_hostname0 .0.3.21 = '10 '
backend_port0 = 5432
backend_weight0 = 1
backend_data_directory0 =' /var/lib/postgresql/9.3/main '
backend_flag0 =' ALLOW_TO_FAILOVER '
backend_hostname1 .0.3.22 = '10'
backend_port1 = 5432
backend_weight1 = 1
backend_data_directory1 = '/ var / lib / postgresql / 9.3 / main '
backend_flag1 =' ALLOW_TO_FAILOVER '
# Because we have Hot Standby:
load_balance_mode = on
# Streaming replication
master_slave_mode = on
master_slave_sub_mode = 'stream'
sr_check_period = 10
sr_check_user = 'postgres'
sr_check_password = '' will work for us
# It makes sense when there are slaves> 1
follow_master_command = ''
# What to do when a node disappears:
failover_command = '/etc/pgpool2/failover.sh% d% P% H% R'
# What to do when a dropped node returns:
failback_command = ''
# Run failover when we can’t connect to the backend
fail_over_on_backend_error = on
search_primary_node_timeout = 10
# Under which user we will do online recovery
recovery_user = 'postgres'
recovery_password = ''
# At the first stage, pgpool continues to accept connections and requests from clients, but not at the second.
# The running script should be in $ PGDATA
recovery_1st_stage_command = 'basebackup.sh'
# How many seconds we wait for the recovery of the
recovery_timeout = 90 node
# We will use watchdog to monitor the status of pgpool
use_watchdog = on
wd_hostname = 'pgpool-1'
wd_port = 9000
wd_authkey = ''
# Virtual address to which the client application will
connect : delegate_IP = '10 .0.3.10.10 '
# Where will the interface management scripts be:
ifconfig_path =' / opt / AWS '
# Run the command to assign the virtual IP to the
node if_up_cmd =' if.sh up $ _IP_ $ '
# Run the command to remove the virtual IP from the node
if_down_cmd =' if .sh down $ _IP_ $ '
#Pgpool does arping while dragging the virtual interface onto itself to update the ARP cache as soon as possible
arping_cmd = ''
# How will we check the liveness of the neighboring pgpool node:
#heartbeat or try to send requests to the database through it
wd_lifecheck_method = 'heartbeat'
# Interval in seconds between checks:
wd_interval = 4
# What port is the helmet on:
wd_heartbeat_port = 9694
# Interval between the keepalive mandrels of the packages
wd_heartbeat_keepalive = 2
# The time after which we consider the silent node to be dropped:
wd_heartbeat_deadtime = 15
# Address of the neighboring node:
heartbeat_destination0 = 'pgpool-2'
heartbeat_destination_port0 = 9694
# You can specify on which heartbeatdevice ’ = 069
heartbeatdevice
# We describe the parameters of another node:
other_pgpool_hostname0 = 'pgpool-2'
other_pgpool_port0 = 9999
other_wd_port0 = 9000
...
4. pgpool-2 The
config is identical to pgpool-1, the descriptions of the neighboring node are changed from pgpool-2 to pgpool-1
In / etc / hosts on both nodes we set the name binding to ip:
10.0.3.11 pgpool-1
10.0.3.12 pgpool-2
10.0.3.21 db-1
10.0.3.22 db-2
5. Integration of pgpool for working with our databases.
On the part of pgpool-1 and pgpool-2, we create a script from the failover_command parameter that runs when the node falls (I have an automatic action, only when the master node falls). Everything that he does is actually checked by the master, if the node is fallen or not, and if the master creates a trigger file on the slave, which automatically puts the slave into READ-WRITE mode, i.e. makes him a master:
#!/bin/bash -x
 FALLING_NODE=$1         # %d
 OLDPRIMARY_NODE=$2      # %P
 NEW_PRIMARY=$3          # %H
 PGDATA=$4               # %R
 KEY_PATH="/var/lib/postgresql/.ssh/id_rsa"
 if [ $FALLING_NODE = $OLDPRIMARY_NODE ]; then
     if [ $UID -eq 0 ]
     then
         sudo -u postgres ssh -T -i $KEY_PATH postgres@$NEW_PRIMARY "touch $PGDATA/postgresql.trigger"
        exit 0;
     fi
     ssh -T -i $KEY_PATH postgres@$NEW_PRIMARY "touch $PGDATA/postgresql.trigger"
 fi;
 exit 0;
From the db-1 and db-2 side, we install the pgpool scheme for work:
sudo -u postgres psql -f /usr/share/postgresql/9.3/extension/pgpool-recovery.sql template1
Create a script in $ PGDATA pgpool_remote_start, which will start postgresql on the neighboring node [depending on the version of postgresql you use, you may need a second parameter passed by pgpool'om pointing to the $ PGDATA directory for the node]:
#! /bin/sh
DEST=$1
PGCTL=/usr/bin/pg_ctlcluster
KEY_PATH="/var/lib/postgresql/.ssh/id_rsa"
ssh -T -i $KEY_PATH postgres@$DEST "$PGCTL 9.3 main stop --force;$PGCTL 9.3 main restart"
And also a script from the recovery_1st_stage_command parameter that will synchronize with the current master of new slaves (also lies in $ PGDATA next to pgpool_remote_start):
#! /bin/sh
datadir=$1
desthost=$2
destdir=$3
KEY_PATH="/var/lib/postgresql/.ssh/id_rsa"
PGCTL="/usr/bin/pg_ctlcluster"
ssh -T -i $KEY_PATH postgres@$desthost "$PGCTL 9.3 main stop --force"
psql -c "SELECT pg_start_backup('Streaming Replication', true)" postgres
rsync -C -a -c --delete -e ssh --exclude postgresql.conf --exclude postmaster.pid \
--exclude postmaster.opts --exclude pg_log \
--exclude recovery.conf --exclude recovery.done \
--exclude pg_xlog $datadir/ $desthost:$destdir/
ssh -T -i $KEY_PATH postgres@$desthost "cp $destdir/../recovery.done $destdir/recovery.conf;rm $destdir/postgresql.trigger"
psql -c "SELECT pg_stop_backup()" postgres
5. To be able to execute commands related to restarting services and copying data on remote hosts, it is necessary to configure passwordless access:
pgpool-1 -> db-1, db-2You can use ssh host-based, you can generate ssh keys and enable them in authorized_keys.
pgpool-2 -> db-1, db-2
db-1 -> db-2
db-2 -> db-1
After setting up access, you need to check it on behalf of the user who will run the scripts during pgpool work, I have this postgres:
From the pgpool-1 host, execute:
sudo -u postgres ssh -i /path_to_key -T postgres@db-1 id
And so for all the necessary hosts, we check access and update the known_hosts file for ssh.
At this stage, a bunch of 4 nodes could already be started for normal work not in the AWS environment.
- Launch the master host (db-1)
- We synchronize the slave with it (postgresql is not running on it yet), over the $ PGDATA directory, execute:
(recovery.done - created recovery.conf template that refers to the IP of the wizard)mv main main.bak && sudo -u postgres pg_basebackup -h 10.0.3.21 -D /var/lib/postgresql/9.3/main -U postgres -v -P && cp recovery.done main/recovery.conf && chown postgres:postgres main/recovery.conf - Run postgresql on the slave:
sudo service postgresql restart - We look at the state of replication through "select * from pg_stat_replication", we see something like this:
application_name | walreceiver
or just check for the presence of wal sender / receiver in the list of processes on the db-1 and db-2 hosts.
client_addr | 10.0.3.22
state | streaming
sent_location | 1 / 2A000848
write_location | 1 / 2A000848
flush_location | 1 / 2A000848
replay_location | 1 / 2A000848
sync_priority | 0
sync_state | async
After starting up, the first pgpool to start pulls the virtual address from the delegate_IP parameter onto itself by executing the command from the if_up_cmd parameter (by default it is just ifconfig).
Log entry:
wd_escalation: escalated to master pgpool successfullyAfter a while, running the second pgpool in the logs, we see that the neighboring pgpool node was successfully recognized and the link worked:
find_primary_node: primary node id is 0The status of the pool can be viewed by one of the pcp_ * commands - pcp_pool_status, pcp_node_info, or by requesting pgpool nodes “show pool_nodes;”, “show pool_pools;”
All these commands, as well as the status of the nodes in the pool are very well described in the documentation for pgpool - www.pgpool.net/docs/pgpool-II-3.3.2/doc/pgpool-en.html
When you disconnect the first pgpool, the second one would pull delegate_ip command from the if_up_cmd parameter.
When the db-1 or db-2 backend crashes, the command from the failover_command parameter is executed.
The pcp_attach_node and pcp_recovery_node commands are used to return the backend to the pool.
AWS Staff:
So what happens in an AWS environment? All the same except that the IP address must be pre-assigned to the network interface through the “Assign a secondary private address” setting in the Network Intefaces menu. For Amazon Linux, which I wrote earlier, it is possible to automatically assign this address to a working instance and then crawl it between pgpool-1 and pgpool-2 if necessary (I personally did not test amazon linux, it would be very interesting to find out how smooth it all works there ) In the case of an image not adapted for AWS, I need to use additional scripts from the ec2-api-tools set .
The latest version of api-tools is best downloaded from amazon .
For ec2-api-tools to work, we need Java, put it - apt-get install default-jre
In the unpacked api-tools archive in aws / bin scripts will be placed to control aws through the console.
But to work with amazon api you need an authorization key.
The process of obtaining authentication data is described in detail on amazon here - docs.aws.amazon.com/IAM/latest/UserGuide/ManagingCredentials.html and here docs.aws.amazon.com/IAM/latest/UserGuide/ManagingUserCerts.html
On the first link we we learn how to create a user with keys and assign him the necessary group through the IAM menu ( console.aws.amazon.com/iam/home?#userswhen creating the key in the clear, it is shown to the owner once, if you do not have time to write it down, you will have to generate another one). When you first try to create a key, Amazon will strongly recommend creating a separate user in the IAM menu for these purposes, instead of creating a key under the AWS administrative account.
On the second link, we will learn how to create our certificate and register it all in the same AWS IAM menu:
openssl genrsa 1024> private-key.pem
openssl pkcs8 -topk8 -nocrypt -inform PEM -in private-key.pem -out private-key-in-PCKS8-format.pem
openssl req -new -x509 -nodes -sha1 -days 3650 -key private-key.pem -outform PEM> certificate.pem
The contents of certificate.pem are poured onto AWS in IAM. Certificate management can be done through the IAM Security Credentials menu:
After all these manipulations, we have:
certificate.pem for the parameter EC2_CERT
private-key-in-PCKS8-format.pem for EC2_PRIVATE_KEY, AWS_ACCESS_KEY and AWS_SECRET_KEY.
You can start using ec2-api-tools.
To do this, I created an if.sh script that will drag delegate_IP for pgpools between instances. The script as parameters receives the action that must be performed with the interface (up / down) and the desired ip address for the interface. Next, the script calculates the subnet for the entered IP (I use / 24 and I just cut off the last octet, so whoever has the mask not / 24 will have to finish the script). I consider the subnet as two interfaces are used on instances - primary and management, in order to understand which of them you need to hang secondary ip on.
If.sh script:
#!/bin/sh
if test $# -eq 0
    then
    echo "This scripts adds and removes ip to subinterfaces and to AWS VPC configuration."
    echo "Don't forget to set variables inside this script."
    echo
    echo Usage: $0' [up|down] IP_ADDRESS'
    echo
    exit 1
fi
#!!!!!!!!!!!!!!!!!!!!!!!!!!!!!!!!!!!!!!!!!!!!!!!!!!!!!!!!!!!!!!!!!!!!!!!!!!!!!!!!!!!!!!!!!!!!!
#CORRECT VALUES MUST BE SET PRIOR TO RUN THIS SCRIPT
#!!!!!!!!!!!!!!!!!!!!!!!!!!!!!!!!!!!!!!!!!!!!!!!!!!!!!!!!!!!!!!!!!!!!!!!!!!!!!!!!!!!!!!!!!!!!!
#Proxy if used:
export EC2_JVM_ARGS='-Dhttp.proxySet=true -Dhttps.proxySet=true -Dhttp.proxyHost=x.x.x.x -Dhttp.proxyPort=3128 -Dhttps.proxyHost=x.x.x.x -Dhttps.proxyPort=3128'
#Path to unpacked ec2-api from http://s3.amazonaws.com/ec2-downloads/ec2-api-tools.zip
export EC2_HOME=/opt
#Path to java
export JAVA_HOME=/usr
#Path to generated private key & cert (READ http://docs.aws.amazon.com/IAM/latest/UserGuide/ManagingUserCerts.html)
export EC2_PRIVATE_KEY=/opt/private-key-in-PCKS8-format.pem
export EC2_CERT=/opt/certificate.pem
#User access & secret key (READ http://docs.aws.amazon.com/IAM/latest/UserGuide/ManagingCredentials.html)
export AWS_ACCESS_KEY=YOUR_ACCESS_KEY
export AWS_SECRET_KEY=YOUR_SECRET_KEY
#Region for this EC2 instance
REGION=YOUR_REGION
#!!!!!!!!!!!!!!!!!!!!!!!!!!!!!!!!!!!!!!!!!!!!!!!!!!!!!!!!!!!!!!!!!!!!!!!!!!!!!!!!!!!!!!!!!!!!!
AWS_PATH=$EC2_HOME
VIP=$2
subnet () {
SUB=`echo $VIP | awk '{ split($0,a,"."); print a[1]"."a[2]"."a[3]"."; }'`
SUBNET=`$AWS_PATH/bin/ec2-describe-subnets --region $REGION | grep -F $SUB | awk '{print $2}'`
echo Subnet-id: $SUBNET
if [ -z "$SUBNET" ]; then
echo "Wrong subnet!"
exit 1;
fi
Instance_ID=`/usr/bin/curl --silent http://169.254.169.254/latest/meta-data/instance-id`
echo Instance_ID=$Instance_ID
ENI_ID=`$AWS_PATH/bin/ec2-describe-instances $Instance_ID --region $REGION | cut -f 2,3 | grep $SUBNET | awk '{print $1}'`
echo ENI_ID=$ENI_ID
}
if_up () {
subnet
/usr/bin/sudo /sbin/ifconfig eth1:0 inet $VIP netmask 255.255.255.255
$AWS_PATH/bin/ec2-assign-private-ip-addresses -n $ENI_ID --secondary-private-ip-address $VIP --allow-reassignment --region $REGION
}
if_down (){
subnet
/usr/bin/sudo /sbin/ifconfig eth1:0 down
$AWS_PATH/bin/ec2-unassign-private-ip-addresses -n $ENI_ID --secondary-private-ip-address $VIP --region $REGION
}
case $1 in
              [uU][pP])
                       if_up
                       break
                       ;;
              [dD][oO][wW][nN])
                        if_down
                       break
                       ;;
              *) echo "Up/Down command missed!"
                 exit 1
esac
/usr/sbin/service networking restart > /dev/null 2>&1
You can use ec2-associate-address and ec2-unassign-private-ip-addresses to manage real elastic IP.
Actually, such motions had to be performed in order to make friends pgpool, which does not work on an Amazon Linux instance, with AWS.